
AQUAPHOR S550, S550 P1 Water Softener
Safety Instructions
- Add salt if the level is below the water level in the brine tank.
- The salt level must always be at least 1/3 of the full load.
- Protect the softener from freezing, including the drain line.
- Follow the requirements for operation, maintenance, and placement of the softener.
- Use the bypass to flush the plumbing after repair or maintenance.
- Check and clean the brine tank and air release valve annually or when sediment appears in the tank.
- During operation, observe the general electrical safety rules when using electrical appliances.
- Only use a power supply unit with output characteristics specified in this Manual.
- Keep your Softener from hitting and falling.
- Make sure that the power cord does not touch surfaces that could damage it.
- Do not immerse the Softener, as well as the AC adapter, power cord, and power cord plug, in water or other liquid, and do not wash them under running water or in a dishwasher.
- To avoid electric shock, do not touch your Softener connected to power with wet hands, as well as the power supply unit, the power cord, and the plug.
- Keep your Softener housing clean. Disconnect your Softener from the power supply and wipe, if necessary, with a dry cloth.
Source Water Requirements
| Source water requirements | Softener S550 | Softener S550 P1 |
| Water hardness, mg-eq/l / l* | no more than 24 | |
| Content of divalent iron, mg/l* | no more than 10 | |
| Content of ferric iron, mg/l | no more than 0.3 | |
| Manganese content, mg/l* | no more than 3 | |
| рН | 6 to 9 | |
| Temperature, °C | from +5 to +38 | |
| Content of oil products, mg/l | no more than 1 | |
| Hydrogen sulfide, mg/l | no more than 0.03 | no more than 1 |
| Permanganate oxidizability, mgО2/l | no more than 5 | |
| Silicon, mg/l | no more than 10 | |
The total “iron + hardness + manganese”, in terms of calcium carbonate, should not exceed the maximum compensated hardness indicated in the “Technical characteristics” table.
Softener Delivery Set
| 1. | Complete softener | 1 pc. |
| 2. | Overflow fitting | 1 pc. |
| 3. | Drainage tube D=16 mm (5/8″), L=2.5 m | 1 pc. |
| 4. | Flexible hose 1″ by 3/4″ (3/4″ by 3/4″) with o-rings | 2 pcs. |
| 5. | Power supply 12 VAC | 1 pc. |
| 6. | Controller | 1 pc. |
| 7. | Drain pipe 1/2″ | 1 pc. |
For Owner’s Reference
| Aquaphor Softener Model | ———————————————————————————————– |
| Serial # | ——————————————————————————————— |
| Date of Installation: | ———————————————————————————————– |
| Hardness: | ———————————————————————————————– |
| Iron: | ———————————————————————————————- |
| pH: | ———————————————————————————————– |
| Water Pressure: | ———————————————————————————————— |
| Water Temperature: | ———————————————————————————————— |
Overview
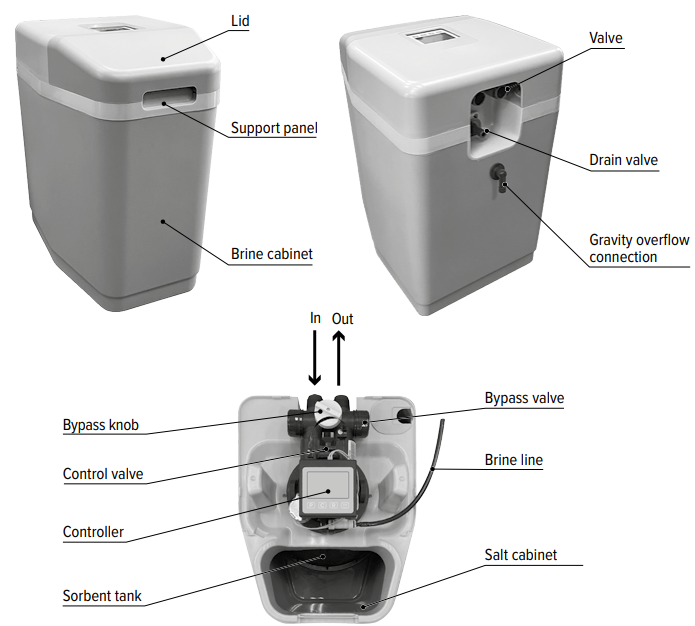
Lid Removal
To access the valve and controller, first remove the front part by grasping the cutout at the front of the lid, then remove the rear lid by pulling it up and towards the front of the softener housing.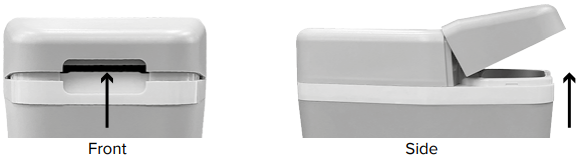
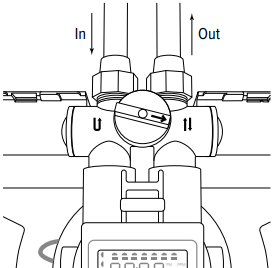
Bypass Valve
The bypass valve will allow you to turn off the softener in the event of a malfunction or leakage. It also makes it possible to use untreated water for watering plants.
The bypass valve is located in the main control valve assembly. To switch to the bypass line, turn the valve handle to the “Bypass” position (fig. 1). Water will enter the house past the softener, without treatment. To prevent untreated water from entering the house, do not use the water in the house when the softener is in Bypass mode.
Do not forget to switch the softener to normal operation (filtration) by turning the knob to the “Service” position (fig. 1) after repairing the device or using untreated water. To obtain water of comfortable hardness, you can use the scheme shown in fig. 5, mixing the source water with purified water.
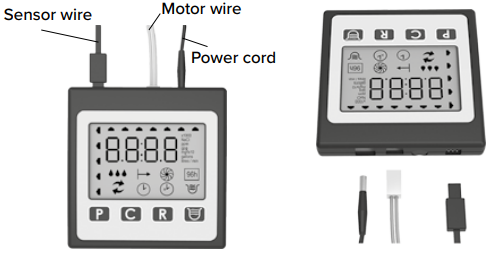
Controller
The controller has four control buttons and, LCD (fig. 2). The controller controls the valve actuators during regeneration. Using the control panel of the controller, the value of the compensated hardness, the current time, and the regeneration time are entered, and the parameters of the softener are selected, as well as the status of the device is viewed. For the filter to work correctly, the controller must be configured correctly.
The controller receives data on water consumption from the flow meter. Based on these data and the selected operating parameters, the controller starts the regeneration of the softener at the appointed time. The controller saves settings in non-volatile memory even after a power outage. The controller is equipped with a non-volatile power supply that allows for two days to maintain the built-in timer.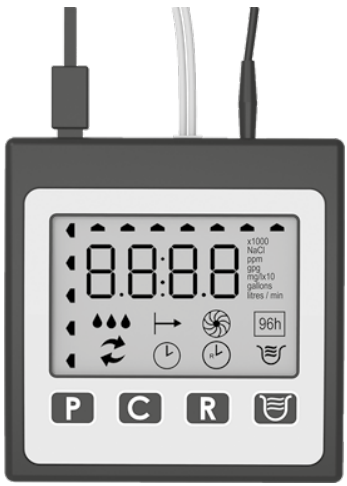
Control Buttons

- User Settings.
- Change user settings.
- Start regeneration manually. It is used when the softener is connected for the first time or for forced regeneration, for example, if the softener runs out of salt.
Start Regeneration Manually
- Press and hold the button for about 5 seconds.
- The softener will start regenerating and will display the current stage of regeneration on the display.
- After all regeneration steps have been completed, the display will return to normal operating mode.
- Interruption of a running regeneration cycle (only used for system diagnostics).
- Press and hold the button for 5 seconds after the regeneration process starts.
- The display will show the stage number (for example, 01).
This function can be performed as part of the service in the following cases
- Operation of the softener on water containing dissolved iron,
- with virtually no regeneration due to insufficient salt, lack of input water, or electricity.
In this mode, the softener will be flushed every other day, consuming 1.6 kg of salt per regeneration. The softener in the mode of enhanced cleaning from iron should work for at least 2 weeks. The increased frequency of regenerations will help to remove the accumulated iron in the ion exchange resin bed. This service procedure is recommended to be carried out at least once a year.
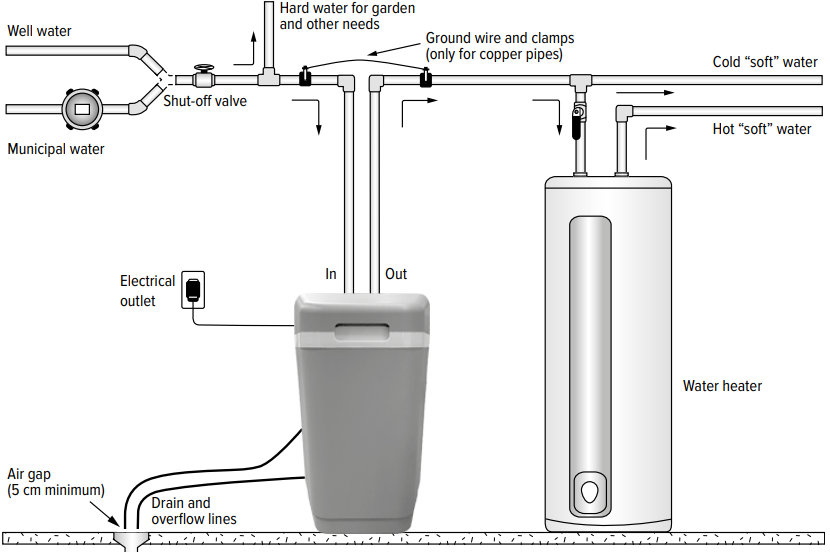
Controller Screen
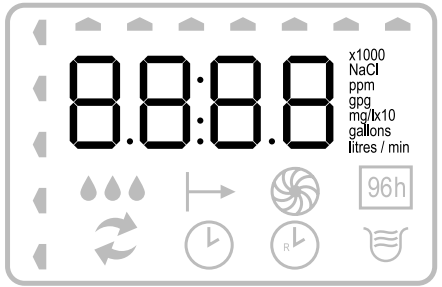
The main screen displays the volume of water in liters (or gallons) that will be treated by the softener before the next automatic regeneration. On average, an adult spends 280 liters of water per day. The volume of water until the next water regeneration is indicated in hundreds or thousands of liters, depending on the value. For example, the number 33 would mean 33,000 l if x 1000 is shown on the display at the same time, and 3300 l if this indicator is inactive.
During Regeneration
The number of the stage currently in progress will flash on the main screen.
- First backwash.
- Salt regeneration / slow washing.
- Second backwash
- Topping up the brine tank.
- HO – return to working position. After the regeneration is completed, the display will again show the amount of water until the next regeneration in hundreds of gallons or hundreds/thousands of liters. The duration of regeneration is 30– 40 minutes.
Regeneration Progress Indicator
Indicates that the softener is auto-regenerating or that a manual regeneration has started.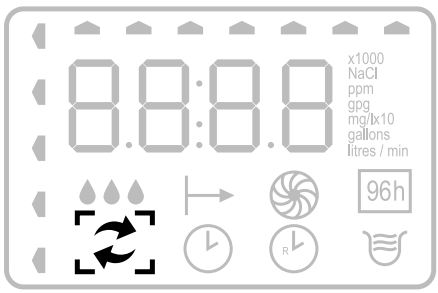
Water consumption indicator
“Droplets” on the display “run” as water flows through the softener. It is convenient for monitoring water consumption and for detecting water leaks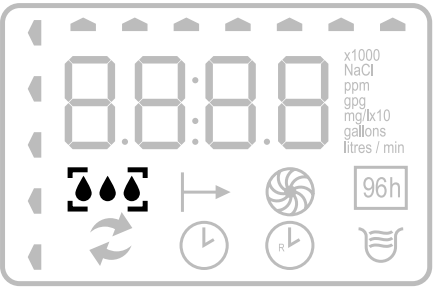
Mode 96h
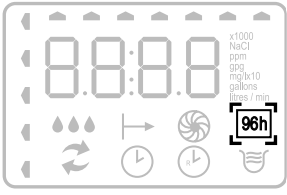
When this mode is enabled, regeneration occurs once every three to four days (72–96 hours) if there is no regular regeneration during this period of time. This is necessary so that the dissolved iron extracted from the water does not precipitate inside the softener. If there is dissolved iron and/or manganese in the source water, the 96h mode must be turned on.
Time of Day Indicator
Displayed when the system is set to the time of day. Regeneration time indicator. The dial with the symbol R is displayed if the time of day is set for the regeneration process. Enhanced regeneration indicator from iron is displayed when the function is active.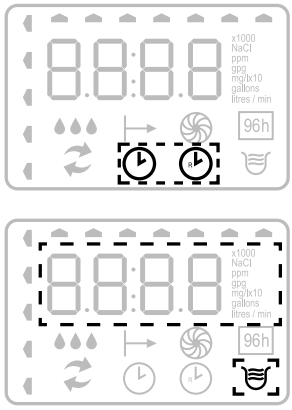
Installing a Softener
The water softener must be connected in accordance with local plumbing regulations. To connect the softener, it is recommended to contact the Aquaphor service department or Aquaphor regional dealers. The connection, setup, and operation of the device must be carried out within the limits of operation specified in this manual. Failure to comply with the requirements of the manual can reduce the effectiveness of flushing and lead to improper operation of the softener and its failure. Before installing the softener, check the quality of the water and the parameters of the water supply, power supply, and sewerage:
Water Quality
Undissolved impurities: If the source water contains sand, sulfur, micro-organisms, algae, oil, ls, or other impurities, the water must be pretreated. We recommend installing an Aquaphor pre-filter.
Iron
The concentration of dissolved iron should not exceed 7 mg/l for the S550 softener, and it is also important to know what form it is in.
- Divalent iron (often referred to as “dissolved iron”) – The only form of iron that can be removed by the S550 softener.
- Ferric iron (undissolved iron) – Precipitation of iron hydroxide. Particles of such iron can clog the ion exchanger layer. Trivalent iron must be filtered before water is supplied to the softener.
- Iron in organic compounds – a dissolved form of iron associated with organic compounds, usually humic or folic acids. Water containing iron in this form is usually colored brown (“peaty water”). Additional equipment is needed to remove this form of iron.
If the water contains ferrous iron, it is recommended to flush the softener with an ion exchanger cleaner every 6months. Follow the instructions given in the ion exchanger cleaner data sheet.
- Manganese
The manganese content should not exceed 3 mg/l. - The pH of the water must be greater than 6
If the pH of the source water is less than 6, it is recommended to install a corrective pH filter. - Hardness of water
Model S550 softens water with hardness up to mg-eq/l-eq / l (840 mg/l in terms of CaCO3).
Water supply parameters
- Water pressure should be within 0.14 to 0.7 MPa (1.4 – 7 bar). For stable suction of the brine during regeneration, it is recommended to supply water with a pressure of at least 0.2 MPa (2 bar).
Plumbing performance
- The minimum required flow for regeneration is 9 liters per minute. Water temperature not less than +5 °C and not more than +38 °C.
Sewerage
- The unit drain must be routed to a wastewater outlet, such as a drain or washing machine drain, in accordance with all local and national plumbing codes. An air gap or siphon must be provided to prevent backflow (see the “Installation and commissioning step by step” section).
Power supply
- The power supply is designed for mains voltage of 220 VAC with a frequency of 50 Hz. If there is a possibility of voltage deviation from the specified values by more than 5–10 %, use a voltage stabilizer. This will prevent malfunctions and failure of both the power supply and the electronic components of the softener.
If you have any questions, please contact support. For support information, see the General Information section and the warranty card.
Installing A Softener
The softener connection must be made in accordance with local plumbing codes. The connection, setup, and operation of the device must be carried out within the limits of operation specified in this manual. Failure to follow these guidelines may reduce flushing efficiency and result in softener malfunction or failure.
How to do
- The softener must be installed after the hydraulic accumulator tank and pump control automation systems.
- The softener must be installed in front of the water heater and other appliances that consume water.
- The softener must be installed at least 1 m from heating appliances.
- It is not recommended to install the softener on a heated floor, as this may cause excessive evaporation from the brine tank and fouling of the softener surfaces with salt crystals.
- Water for watering a lawn or garden does not require softening and filtration, so this water can be drained before the softener.
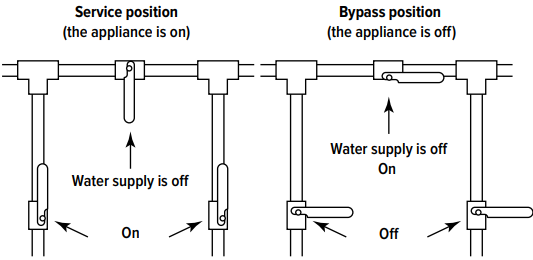
- When connecting the softener, it is recommended to provide a bypass valve – “bypass” (see fig. 5).
- The bypass valve will simplify the maintenance of the softener and will supply unsoftened water in case of emergency when the softener is dismantled. It is also recommended to drain the first portions of contaminated water through the bypass after maintenance work on the well, water supply, or pump.
- If the length of the pipe between the softener and the water heater is less than 3m, it is recommended to install a non-return valve on this line as close as possible to the water heater. Make sure the water heater is set to the correct temperature and the safety valve is correct and in good working order.
You cannot do
- Install and operate the softener in a room where the temperature can drop below +5 °C.
- Install and operate the softener in a room with humidity over 70 %.
- Install the softener near heating appliances.
- Connect the softener to the water supply in the opposite direction.
Prepare a place for connection.
- Turn off the power and water supply to the water heater. For gas water heaters, additionally turn the gas valve to the “Maintenance” or “Off” position. (See instructions for your water heater.)Turn off the water supply. Open hot and cold water taps to relieve pressure in the lines. Check the water supply for lime deposits, rust, or other contaminants. Clean or replace clogged plumbing.
- Organize the insertion point of the softener according to the figure. 3 to prevent axial distortions and tensions during installation, as this can lead to damage to the bypass assembly or softener valve.
- Arrange an electrical outlet at a distance of no more than 2 m
Connect the softener to the water supply
The softener must be connected to the water line in accordance with national and local building, plumbing, and electrical codes.
- Remove the softener lid. To do this, first remove the front lid by grasping the cutout in its front part, then remove the lid by pulling it up and towards the front of the softener housing.
- Empty the salt compartment of all packaging and installation materials.
- Make sure that the shims are inserted into the union nuts of the flexible hoses. Connect the softener to the water supply using flexible hoses. Check that the direction of water flow is correct using the arrow on the bypass valve (see section “Bypass valve”).
- Tighten the flexible hose nuts. Do not apply excessive AQUAPHOR Water Softener force so as not to damage the threaded part of the fittings.
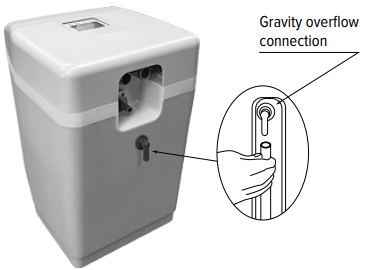
Connect the overflow line
- The overflow line is designed to drain excess AQUAPHOR Water Softener water when the brine tank is overfilled or the softener depressurizes.
- Screw the elbow overflow fitting included with the softener into the hole on the back of the softener housing and point downwards (see fig. 6).
- Install a flexible tube with an inner diameter of 12 mm (1/2”) (smaller tubing is not permitted) between an overflow fitting and a drain, washing machine drain, or other suitable wastewater outlet.
- This pipe is not included with the softener.
- Removal of excess water through the overflow line occurs by gravity.
- Make sure the overflow line terminates at a drain that is at least 8 cm below the edge of the overflow fitting. Provide an air gap of at least 5 cm.
- It is not allowed to bend the outlet tube of the overflow line or lift it in height.
Connect the Drain Line
The drain line is designed to drain water during regeneration.
- Connect the drain line to the drain port (see fig. 7) using the 5/8” ID (~16mm) flexible hose supplied with the softener. Reducing the diameter is not allowed.
- Run a drain line to a drain, washing machine drain, or AQUAPHOR Water Softener other suitable sewage outlet.
- Provide an air gap of at least 5 cm between the drain line and the maximum fill level of the wastewater receiver to prevent backflow.
- The drainage line should not have kinks, creases, twists, or other damages that restrict the flow of water.
Flushing the Water Supply
- Make sure the softener valve is in the “Bypass” position (see fig. 1). Turn on the water supply.
- Open the nearest cold water faucet and flush the pipes of solder flux residue and other foreign material.
- Close all outlet taps to pressurize the system. Check AQUAPHOR Water Softener all lines and connections for leaks.
If a leak is found,
- turn off the water supply.
- fix all leaks; turn on the water supply.
Slowly move the valve to the “Service” position (see fig. 1), slowly, to avoid water hammer, fill the softener. Open the nearest cold water faucet to bleed air from the system. When water comes out of the faucet without air, close the faucet and check for leaks.
Connecting the Controller and Power Supply
- Flow sensor connector (fig. 8),
- motor connector,
- The power supply connector.
- Lay the power supply wire at the outlet of the water lines. Connect the power supply to an outlet.
- Make sure the outlet to which the softener is connected does not have an ON/OFF switch.
Adjusting the Softener

Flush the Softener
- Pour 8 L of water into the brine tank.
- Make sure the softener is in filtration mode and the AQUAPHOR Water Softener water supply is turned on.
- Perform a forced regeneration. To do this, press and hold the R button for about 5 seconds until the numbers 01 appear on the display and the regeneration process starts.
- During the regeneration, which lasts 30–40 minutes, the device will first take and then add water to the brine tank to the desired level.
Load Salt in the Brine Tank
Load salt into the brine tank up to 25 kg. Use purified tableted or granulated table salt (NaCl). Do not use these two types of salt at the same time. Use only high-quality AQUAPHOR Water Softener tableted or granulated salt, such as AQUAPHOR. Poor-quality salt can cause a decrease in the efficiency of regeneration or the failure of the softener. This is necessary for the formation of a saturated saline solution.
Complete the Installation Process
Make sure the bypass valve is in the “Service” position AQUAPHOR Water Softener (see fig. 1). Make sure the water supply is turned on. If there is an external bypass circuit, make sure the taps are in the correct position (see fig. 5).
Turn on the power and water supply to the water heater (if any). For gas water heaters, turn the gas valve to the “Operation” position (see the instructions for your water heater).
Open the nearest cold water faucet and run the softener for 20 minutes or until about 270 liters of water. Make sure that the water consumption indicator on the controller display is working – this indicates the water consumption and the operation of the liter counter. Replace the softener cover.
Controller Setup
For the correct operation of the softener, it is necessary to enter into the processor data on the content of hardness salts, iron, and manganese in the water. To do this, it is necessary to calculate the total parameter, which will include all these pollutants.
To calculate the “compensated hardness,” it is necessary.
- Multiply the number of mg-eq/lq / l by 50.
- Add the concentrations of iron (mg/l) and AQUAPHOR Water Softener manganese (mg/l), and multiply the sum by 85.
- Add up both items.
EXAMPLE 1/2
- Total hardness = 6.84 mg-eq / l
- Ferrous iron (dissolved) = 3 mg/l
- Manganese = 1 mg/l
- Compensated hardness = 6.84 × 50 + (3+1) × 85 = 682
- General hardness = 342 mg/l CaCO3
- Ferrous iron (dissolved) = 3 mg/l
- Manganese = 1 mg/l
- Compensated hardness = 342 + (3+1) * 85 = 682
Quick Setup/Basic Settings
Set the hardness value
- Click. After approximately 4 seconds, the controller AQUAPHOR Water Softener will beep, nd the display will show ppm.
- Click to save the settings and proceed to the next step.
Setting the current time
- Press until you set the current hour. Press to save the setting and move on to setting the minutes.
- Press until you set the current minutes. Press to save the setting and go to the home screen.
Mode of Enhanced Washing
Turning on / off the enhanced iron washing mode
Press and hold to turn the feature on or off. In the mode of enhanced washing from iron, a more intensive washing of the softener with saline occurs, which contributes to more efficient cleaning of the sorbent from iron.
Advanced Settings
Advanced settings allow you to select the brine regeneration mode, turn on the 96h mode, change the liter/gallon and mg/L/gpg units, and set the regeneration start time. Please be careful when using advanced settings.
Salt Regeneration Mode Change
- Press and hold for about 4 seconds, the controller will beep and display the brine regeneration mode on the display.
- Press to cycle through AU, HC, and HE modes. Press to save the selected option and proceed to step 2.
Salt regeneration modes
- AU (Auto mode) – In this mode, the controller monitors the daily water consumption and regulates the amount of salt for regeneration.
- HC (High capacity mode) – fixed setting of salt regeneration, which allows less frequent washing of the sorbent.
Unit Switching: gallon/liter
Press C to switch gallon/liter units. The changes will be displayed on the screen as gallons or liters. Click to save your settings and move on to the next step.
Setting the Regeneration Start Time
- Press to set/change regeneration start time (hours). Press to save the settings and go to the minutes setting.
- Press to change the minutes at which regeneration starts. Click to save the settings and go to the home screen.
Specifications
| Maximum capacity, g | 1100 |
| Maximum compensated hardness, mg/l | 1200 |
| Maximum concentration of dissolved iron and manganese, mg/l* | 10 |
| Minimum pH | 6 |
| Temperature of water and environment, °C | +5…+38 |
| Water pressure, MPa | 0.14–0.7 |
| Minimum water flow for backwash, l/min** | 7.6 |
| Maximum flow to drain during regeneration, l/min | 9.1 |
| Nominal/maximum flow, l / min | 23 / 35 |
| Pressure loss at flow 22.7 l/min (6 gpm), MPa*** | 0.1 |
| Capacity in HE mode, kg of salt/gram of hardness | 0.8 / 465 |
| Capacity in HC mode, kg of salt/gram of hardness | 2.1 / 903 |
| Maximum capacity in AU mode, kg of salt/gram of hardness | 3.3 / 1100 |
| Regeneration method | Intelligent, by water meter |
| Power options | 12 VAC; 50/60 Hz; 0.015 kWh |
| Connection ports (NPT) | 1″ (MNPT) |
| Minimum drain line diameter, mm (in) | 16 (5/8) |
| Filtration tank size (ID × H), mm | 267 × 277 |
| Height, cm | 55.4 |
| Base, cm | 32.2 × 43.2 |
| Gross weight, kg | 35 |
| Filter medium and its quantity | |
| Superfine monodisperse ion exchange resin, l | 15 |
| Quartzite, kg | 0.8 |
| or KDF85****, l | 0.35 |
Troubleshooting
| Probable Cause | Solution | ||
| Problem: | No soft water output after softener regeneration | ||
| There is no salt in the brine tank | Add salt | ||
| Solids in the brine tank clogged the brine line, brine valve, air check valve, or injector. | Dismantle the brine line together with the air cut-off valve. Air check. Rinse them with clean water. | ||
| Clogged or improperly installed brine line flow restrictor | Dismantle the brine valve, clean, and properly install the salt flow restrictor | ||
| Drain line kinked, frozen, or clogged | Straighten the line, let it thaw, or clean it | ||
| Clogged injector | Remove the injector cap, and clean the nozzle with a wooden toothpick. Reinstall the removed items | ||
| A salt bridge has formed (appearance of salt) in the salt compartment due to high humidity or the use of the wrong type of salt | Try to break the crust with a blunt object; you can use hot water. | ||
| Problem: | No soft water at the softener outlet | ||
| The bypass valve is in the Bypass position or deviated from the Service position | Set the bypass valve to normal operation. | ||
| The device is connected to the water supply in the opposite direction | Check if the device is connected correctly | ||
| Prolonged power failure | Reset the current time | ||
| Lack of accounting for water consumption | See if the water consumption indicator on the softener works when the water is being drawn. | ||
| The composition of the source water has changed. | Explore the water, and make changes to the settings according to the new data | ||
| Source water is mixed with purified water | Make sure that there is no admixture of the source water | ||
Error Codes | |||
| E1 – Home position not detected | Turn the power off and on by unplugging and plugging in the AC adapter. The search for the home position will start again. | ||
| E2 – Engine malfunction | Disable the electric power and connect the motor. | ||
| E3 – Shift of home position | The magnetic arm does not start from the correct home position. The controller will automatically attempt to adjust by searching for the home position and continue regeneration. | ||
| E4 – Home position locked | Transmission teeth not engaged or stripped. Something has jammed the valve mechanism. | ||
| E5 – Memory error | To reset the error, turn off and turn on the softener power. | ||
Warranty Coupon Aquaphor Softener
| Aquaphor Softener Model | ——————————————————————————————- |
| Serial # | —————————————————————————————— |
| Date of Sale | ——————————————————————————————- |
| Seller’s stamp | —————————————————————————————– |
| Seller’s signature | ————————————————————————————– |
Installation Information
| Name of the company that carried out the installation: | —————————————————————————————— |
| Name of the service engineer: | —————————————————————————————– |
| Service engineer’s signature: | —————————————————————————————– |
| Client’s signature: | —————————————————————————————– |
| For installation, operational, and technical maintenance, please contact: | —————————————————————————————– |
Disposal
Disposal in accordance with environmental, sanitary, and other requirements established by national standards in the field of environmental protection, AQUAPHOR Water Softener and ensuring the sanitary and epidemiological welfare of the population.
Limited Warranty
Terms of Service and Warranties
AquaphoWaterer Softener – Two-Year Warranty from AQUAPHOR Water Softener the date of purchase under normal use and service. This does not apply, however, to filter material and/or ion exchange resin.
Exclusions and Limitations
- Aquaphor warrants its products to be free from manufacturing defects under normal use and service.
- Aquaphor reserves the right to make such AQUAPHOR Water Softener inspections as may be necessary to determine the cause of the defect. Aquaphor will not charge for labor or parts in connection with warranty repairs for the first full year from the date of purchase on all products except those that may be subject to commercial use limitations.
- Aquaphor is not responsible for the cost of removal, return (shipping), and/or reinstallation of products.
This warranty does NOT apply to
- Damage or loss that occurs during shipment.
- Damage or loss sustained through any natural or manmade causes beyond the control of Aquaphor, including but not limited to fire, earthquake, floods, etc.
- Damage or loss resulting from sediments or foreign matter contained in a water system.
- Damage or loss resulting from negligent or improper installation, including installation of a unit in a harsh or hazardous environment.
- Damage or loss resulting from removal, improper repair, modification of the product, or improper maintenance, including damage caused by chlorine, chlorine-related products.
- Damage or loss resulting from acts which are not the fault of Aquaphor or which the Product is not specified to tolerate.
- This warranty gives you specific legal rights. You may have other rights that may vary from state. to state
Customer Service
- Tel: +372 600 2255
- Website: www.aquaphor.com
- Address: Katusepapi 44, Estonia, 11412, Tallinn, Europe
FAQs
Q: What is the difference between the S550 and S550 P1 models?
Although both versions provide effective water softening, the S550 P1 has sophisticated electronic controls and an integrated pre-filtration system to remove chlorine and sediment. The S550 is perfect for areas with comparatively clean incoming water because it just concentrates on softening.
Q: How does the AQUAPHOR S550 water softener work?
The technique substitutes sodium ions for the hardening-causing calcium and magnesium ions using ion-exchange resin. The device automatically runs a regeneration cycle using a salt (sodium chloride) solution to restore the resin’s softening ability when it becomes saturated.
Q: How often does the water softener regenerate?
Although sophisticated variants (such as the S550 P1) can automatically adapt based on real-time water consumption, the S550 typically regenerates every 7–10 days.
Q: What type of salt should I use in the brine tank?
Use crystals or pellets of high-purity water softening salt (sodium chloride). Steer clear of rock salt and salts with additional cleaning agents, as they might lead to residue accumulation and lower system performance.
Q: How much salt does the system use during regeneration?
The amount of salt used in a regeneration cycle usually ranges from 2 to 4 kilograms (4 to 9 pounds), depending on your model and settings. To preserve performance, check the salt level indication frequently and replenish as necessary.
Q: How do I know when to add more salt?
Every few weeks, check the brine tank. Refill it when the salt level drops below halfway. Because the system needs brine to fully regenerate, never allow the tank to run empty.
2 Comments
hello, its nice.
Pingback: AQUAPHOR OSMO PRO 50 Water Filter System | Full Guide