
BLAUPUNKT GTD 1608 A DSP Amplifier
Contents in the Box
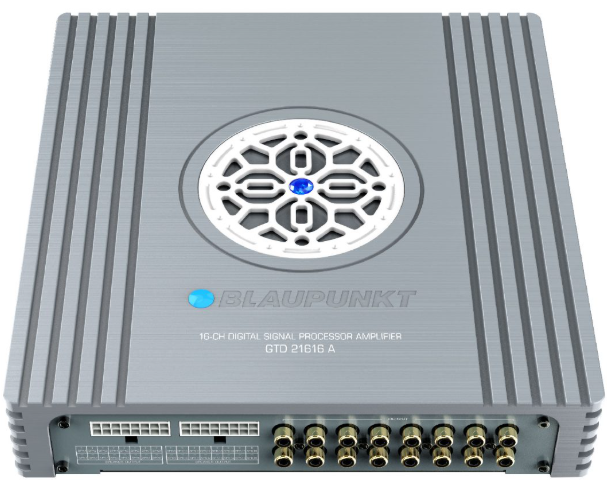
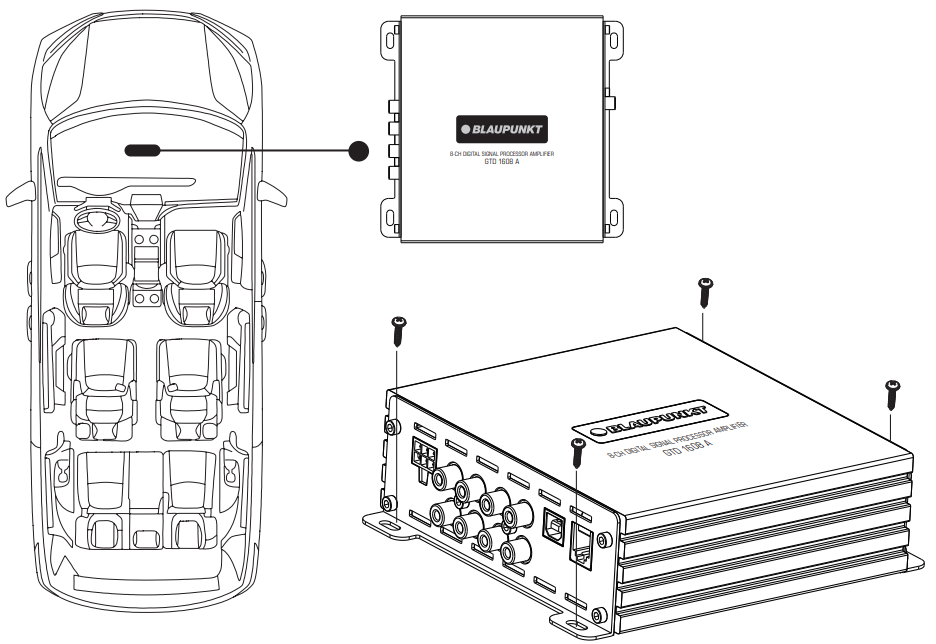
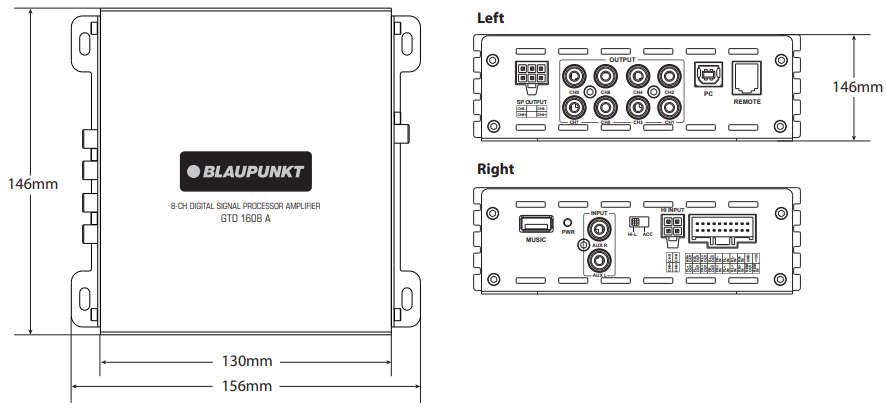
- Digital Signal Processor (156 x 47.5 x 146mm)
- 4x Parker-Type Screws (4x20mm)
- 1x 1.5m USB Cable
- 1x Speaker-in Cable
- 1 x Speaker-out Cable
- 1 x Unit Cable
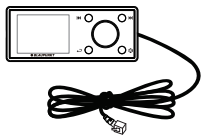
- 1x Wired Remote Control (Optional)
Features
- Class AB Amplifier
- Max. Output Power: 300W
- Frequency Response: 20Hz-20kHz
- Max. Current Draw: 30A
- Dimension (W x H x D) : 156 x 47.5 x 146mm
- Weight: 0.94 kg
Accessories
- 4x Parker-Type Screws (4x20mm)

- 1x Speaker-in Cable
- 1x Wired Remote Control
- 1x 1.5m USB Cable
- 1x Speaker-out Cable
- 1x Unit Cable

SOFTWARE OPERATION (WINDOWS)
GTD 1608 A.exe
Car entertainment enthusiasts/experts may now begin to tone signal details. Enhance the sound effect according to your very own preference for optimum music enjoyment with the DSP software.
Channel Panel (31-band Tuning)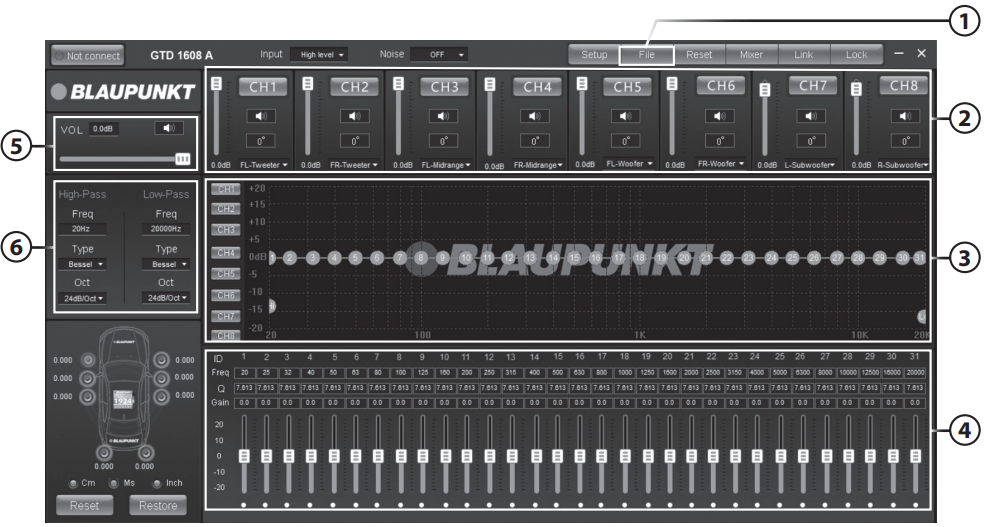
Source Load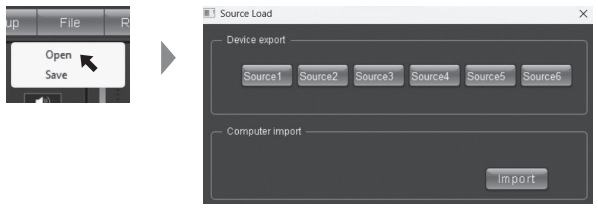
8-channel Control
31-band Tuning Waveform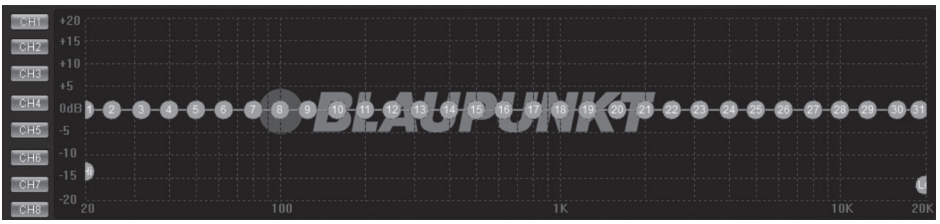
31-band Equalizer Control
Main Volume Control
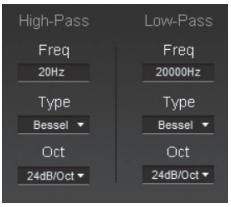
Crossover Frequency Setting
- 3 Types of High-pass Frequency
- 3 Types of Low-pass Frequency
SOFTWARE OPERATION (MOBILE APPLICATION)
Mobile Application
- Download “Blaupunkt GTD 1608 A” App from Play Store (Android) or App Store (iOS).
Main Interface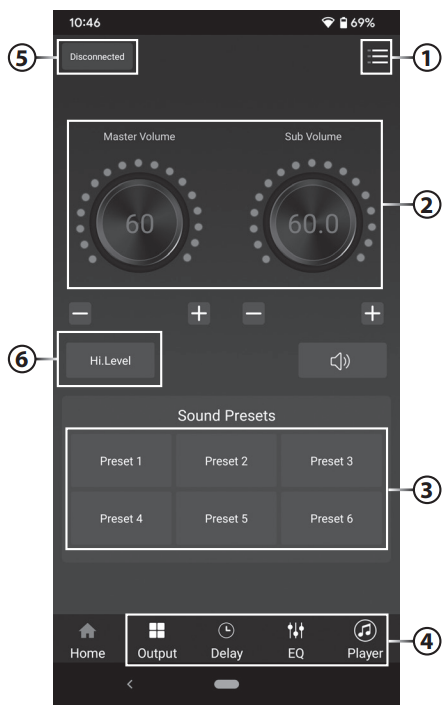
Setting
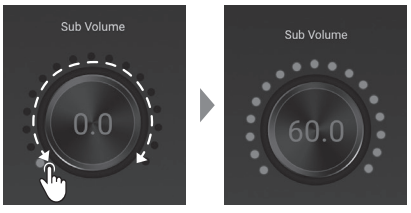
Adjustment of Main Volume
- Adjust the main volume by clicking on the scale clockwise (Increase) or counterclockwise (Decrease)
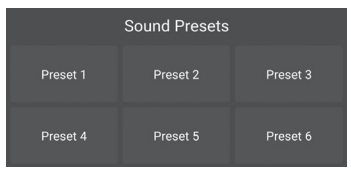
Sound Effect
- 6 Presets
Bottom Navigation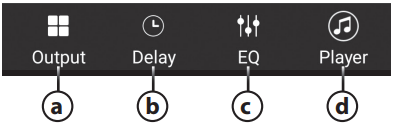
Output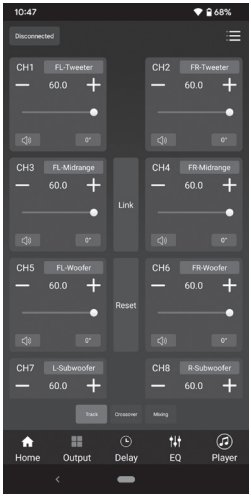
Delay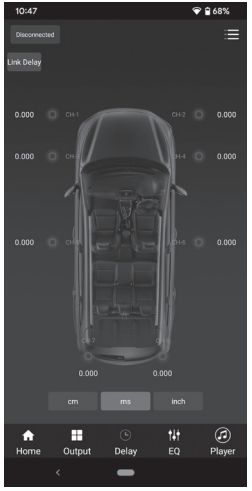
EQ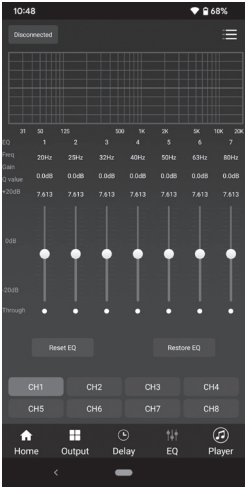
Player
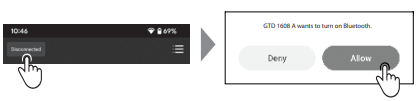
BT Connection
- Click on the BT icon to turn on the BT.
- Click on the available device & connect to “GTD 1608 A APP”

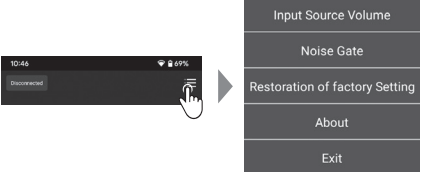
Input Source Setting
- Click on the preferred input source.

Installation Instructions
- Use the device in a manner that enhances the user’s safety while operating the vehicle.
- The user should install the device at an appropriate location during operation.
- While driving, it is not recommended for the user to use applications that may lead to distraction.
- Before installation, disconnect the negative terminal of the battery.
- Refer to the safety vehicle manufacturer’s user manual.
- Ensure that the positions of the holes are nowhere near the vehicle components to avoid any damage during drilling.
- Ensure cross cross-section of the cables is not more than 5mm if the positive and the negative cables are too long.
- Incorrect installation may result in the malfunction of the device or the car’s sound system.
- Select a dry and well-ventilated location to install the device.
- The device must not be installed in an overly exposed location.
- The installation location must be suitable for screw holes and stable ground support.
Voltage Supply
- +12V: Positive connection terminal for a 12V car power supply.
- GND: Power supply negative connection terminal. Firmly and carefully connect the ground lead to a bare metal point on the vehicle chassis.
- Operation temperature : 0° – 70°C
Compatible OS
- PC – Windows XP or higher
- Mobile Phone – Android 5.0 or higher, iOS 12.0 or higher
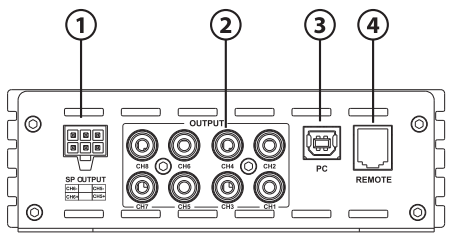
Function
- High-Level Speaker Output
- Ch1~Ch8 Low Level Outputs
- USB 2.0 Port
- Remote Control Input
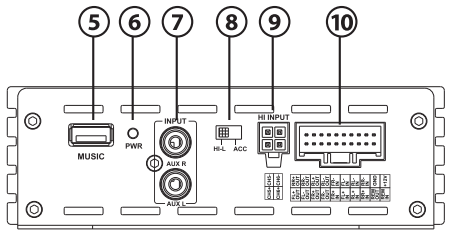
- USB Player
- Power & Protection LED
- Aux R & Aux L Low Level Inputs
- Hi-L/ ACC Converter
- High-Level Input
- Speaker Outputs /Speaker Input / Remote In/ Remote Out
Diagram
Car Specific Wiring Method – High Level Input/Output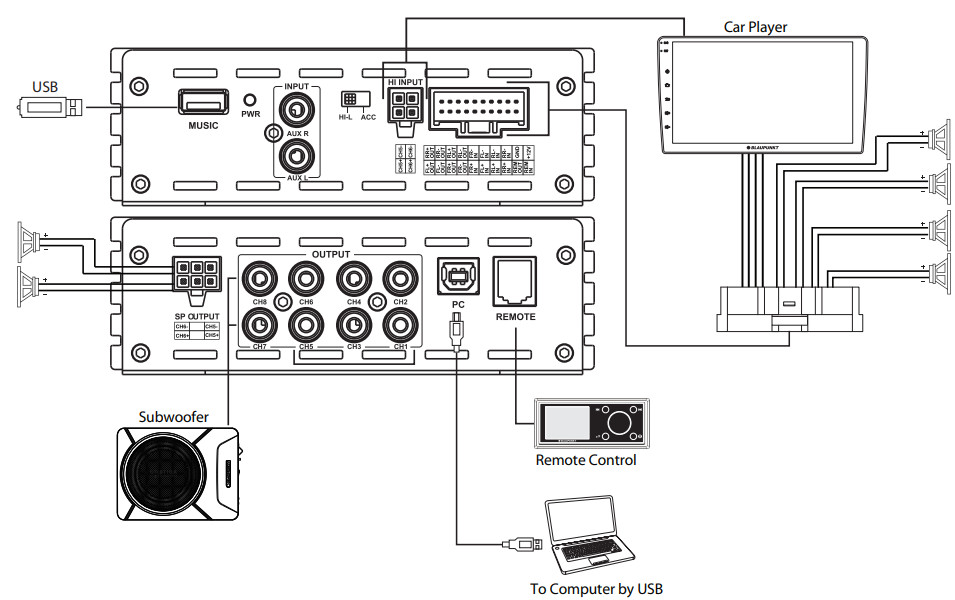
Car Specific Wiring Method – Low Level Input/Output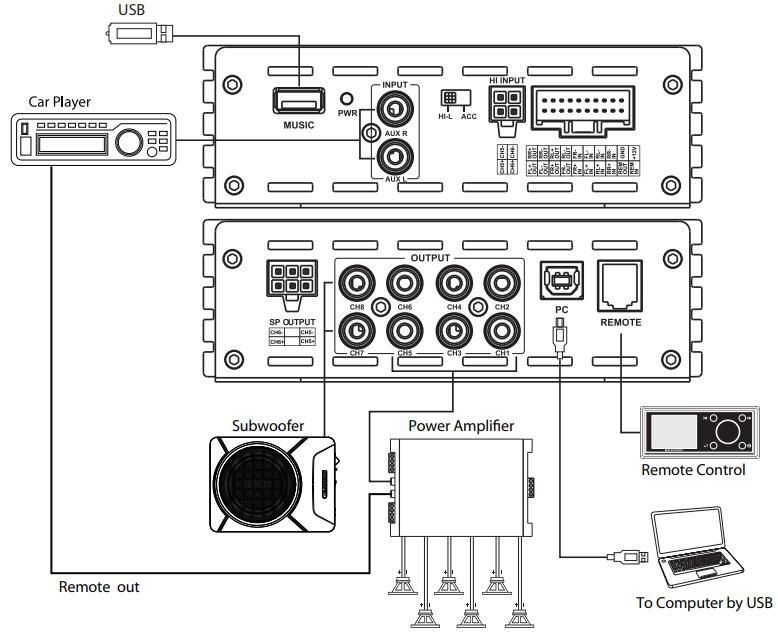
Universal Wiring Method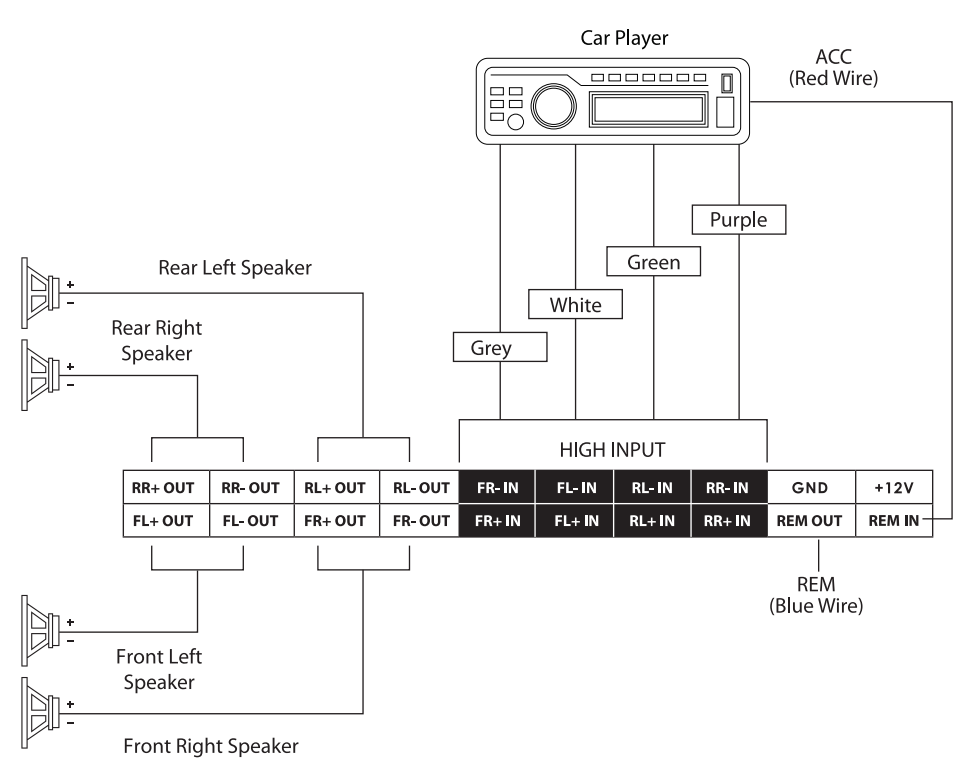
SPECIFICATION
Audio
- DSP RMS Power : 35W x 6(4Ω), 50W x 6(2Ω)
- DSP Resolution: 24 Bit
- DSP Output Power: RMS @ 4 Ohms (≤1% THD +N) : 35Wx6
- DSP Output Power: RMS @ 2 Ohms (≤1% THD +N) : 50Wx6
- Distortion (THD): ≤0.005%
- Damping Factor : >70
- Operating Voltage: 10 -14.4V
- Sampling Rate: 48kHz
- Signal Converter A/D : AKM7735
- Signal Converter D/A : Cirrus Logic CS4344
Input
- 2 x RCA/ Aux-in
- 6 x High-Level Speaker Input
- 1 x Remote-in
- 1 x USB
- RCA/ Cinch Sensitivity: 300mV
- High Level Input Sensitivity: 3.5V
- Impedance High Level: 240 Ohms
- S/N Ratio Analog-in : ≥100dB
Output
- 8 x RCA/ Cinch
- 6 x High-Level Speaker Output
- 1 x Remote-out
- Voltage RCA/ Cinch: 4V RMS
TROUBLESHOOTING
Problem & Solution
- Examine if the ground connection is intact.
- Examine if the remote input has at least 5V DC.
- Examine if battery power is connected correctly to the + terminal.
- Ensure the supplied voltage is a minimum of 12V.
- Inspect the fuse for damage and replace it if needed.
- Restart the device if the protection LED light is on.
No sound output
- Examine fuses and replace if necessary.
- Examine if the ground connection is intact.
- Examine if the remote input has at least 5V DC.
- Examine if RCA audio cables are BLAUPUNKT GTD 1608 A DSP Amplifier connected to the right inputs.
- Examine if the speaker wiring is intact.
Low sound output
- Reset Level Control
- Examine the Crossover Control setting.
Squealing noise interference
- Ensure RCA connections are properly connected.
Distorted sound output
- Ensure the input level of the device matches the signal level of the head unit.
- Always set the input level to the lowest.
- Examine if the crossover frequency is set correctly.
- Examine if the speaker wire had a short circuit.
The amplifier temperature increases.d
- Examine if the minimum speaker impedance for the amp models is correct.
- Ensure good air ventilation around the device. Add an external cooling fan if necessary.
Engine noise (static sound) interference
- Typically, poor RCA cable quality is the cause of noise release.
Engine noise (alternator whine) interference
- Examine if RCA cables are nowhere near or attached to the vehicle chassis.
- Examine if the head unit is properly connected to the wires.
Disposal
- Do not dispose of your old unit in the household trash.
- Use the return and collection systems available to dispose of the old device.
- This manual may be updated from time to time without notice.
Disclaimer
- Blaupunkt is not liable for any loss or damage caused or resulting from unauthorized disassembly or modification to the product.
- No warranty, whether express or implied, is provided in the U.S. and Canada.
Customer Service
- Tel: 1800 252 878 658
- Visit: http://www.blaupunkt.com
- Scan:

FAQs
Q: What type of vehicle is the GTD 1608 A DSP Amplifier compatible with?
Ans: The GTD 1608 A DSP Amplifier is compatible with most 12V vehicles, including automobiles, SUVs, and light trucks. Before installing the amplifier, make sure the power supply and audio system in your car can handle its requirements.
Q: Does this amplifier include a built-in DSP (Digital Signal Processor)?
Ans: Indeed. For sophisticated tuning, time alignment, EQ control, and crossover settings, the GTD 1608 A has an integrated 8-channel DSP. This makes it possible to precisely customise for excellent audio quality.
Q: Do I need a separate DSP tuning software for setup?
Ans: Indeed. DSP settings are managed via Blaupunkt DSP software, which can be downloaded from the official website.
Q: Can I use this amplifier with factory head units?
Ans: Of course. OEM (manufacturer) radios without RCA pre-outs can use the GTD 1608 A since it accepts high-level (speaker-level) input.
Q: What is the correct power supply voltage for this amplifier?
Ans: 12V DC (10–16V range) powers the GTD 1608 A. To avoid noise or performance problems, make sure the ground connection is tight and the electrical system in your car is steady.
Q: What type of wiring kit is recommended?
Ans: Make use of an automotive amplifier-rated 4-gauge (AWG) wiring kit of superior quality. A fused power cable, ground cable, remote turn-on wire, and RCA interconnects (if any) should all be included in the kit.
Q: How should I ground the amplifier?
Ans: No more than 18 inches (45 cm) from the amplifier, attach the ground wire to a bare metal surface on the car’s chassis. Power instability and noise are frequently caused by a bad ground connection.