
Dometic DM20D Drawer Design refrigeration
Safety Instructions
- Inadequate repairs may cause serious hazards.
- Do not locate multiple portable socket-outlets or portable power supplies at the rear of the appliance.
- The refrigerant circuit contains a small quantity of an environmentally friendly but flammable refrigerant.
- It does not damage the ozone layer and does not increase the greenhouse effect.
- Any leaking refrigerant may ignite.
- Keep the installation recess for the minibar free of any electrical components and light sources that, during normal or abnormal operation, produce sparks or arcs (i.e., relays or fuse boxes).
- Do not use or store the minibar in confined spaces with no or minimal air circulation.
- After installation, it must still be possible to disconnect the minibar from the supply mains.
- This may be achieved by having the plug accessible or by incorporating a switch in the fixed wiring according to the wiring rules.
- Keep ventilation openings in the minibar enclosure or in the built-in structure clear of obstruction.
- Do not use mechanical devices or other means to accelerate the defrosting process, other than those recommended by the manufacturer.
- Do not open the refrigerant circuit under any circumstances.
- Do not use electrical devices inside the minibar unless they are recommended by the manufacturer for that purpose.
Explanation of Symbols
- Safety instruction: Indicates a hazardous situation that, if not avoided, will result in death or serious injury.
- Safety instruction: Indicates a hazardous situation that, if not avoided, could result in death or serious injury.
- Safety instruction: Indicates a hazardous situation that, if not avoided, could result in minor or moderate injury.
- Indicates a situation that, if not avoided, can result in property damage.
- Supplementary information for operating the product.
Operation
- Do not touch exposed cables with your bare hands
- Before starting the minibar, ensure that the power supply line and the plug are dry.
- Ensure that you only put items in the minibar that may be chilled at the selected temperature.
- Food may only be stored in its original packaging or in suitable containers.
- Opening the door for long periods can cause a significant increase in the temperature in the compartments of the minibar.
- • Clean regularly the surfaces that can come in contact with food and accessible drainage systems.
- If the minibar is left empty for long periods:
- Switch off the minibar.
- Defrost the minibar.
- Clean and dry the minibar.
- Leave the door open to prevent mold from developing within the minibar.
- Do not place the minibar near naked flames or other heat sources (burning candles, heaters, direct sunlight, gas ovens, etc.).
- Never immerse the minibar in water.
- Protect the minibar and the cable against heat and moisture.
- Ensure that foodstuffs do not touch the walls of the cooling area.
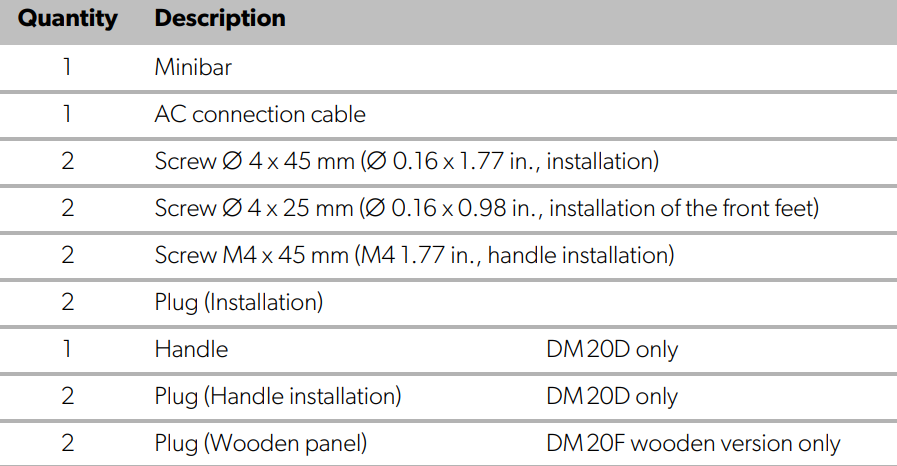
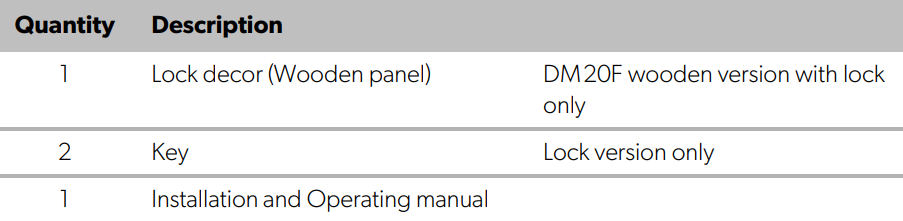
Scope of Delivery
The following main alternatives are obtainable:
- Minibar DM20D with door panel, without lock
- Minibar DM20D with door panel, with lock
- Minibar DM20F without door panel, without lock
- Minibar DM20F without door panel, with lock

Intended use
The refrigeration appliance (also referred to as minibar) is intended to be used in household and similar applications, such as:
- Staff kitchens in stores, offices, and other work areas
- Farmhouses
- By clients in hotels, motels, and other residential-type environments
- Bed and breakfast-type environments
- Catering and similar non-retail applications
This minibar is only suitable for the intended purpose and application in accordance with these instructions. This manual provides information that is necessary for the proper installation and/or operation of the minibar.
Poor installation and/or improper operation or maintenance will result in unsatisfactory performance and a possible failure. The manufacturer accepts no liability for any injury or damage to the product resulting from:
- Incorrect assembly or connection, including excess voltage
- Incorrect maintenance or use of spare parts other than the original spare parts provided by the manufacturer
- Alterations to the product without express permission from the manufacturer
- Use for purposes other than those described in this manualDometic reserves the right to change product appearance and product specifications.
Technical description
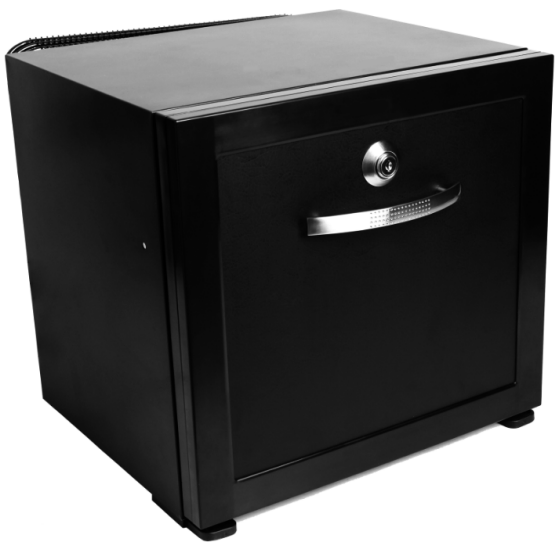
The minibar has a drawer with room for 12 cans (plus snack bars). On delivery, the provided shelves and compartments are positioned so that the device can be operated in an energy-efficient manner. The minibar DM20D comes with an anthracite panel and pull handle. The minibar DM20F is delivered without a panel and is prepared for fitting the hotel’s own door decor. Its cooling system is a non-wearing Peltier cooling system. A lock is optionally available.
Description of the device
Front side
Rear side
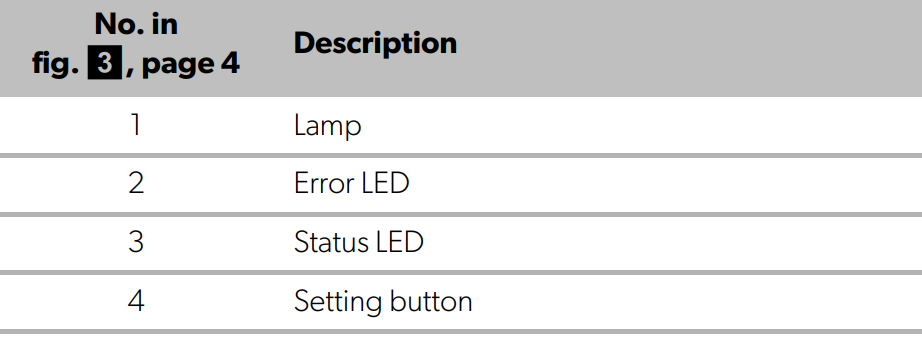
Control panel (inside the device)
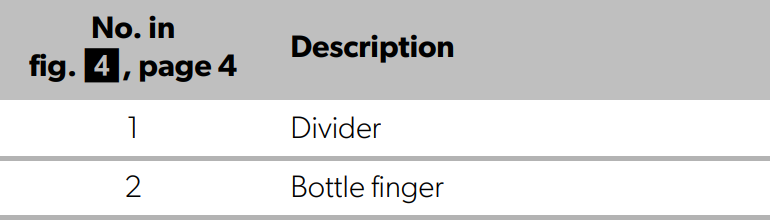
Main drawer
Installation
Mounting the minibar into a piece of furniture
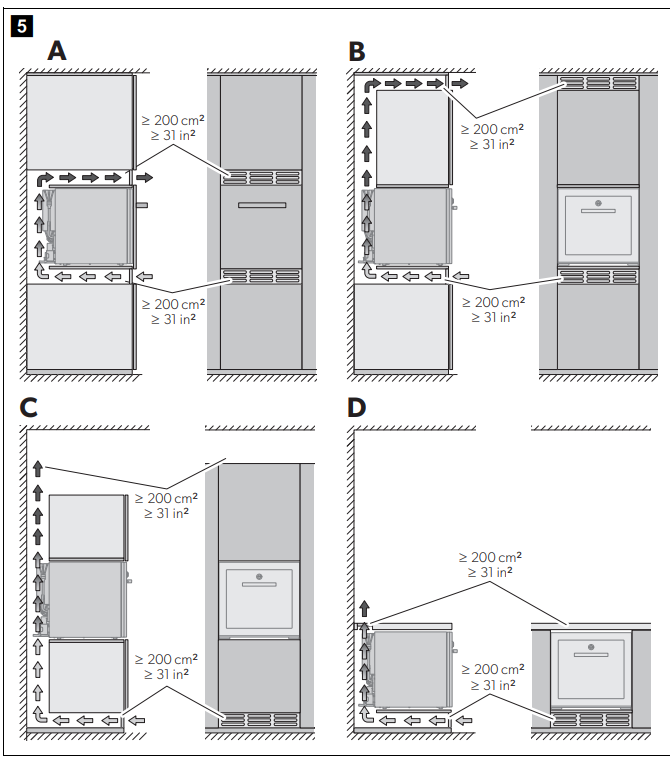
- There are four ways to mount the minibar Dometic DM20D Drawer Design refrigeration into furniture.
- Choose your preferred installation alternative (fig.5, page 5).

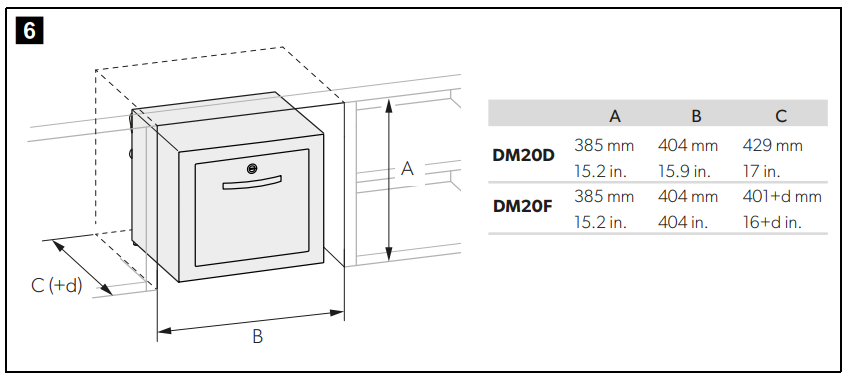
- Observe the required installation recess (fig. 6, page 6). d is the thickness of the hotel‘s own decor.
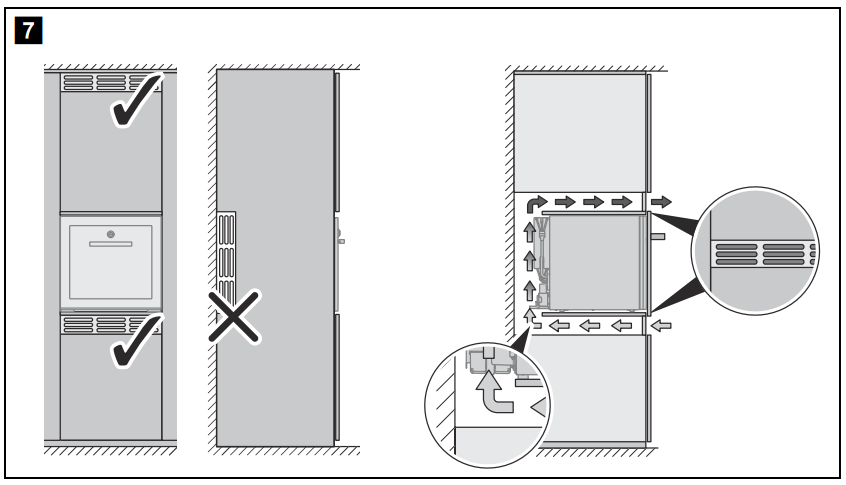
- Observe the correct placement of the minibar and ventilation openings to ensure a proper air flow (fig.7, page 6).
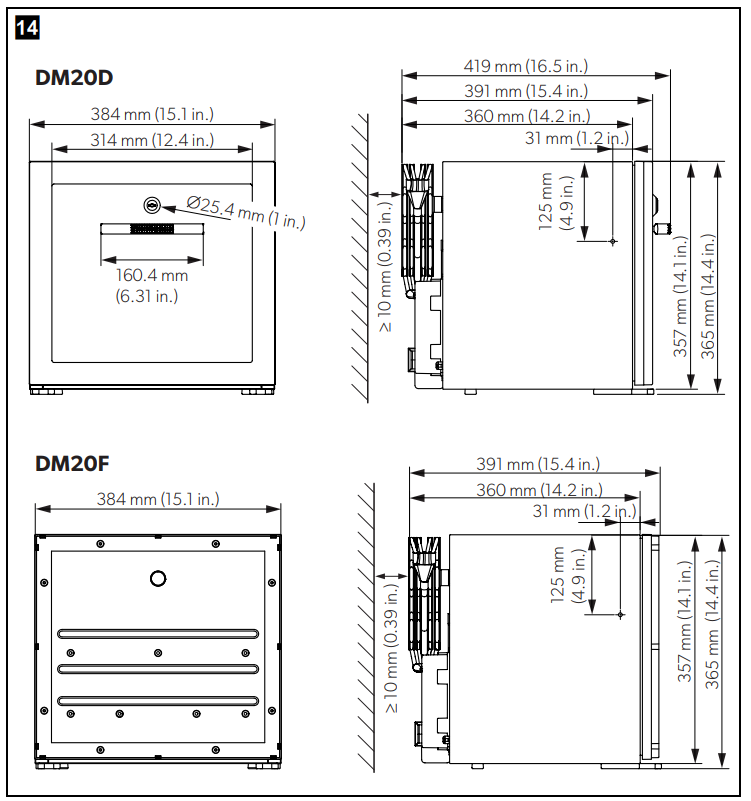
- Ensure the minimum clearance between the back of the minibar and the furniture wall (fig.14, page 10).
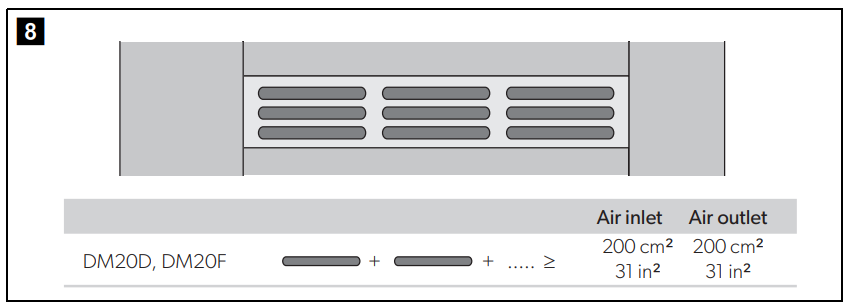
- Produce the ventilation openings as shown in fig.8, page 6.
- Fix the refrigerator in place using suitable screws (fig.9, 1 and 2, page 7).

Connecting the Minibar Electrically
- Plug the AC connection cable into the AC voltage socket and connect it to the AC mains supply.
- The status LED lights up.
- The minibar starts cooling the interior.
Mounting
- The hotel’s own door decor has to comply Dometic DM20D Drawer Design refrigeration with the following requirements:
- Maximum weight: 2 kg (4.4 lb.)
- Maximum thickness: 14 mm (0.55 in.)
- Fasten the decor with four screws.
- Drill a hole with a diameter of 35 mm (1.4 in.) into the decor.
- Mount the lock together with the lock decor.
Mounting the lock
Disassembling the drawer (fig.10, page 8)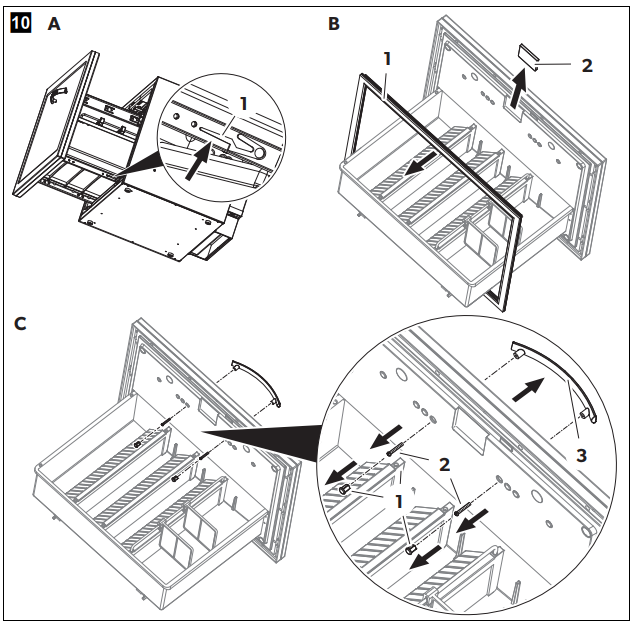
- Open the drawer completely.
- Press the rail lock (A 1).
- Pull the drawer out of the cabinet.
- Remove the gasket (B 1).
- Remove the lock cover (B 2).
- Remove the plugs (C 1) from the screws of the door handle (C 3).
- Unscrew the screws (C 2) of the door handle (C 3).
- Remove the door handle (C 3).
Drilling the Holes
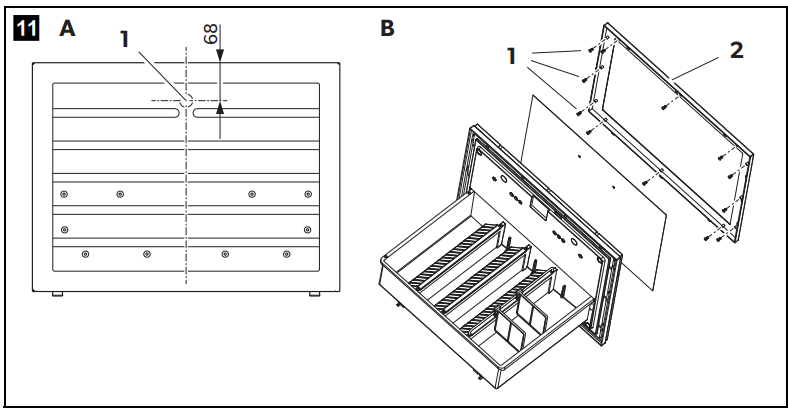
- Drill a hole with a diameter of 25 mm (0.98 in.) through the decor and the door (A 1).
- Unscrew the screws (B 1) of the decor frame (B 2).
- Remove the decor frame (B 2).
Assembling the Lock
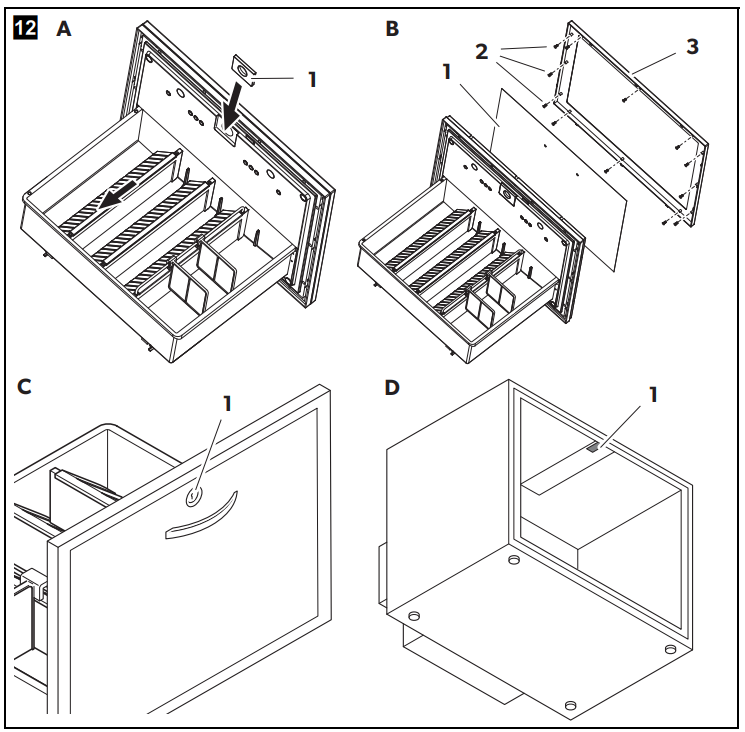
- Put the new lock cover (A 1) into place.
- Put the decor (B 1) into the decor frame (B 3).
- Screw the decor frame (B 3) onto the door (B 2).
- Install the door lock (C 1).
- Install the lock catch in the cabinet (D 1).
Drawer
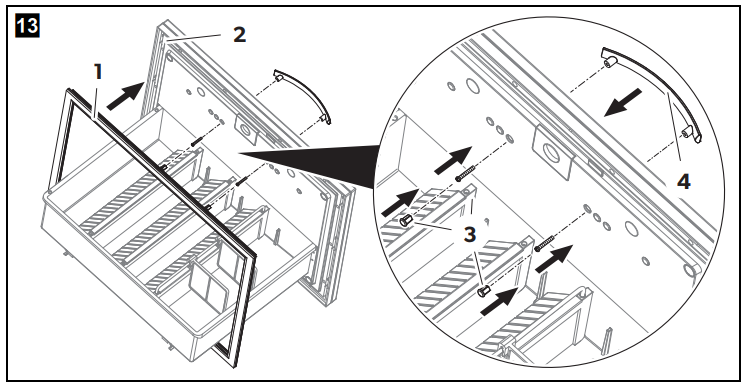
- Push the gasket (1) on the decor frame (2).
- Screw the door handle (4) onto the door.
- Push the plugs (3) on the screws of the door handle (4).
- Push the drawer into the cabinet.
Using the minibar
The minibar starts cooling when connected to power. During normal operation, the Status LED is glowing. If an error occurs, the Error LED is blinking.
Setting the Temperature
To avoid food waste, note the following:
- Keep temperature fluctuation as low as possible.
- Only open the minibar as often and for as long as necessary.
- Store the food in such a way that the air can still circulate well.
- The minibar is equipped with an automatic temperature regulation function.
- Select the average of the possible temperature values.
- Adjust the temperature according to the quantity and type of the foodstuff.
- The minibar is set by default to a cooling temperature of 7 °C (47 °F) at an ambient temperature of 25 °C (77 °F).
- You can use the setting button (fig.3 4, page 4) to set the cooling temperature to one of three values: 5 °C, 12 °C, and 7 °C (41 °F, 54 °F, and 45 °F).
- Thereby the temperature will be changed in the order 5 °C … 12 °C … 7 °C … 5 °C (41 °F … 54 °F … 45 °F … 41 °F) etc.
- The lamp indicates the setting temperature:
- 5 °C (41 °F): the lamp flashes five times in three intervals
- 12 °C (54 °F): the lamp flashes once in three intervals
- 7 °C ( 45 °F): the lamp flashes three times in three intervals
Cleaning and maintenance
- Occasionally, clean the cooling device’s interior and exterior with a damp cloth.
- Ensure that the air inlet and outlet vents on the cooling device are free of any dust and dirt, so that heat can be released and the cooling device is not damaged.
- Occasionally, clean the inlet filter.
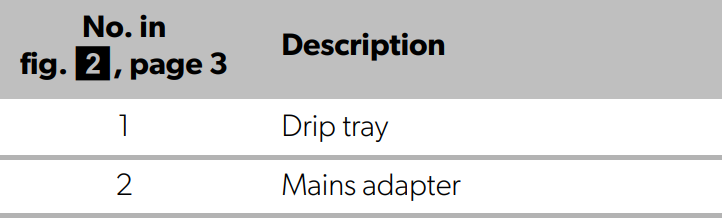
- If you find water in the drip tray (fig.2 1, page 3), check whether the drainage system is blocked.
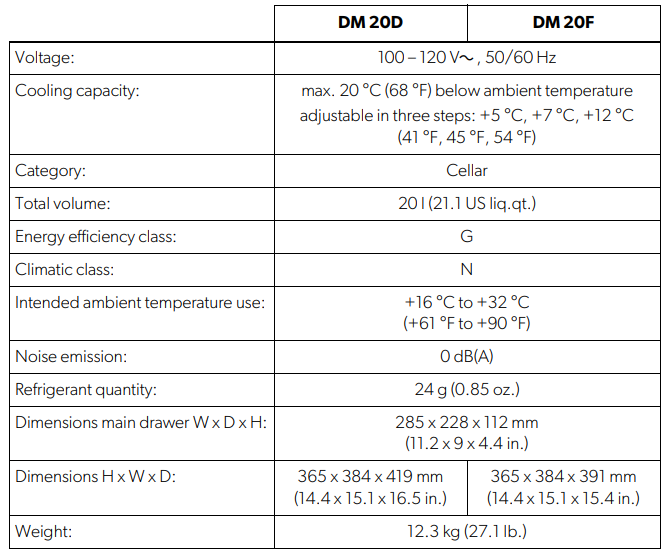
Technical Data
The refrigerant circuit contains R600a
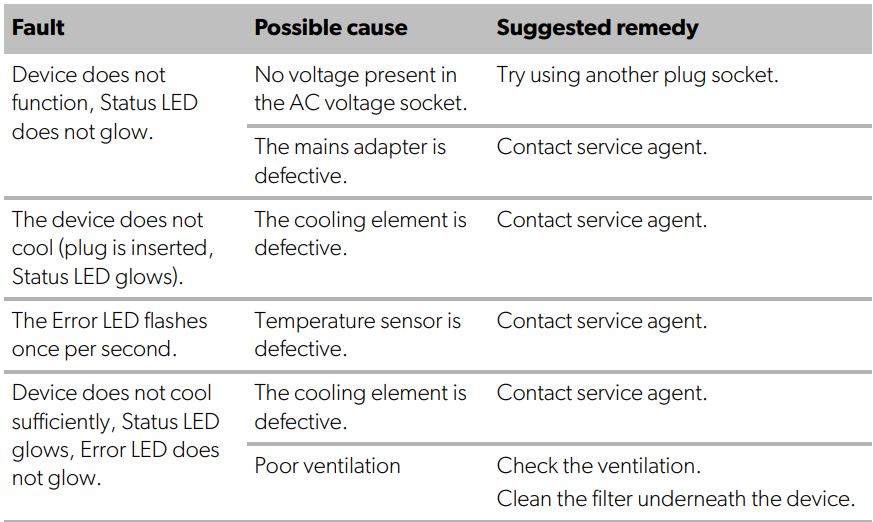
Troubleshooting
Warranty
Refer to the sections below for information about Dometic DM20D Drawer Design refrigeration warranty and warranty support in the US, Canada, and all other regions.
Disposal
Place the packaging material in the appropriate recycling waste bins, wherever possible. Consult a local recycling center or specialist dealer for details about how to DOMETIC SB27150 90 Degree Bezel Kit Installation dispose of the product in accordance with the applicable disposal regulations.
Customer Service
SPAIN
- Address: Dometic Spain S.L. Avda. Sierra del Guadarrama, 16 E-28691 Villanueva de la Cañada Madrid
- Call: 8 +34 900 100 245.
- Email: info@dometic.es
GERMANY
- Address: Dometic WAECO International GmbH Hollefeldstraße 63 • D-48282 Emsdetten
- Call: 9 +49 (0) 2572 879-195
- Email: info@dometic-waeco.de
FRANCE
- Address: Dometic SAS ZA du Pré de la Dame Jeanne B.P. 5 F-60128 Plailly
- Call: +33 344633518
- Email: vehiculesdeloisirs@dometic.fr
AUSTRALIA
- Address: Dometic Australia Pty. Ltd. 1 John Duncan Court • Varsity Lakes QLD 4227
- Call: 8 +61 7 55076001
- Email: sales@dometic-waeco.com.au
FAQs
What is the Dometic DM20D designed for?
When effective, space-saving refrigeration is required in offices, boats, RVs, or tiny living areas, the DM20D is a small drawer-style refrigerator that is perfect for installation.
What is the storage capacity of the DM20D?
With its roughly 20 litres of chilled storage, the DM20D is ideal for keeping drinks, snacks, and small foods fresh.
What power sources does the DM20D support?
This unit is compatible with common mobile power systems seen in boats, RVs, and off-grid settings because it runs on 12V or 24V DC power.
Can the DM20D freeze food?
No, the DM20D does not include a freezer feature; it is only intended for refrigeration.
How is the temperature controlled?
With its digital thermostat, the DM20D can precisely regulate the temperature within a cooling range that is ideal for keeping food and beverages.
Is the DM20D suitable for tight spaces?
Indeed, because of its drawer-style design, which allows for simple access without requiring additional swing clearance like typical refrigerators, it is perfect for small or narrow locations.
How energy efficient is the DM20D?
The refrigerator maximises battery life in mobile applications by minimising power consumption through the use of insulation and a high-efficiency compressor.
Can the DM20D operate quietly?
Indeed, the device is made to run quietly, causing the least amount of noise disturbance in living or working spaces.