
DOMETIC SB27150 90 Degree Bezel Kit Installation
Safety instructions
Safe operation of the product relies on correct installation and maintenance. Safe operation also depends on the boat operator’s good judgment, boating knowledge, and skills.
- Know and obey all applicable federal, state, and municipal laws and regulations that govern boating in your region.
- Take a boating safety course.
- Never operate a boat while under the influence of drugs or alcohol.
- Wear a personal flotation device (PFD) that is approved for use by the proper agency in your region.
- Attach the engine shut-off lanyard to your PFD.
- Watch this safety video to learn the correct usage of the steering system, see
- Visit: qr.dometic.com/bfqlLt.
- Scan:

- Watching the safety video does not replace reading and following all the instructions, guidelines, and warnings included in the product manual.

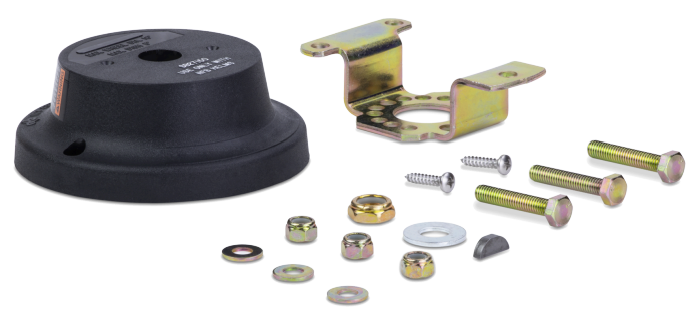
Scope of delivery
The SB27150 kit can only be used with the SH4910, SH4920, and SH5150 helms.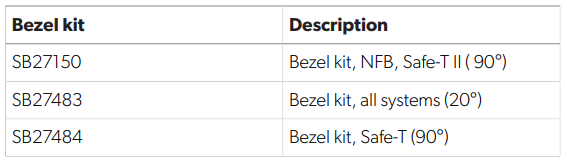
In addition to this kit, you will need the following parts to complete the system:
- Steering helm
- Engine connection kit
- Steering wheel, maximum wheel diameter 16 in (406.4 mm), maximum wheel dish 5 in (127 mm)
- SSC62xx steering cable
Target groups
The mechanical and electrical installation and setup of the device must be performed by a qualified technician who has demonstrated skill and knowledge related to the construction and operation of marine equipment and installations, and who is familiar with the applicable regulations of the country in which the equipment is to be installed and/or used, and has received safety training to identify and avoid the hazards involved.
Intended use
This manual provides information that is necessary for the proper installation and/or operation of the product. Poor installation and/or improper operating or maintenance will result in unsatisfactory performance and a possible failure. The manufacturer accepts no liability for any injury or damage to the product resulting from:
- Incorrect installation or assembly
- Incorrect maintenance or use of spare parts other than the original spare parts provided by the manufacturer
- Alterations to the product without express permission from the manufacturer
- Use for purposes other than those described in this manual. Dometic reserves the right to change product appearance and product specifications.
Installation
- All steering components must be compatible with and rated for the engine installed on the boat.
- Do not substitute any part of the system without written authorization from the manufacturer.
- Do not use a wheel-mounted trim switch with a ca oiled cord. The cord could wrap around the steering wheel and inhibit the steering.
- Do not connect any electric ground wires to the helm.
- Doing so can cause an electrolytic reaction in the steering system, which might lead to system failure or significantly shorten its lifespan.
- Never take helms apart for any reason. If they are not put back together correctly. Taking the helm apart could cause the entire system to fail. Taking the helm apart voids the warranty.
Unsafe boat operation hazard
- To prevent heavy steering loads and to get the best steering performance, adjust the outboard motor, tilt position, or trim tabs as instructed in the motor manufacturer’s operation manual.
- When replacing a steering system, stick with the type (rotary or rack) that the boat manufacturer originally installed. Never switch your steering from a dual cable to a single cable system.
- Keep the cable and drive assembly clean during installation. Dirt will damage the system and cause premature wear. This notice does not include the engine output RAM end of the cable.
- Keep these guidelines in mind when installing the system:
- Make sure you have all the necessary components ready before starting.
- Inspect the steering cable for stiffness, cracks, or any other damage. If any issues are found, replace the steering cable.
- Once the installation is complete, carry out the system inspection checks as explained in this manual.
- Fix any problems before handing the boat over to the owner.
Mounting the helm bracket
90° Bracket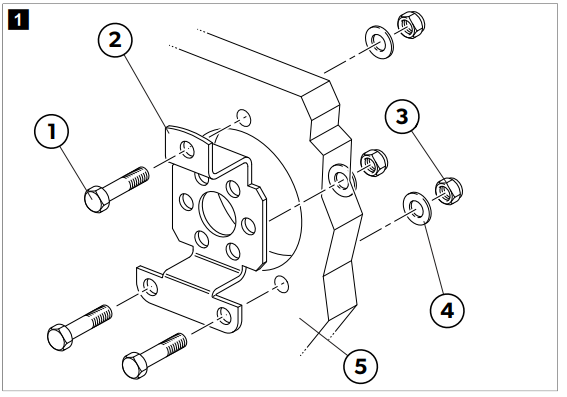
- Hex bolt
- Helm mounting bracket
- Locknut
- Flat washer
- Face of dash
- Position the helm mounting bracket on the dash.
- Insert the hex bolts through the holes in the bracket and dash.
- Place a flat washer on each hex bolt.
- Thread a locknut on each hex bolt.
- Torque to a minimum of 110 in·lb (12.428 Nm). Do not exceed 145 in·lb (16.383 Nm).
Mounting the helm
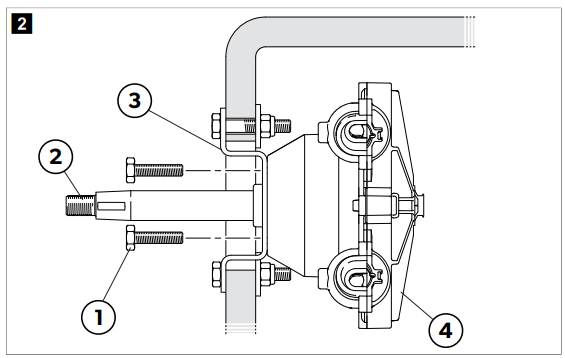
- Bolts supplied with helm (¾ in to 1 in, depending on the helm)
- Helm steering sha
- Helm mounting bracket (90° shown)
- Helm (SH5150 shown)
- Insert the helm steering shaft through the hole in the helm mounting bracket.
- Orient the helm in the proper direction for the steering cable entry and align the mounting holes.
- Insert the hex bolts through the mounting bracket and thread them into the helm.
- Torque to a minimum of 75 in·lb (8.474 Nm). Do not exceed 120 in·lb (13.558 Nm).
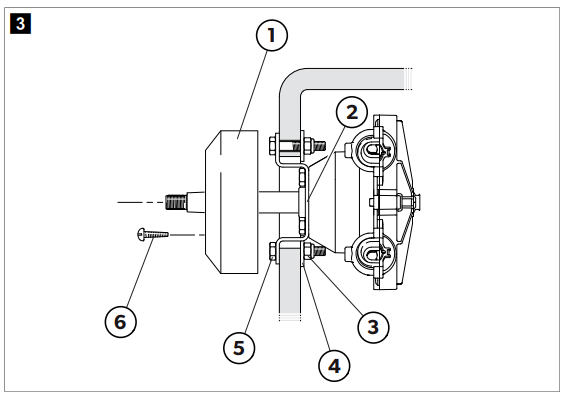
- Plastic bezel (90° shown)
- Helm mounting bracket
- Locknut, 5/16–18
- Flat washer, 5/16 in ID
- Hex bolt, 5/16–18
- Screw, #10 self-tapping
- Center the plastic bezel around the shaft.
- Fasten with the self-tapping screws.
- Tighten the screws securely.
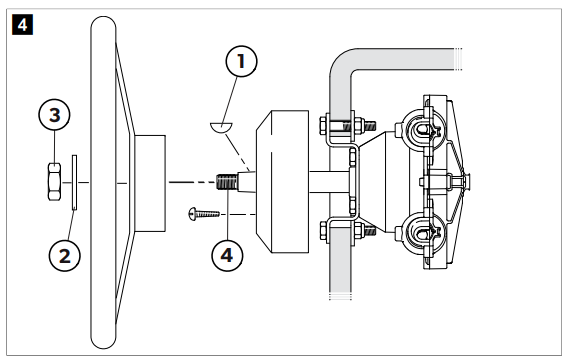
- Woodruff key, no. 9
- Flat washer, 5/16 in ID
- Locknut, ½–20
- Helm steering shaft
- Apply marine grease to the helm steering shaft.
- Insert the Woodruff key into the slot in the helm steering shaft.
- Slide the steering wheel over the helm steering shaft, aligning the keyway with the Woodruff key.
- Position the flat washer on the helm steering shaft.
- Thread the locknut on the helm steering shaft.
- Torque to a minimum of 240 in·lb (27.116 Nm). Do not exceed 320 in·lb (36.155 Nm).
- Turn the steering wheel to the right and then to the left. Check to make sure the steering moves smoothly and without any problems.
Operation
- If the steering cable feels stiff when used, the cable is not safe to operate. Replace the cable immediately.
- Tighten or replace any loose or missing fasteners before operating the boat.
- Do not cover any cracks in the steering cable with tape or other sealants. Doing so might lead to the cable failing suddenly and without warning.
Loss of steering control hazard
The engine can be over-trimmed, causing the steering torque to increase so much that the steering wheel becomes impossible to turn, even if you don’t feel the torque at the wheel. This might make the steering feel locked. This situation can happen when jack plates are used to raise the engine on the transom. The only way to fix this is by either lowering the boat speed or adjusting the engine trim to a less extreme position. Until you fully understand how the boat and power trim work together, be very careful when making trim adjustments.
Unsafe boat operation hazard
Failure to obey the following warnings could result in death or serious injury. Do not use the boat if any part is not working correctly. Do not let anyone who is not familiar with the controls (like the steering, shi, throttle, etc.) operate the boat.
Keep the following guidelines in mind when using the system
- Make sure the steering wheel responds right away when turned.
- Look for any parts that are stuck, loose, worn out, or damaged. If any are found, fix or replace them.
- Inspect the steering cable for stiffness, cracks, or any other damage. If any issues are found, replace the steering cable.
Cleaning and maintenance
Loss of steering control
- Keep all moving parts clean and free from salt buildup or other foreign materials. These can affect how they work and may cause steering problems.
Damage hazard
- Do not use acetone or cleaners that contain ammonia, acids, or other corrosive ingredients on any steering components.
- Some cleaning products made for fiberglass hulls can strongly corrode stainless steel shafts. If you use a hull cleaning agent, be careful not to spray the cleaning agent on the steering system. If any spray gets on the steering system, rinse the spray off right away with fresh, clean water.
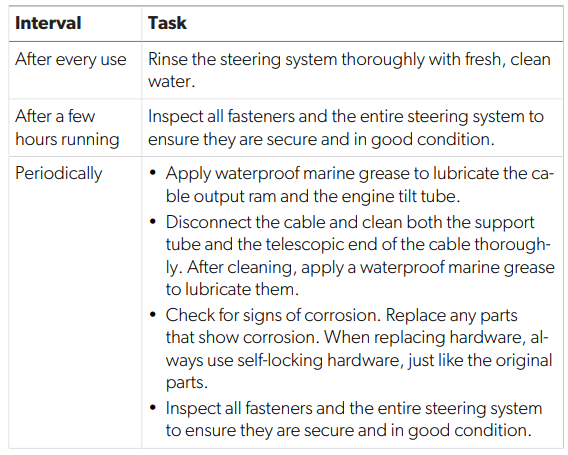
Maintenance schedule
Table 1
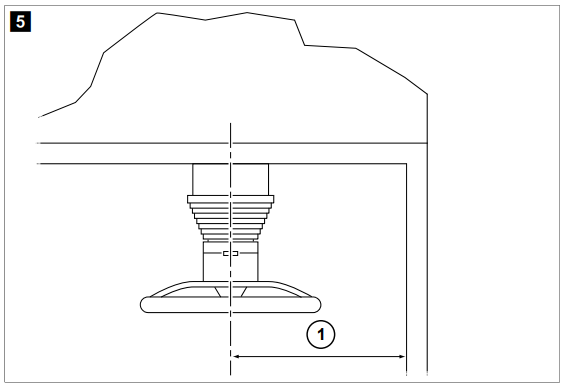
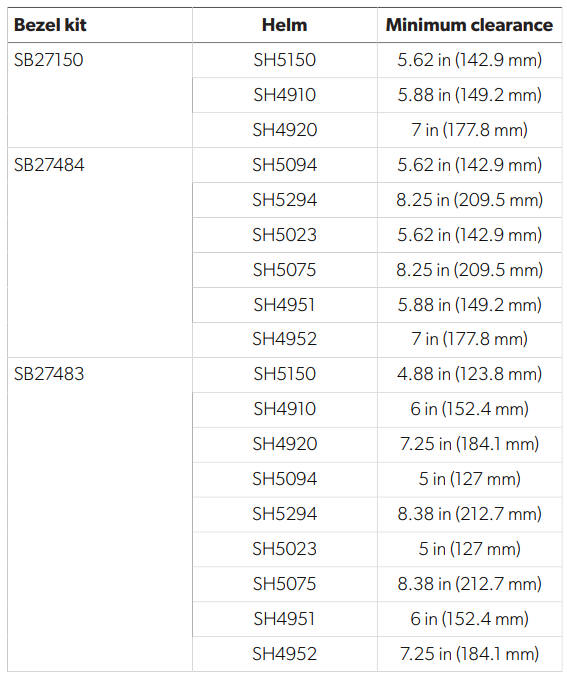
Minimum clearances
A minimum horizontal clearance of 12 in (304.8 mm) is required from the gunwale to the center of the helm steering shaft.
12 in (304.8 mm)
The minimum clearances for the bezel installation depend DOMETIC SB27150 90 Degree Bezel Kit Installation on the bezel kit and helm models.
90° Bezel (SH5150 shown)
- Minimum clearance
- 4 in (101.6 mm)
20° Bezel (SH5150 shown)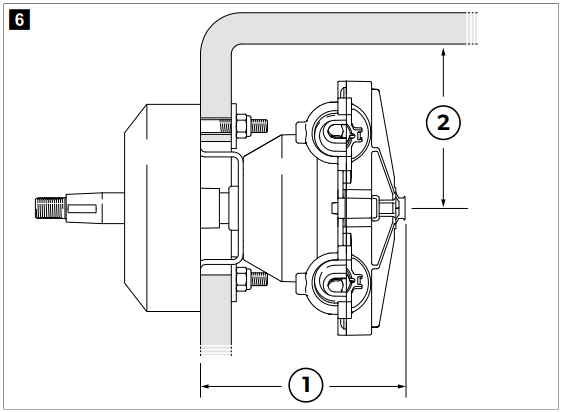
- Minimum clearance
- 2 in (50.8 mm)
- Inside corner of the dash
Warranty
Refer to the sections below for information about warranty and warranty support in the US, Canada, and all other regions.
Disposal
Place the packaging material in the appropriate recycling waste bins, wherever possible. Consult a local recycling center or specialist dealer for details about how to DOMETIC SB27150 90 Degree Bezel Kit Installation dispose of the product in accordance with the applicable disposal regulations.
Customer Service
SPAIN
- Address: Dometic Spain S.L. Avda. Sierra del Guadarrama, 16 E-28691 Villanueva de la Cañada Madrid
- Call: 8 +34 900 100 245.
- Email: info@dometic.es
GERMANY
- Address: Dometic WAECO International GmbH Hollefeldstraße 63 • D-48282 Emsdetten
- Call: 9 +49 (0) 2572 879-195
- Email: info@dometic-waeco.de
FRANCE
- Address: Dometic SAS ZA du Pré de la Dame Jeanne B.P. 5 F-60128 Plailly
- Call: +33 344633518
- Email: vehiculesdeloisirs@dometic.fr
AUSTRALIA
- Address: Dometic Australia Pty. Ltd. 1 John Duncan Court • Varsity Lakes QLD 4227
- Call: 8 +61 7 55076001|
- Email: sales@dometic-waeco.com.au
FAQs
What is the purpose of the SB27150 90 Degree Bezel Kit?
When installing Dometic ventilation equipment at a DOMETIC SB27150 90 Degree Bezel Kit Installation 90-degree angle, the SB27150 bezel kit is made to offer a neat, safe, and expert finish, enhancing both airflow and visual appeal.
Which Dometic models is this bezel kit compatible with?
A variety of Dometic refrigeration and ventilation systems that need a 90-degree mounting solution can be installed with this bezel kit. Consult the product handbook to confirm compatibility with your particular model.
How do I properly align the bezel during installation?
Make sure the bezel is perfectly aligned at a 90-degree angle and flush with the mounting surface. Before fastening screws, ensure accurate alignment using an angle guide or carpenter’s square.
Is the bezel kit waterproof or weather-resistant?
When installed properly, the SB27150 bezel assembly offers a sealed fit and is suited for outdoor use. For better protection, more waterproof sealant should be applied around the edges.
Can I install this bezel kit myself, or should I hire a professional?
Self-installation is feasible if you are familiar with basic do-it-yourself projects and can follow directions. If in doubt, seek advice from a qualified installer, particularly when it comes to electrical or ventilation connections.
Can the bezel kit be rotated or adjusted after installation?
The bezel is designed to be installed at a fixed 90-degree angle. Screws may need to be loosened and resecured for adjustments made after installation, which could compromise the seal.
Where can I find the full installation manual?
The product box contains all of the installation instructions. Alternatively, you can obtain the PDF handbook from the official Dometic website.
Can I purchase replacement parts for the bezel kit?
Yes, authorised Dometic dealers and their online site sell replacement screws and mounting accessories.