
EPSON EB-PU2220B Ansi Lumen Projector

Introduction
Epson periodically provides firmware updates to enhance your projector’s features and to address issues of performance. Refer to these sections to learn more about the updated features within each firmware version.
Related Links
- Features of Firmware Version 1.04″ p.4
- Features of Firmware Version 1.05″ p.5
- Features of Firmware Version 2.00″ p.6
- Features of Firmware Version 2.50″ p.7
- Features of Firmware Version 2.60″ p.8
Features of Firmware Version 1.04
Refer to the section for a summary of the updated features of projector firmware version 1.04.
Related Links
- Updates to Supported Optional Accessories (Version 1.04)” p.4
Updates to Supported Optional Accessories (Version 1.04)
Version 1.04 firmware supports the following optional accessories in addition to the existing optional accessories.
- Lens units ELPLU03, ELPLW05, ELPLM0,8 and ELPLM09 are available with your projector.
Features of Firmware
Updates to Projector Menus (Version 1.05)
The following projector menus change in firmware version 1.05.
- 21:9 has been added to the Screen Type menu from Extended > Display > \Screen.
- 3440×1440 and 2560×1080 have been added to the EDID menu from Signal Advanced.
Features of Firmware Version 2.00
Refer to the section for a summary of the updated features of projector firmware version 2.00.
Related Links
- Updates to Supported Software (Version 2.00)” p.6
- Updates to Projector Menus (Version 2.00)” p.6
- Updates to User Operations (Version 2.00)” p.6
Updates to Supported Software
Version 2.00 firmware supports the following software in addition to the existing optional software available for your projector.
- Epson Projector Professional Tool Version 1.5
Sethe e Epson Professional Projector Tool Operation Guide for more details.
Updates to Projector Menus (Version 2.00)
The following projector menus change in firmware version 2.00.
- The Group Tiling menu has been added to the Extended > Multi-Projection menu, and the menu hierarchy for Projector Grouping, Tiling, and Scale has been changed.
- The Simple Blending setting has been added to Extended > MultiProjection.
Updates to User Operations
The following projector operations change in firmware version 2.00.
- Stacking & Blending has been added to the projected image composition method using the Epson Projector Professional Tool software.
- When compositing projected images using the camera assist feature in the Epson Projector Professional Tool software, curved surfaces are now supported in addition to flat surfaces.
- You can create a horizontally wide screen image projected from two projectors using the optional external camera.
Firmware Version 2.50
Refer to the section for a summary of the updated features of projector firmware version 2.50.
Related Links
- Updates to Supported Software (Version 2.50)” p.7
- Updates to User Operations (Version 2.50)” p.7
Supported Software (Version 2.50)
Version 2.50 firmware supports the following software in addition to the existing optional software available for your projector.
- Epson Projector Professional Tool Ver. 1.52 See Epson Professional Projector Tool Operation Guide for more details.
Features of Firmware Version 2.60
Refer to the section for a summary of the updated features of projector firmware version 2.60.
Related Links
- Updates to Supported Software (Version 2.60)” p.8
- “Updates to Projector Menus (Version 2.60)” p.8
Updates to Supported Software (Version 2.60)
Epson Projector Management
- Explanations in the User’s Guide have been updated.
Related Links
- Epson Projector Management” p.18
Updates to Projector Menus (Version 2.60)
The following projector menus have changed in firmware version 2.60:
- The EPMC Monitoring Control menu has been added to the Network menu.
- The Monitor Password setting has been added to the Network > Network Configuration > Basic menu.
- The explanation in the User’s Guide regarding the Network > Network Configuration > Others > Command Communication setting has been updated.
- The Crestron XiO Cloud setting has been added to the Network > Network Configuration > Others menu.
Related Links
- “EPMC Monitoring Control” p.19
- Monitor Password” p.19
- Command Communication” p.19
- Crestron XiO Cloud” p.20
Details of Updated Firmware
Check these sections for the updated details of the firmware.
Related Links
- Details of Updated Optional Accessories (Version 1.04)” p.10
- Details of Updated Projector Menus (Version 1.05)” p.12
- Details of Updated Projector Menus (Version 2.00)” p.13
- Details of User Operation Change (Version 2.00)” p.14
- Details of User Operation Change (Version 2.50)” p.17
- Details of Supported Software Update (Version 2.60)” p.18
- Details of Updated Projector Menus (Version 2.60)” p.19
Details of Updated Optional Accessories (Version 1.04)
Refer to these sections for more details about newly supported optional accessories.
Related Links
- ELPLU03, ELPLW05, ELPLM08 and ELPLM09 Support” p.10
ELPLU03, ELPLW05, ELPLM08 and ELPLM09 Support
You can use lens units ELPLU03, ELPLW05, ELPLM0,8 and ELPLM09 with your projector when you update the firmware to version 1.04. Refer to Specifications for the technical details of lenunitsit ELPLU03, ELPLW05, ELPL, M08, and ELPLM09.
Related Links
- Hazard Distance according to IEC624,1-5″ p.10
Hazard Distance according to IEC62471-5
When using projectors and interchangeable lenses that change to Risk Group 3, no direct exposure to the beam is permitted. Operators must control access to the beam within the hazard distance or install the product at a height that will prevent eye exposure within the hazard distance. Looking into the lens at distances closer than those indicated here can cause damage to eyesight.
EB‑PU2220B/EB‑PU2120W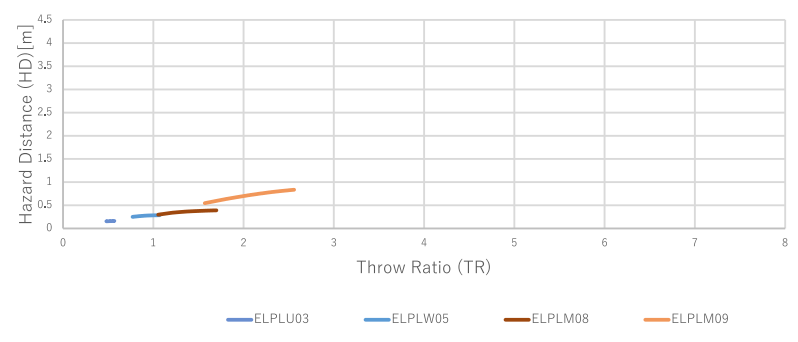 EB‑PU2216B/EB‑PU2116W
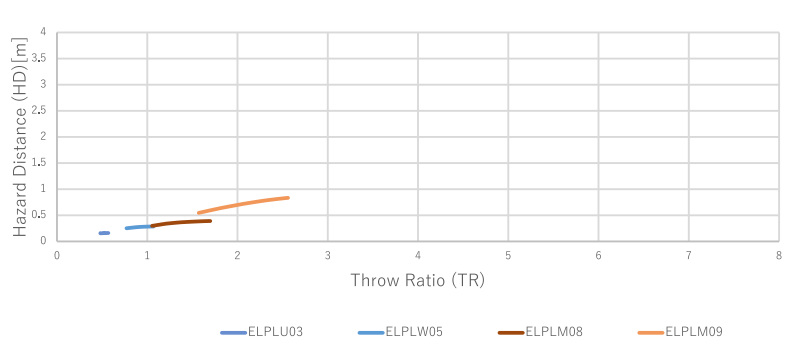
Details of Updated Optional Accessories (Version 1.04)
EB‑PU2213B/EB‑PU2113W: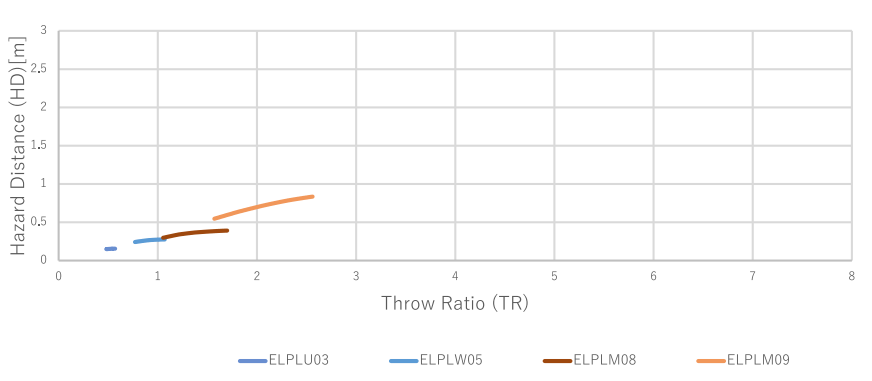
Details of Updated Projector Menus (Version 1.05)
Refer to these sections for details about projector menu changes.
Related Links
- 21:9 Support for Screen Type and EDID” p.12
Support for Screen Type and EDID
21:9 has been added to the Extended > Display > Screen > Screen Type setting,g and EDID for this screen type has been added to the Signal > Advanced > EDID setting. This is useful for video meetings using Microsoft Teams Rooms with Front Row layout.
Previous Settings Menu (Version 1.04)
New Settings Menu (Version 1.05)
 Details of Updated Projector Menus (Version 2.00)
Refer to these sections for details about projector menu changes.
Related Links
- Group Tiling” p.13
- Simple Blending” p.13
Group Tiling
The Group Tiling menu has been added to the Extended > Multi-Projection menu, and the menu hierarchy for Projector Grouping, Tiling, and Scale has been changed.
Previous Multi-Projection Menu (Version 1.05)
- Extended > Multi-Projection > Projector Grouping
- Extended > Multi-Projection > Tiling
- Extended > Multi-Projection > Scale
New Multi-Projection Menu (Version 2.00)
- Extended > Multi-Projection > Group Tiling > Projector Grouping
- Extended > Multi-Projection > Group Tiling > Tiling
- xtended > Multi-Projection > Group Tiling > Scale
Simple Blending
- The Simple Blending setting has been added to Extended > Multi-Projection.
Location Setup
- Sets the position of the primary projector.
Whole Screen Aspect
- Sets the screen aspect ratio after combining
Start Auto Adjustment
- Automatically adjusts the projected image using the external camera.
Screen Matching
- Corrects the tint and brightness of each projected image.
Details of User Operation Change (Version 2.00)
Refer to these sections for details on changes to user operations.
Related Links
- Stacking & Blending Using the Epson Projector Professional Tool Software” p.14
- Curved Surface Correction Using the Epson Projector Professional Tool Software” p.14
- Simple Blending Using the Projector’s Menu and the Optional External Camera” p.15
Stacking & Blending Using the Epson Projector Professional Tool Software
Stacking & Blending has been added to the projected image composition method using the Epson Projector Professional Tool software. You can use the Geometry Assist – Stacking & Blending Function wizard to easily and quickly create a single large, bright, projected image by joining and overlapping the images of multiple projectors. See the Epson Professional Projector Tool Operation Guide for more details.
- Start the Epson Projector Professional Tool software.
- Create a group of projectors that support Stacking & Blending on the Layout/Monitoring tab.
- Select Blending and Stacking Settings on the Create Group screen.
- Specify the projectors’ positions in the Blending and Stacking Settings.
- Start the Geometry Assist – Stacking & Blending Function wizard.
- When the wizard has finished, perform the following operations as necessary:
- Screen Matching to correct the tint and brightness of each projected image.
- Point Correction to adjust the gaps in the positions of the projected\ image.
Curved Surface Correction Using the Epson Projector Professional Tool Software. When compositing projected images using the camera assist feature in the Epson Projector Professional Tool software, curved surfaces are now supported in addition to flat surfaces.
Previous Image Composition (Version 1.05)
When compositing projected images using the camera assist feature in the Epson Projector Professional Tool software, only flat surfaces are supported.
New Image Composition (Version 2.00)
When compositing projected images using the camera assist feature in the Epson Projector Professional Tool software, the following functions now support curved surfaces.
- Screen Matching (convex surfaces are not supported)
- Color Calibration
- Blending
- Stacking
- Stacking & Blending See Epson Professional Projector Tool Operation Guide for more details
Details of User Operation Change (Version 2.00)
Check the following points when using the camera assist feature to correct
images projected onto a curved surface.
- All projectors in the group must support the Curved Surface Correction feature.
- Before using this software to automatically adjust the projected image, determine the position of linearity for the entire screen, and attach stickers or other markers to the screen to mark the linearity adjustment.
- Attach the stickers for linearity adjustment at equally spaced gaps on the projection surface.
- When correcting the shape using the Geometry Assist wizard, align the number and position of the correction points with the stickers for linearity adjustment.
You can use the simple blending feature under the following conditions:
- The illuminance ratio on the screen surface when projecting an all-white screen and when projecting an all-black screen is 8:1 or more. (When the screen illuminance is 40 lux or less, we recommend using projection sizes within the following ranges for each projector.)
- Up to 9.9 Klm: 50 to 200 inches
- 10 Klm to 14.9 Klm: 60 to 300 inches
- 15 Klm to 19.9 Klm: 70 to 350 inches
- 20 Klm to 24.9 Klm: 80 to 400 inches
- 25 Klm to 29.9 Klm: 90 to 450 inches
- 30 Klm: 100 to 500 inches
- The original resolution of all theprojectorsr ithe s same. (except for screen matching)
- Projection in the projector’s Extended menu is set to Front or Front/ Ceiling for all projectors.
User Operation Change (Version 2.00)
Refer to these sections for details on changes to user operations.\
Related Links
- “Stacking & Blending Using the Epson Projector Professional Tool Software” p.14
- “Curved Surface Correction Using the Epson Projector Professional Tool Software” p.14
- “Simple Blending Using the Projector’s Menu and the Optional External Camera” p.15
Stacking & Blending Using the Epson Projector Professional Tool Software
- Start the Epson Projector Professional Tool software.
- Create a group of projectors that support Stacking & Blending on the Layout/Monitoring tab.
- Select Blending and Stacking Settings on the Create Group screen.
- Specify the projectors’ positions in the Blending and Stacking Settings.
- Start the Geometry Assist – Stacking & Blending Function wizard. When the wizard has finished, perform the following operations as necessary:
- Screen Matching to correct the tint and brightness of each projected image.
- Point Correction to adjust the gaps in the positions of the projected image.
Operation Change (Version 2.50)
Refer to these sections for details on changes to user operations.
Related Links
- Selecting the Image Aspect (Camera Assist V150)” p.17
- Overshoot Light (Camera Assist V150)” p.17
Selecting the Image Aspect (Camera Assist V150)The
Geometry Assist wizard for the Epson Projector Professional Tool is now available even when the input video aspect ratio is 16:9.
Previous version (Version 2.00)
Geometry Assist wizard for the Epson Projector Professional Tool only supported 16:10.
New version (Version 2.50)
The following function of Geometry Assist supports the 16:9 video aspect in addition to 16:10.
- Stacking
- Blending (horizontal direction only)
- Stacking & blending (horizontal direction only)
Overshoot Light (Camera Assist V150)
Epson Projector Professional Tool’s Geometry Assist wizard now supports overshoot light. The projected images can be automatically adjusted even when the projected image extends onto the wall adjacent to the wall of the target projection area.
Refer to these sections for details about the supported software update.
Related Links
- Epson Projector Management” p.18
Epson Projector Management
The explanation in the User’s Guide regarding the authentication method when registering projectors has been updated.
Previous Version (Version 2.50)
Epson Projector Management software (Windows only) lets you monitor and control your projector through the network. See the Epson Projector Management Operation Guide for instructions. You can download Epson Projector Management from the following website. epson.sn
New Version (Version 2.60)
Epson Projector Management software (Windows only) lets you monitor and control your projector through the network. See the Epson Projector Management Operation Guide for instructions. You can download Epson Projector Management from the following website. epson.sn
The authentication method when registering projectors varies depending on the version of the Epson Projector Management software you are using.
- Epson Projector Management Ver. 5.30 or earlier: Monitor Password
- Epson Projector Management Ver. 5.40 or later: Web Control Password. For the best results, we recommend that you use the latest version of the Epson Projector Management software.
Related Links
- Command Communication” p.19
Details of Updated Projector Menus (Version 2.60)
Refer to these sections for details about projector menu changes.
Related Links
- EPMC Monitoring Control” p.19
- Monitor Password” p.19
- Command Communication” p.19
- Crestron XiO Cloud” p.20
EPMC Monitoring Control
- The EPMC Monitoring Control menu has been added to the Network menu.
- Previous Network Menu (Version 2.50)
- No setting is available.
New Network Menu (Version 2.60)
sNetwork > EPMC Monitoring Control Set EPMC Monitoring Control to On and make the necessary settings to directly communicate with the Epson Projector Management Connected cloud server, not through the Epson Projector Connected Agent. See the Epson Projector Management Connected Operation Guide for more details. https://www.projection-service.epson.com/pages/epm-connected/onlinemanual/web-front/EN/index.html
Monitor Password
- The Monitor Password setting has been added to the Network > Network Configuration > Basic menu.
Previous Basic Menu (Version 2.50)
- No setting is available.
Basic Menu (Version 2.60)
sNetwork > Network Configuration > Basic > Monitor Passwor.d This is useful for monitoring and controlling projectors with a switcher, a system controller, or using Epson Projector Management Ver. 5.30 or earlier. (No password is set by default.)
- This setting is available only when Command Communication is set to Compatible. sNetwork > Network Configuration > Others > Command Communication
- Make sure that the Monitor Password matches the password set for the switcher or the system controller.
- Enter up to 16 alphanumeric characters (do not use spaces or any symbols other than @).
Command Communication
The explanation in the User’s Guide has been updated. Previous Version (Version 2.50) sNetwork > Network Configuration > Others > Command. You can select the authentication method for command communication.
Protected
Select when performing a digest authentication using Web Control Password. You need to install the latest version of the Epson Projector Management software.
Compatible
Select when performing plain text authentication using the Monitor Password (up to 16 alphanumeric characters long).
- Select Compatible when monitoring projectors with a switcher and a system controller or using Epson Projector Management Ver. 5.30 or earlier.
- Make sure that the Monitor Password matches the password set for the switcher or the system controller. sNetwork > Network Configuration > Basic > Monitor Password
Crestron XiO Cloud
The Crestron XiO Cloud setting has been added to the Network > Network Configuration > Others menu.
Appendix
Refer to these sections for important notices.
Related Links
- Notices” p.22
Notices
Check these sections for important notices.
Related Links
- Copyright Notice” p.22
- Trademarks” p.22
- Copyright Attribution” p.22
Limited Warranty
Limited Warranty for Epson® Products
Epson products are covered by warranty against defects in workmanship and materials when operated under normal use and handling conditions, as indicated in the product documentation, for the period specified in the section “Epson Limited Warranty Coverage.” Coverage begins as of the date of delivery to the purchaser by Epson or by an authorized Epson dealer, in the country of purchase. Epson also guarantees that the consumables (batteries, filters, and lenses) included with the product will perform according to the usage specifications as long as they are used before the expiration of their warranty period.
Scope of Warranty
Should Epson receive notice of a defect during the warranty period, it may, at its discretion, repair or replace the defective product at no cost to the purchaser. In the event of a replacement, the replaced equipment will become the property of Epson. The replaced item may be new or previously repaired to the Epson standard of quality, and will assume the remaining warranty period of the product that was originally purchased. This warranty does not include any compensation or damages whatsoever, resulting fromthe operating failures of the Epson product.
Limitations and Exclusions
The warranty will be invalid in the following cases:
- When the damage resulted from the use of refilled supplies or consumables.
- When damages resulted from inappropriate tests, installation, maintenance, or adjustments.
- When damages resulted from the inappropriate transport of the equipment (packaging, installation, maintenance, transportation).
- When damages were caused by natural or intentional disasters (fire, floods, lightning, earthquakes, etc.), power surges, or interaction with other brand products.
How to Obtain Warranty Service
Furthermore, in order for the unit to operate optimally, always use original Epson supplies and consumables. If there are no Authorized Service Centers in your area, call the Technical Assistance Center for service referral.
Responsibilities of Purchaser
The purchaser is responsible for the safety of all confidential and proprietary information stored on the product, as well as for recovering backup files in case of damage. This also applies if the failure was the result of a defect in the purchaser’s proprietary software or of a computer “virus.”
Other Provisions
- Other Rights You May Have: This Epson limited warranty gives you specific legal rights, and you may also have other rights, which vary from jurisdiction to jurisdiction.
- Governing Law: Except for claims subject to arbitration pursuant to Section 6 “ARBITRATION”, you and Epson agree that the law of the state or country where you reside shall govern.
- Jurisdiction: Except for claims subject to arbitration pursuant to Section 6 “ARBITRATION”, in the event odisputesput, you and Epson both consent to the jurisdiction of the courts in your state of residence or, if you do not reside in a state, then of the courts in Orange County, California.
Epson Limited Warranty Coverage
Technical Support Service and Support
Epson offers technical assistance through electronic and telephone services. Before calling Epson, refer to the documentation included with your product.
Extended Warranty Service and Support
To be eligible for one (1) additional year of limited warranty (for a total of two (2) years), you must register your product at http://latin.epson.com/registro within 30 days of the purchase date, that is, from the date of the original purchase invoice.
Copyright Notice
Neither Seiko Epson Corporation nor its affiliates shall be liable to the purchaser of this product or third parties for damages, losses, costs, or expenses incurred by the purchaser or third parties as a result of: accident, misuse, or abuse of this product or unauthorized modifications, repairs, or alterations to this product, or (excluding the U.S.) failure to strictly comply with Seiko Epson Corporation’s operating and maintenance instructions.
Seiko Epson Corporation shall not be liable against any damages or problems arising from the use of any options or any consumable products other than those designated as Original Epson Products or Epson Approved Products by Seiko Epson Corporation.
Trademarks
Windows and Microsoft Teams are trademarks or registered trademarks of Microsoft Corporation in the United States and/or other countries. Mac and macOS are trademarks of Apple Inc. Crestron XiO Cloud® is a registered trademark of Crestron Electronics, Inc. Other product names used herein are also for identification purposes only and may be trademarks of their respective owners. Epson disclaims all rights in those marks. Software Copyright: This product uses free software as well as software to which this company holds the rights.
Copyright Attribution
This information is subject to change without notice. © 2023 Seiko Epson Corporation Rev.3.0 2024.12 EN
Customer Service
- Website: https://epson.com/
- Ph: 800-087-1080