
![]()
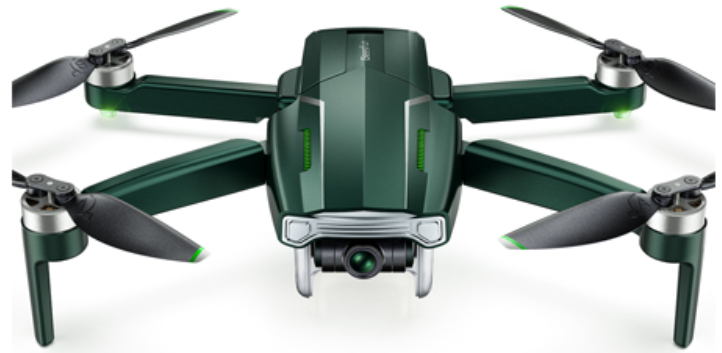
Gleesfun G11PRO 6K Auto Return Camera Drone
Safety Instructions
- Allow Gleesfun Fly to access your location. Otherwise, features like Follow Me won’t function.
- Correctly set up the options that appear after connecting the data cable to the Gleesfun Fly.
- Grant permissions for other functions, such as photo album access and recording.
- The maps used in the map interface need to be downloaded from the internet.
- Before using this feature, connect your mobile device to the internet to cache the map data.
- Please download the correct app, Gleesfun Fly, to ensure proper operation with the aircraft.
- When using the Gleesfun Fly App on your phone, keep your device running smoothly by closing any unnecessary background apps.
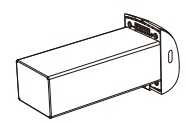
Accessories Support
Battery
Propellers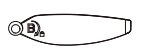
Remote Controller
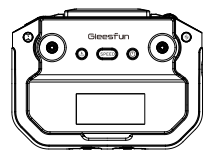
All of the above accessories can be purchased by searching on Amazon and visiting the Gleesfun store. Be sure to use only original manufacturer parts. Using non-original parts may pose a risk to the safe operation of the aircraft.
Other
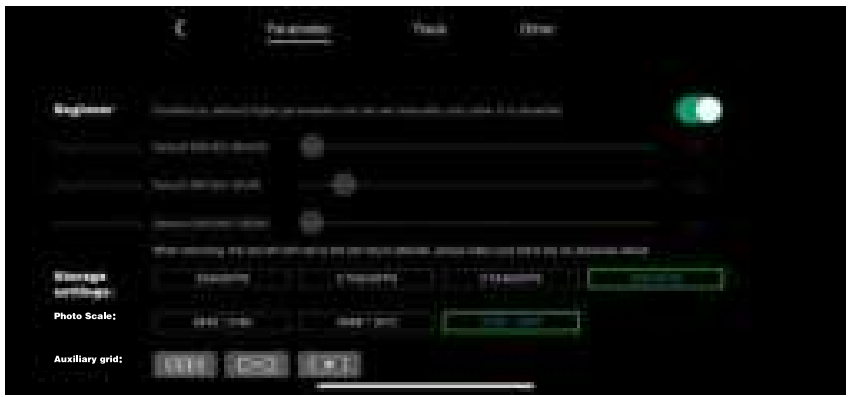
- Unit: Switch between metric and imperial measurement units.
- Voice prompt: Turn the app’s voice prompts for aircraft status on or off.
- Drone Information Display: Shows the app version, Wi-Fi version, and ID number.
Flight
After installing and preparing the product, please first complete flight training or practice (we recommend doing this in beginner mode). Choose an appropriate flying environment. The aircraft has a maximum flight altitude of 120 meters.
Flight Environment Requirements
- Do not fly in severe weather conditions such as strong winds, snow, rain, or fog.
- It is recommended to fly in an open space with at least a 33ft (10m) radius free of obstructions. Flying at an altitude greater than 49ft (15m) is suggested to avoid ground obstacles and signal interference.
- Keep the aircraft within line of sight during flight, and stay clear of obstacles and crowds.
- When flying over water, maintain a distance of at least 9.8ft (3 meters) from the surface.
- Control signals can be disrupted by high-voltage power lines, communication towers, or transmission towers. Avoid flying near these areas.
- When GPS is active, the aircraft can achieve stable hovering, smart return-to-home, and smart flight functions. Without GPS, these functions will not work, and the aircraft may drift with the wind and fail to hover.
Pre-Flight Checklist
- Ensure that the remote controller, smart flight battery, and mobile device have sufficient power.
- Make sure the aircraft’s arms are fully extended.
- Make sure GPS is enabled to avoid losing signal, and fly outdoors in an open area.
- Check that the data cable connecting the remote controller and mobile device is securely installed.
- After powering on, verify that all four motors start normally and that their speeds are consistent.
- If replacing parts, always use original manufacturer components.
Connect the Data Cable
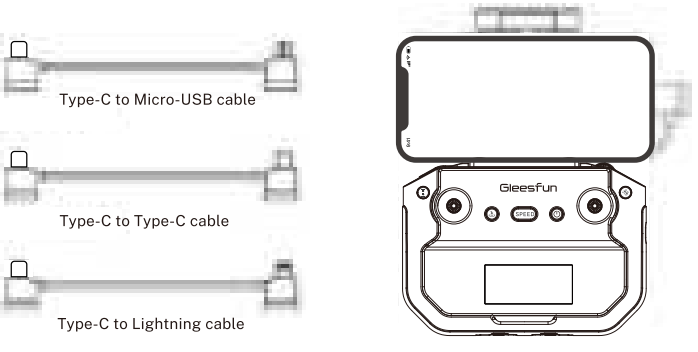
- Select the appropriate data cable.
- Use the data cable to connect the remote controller to the mobile device.
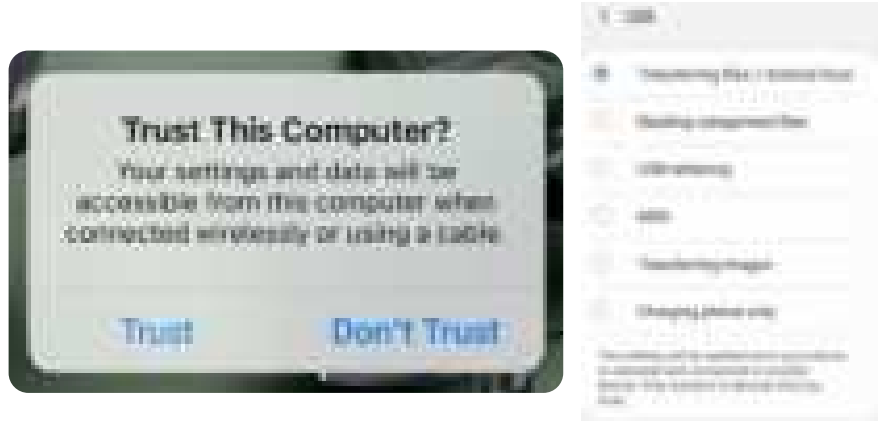
- Open the Gleesfun Fly App and allow pop-up permission requests.
- Enter the operating interface. If you see the aircraft’s live video feed, the connection is successful.
- Set the USB options correctly when prompted: On Android devices, select ‘Transferring Files /Android Auto’; on iPhones, select ‘Trust’.

- On some Android devices, USB settings are hidden in the Developer Options. You need to enable Developer Mode and then change ‘Default USB Configuration’ to ‘File Transfer’ (the method to enable Developer Mode varies by phone model; you can find specific instructions by searching Google).
- The remote controller does not support fast charging for mobile devices. Please check the battery level of your mobile device before use.

Compass Calibration
If the aircraft is flying in an environment with significant interference or if you experience unusual behavior indicating possible loss of control, you can check the compass interference level using the app. Perform a compass calibration to address this issue. The main purpose is to prevent sensor interference from causing abnormalities, which could lead to loss of control and potential crashes.
Calibration Steps
Short-press to enter compass calibration.
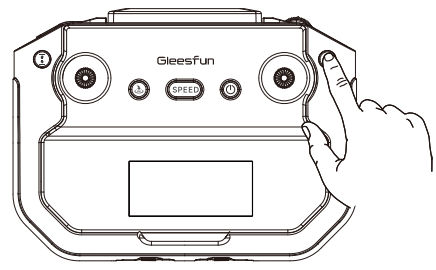
- Extend the aircraft’s four arms and place it on a flat, open surface.
- Turn on the aircraft and the remote controller, and ensure they are paired successfully.
- Open the app to see the calibration guide animation.
- Press the compass calibration button on the remote controller; the aircraft’s lights will start flashing quickly.
Horizontal Calibration
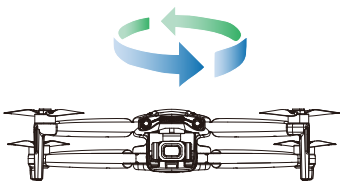
Follow the app’s instructions: Hold the aircraft at a height of 1 meter above the ground, rotate it horizontally 2-3 times until you hear a beep, and the app indicates that it’s time to begin vertical calibration.
Vertical Calibration
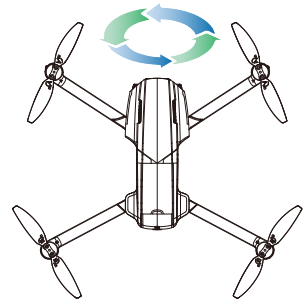
Hold the aircraft to a height of 1 meter above the ground with the camera facing up. Rotate the aircraft vertically 2-3 times until you hear a beep and the animation on the app interface stops. This indicates that the compass calibration is complete. The aircraft’s lights will return to their original state.
Gyroscope Calibration
Gyroscope Calibration Steps
- Ensure the aircraft is placed on a level surface with enough space below the camera.
- Push both the left and right control sticks to the ‘5 o’clock position simultaneously.
- The aircraft’s lights will flash quickly, indicating that automatic horizontal calibration is in progress.
- When the app calibration prompt disappears and the lights return to their original state, calibration is complete.
Starting the Motors
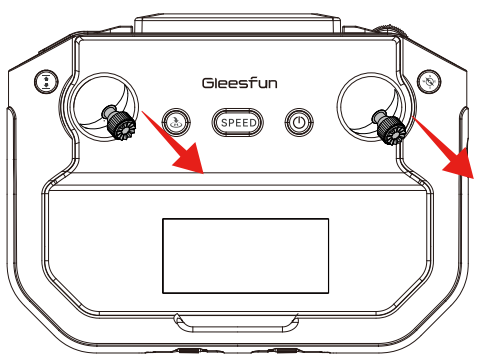
Method 1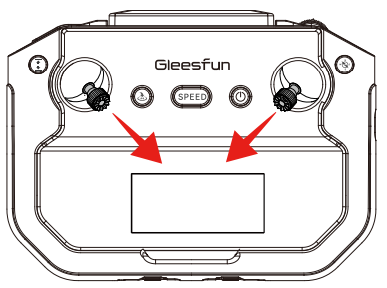
- Push the joysticks to the 5 o’clock and 7 o’clock positions simultaneously. Once the motors start, immediately release the joysticks.
Method 2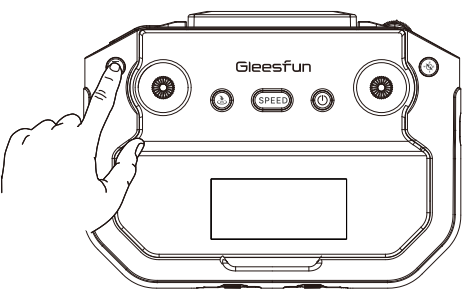
- When the motors are not running, press and hold the takeoff/landing button on the remote controller to start them.
Stopping the Motors
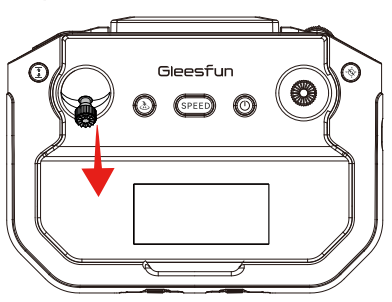
- Push the throttle stick to the lowest position and do not release it until the motor stops.
One-key Takeoff
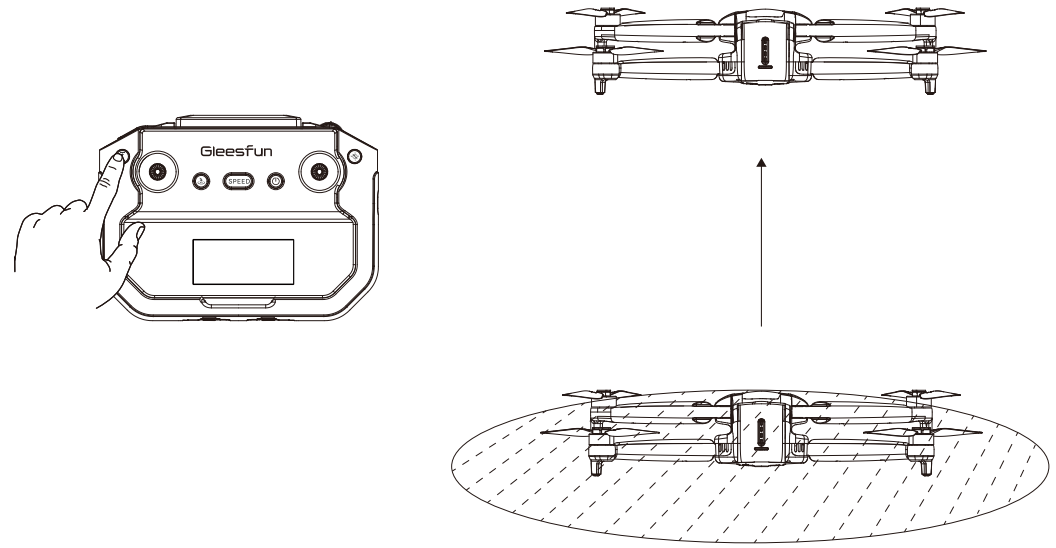
- Method 1
- After starting the motors, press and hold the takeoff/landing button * on the remote controller. The aircraft will take off automatically and hover at a distance of 4.9ft (1.5m) from the ground.
- Method 2
- Tap the one-key takeoff icon in the App, then swipe right in the pop-up window. The aircraft will take off automatically and hover at a distance of 4.9ft (1.5m) from the ground.
One-key Landing
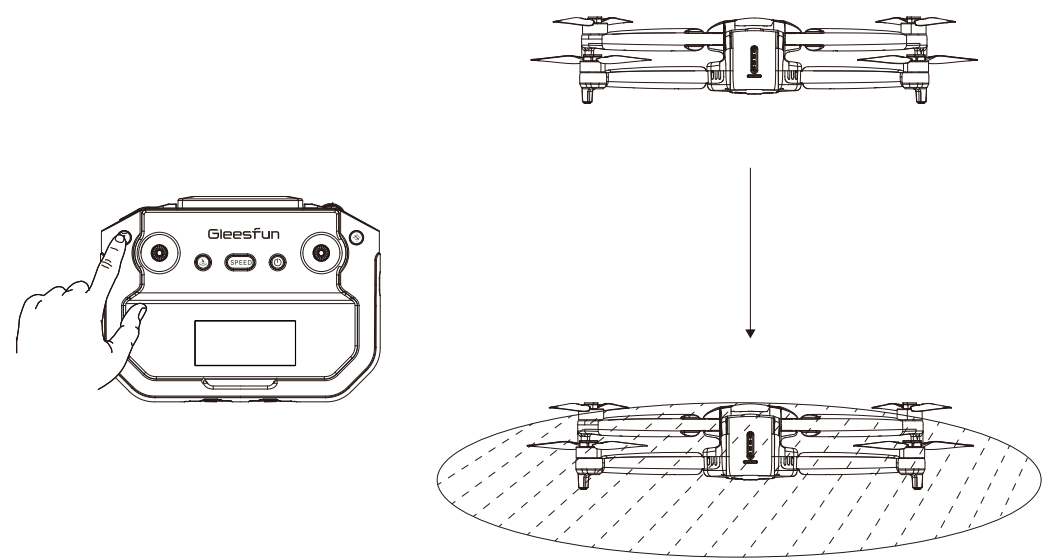
- Method 1
- After takeoff, press and hold the takeoff/landing button on the remote controller. The aircraft will land on the ground and stop the motors.
- Method 2
- Tap the one-key landing icon in the App, then swipe right in the pop-up window. The aircraft will land on the ground and stop the motors.
Return to Home (RTH)
- The G11PRO aircraft features a Return to Home (RTH) function in GPS mode when it has a strong GPS signal. This function returns the aircraft to the last recorded home point and lands it automatically. There are three types of RTH: Smart RTH, Low Battery RTH, and Lost Signal RTH.
Home Point Definition
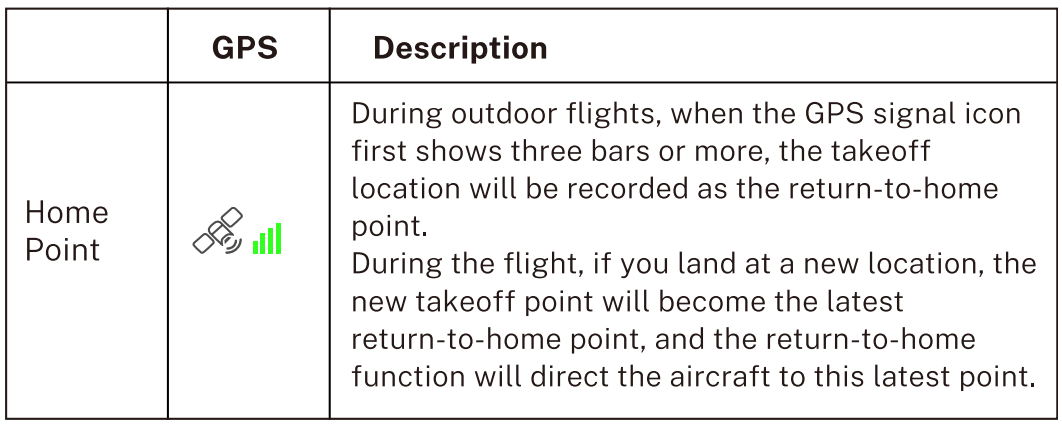
Smart RTH
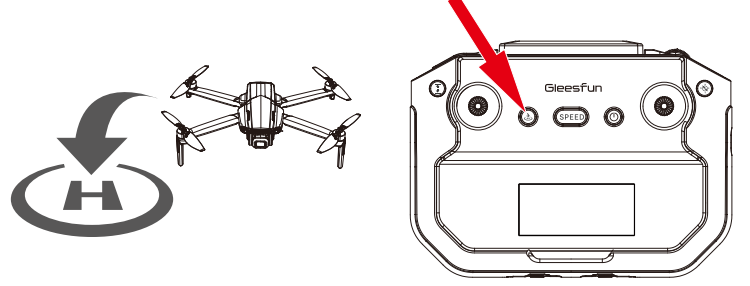
- When you need the aircraft to return home automatically, you can press the Smart Return-to-Home button on the remote controller or tap the return-to-home icon on the app interface to initiate automatic return.
- During the return-to-home process, pressing the button or tapping the icon again will cancel the return. After canceling Smart RTH, you can regain control of the aircraft.
- During the Smart RTH process, you can maneuver the aircraft to ascend or descend to avoid obstacles. You can also press the RTH button again to cancel the return.
Low Battery RTH
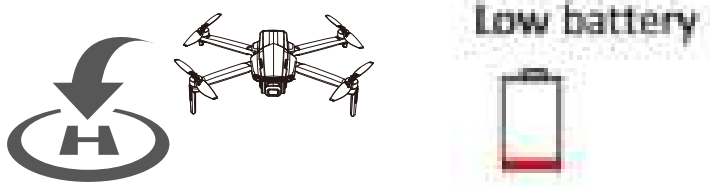
- When the smart flight battery is too low or there is not enough power to return home, the user should land the aircraft as soon as possible to avoid damage to the aircraft or other dangers.
- To prevent unnecessary dangers due to insufficient battery power, the Low Battery RTH function will be automatically triggered when the aircraft’s battery power is low.
- According to the remaining power after starting to return, there are 2 situations:
- First-level low battery:
- After the aircraft triggers the Low Battery RTH, it will automatically return to the Home Point and hover. After hovering, it can continue to fly within a 98ft (30m) radius at a height of 98ft (30m).
- Second-level low battery
- The aircraft will land directly on the ground.
- First-level low battery:
- When the aircraft’s battery is low, the remote controller will emit a sound. At First-level Low Battery, the remote controller will beep slowly. At Second-level Low Battery, the remote controller will beep rapidly.
Lost Signal RTH

- If the remote controller’s battery is low, turned off, or loses signal for 10 seconds, the aircraft will enter automatic return-to-home mode and return to the Home Point.
- If the remote controller reconnects during the RTH process and you wish to cancel the return, you can press the RTH button to cancel it.
- Lost Signal RTH process
- Record Home Point. (For information about the Home Point, refer to section 3.4.1.)
- Trigger RTH (triggered by low battery of remote controller, signal loss, etc.).
- After triggering the RTH, the aircraft adjusts the nose direction and starts to return home.
- The aircraft automatically flies to the Home Point, then starts to land, and completes the return.
Smart Flight
Route Planning
- The aircraft flies along the path marked on the App.
- G11PRO has four types of smart flight: Route Planning, GPS Follow, Fly Around, and Cruise Control.
- Make sure that the Gleesfun Fly App has been downloaded and installed on the phone.
- Make sure the map is loaded on the Gleesfun Fly App before taking off the aircraft.
- Take off the aircraft in GPS mode and ensure flight height is higher than the nearby obstructions.
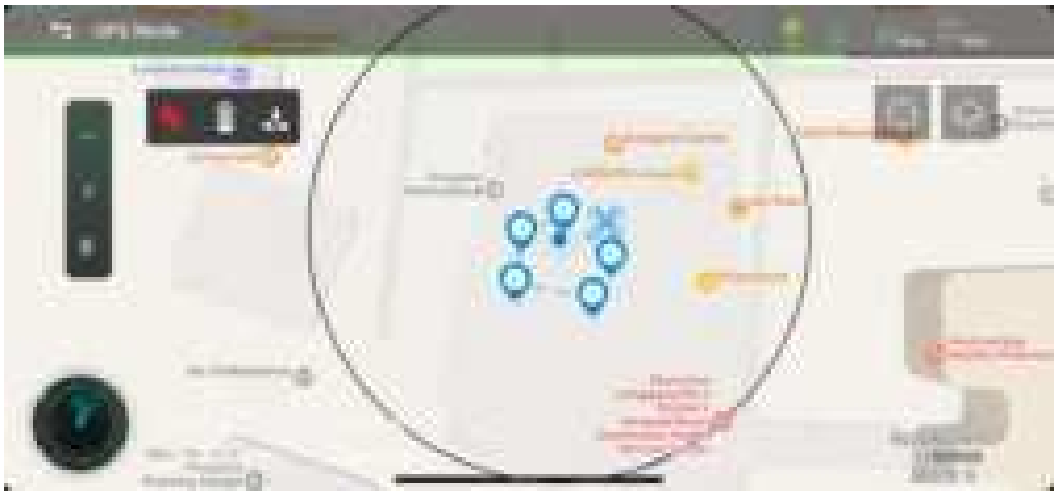
- Tap the icon(®3)on the app interface to start the Route Planning.
- You can find a red circle on the map (limited flight range). Mark the points (up to 10) that you plan to fly the aircraft along within the circle.
- Tap “Delete Single Point” or “Delete All” to reset the marked point.
- Confirm that the marked points are correct and tap “Go”. The aircraft will start waypoint flight.
- Push the right joystick to cancel the waypoint flight function.
GPS Flow
Aircraft will lock onto the user and can track the user’s movement as he moves.
- Make sure that the Gleesfun Fly App has been downloaded and installed on the phone. Connect your phone to the remote controller with the data cable, and enter the App operation interface.
- Take off the aircraft with a strong GPS signal and make sure the horizontal flight distance is 26.25ft-164.04ft (8m-50m). Tap the icon on the app interface to start the GPS Follow.
- Follow me mode is ready” will be displayed on the App interface, and the aircraft turns on the “GPS follow”. The aircraft will track your movements to fly. Tap the icon again to exit the GPS Follow.
Fly Around
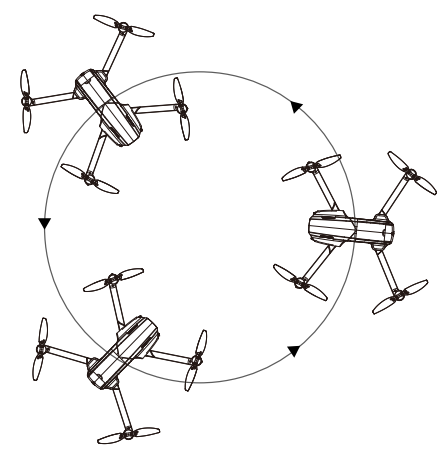
- The aircraft will fly around the target center point with a radius.
- Make sure that the Gleesfun Fly App has been downloaded and installed on the phone.
- Connect your phone to the remote controller with the data cable, and enter the App operation interface.
- Take off the aircraft in GPS mode and make it hover around the center point of the target.
- Tap the icon on the app interface to start the Fly Around.
- The aircraft will move backward 16ft (5m) (default orbit radius) and then use the position where the Fly Around function was initiated as the center to start the surrounding flight.
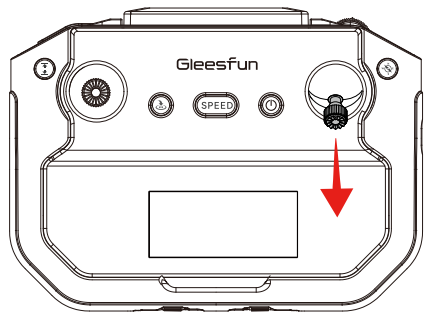
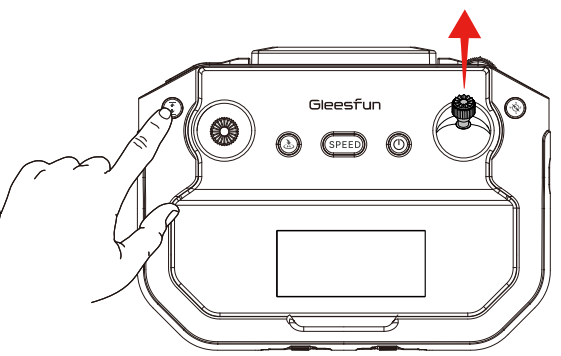
- During the surrounding flight, the pilot can adjust the surrounding radius using the joystick (the radius range can only be between 16ft (5m) and 328ft (100m). Pushing the joystick down will increase the surrounding radius, while pushing the joystick up will decrease the surrounding radius.
- By default, the aircraft performs a surrounding flight in a counterclockwise direction. The pilot can change the surrounding direction by pushing the directional joystick left or right.
- Tap the icon again to cancel the Fly Around.
- If the flight altitude is lower than 16ft (5m) when the Fly Around is activated, the aircraft will rise to 16ft (5m).
- The flying speed of the surrounding radius depends on the surrounding radius. The larger the radius, the faster the flight speed.
Cruise Control
- The aircraft automatically flies at a constant speed according to the current flight action.
- This function requires the use of GPS mode with a strong GPS signal.
- Set the desired auto-flight distance and altitude, and fly the aircraft to an altitude above 49ft (15m) (it will be unavailable while below 49ft (15m)).
- Keep toggling the left or right joystick to operate the aircraft forward, backward, ascent, or descent, then press the remote controller’s one-key takeoff/landing button ••
- Release the joystick, and the aircraft will fly automatically according to your action. (e.g., pushing the right joystick forward will make the aircraft fly forward automatically.
- During cruise control, you can continue to use the joystick to adjust the aircraft’s direction and altitude. Repeat steps 2 and 3, and the aircraft will automatically fly based on your last joystick input.
- Method 1: During Cruise Control, pressing the one-button takeoff/landing * on the remote controller without operating the joystick will cancel cruise control.
- Method 2: Tap the icon X on the App to exit it. This function is unavailable when the flight altitude is below 49ft (15m). This function is unavailable when the aircraft battery power is low. During cruising, if the aircraft’s battery is low, it will automatically exit this function.
Basic Flight Steps
- Press and hold the power button to turn on the aircraft.
- Short press then long-press the power button on the remote controller to turn it on.
- The aircraft and remote controller will automatically pair, which takes about 20 seconds.
- Once pairing is complete, connect the phone to the remote controller using a data cable.
- Open the Gleesfun Fly App and enter the operating interface.
- Wait for the GPS signal search to complete; the aircraft’s indicator light will be solid green.
- Unlock and start the motors.
- Slowly push the throttle stick up to achieve a smooth takeoff.
- Pull down the throttle stick to descend.
- After landing, pull the throttle stick to its lowest position and hold it there until the motors stop.
- After stopping the motors, turn off the power of the aircraft and the remote controller in sequence.
Aerial Photography Tips
- Perform the pre-flight check.
- It’s recommended to take photos or record videos in Stable Mode.
- Choose clear, calm weather for shooting.
- During flight, make small, smooth stick movements to keep the aircraft stable.
Specifications
Aircraft
- Model: G11PRO
- Weight (including battery): About 357g/12.60 oz
- Battery capacity: 3200mAh
- Satellite system: GPS/GLONASS
- Maximum flight altitude: 393.7ft
- Maximum flight distance: 10000ft
- Unfolded size: 1.15×1.26×0.21ft
- Folded size: 1.15×1,26×0,21ft
- Stable mode speed: 6m/s
- Sport mode speed: 8m/s
- Operating temperature range: 32°F – 104°F (0°C – 40°C)
Gimbal Stabilization
- Mechanical range of gimbal stabilization
- Tilt axis: approximately -100° to +70°
- Roll axis: approximately -35° to +35°
- Yaw axis: approximately -20° to +20°
- Camera angle adjustment range: Approximately -90°T0+0°
Camera
- Lens: FOV 75°
- Equivalent focal length: 60cm/23.3 inches
- Focus range: Fixed focus
- Maximum photo resolution
- App: 5700×3200P
- SD card:5700×3200P
- Maximum video resolution
- App: 1280X720@25fps
- SD card: 3840x2160P@30fps
- Photo format: JPG
- Video format: MP4
- Supported file system: FAT32
- Supported SD card: Micro SD card (Class 10/U1 or higher) 16GB to 128GB
5.8G Transmission
- Working frequency: 5.725-5.825 GHz
- Supported Transmission Protocols: 802.11a; 802.11n20; 802.11n40
App / Live View
- Mobile App: Gleesfun Fly App
- Transmission range: 10000ft (outdoor, open, interference-free environment)
- Live view quality: 1280×720@25fps
- Mobile Compatibility: Android 7.1 and above, iOS 13.0 and above
Remote Controller
- Working frequency: 5.8G
- Remote controller range: Up to 10,000ft (outdoor, open, interference-free environment
- Battery capacity: 3600mAh
- Charging time: About 3.5 hours
- Operation time: About 4 hours
- Operating voltage: 3.7V
- Mobile device holder: 3.5 inches
- Operating temperature: 32°F to 104°F (0°C to 40°C)
Smart Flight Battery
- Battery capacity: 3200 mAh
- Voltage: 7.7V
- Battery type: Li-polymer
- Energy: 24.64Wh
- Net weight: About 126.5 g / 4.46 oz
- Charging time: About 2.5 hours (using PD fast charging)
- Charging temperature range: 32°F to 104°F (0°C to 40°C)
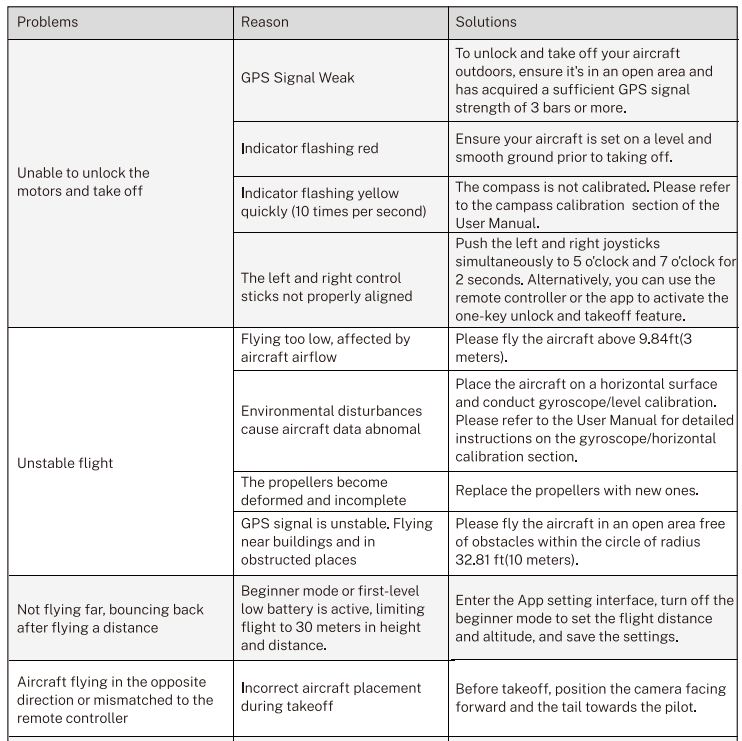
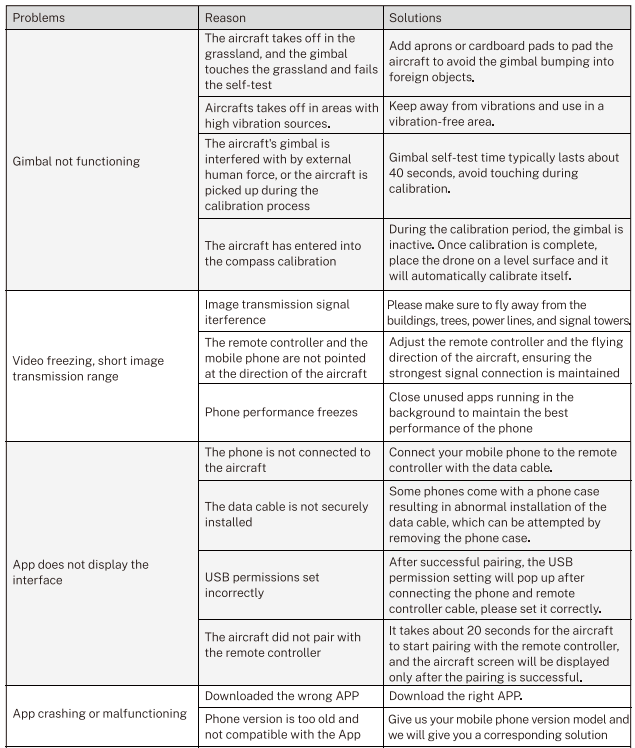
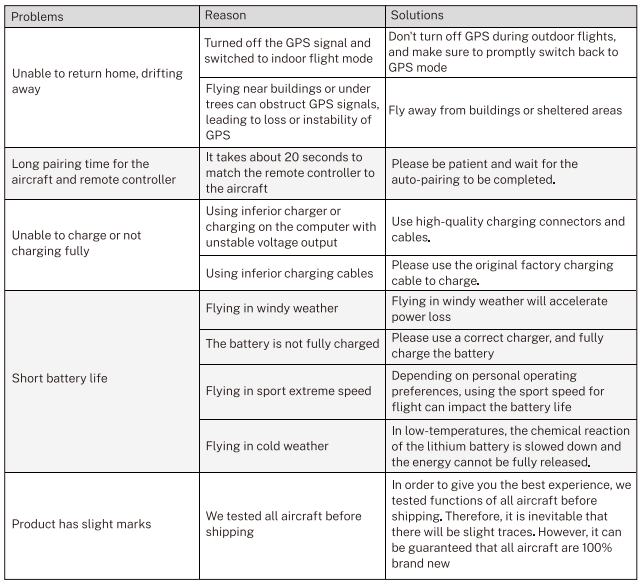
Troubleshooting
FCC STATEMENT
The remote controller complies with Part 15 of the FCC Rules. Operation is subject to the following two conditions:
This device may not cause harmful interference. This device must accept any interference received, including interference that may cause undesired operation. Changes or modifications to this unit not expressly approved by the party responsible for compliance could void the user’s authority to operate the equipment.
This equipment has been tested and found to comply with the limits for a Class B digital device, pursuant to Part 15 of the FCC Rules. These limits are designed to provide reasonable protection against harmful interference in a residential installation. This equipment generates uses and can radiate radio frequency energy and, if not installed and used in accordance with the instructions, may cause harmful interference to radio communications. However, there is no guarantee that interference will not occur in a particular installation.
If this equipment does cause harmful interference to radio or television reception, which can be determined by turning the equipment off and on, the user is encouraged to try to correct the interference by one or more of the following measures:
- Reorient or relocate the receiving antenna.
- Increase the separation between the equipment and receiver.
- Consult the dealer or an experienced radio/TV technician for help.
This device and its antenna(s) must not be co-located or operated in conjunction with any other antenna or transmitter.
Radiation Exposure Statement
The device has been evaluated to meet the general RF exposure requirements inportable exposure conditions without restriction.
Customer Support
- Ph:+86 19120118935|
- Website: https://www.gleesfun.com/