
Guardian DH201 Small Space Dehumidifier Use & Care
 SAFETY PRECAUTIONS
When using this dehumidifier, always folow basic safety precautions, including the following:
- Keep this product out of the reach of children and pets.
- Use this appliance only for its intended purpose as described in the instruction manual.
- Never operate this dehumidifier in an area that is likely to accumulate standing water. If this condition develops, for your safety disconnect the power supply before stepping into the water.
- Never unplug your dehumidifier by puling on the power cord. Always grip plug firmly and pul straight out from the receptacle.
- Replace immediately al electric service cords that have become frayed or otherwise damaged. Adamagedpower supply cord must be replaced with a new power supply cord obtained from the manufacturer and not repaired. Do no use a cord that shows cracks or abrasion damage along its length or at either the plug or connector end.
- Donot handle the plug with wet hands.
- If the receptacle does not match the plug, the receptacle must be changed out by a qualified electrician.
- Turn the dehumidifier OFF and unplug it before cleaning.
- Donot submerse this product in water. Do not clean the unit or tank with detergents or chemicals of any kind. Do not use sharp-edged objects to clean the product.
- Donot treat the tank with any chemicals, oils, fragrances, etc. They wil damage the unit and void the manufacturer’s warranty.
PRODUCT SPECIFICATIONS AND PARTS
- DEHUMIDIFYING TECHNOLOGY: Peltier (thermo-electric)
- POWERSUPPLY:12VDC,60Hz,5A
- POWERCONSUMPTION: 60W
- DIMENSIONS: 5.24″ Lx 8.11″ W x 13.39″ H
- WEIGHT: 4.15 lbs. (not including packaging)
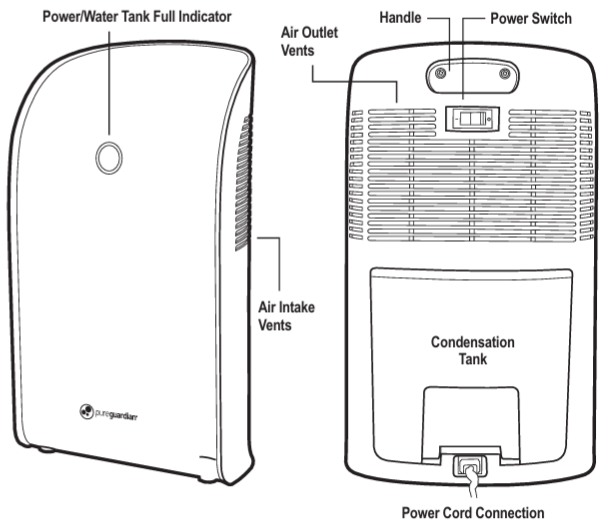
PRODUCT COMPONENTS
INTENDED USE
his device is intended for the dehumidification of smal, closed rooms. Your dehumidifier operates according to the condensation principle. A fan inside the device blow air over a chile r, this causes the humidity contained in the air to condense and drip into the condensation tank. Then the chiled air exits the device.
DIRECTIONS FOR USE
BEFORE OPERATING THE DEHUMIDIFIER
- Select a firm, level and flat location for the dehumidifier
CAUTION: For proper air flow, locate the unit at least 1 foot from any wal or furniture. - Make sure the vents on the back of the product free of dirt and are not blocked.
- Connect the power cord to the dehumidifier then plug the power cord into a 120VAC outlet.
TIP
Best results wil be obtained when the windows and doors are closed in the room where the dehumidifier is being used.
IMPORTANT
When moving the dehumidifier, always lift unit by the carrying handle located on the back.
OPERATING THE DEHUMIDIFIER
- Turn the unit power ON.
- The green power-on light shows that the device is operating.
- To switch o f the device, press the ON/OFF switch.
EMPTYING THE CONDENSATION TANK
The green power-on light wil turn to red when the condensation tank is full.
- Turn of the device and disconnect from the power supply.
- Remove and empty the condensation tank.
- Replace the tank and plug it back in.
NOTE: To prevent the water tank from becoming accidentaly dislodged, once fitted into the housing, it is secured to prevent any possible movement. When removing the tank, grip the two hand holds provided and then pul the tank away from the body to release it from the housing. In this way you reduce the amount of force necessary to overcome the locking device and then you can remove the water tank in one motion.
MAINTENANCE & CLEANING
IMPORTANT
Always turn o f then disconnect the power supply when not in use or before cleaning or storing. Al ow the device to cool down to room temperature before you clean it and or/stow it away. Always empty the condensation tank. Risk of Electric Shock!
Cleaning
- Disconnect the power supply.
- Allow device to cool down.
- Use a dry cloth to remove dust on the outside of the device.
- Clean the ventilation slots at regular intervals with vacuum or soft brush to remove dust and dirt.
- Make sure to remove al water from the condensation tank before storing.
TROUBLE SHOOTING GUIDE
| The device does not seemto be working. | power supply.connected with the mainThe main plug is not correctly.is fuThe condensation tankl or not Is | the main power supply.Insert the main plug into
correctly.tank. Insert into the deviceEmpty the condensation |
| The device has switchedo f during operation. | The condensation tankis fu l. | Empty the condensation tank. |
LIMITED WARRANTY
To the consumer, Guardian Technologies LLC warrants this product to be free of defects in materials or workmanship commencing upon the date of the original purchase. Refer to the original product carton or specific product/model page on the Guardian Technologies website for warranty length for your particular model.
Defects that are the result of normal wear and tear wi l not be considered manufacturing defects under this warranty. If this product should become defective within the warranty period, we wil repair or replace any defective parts free of charge. Al warranty repairs must be completed by Guardian Technologies LLC.
This warranty gives you specific legal rights and you may also have other rights (other rights may vary from state to state in the U.S.A.) To submit product under warranty the complete machine must be delivered pre-paid to Guardian Technologies LLC. Please include complete information including: the problem, the model number of the product, the day of purchase, and a copy of the original sales receipt along with your name, address, and telephone (email optional). Address returns to the atention of: Customer Service, at the address below. Additional questions or comments can be made tol free to the number listed below.
Customer Services
-
- USA and Canada Guardian Technologies LLC 26251 Bluestone Blvd. Euclid, Ohio 44132
- 1.866.603.5900
- www.guardiantechnologies.com
Please go to www.guardiantechnologies.com to register your product. We consider the registration process important to ensuring superior service to our customers; however, submitting the warranty registration is optional and does not affect your rights to utilize this warranty according to the conditions stated above.