
Hama 00221056 2 in1 Zapper Remote Control

Safety Instructions
Before using the Hama 00221056 2 in1 Zapper Remote Control, carefully read the following safety instructions to ensure proper and safe use. For proper mounting and installation of compatible Hama devices like TVs or wall units, see the Hama 00220854 TV Wall Bracket Installation Manual.
- The product is intended for private, non-commercial use only.
- Use the product for its intended purpose only.
- Protect the product from dirt, moisture, and overheating, and use it in dry environments only.
- Do not use the product in an area where electronic products are not permitted.
- Do not modify the product in any way. Doing so voids the warranty.
- Keep the packaging material out of the reach of children due to the risk of suffocation.
- Dispose of packaging material immediately in accordance with the locally applicable regulations.
- Do not operate the product outside the power limits given in the specifications.
- Do not attempt to service or repair the product yourself. Leave any service work to qualified experts.
Batteries Instructions
- Before inserting the batteries into the Hama 00221056 2 in1 Zapper Remote Control, clean the battery contacts and the polarity contacts.
- Do not allow children to change batteries without supervision.
- Replace all the batteries in a set at the same time.
- Do not mix old and new batteries, or batteries of different types or from different manufacturers.
- Do not short-circuit batteries.
- Do not charge batteries.
- Do not burn batteries or heat them up.
- Never open, damage, or swallow batteries or allow them to enter the environment.
- They can contain toxic, environmentally harmful heavy metals.
- Remove spent batteries from the product and dispose of them without delay.
- Ensure that batteries with damaged housings do not come into contact with water.
- Keep batteries out of the reach of children.
Function Keys
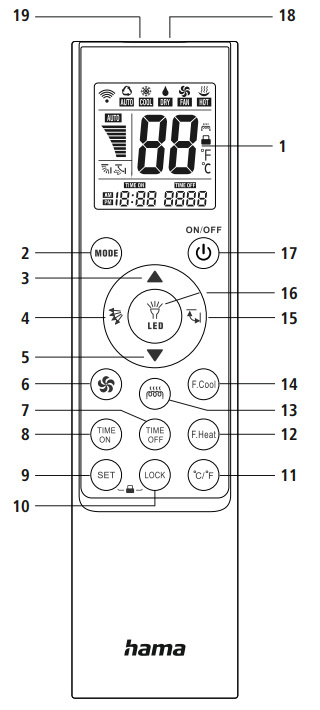
| No. | Function | Brand |
| 1. | LC display | |
| 2. | Mode | Gree / Hualing / Hisense / Mi / Skyworth |
| 3. | Temperature ▲ | LG / Samsung |
| 4. | Fan direction manual | Hitachi / Panasonic |
| 5. | Temperature ▼ | Shinco / Aucma / AUX |
| 6. | Fan power | Daikin / Fujitsu / Carrier |
| 7. | Timer Off | |
| 8. | Timer On | |
| 9. | Setup | |
| 10. | Lock Key lock | |
| 11. | Temperature unit °C/°F | |
| 12. | Rapid heat-up | Chigo / TCL / Kelon |
| 13 | Heating on | Frestech / Yair |
| 14 | Fast cooling | Midea / Changhong / Chunlan |
| 15 | Fan direction automatic | Sanyo / Sharp / Haier / Mitsubishi |
| 16. | LED lamp On/Off | |
| 17. | Power On/Off | |
| 18. | LED | |
| 19. | IR LED |
Displays

| No. | Displays |
| 20 | Signal transmission display |
| 21. | Auto mode |
| 22. | Cooling on |
| 23. | Dehumidifier on |
| 24. | Fan on |
| 25. | Heating on |
| 26. | Auxiliary heating on |
| 27. | Child lock active |
| 28. | Temperature display unit |
| 29. | Timer off / Time |
| No. | Displays |
| 32. | Fan direction manual |
| 33. | Fan power |
Inserting the Batteries
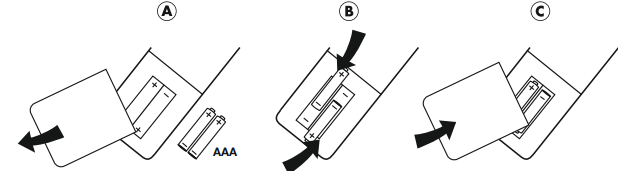
- For the Hama 00221056 2 in1 Zapper Remote Control, alkaline batteries are recommended. Use two AAA batteries (LR03/Micro).
- Remove the battery cover on the underside of the remote control.
- Ensure the correct polarity (+/-) of the batteries and the battery compartment.
- Insert the batteries. Reattach the battery cover on the remote control.
- This remote control is equipped with a memory function to save settings when changing the battery.
Remote Control Settings
Default setting/factory setting
This Hama 00221056 2 in1 Zapper Remote Control comes pre-programmed at the factory. After inserting the batteries, most Gree and Midea appliances can be controlled. For other brands, use one of the following methods: A, B, C, or D for programming.
Quick Search of Brands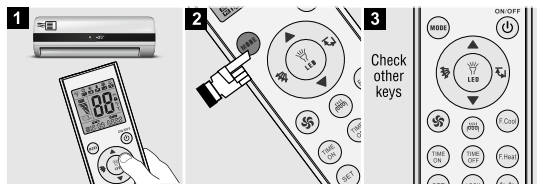
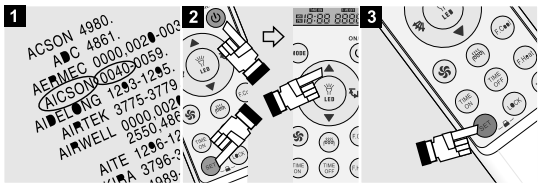
The overview of functions and displays (page 1) shows which button is assigned to which brand. These are the brands pre-programmed on the individual buttons so that you can set up your remote control using just one button. Example: The “TEMP ▲” button is intended for LG and Samsung.
- Switch on the air conditioning system manually and point the remote control at the air conditioning reception window.
- Press the button corresponding to the brand of your air conditioning system until the air conditioning system is automatically activated with a beep.
Fully Automatic Search by Model
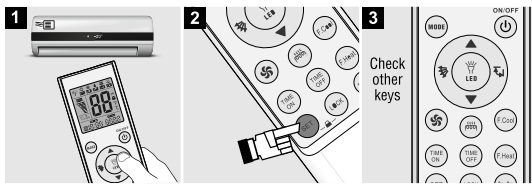
- Switch on the air conditioning system manually and point the remote control at the air conditioning reception window.
- Press and hold the “SET” button for about 6 seconds. As soon as the model code “—” appears in the display, observe your air conditioning system. Do not release the SET button until your air conditioner starts automatically.
- Check whether the functions of the buttons are correct. If they are correct, the code is valid. If not, repeat steps 2 and 3.
Manual Code Entry
- Search the code list (from page 74) for the brand of your air conditioning system and the corresponding codes.
- Switch on the air conditioning manually.
- Press and hold the “SET” and “POWER” buttons simultaneously until the model code flashes on the display. (e.g. De’Longhi 0000)
- Then, press the “Temp ▲” button until the required code appears in the window and flashes. The air conditioning starts automatically if the code is correct. If the code is correct, press the “SET” button to save the code. If not, the remote will save the code after 15 seconds without any settings.
- Verify that the functions of the various buttons are correct. If this is the case, the setting is complete. If not, repeat steps 2 and 3.
Manual Code Search

- Switch on the air conditioning system manually and point the remote control at the air conditioning reception window.
- Press and hold the “SET” and “POWER” buttons simultaneously until the model code flashes on the display.
- Then press the “Temp ▲” button and closely monitor the status of the air conditioning system. If the air conditioning starts automatically, press the “Set” button to end the search.
Reset to the Default Setting
Restore factory settings: If you press and hold the “Set” + “Wind ” buttons simultaneously for three seconds, the factory settings are restored.
More Settings
Buttons for Rapid Cooling and Rapid Heating
- Press the “F. Cool” button (rapid cooling) to automatically set the cooling mode: 21°C, Strong Breeze, Automatic Wind.
- Press the “F. Heat” button (rapid heating) to automatically set the heating mode: 27°C, Strong Breeze, Automatic Wind.
Timer Function “TIME ON” and “TIME OFF”
The remote control takes over the timer function of the original remote control. After pressing the “TIME ON” or “TIME OFF” button, the timer display of the air conditioning system lights up and indicates that the timer status is activated.
Setting the Childproof Lock
- Locks
Press the “Set” and “Manual Wind ” buttons simultaneously. The “Child-lock ” symbol appears on the display. - Unlock
Press the “Set” and “Manual Wind ” buttons simultaneously. The “Child-lock ” symbol on the display disappears.
Setting the Clock Function
- Press and hold the “Set” and “Mode” buttons simultaneously. When the corresponding number starts flashing, this means that the time can be set.
- Press the “TEMP ▲”(or “Temp▼”) button to set the clock forward (back) by one hour. If you press the corresponding button for two seconds, you can continuously set the clock forwards or backwards by several hours.
- Press the “Set” button to finish setting the hours.
- The number for the minutes then starts to flash. You can use the “Temp ▲”(or “Temp ▼”) button to set the minutes.
- Once you have set the minutes, press the “Set” button to end the clock function.
Temperature Display Unit °C/ °F
Press the °C/°F button to switch between the temperature display in Celsius or Fahrenheit.
- Backlight
The entire display is equipped with a backlight. This is automatically activated each time the button is pressed and goes out again 10 seconds after the last button is pressed. - LED torch
This remote control is equipped with a small LED torch. Press & hold the LED button to switch it on. As soon as you release the button, the torch goes out.
Care and Maintenance
- Never use old and new batteries in the replacement remote control at the same time, as old batteries tend to leak and can lead to a loss of performance.
- Never clean the replacement remote control with scouring agents or harsh cleaning agents.
- Keep the replacement remote control free of dust by cleaning it with a dry soft cloth.
Warranty
Hama GmbH & Co KG assumes no liability and provides no warranty for damage resulting from improper installation/ mounting, improper use of the Hama 00222239 JAMAIKA Weather Station product, or from failure to observe the operating instructions and/or safety notes.
Disclaimer
Hama GmbH & Co KG accepts no liability or warranty for damage resulting from improper installation,
assembly, or improper use of the product or failure to observe the operating instructions and/or safety instructions.
Service and Support
Please contact the Hama product advisory service if you have any questions about the product.
Declaration of conformity
Hama GmbH & Co KG hereby declares that the radio equipment type[00176638]complies with Directive 2014/53/EU.
Customer Service
- Website: https://de.hama.com
- Ph: 49 9091 502-0
FAQs
Q: What is the Hama 00221056 2-in-1 Zapper Remote Control used for?
This gadget combines LED torch capability with insect control. In addition to serving as a portable light source, it is intended to draw in and get rid of flying insects like mosquitoes.
Q: What kind of insects does it target?
It works well against gnats, flies, mosquitoes, and small flying insects. It is not made for crawling insects.
Q: Is it safe to use indoors?
The gadget is safe to use indoors, including in living rooms, kitchens, and bedrooms. Steer clear of the electrified grid.
Q: Can I use it outdoors?
Yes, it may be used outside in dry weather. Avoid exposing it to rain or extreme moisture because it is not waterproof.
Q: What power source does it use?
AA batteries are required for the zapper to function; the precise type and quantity can be found in the handbook. Additionally, some versions might include a USB charging capability.
Q: How long does the UV light attract insects effectively?
When the device is turned on, the UV light is always on. The best results are obtained while using the device at night and dusk in regions with high insect activity.
Q: Can the flashlight function be used while the zapper is on?
Yes, depending on your demands, you can use the torch and zapper at the same time or separately.
Q: Is the zapper harmful to humans or pets?
No, handling the electrified grid is safe because it is enclosed. Keep your fingers and metal objects out of the grid.