
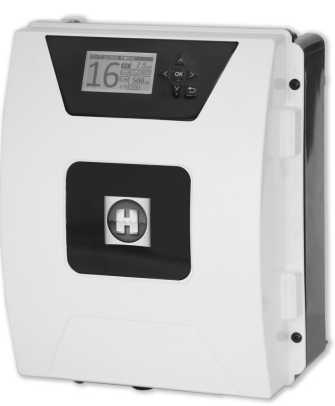
Hayward AquaRite Flo Advanced Salt Chlorinator
Safety Instructions
- Ensure that children cannot play with the device. Keep your hands and any foreign objects away from openings and moving parts.
- Check that the supply voltage required by the product corresponds to the voltage of the distribution network and that the power supply cables are suitable for the product’s power supply.
- Chemicals can cause internal and external burns. To avoid death, serious injury, and/or damage to equipment, wear personal protective equipment (gloves, goggles, mask, etc.) when servicing or maintaining this device. This device must be installed in an adequately ventilated place.
- To reduce the risk of electric shock, do not use an extension cable to connect the device to the mains. Use a wall socket.
- Carefully read the instructions that appear in this manual and on the device. Failure to comply with the instructions can cause injuries.
Description
ELECTRONIC BOX 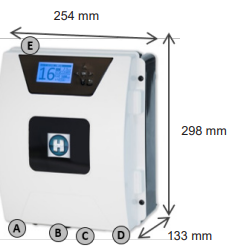
- Main connection 230 V – 50 Hz
- Cell connection
- Options connections
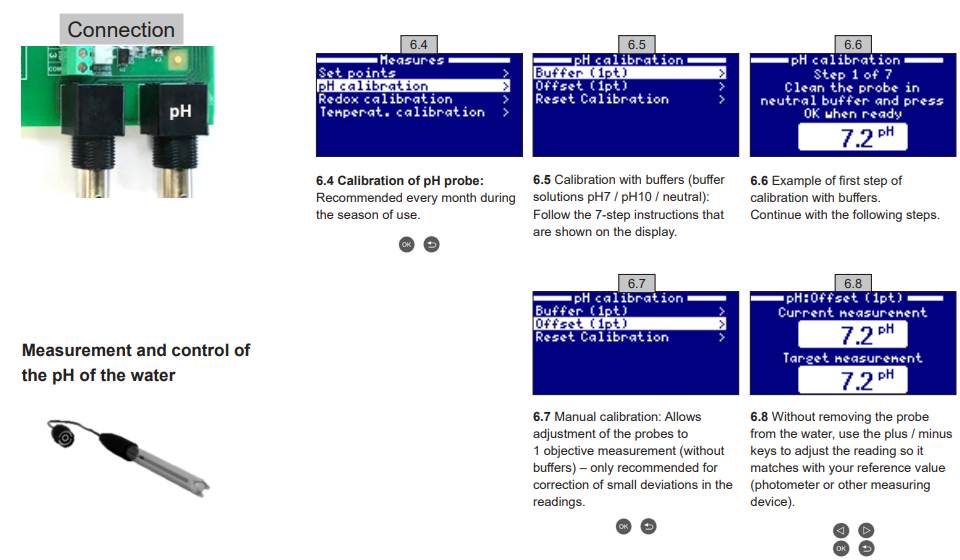
- pH and Rx connection
- ON/OFF switch
CELL
- Electrolysis cell
- Connection to the unit
- Cell housing
- Flow/gas detector (internal)
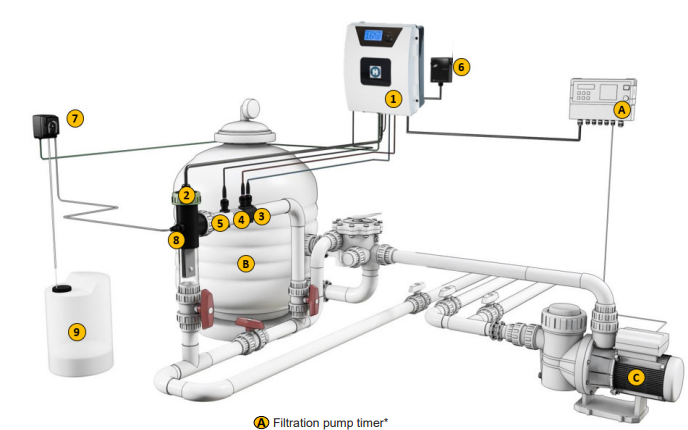
Installation
- Filtration pump timer*
- Silex/glass/diatom filter
- Recirculation pump
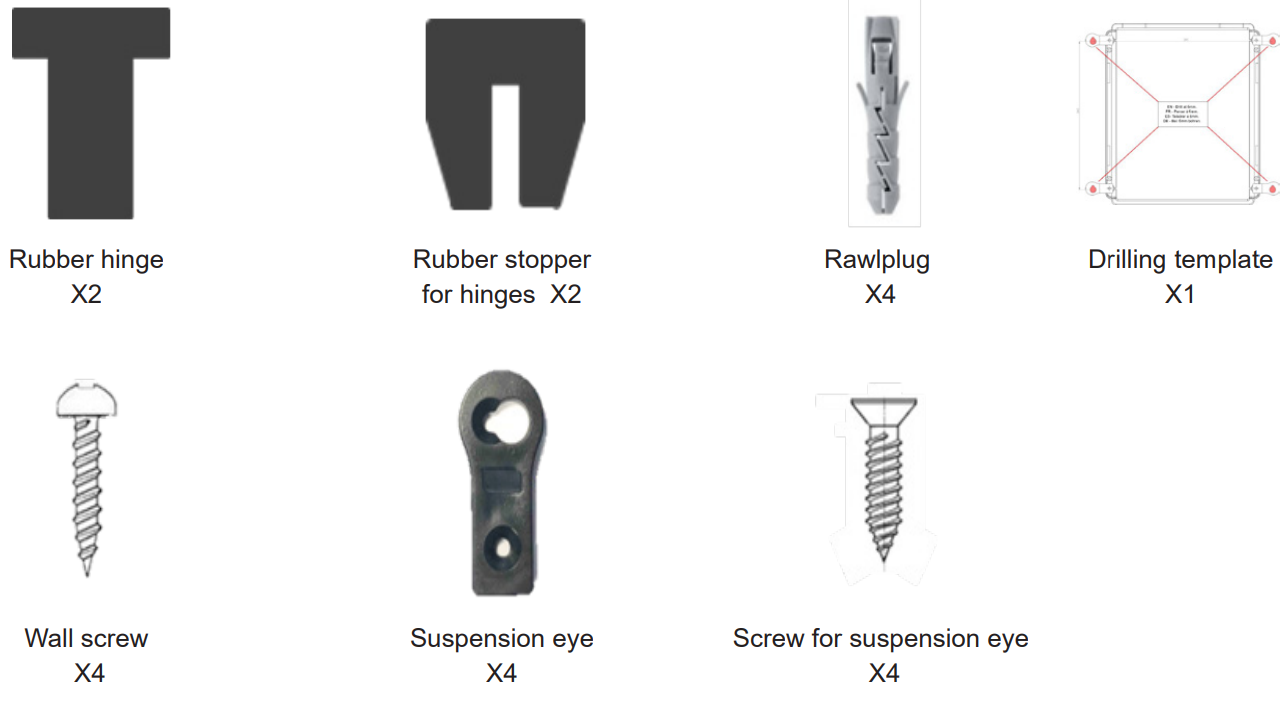
Part List
- Electronic box
- Electrolysis cell (always vertical)
- pH probe (optional)
- Rx probe (optional)
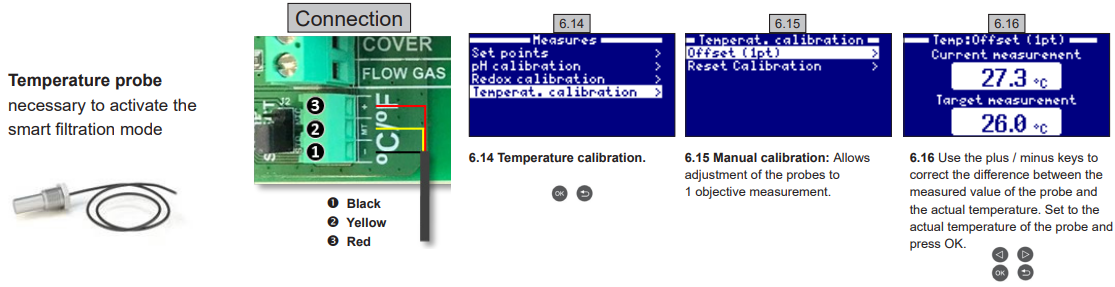
- Temperature probe (optional)
- WiFi module (optional)
- Acid dosing pump (optional)
- Acid injector (optional)
- Hydrochloric acid container (not supplied)
Electricity Consumption
Use of a 16A time delay circuit breaker is recommended for AQR FLO ADVANCED devices. Where the power supply is shared with other devices, please consult a technician for the correct sizing of your installation.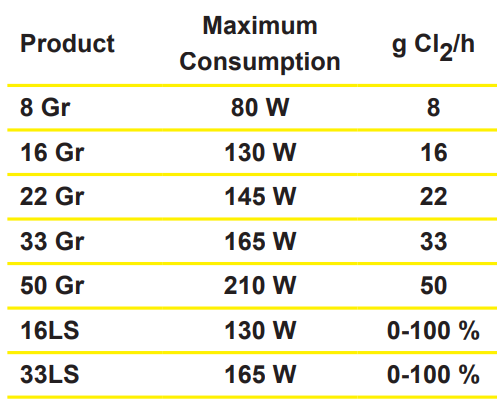
Filtration control by external timerFiltration control by internal timerAssembly
 Filtration control by internal timer
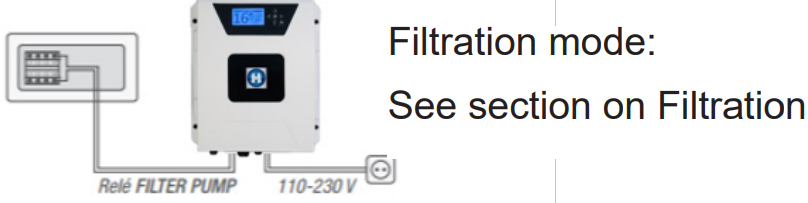 Assembly
- Step 1. Without opening the unit cover, screw the 4 suspension eyes to the box from behind.
- Step 2. Mark the positions of the 4 eyes using the drilling template.
- Step 3. Drill and insert the 4 rawlplugs into the wall.
- Step 4. Screw in the 4 wall screws and hang up the unit.
PH and REDOX CHIP
ASSEMBLY AND CONNECTION OF THE CELL
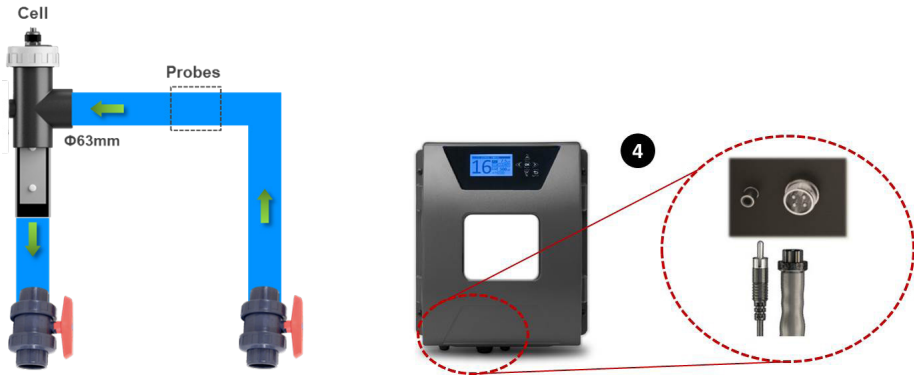
- Install the cell in a vertical position
- Install the cell on bypass
- Install the cell at the highest point of the installation
- Connect the cell and the gas detector to the electronic box
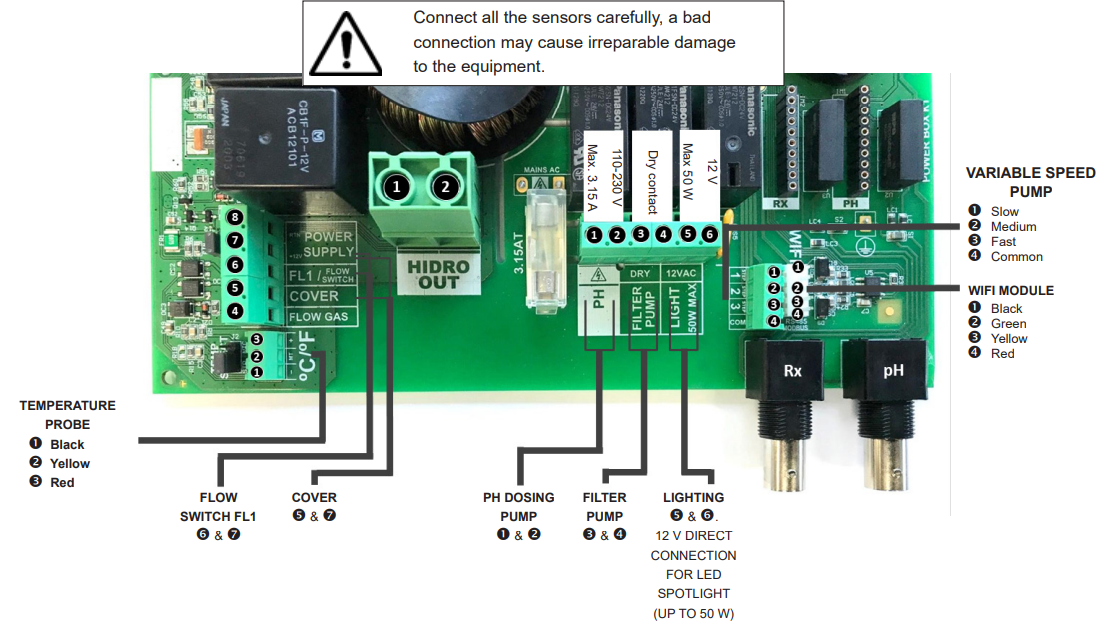
ELECTRONIC PANEL FOR ELECTRICAL CONNECTIONS
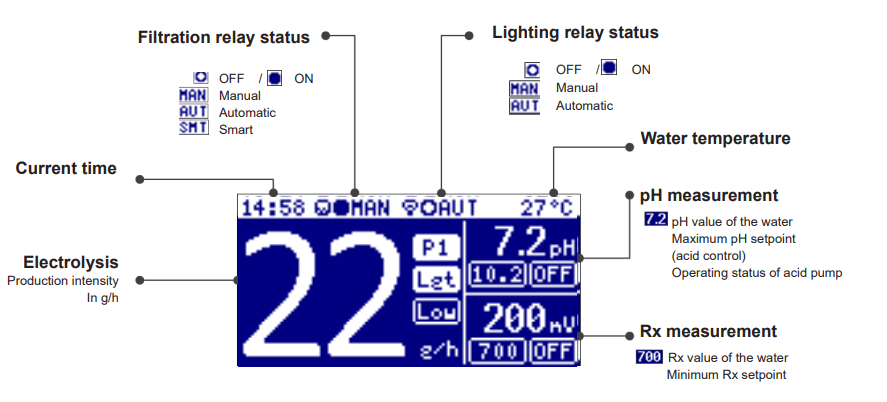
Main Screen
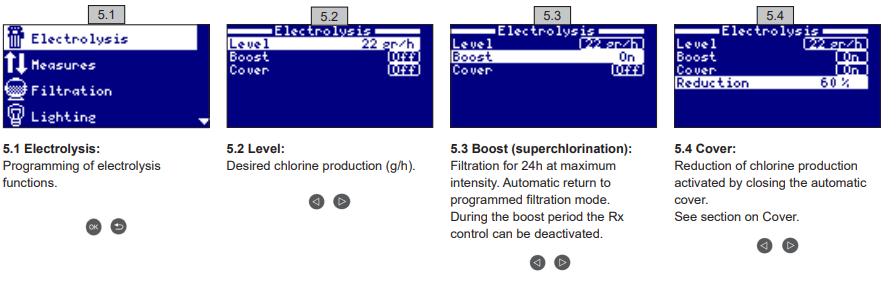
Elecrolysis
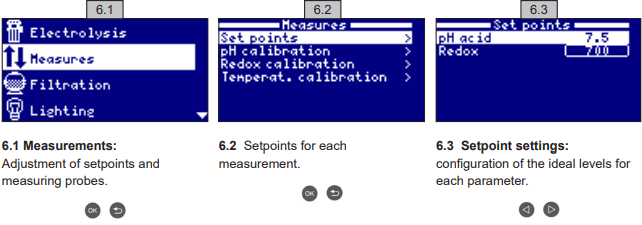
Measurements / Setpoints
pH calibration
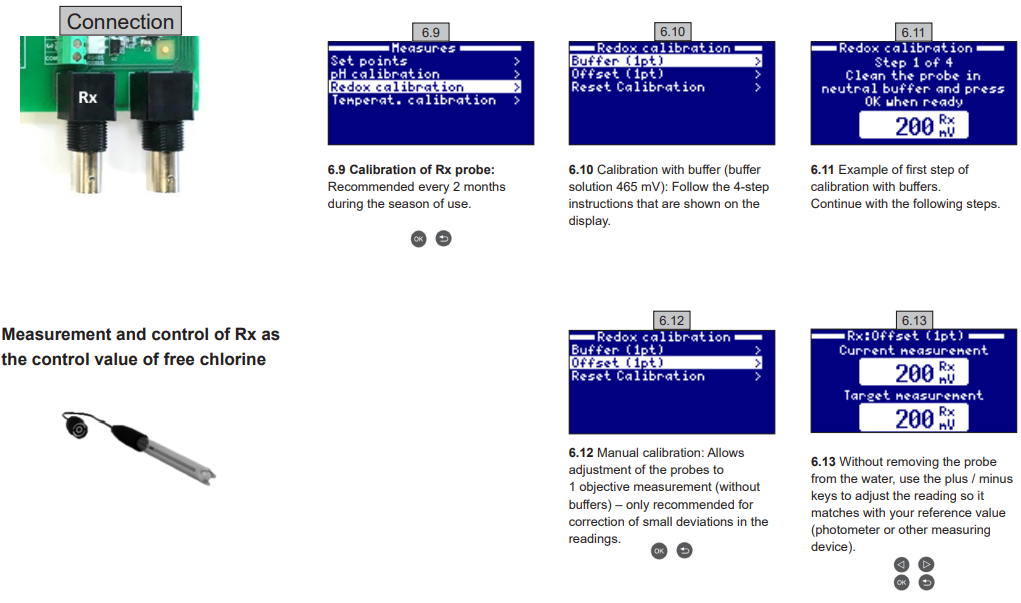
Rx calibration
- Connect your pool filtration system (the salt in the pool must be completely dissolved).
- Add chlorine to the water until a level of 1-1.5 ppm is reached (approx. 1-1.5 g/m3 water). pH levels should be between 7.2 – 7.5.
- After 30 minutes, take a reading of the free chlorine level in the pool (manual test kit DPD1). If the free chlorine level is in the range 0.8 – 1.0 ppm, look at the value on the Rx display and put this value into the memory as the setpoint to activate/deactivate the electrolysis/hydrolysis cell.
- The next day, check the levels of free chlorine (manual test kit DPD1) and Rx. Raise/lower setpoint if necessary.
- Remember to check the Rx setpoint every 2-3 months and/or when the water parameters change (pH/temperature/conductivity).
Temperature calibration
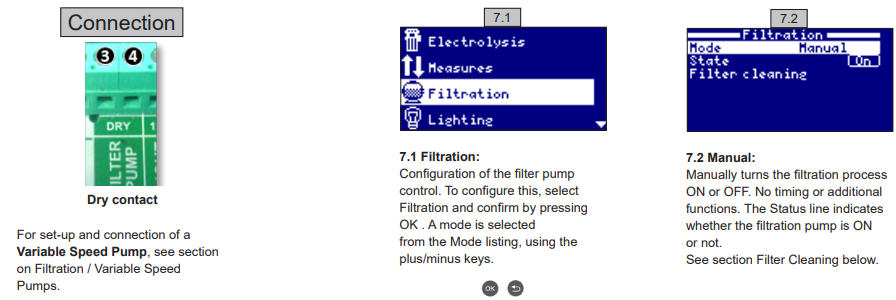
Filtration
Automatic mode
Automatic (or with timer)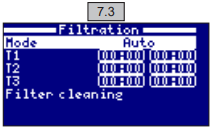
In this mod, the filtration is switched on in accordance with timers that allow adjustment of the start and end times of the filtration. Timers always operate daily, in cycles of 24 hours. To set the ON/OFF times (configuration of up to 3 times possible), use the up/down keys in the timer line that you want to change (1-
Open the start time input field for the selected timer using the plus/minus keys. Set the time on the h plus/minus keys. Use the up key to scroll up to the minutes input field and set this using the plus/minus keys. To confirm, press OK, and to cancel, press return/escape. To set the OFF timer, proceed in the same way. See section Filter Cleaning below.
Smart mode
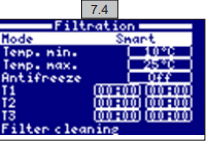
Smart*: This mode is based on the automatic or timer mode, with its 3 filtration intervals, but with adjustment of the filtration times as a function of the water temperature. Two temperature parameters are provided for this: the maximum temperature, above which the filtration times will be those set by the timers, and the minimum temperature, below which the filtration time will be reduced to 5 minutes, which is the minimum operating time.
Between these two 2temperaturese, the filtration times increase linearly. Use the plus/minus keys to set the desired minimum and maximum temperatures. There is the option of activating the antifreeze mode, which sets the filtration to run continuously if the water temperature is below 2 °C. To set the ON/OFF times (configuration of up to 3 times possible), follow the instructions for the Automatic Mode. See section Filter Cleaning below.
Filter Cleaning
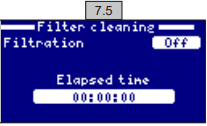
- Turn the filter pump OFF using the plus/minus keys.
- Place the filtration pump valve in the backwash cleaning position.
- Turn the filtration pump back ON. You can check the duration of the backwash cleaning by looking at the clock on the screen. Make sure an adequate and complete backwash of your filter has been carried out.
- When you have finished the backwash cleaning, again turn the filtration pump OFF and put the valve back in the filtering position. If you wish, you can now perform a rinse cycle.
- Proceed in the same way as for backwash cleaning, this time placing the filtration pump valve in the rinsing position.
- When exiting the Filter Cleaning menu using the return/escape key, the system will revert to the mode programmed previously
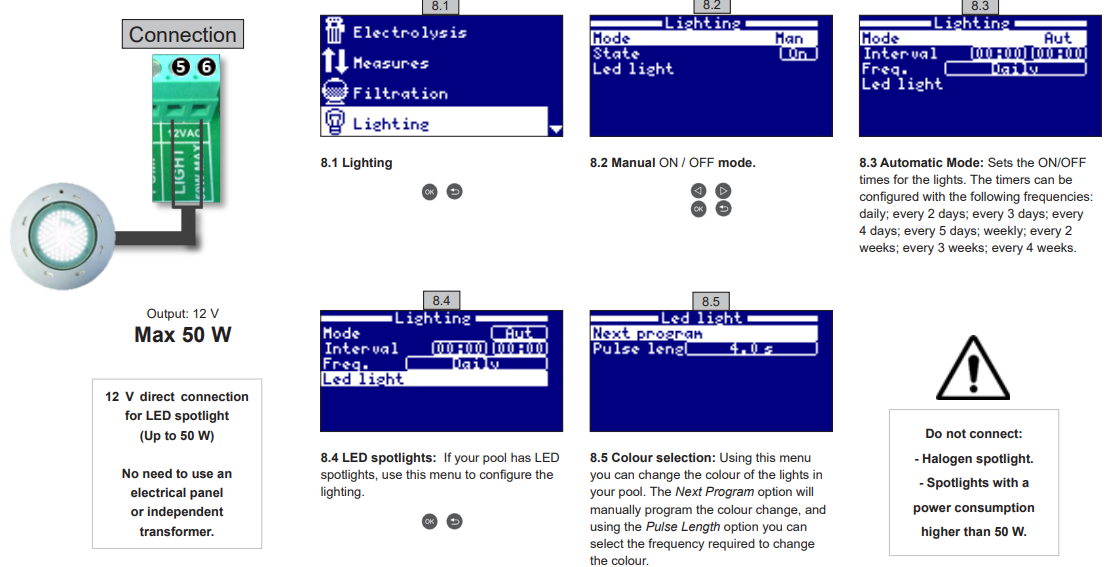
Lightning
pH Pump Relay
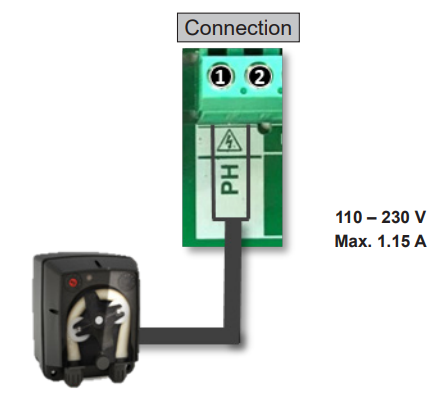
Acid dosing pump:
- The pump turns on in response to the setpoint that was configured in the menu entitled Measurements – Setpoints – acid pH (setpoint < pH value of the water).
- In the standard menu, the maximum dosing time is 60 minutes to avoid acidification of the water (AL3).
- It can dose either acid or alkali (please contact your supplier).
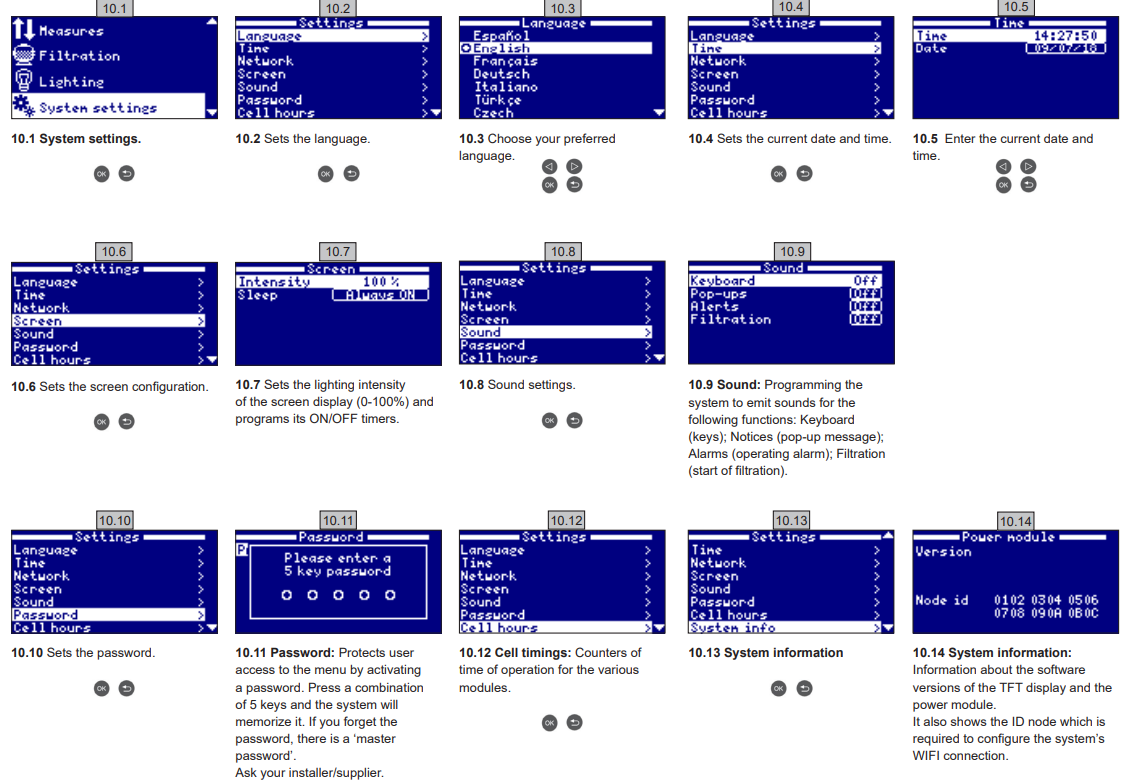
System Setting
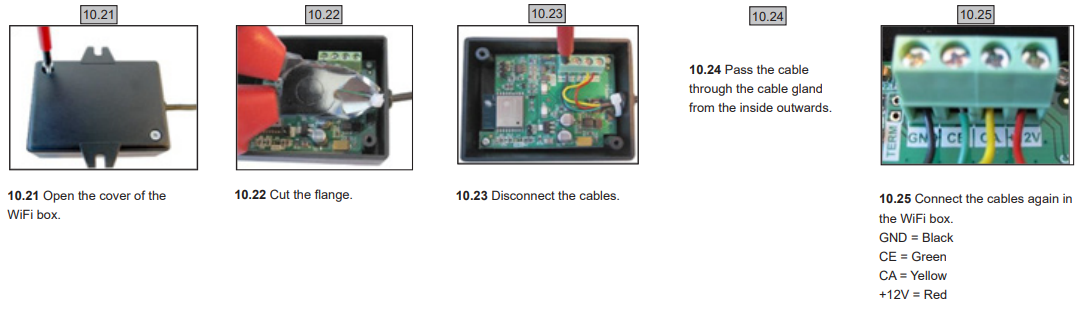
Wifi Installation
COVER
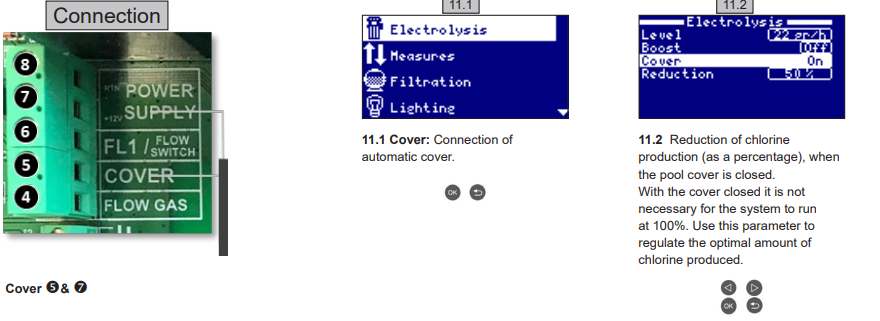
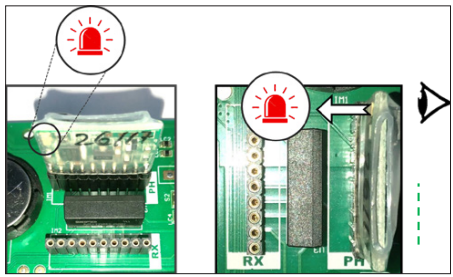
FLOW SWITCH
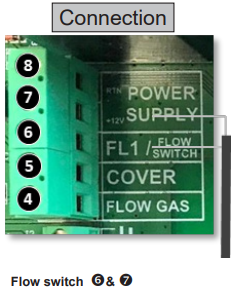
Input for the mechanical security flow switch. It stops the electrolysis and dosing pumps if there is no water flow. It is possible to add an external flow switch to the system. Connect as shown in the illustration and contact your installer to activate it. The titanium cell includes a gas flow sensor, and you can combine the two for better control.
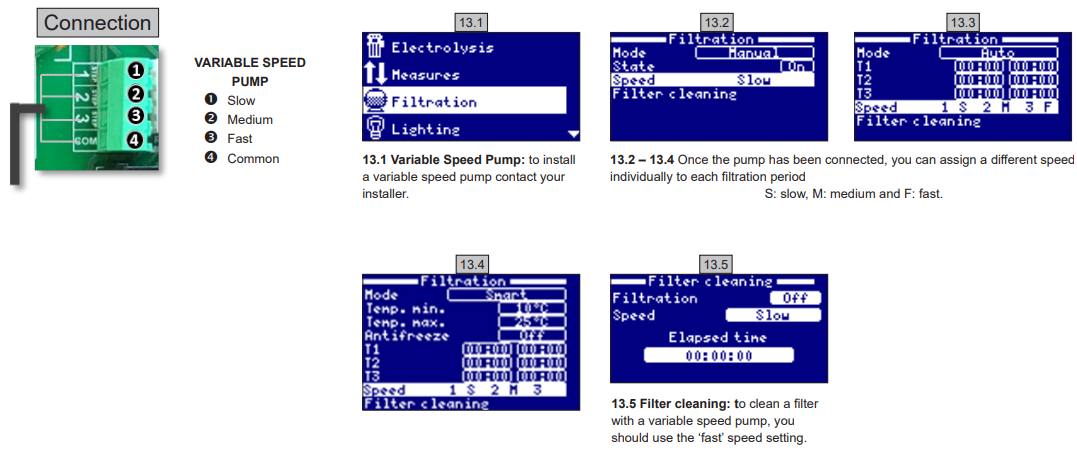
VARIABLE SPEED PUMP
Messages/Alarms
| P1/P2 | Operating cell polarity. The cell changes polarity automatically to clean itself. |
| Lgt | Lighting is on. |
| Cov | Cover detector indicates that it is closed. Production will reduce automatically to the value configured in the electrolysis menu. |
| F1 | Lack of water flow in the installation. Monitor the flow switches and check that the pressure is correct. |
| Low | Production of the device is not reaching the desired level. This can be due to various factors – Lack of salt, – Scaled-up cell, Consumed cell (check the hours counter), – Low water temperature. |
| AL3 | Maximum time exceeded for acid dosing. Check pH readings, calibration, and verify that the acid tank is not empty. To reset the alarm, press the ‘Back’ key. |
Warranty
All Hayward products are covered for manufacturing defects or material defects for a warranty period of 2 years from the date of purchase. Any warranty claim should be accompanied by proof of purchase, indicating the date of purchase. We would therefore advise you to keep your invoice.
In order to make a claim under the warranty and in order to request repair or replacement of an article, please ask your dealer. Parts damaged by wear and tear: gasket and cell plate coating.
Customer Service
- Ph: 1-800-657-2287
- Website: www.haywardcommercialpool.com
FAQs
What is the Hayward AquaRite Flo Advanced Salt Chlorinator used for?
Without the need for human chlorine addition, the AquaRite Flo Advanced is an autonomous salt chlorine generator that turns the salt in your pool water into chlorine, ensuring constant and reliable cleanliness.
How much salt should be added to the pool?
A salt content of 3,200 parts per million (ppm) is advised. Always use pool-grade salt and measure the size of your pool. For optimal results, keep the salt content between 2,700 and 3,400 parts per million.
How often should the salt cell be cleaned?
Every three to six months, or sooner if calcium accumulation is apparent, examine and clean the cell. As directed in the handbook, clean with a weak acid solution.
Will the AquaRite Flo replace all chemical use?
No. Even while it greatly lessens the need for manually applied chlorine, maintaining water balance still requires constant monitoring and adjustment of pH, alkalinity, and calcium hardness.
What is the “Super Chlorinate” function?
After prolonged use, storms, or the presence of algae, this feature briefly increases the chlorine output to sanitise the pool. After 24 hours, it automatically returns to regular operation.
Can I use this chlorinator in saltwater and traditional chlorine pools?
It is made especially for pools with salt water. Avoid using it in conventional chlorinated pools without first turning it into salt.
What happens if the salt level is too high?
Excessive salt can shorten cell life and result in system problems. To reduce the concentration, empty the pool and add fresh water.