
Hayward LPCUS22xxx LED Light Fixtures
Introduction
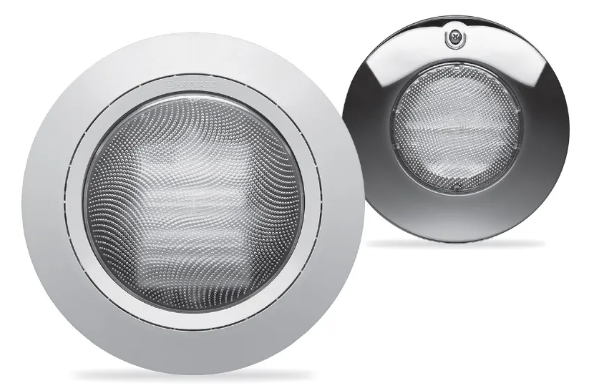
Congratulations on your purchase of a Hayward® Universal ColorLogic®/CrystaLogicTM LED Light. Welcome to a more colorful world, brought to you by Hayward, that generates colored light and effects using a microprocessor to control red, green, blue, and white LEDs!
Safety Instructions
- Do not open. Light has no user-serviceable parts inside.
- Improper installation may result in death or serious injury to bathers or service personnel, or others by way of electric shock.
- Disconnect electrical power before installing or servicing this equipment.
- Read and follow all instructions.
- This product is to be installed by qualified personnel only.
Installation Depth
Except when the fixture is installed in an area of the swimming pool that is not used for swimming and the lens is adequately guarded to keep any person from contacting it, the fixture must be installed in a wall or on a floor of a pool, spa, or water feature with the top of the lens opening not less than 18 in. and no more than 72 in. below the normal water level of the pool.

Overview
The new Hayward ColorLogic and CrystaLogic lights offer a modular design for quick, easy installation and replacement. The four-piece design allows you to separate the trim ring, light flange, light, and power cable. The watertight plug-in power cable lets you replace the light at any time without having to snake new wire through conduit or make new wiring connections at the transformer. Also, the light can be replaced without having to reinstall the flange to the niche, making installation quick and simple. The illustration below shows the four parts of the new ColorLogic and CrystaLogic lights.
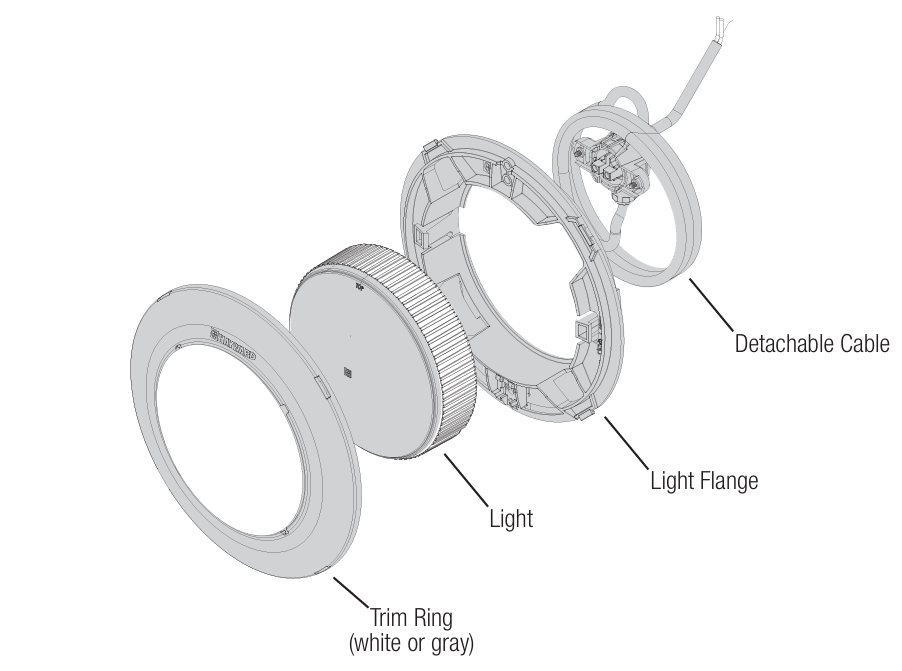
Note that the light and flange are shipped from the factory as an assembly. For most installations, it will be easier to keep these parts together. If your installation requires you to remove the light from the flange, refer to the diagram below.
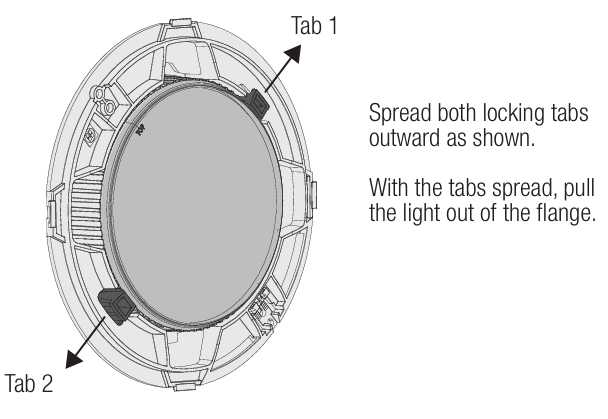
This method can also be used if the light requires replacement after installation. There is no need to remove the flange from the niche; just remove the light using the method above.
Wiring Checklist
- The above safety warnings and the complete installation instructions in this manual have been read and followed.
- A SAFETY LISTED POOL/SPA ISOLATION TRANSFORMER HAS BEEN USED TO SUPPLY 14 VOLTS TO THE FIXTURE.
- The transformer output wiring HAS NOT been tied or shorted to ground.
- The cord length has not been extended beyond the guidelines in this manual.
- The cord jacket is not damaged, cut, or spliced except as noted below.
- Extensions or splices to the cord are only made in a safety-listed Pool/Spa junction box or junction box transformer system.
- The luminaire is firmly secured to the niche and cannot be removed without the use of a tool.
- The niche is properly bonded UNLESS a Hayward Universal ColorLogic Niche (LFGUY1000 or LGGUY1000) is used.
- The luminaire has been installed by qualified personnel in compliance with the National Electrical Code (NEC) or Canadian Electric Code (CE Code) and any applicable local codes/regulations.
- The cord has been attached and secured to the light.
Features
Your Hayward Universal ColorLogic/CrystaLogic underwater pool or spa light has these features:
- Detachable light cord, which allows you to change/replace lights without rewiring or snaking a new light cord.
- Long-lasting LEDs (light-emitting diodes) last up to 10 times longer than current incandescent or halogen pool and spa lights.
- In stand-alone mode, Universal ColorLogic lights offer 17 different programs: 10 fixed colors and 7 color shows.
- In Omni Direct mode (requires a compatible Hayward Omni pool controller), LPCUS22xxx and LSCUS22xxx Universal ColorLogic lights offer 20 fixed colors and 7 color shows with full control over speed and brightness.
- CrystaLogic models offer programmable dimming (page 4).
- Universal ColorLogic/CrystaLogic lights offer spectacular, brilliant light with low power consumption. Uses up to 86% less energy than a typical incandescent pool light.
The 12-volt Hayward Universal ColorLogic and CrystaLogic LED (light-emitting diode) underwater lighting fixtures you have purchased are UL Listed to be installed in all Hayward or any other manufacturer’s light fixture housing (niche). Installation of light and niche must be by Article 680 of the National Electrical Code (NEC) and any applicable local codes. Ensure that your niche is properly grounded and bonded.
Operation
Universal ColorLogic Light modes The Hayward Universal ColorLogic light is designed to operate in one of 3 modes: Universal ColorLogic, ColorLogic 4.0, and Omni Direct mode. For Omni Direct mode, the lights must be used with an OmniLogic or other Omni-type pool controller (page 5).
Universal ColorLogic mode (default)
- The light is shipped in this mode. Use this mode for new installations and installations with other Universal ColorLogic lights.
ColorLogic 4.0 mode
- Use this mode when installing your new light in systems with ColorLogic 4.0 lights. The Universal ColorLogic light will be “seen” as another ColorLogic 4.0 light and will operate in the same manner as the others.
Omni Direct mode
- Omni Direct mode offers unique colors as well as speed and brightness control. It must be configured and controlled by a Hayward OmniLogic, OmniHub, or other Omni-type pool controller.
How to change modes
- Turn on the lights and then turn them off for between 11-15 seconds.
- Turn on the lights and then turn them off for between 11-15 seconds.
- Turn on the lights and then turn them off for between 11-15 seconds.
- The light should blink one of 3 colors, indicating which mode it is currently in. Refer to the table below to determine which mode is currently active.

- To change modes, turn the light off and back on.
- The light will then advance to the next mode.
- Continue this method until you arrive at the desired mode.
- When the light is in the desired mode, remove power from the lights for at least one minute.
- The light will restart in the new mode the next time it is turned on.
Light Dimming (White Light)
The CrystaLogic light can be adjusted to operate at different light intensities. To change light intensity, follow the procedure below.
- Turn on the lights and then turn them off for between 11-15 seconds.
- Turn on the lights and then turn them off for between 11-15 seconds.
- Turn on the lights and then turn them off for between 11-15 seconds.
- The light will blink, indicating which mode it is currently in:
- Mode 1 (1 blink) – 100% intensity
- Mode 2 (2 blinks) – 60% intensity
- Mode 3 (3 blinks) – Variable intensity. Once the desired mode is saved, the user may select among 5 brightness levels by briefly toggling power (100%, 80%, 60%, 40%, 20%, 40%, 60%, 80%, 100%, 80%, etc. )
- To change modes, turn the light off and back on. The light will then advance to the next mode. Continue this method until you arrive at the desired mode.
- To save, remove power from the lights for at least one minute.
- The light will restart in the new mode the next time it is turned on.
Operating the Universal ColorLogic
- The Universal ColorLogic light is controlled through power-cycling: a method of changing light programs that requires no special controller or interface.
- To activate the light, simply turn on the switch. To deactivate the light, turn off the switch.
- To advance to the next light program (fixed color or color show), turn the switch off, then back on within 10 seconds.
- When the light has been off for over 60 seconds, and is first turned on, it will come on to white for 15 seconds for a quick, clear view of your pool, then go to the last fixed color or color show it was running.
Light Synchronization
- If your pool or spa has multiple Hayward Universal ColorLogic LED lights, they may be operated independently, or they can be easily synchronized so they will all display the same colors and shows at the same time.
- For light synchronization, all lights must be wired to the same switch. Once installed, all lights should be automatically synchronized; however, if they get out of sync, they can be re-synchronized easily.
- To re-synchronize your lights, turn the switch on, then back off, then wait between 11 and 14 seconds, and turn the switch back on.
- When the lights come back on, they should enter program #1 and be synchronized.
Programs
When in Universal ColorLogic mode (default), the Universal ColorLogic light can display 17 different programs: 10 fixed colors and 7 color-changing shows. These programs are advanced using power-cycling (quickly powering the lights on, then off, then back on). The programs are listed below:
- Show-Voodoo Lounge
- Fixed-Deep Blue Sea
- Fixed-Royal Blue
- Fixed-Afternoon Skies
- Fixed-Aqua Green
- Fixed-Emerald
- Fixed-Cloud White
- Fixed-Warm Red
- Fixed-Flamingo
- Fixed-Vivid Violet
- Fixed-Sangria
- Show-Twilight
- Show-Tranquility
- Show-Gemstone
- Show-USA
- Show-Mardi Gras
- Show-Cool Cabaret
Omni Direct
Omni Direct mode offers some unique colors as well as speed and brightness control. The programs are listed below. To use Omni Direct mode, LPCUS22xxx and LSCUS22xxx Universal ColorLogic lights must be configured and controlled by a supporting Hayward “Omni” pool control. Compatible pool controls include the Hayward OmniLogic, OmniHub, and OmniPL. Refer to your control’s manual to determine compatibility and for specific information about configuration and operation.
- Show-Voodoo Lounge
- Fixed-Deep Blue Sea
- Fixed-Royal Blue
- Fixed-Afternoon Skies
- Fixed-Aqua Green
- Fixed-Emerald
- Fixed-Cloud White
- Fixed-Warm Red
- Fixed-Flamingo
- Fixed-Vivid Violet
- Fixed-Sangria
- Show-Twilight
- Show-Tranquility
- Show-Gemstone
- Show-USA
- Show-Mardi Gras
- Show-Cool Cabaret
- Fixed-Yellow
- Fixed-Orange
- Fixed-Gold
- Fixed-Mint
- Fixed-Teal
- Fixed-Burnt Orange
- Fixed-Pure White
- Fixed-Crisp White
- Fixed-Warm White
- Fixed-Bright Yellow
Before You Begin
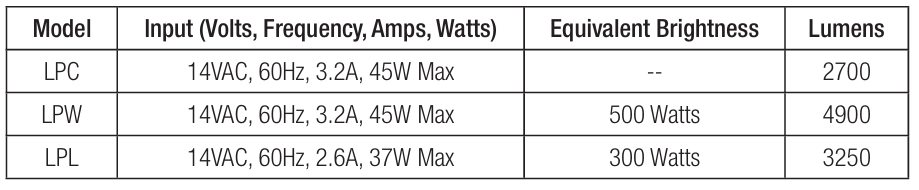
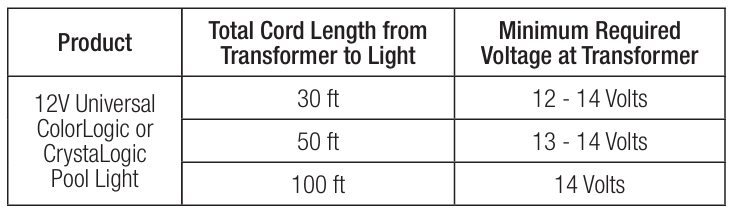
- Cord Length and Minimum Required Voltage Considerations When installing Universal ColorLogic/CrystaLogic low-voltage lights, the length of the cord has an effect on performance.
- To prevent performance problems, verify that the transformer is providing the minimum required voltage according to the table below.
- To check this voltage, measure the voltage at the transformer while the light is “on” and operating in “white” mode. In some cases, a voltage greater than 12 volts is required due to a long cord run.
- Some transformers provide higher voltage taps for this purpose; check your transformer manufacturer’s installation instructions for details.
- When using Hayward or other transformers that offer a 14V option, we suggest that you always use the 14 volt tap.
Mounting Location and Height
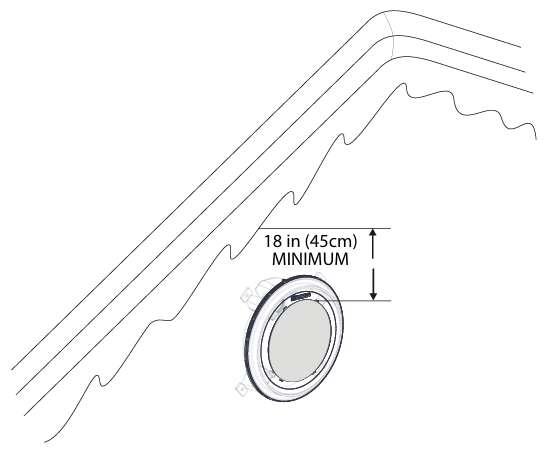
The light fixture must be installed on a wall or the floor of Hayward LPCUS22xxx LED Light Fixtures the pool or spa, with the top of the lens not less than 18 inches (45 cm) below the normal water level of the pool, except when the fixture is installed in an area of the swimming pool that is not used for swimming.
Select a location for the light fixture(s) that will give optimum light dispersion for the pool or spa design. Be sure to consider the direction of emitted light and take care not to point lights directly at the house or outdoor living spaces.
Verify Connection
The ColorLogic and CrystaLogic power cable comes attached to the light from the factory. If the cable needs to be removed, it’s important that the cable be reinstalled properly. Refer to the information below when reinstalling the power cable. Check that the power cable is securely fastened before installing the ColorLogic or CrystaLogic light.
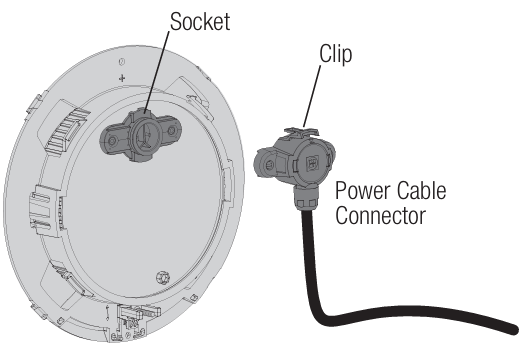
Plug the power cable connector into the socket on the backside of the light as shown. The clip on the top of the connector should firmly lock into the socket on the light.

Routing the Light Cord
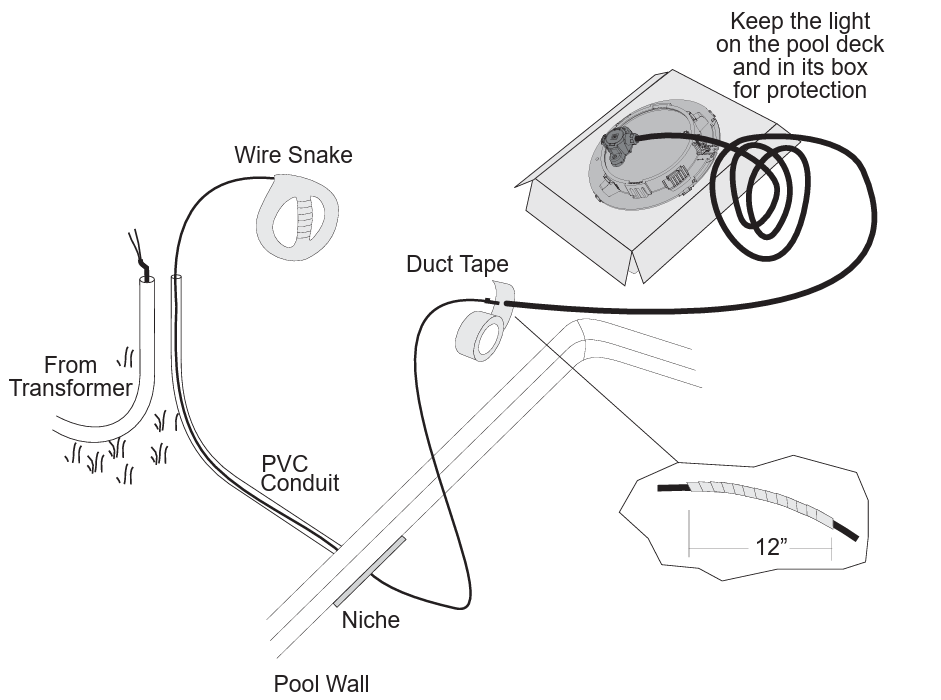
If replacing an existing light, remove power to the light at the electrical panel before starting this installation. Installation must be performed according to Local and NEC codes. Route the light cord through the niche and conduit to the location of the junction box or transformer. Refer to the diagram below. Note: If the light cord requires replacement for any reason, use only Hayward part GLXLPCORD100. Refer to page 15 for replacement parts.
Mounting
Hayward Niche LFGUY1000
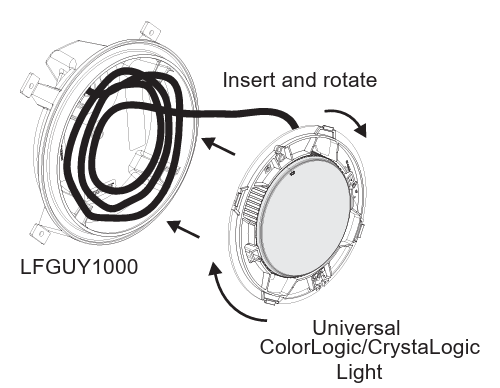
The Universal ColorLogic/CrystaLogic Light offers a unique tool-less design when used with the Hayward LFGUY1000 niche. With the power cord routed to the junction box or transformer, coil up 3-4ft of extra cord (up to 15ft can be coiled if necessary) and insert it in the LFGUY1000 niche.
To mount the light, insert it into the niche and twist the light flange clockwise until it firmly locks. The mounting hole should now be at the noon position.
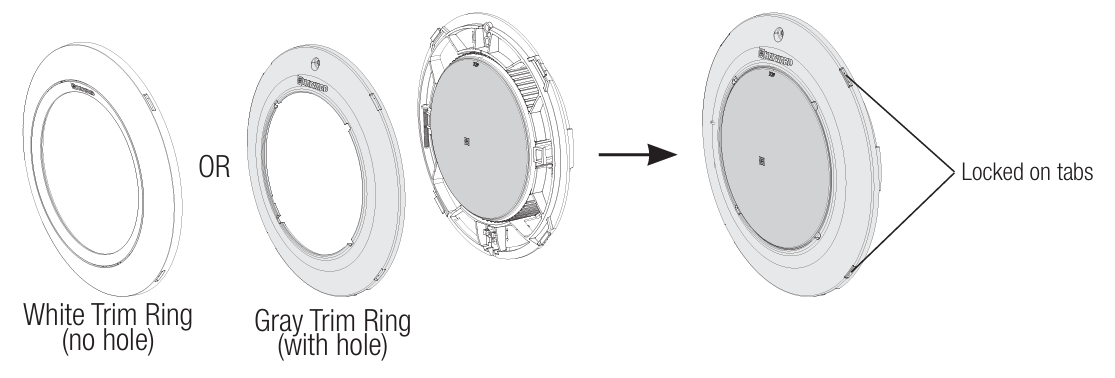
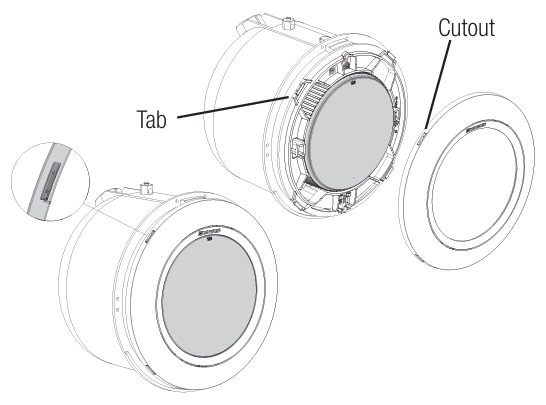
Install either the white or gray plastic trim ring by gently snapping all four trim ring tabs to the four cutout locations on the light flange. Note that the gray trim ring with the mounting screw hole should be used if the stainless steel trim ring will be installed over it (see next section below).
Stainless Steel Trim Ring Installation (optional)
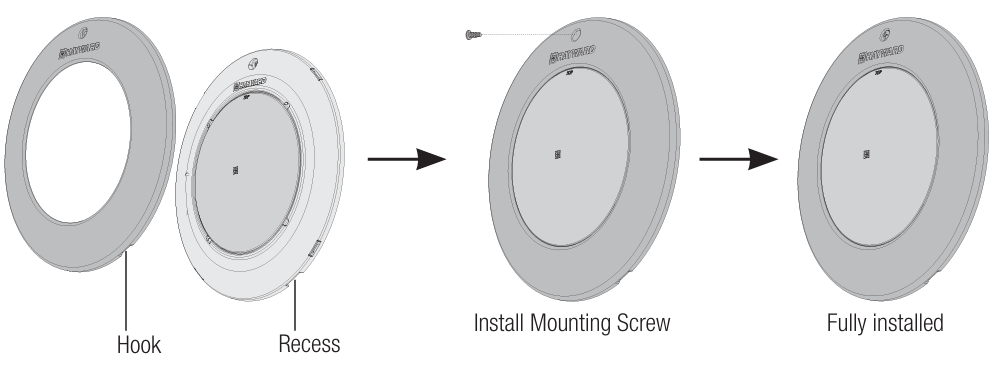
Position the light and gray plastic trim ring, and insert the two hooks on the bottom with the two recesses on the plastic trim ring. Tilt the stainless steel trim ring toward the light and then finish the installation by hand-tightening the screw into the hole at the top of the stainless steel trim ring. Be careful not to over-tighten.
Trim Ring Removal
Remove the mounting screw (if used) and then remove the trim ring by locating the tabs that have been inserted into the trim ring cutouts (shown above). With a small flat head screwdriver, gently pry the trim ring off of each tab until the trim ring comes free.
Light Flange Removal
With the trim ring removed, insert a #2 Phillips head or any small screwdriver into the access hole at the molded latch shown to the right. Gently pry the latch away from the catch so that you can twist the light flange counterclockwise. Twist the light flange until it comes free from the niche.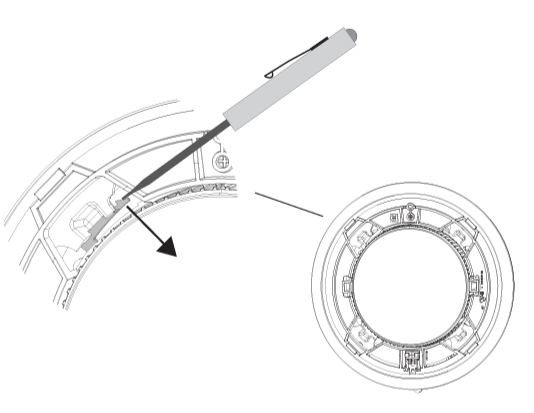
All other Niches
The Universal ColorLogic/CrystaLogic lights have multiple screw holes and hook positions to fit most niches. Before mounting, examine the light flange, paying particular attention to the adjustable hook (6 o’clock) and the two mounting screw hole positions (noon). The hook can slide up and down and will adjust to a position that will align one of the two mounting screw holes with the niche screw hole.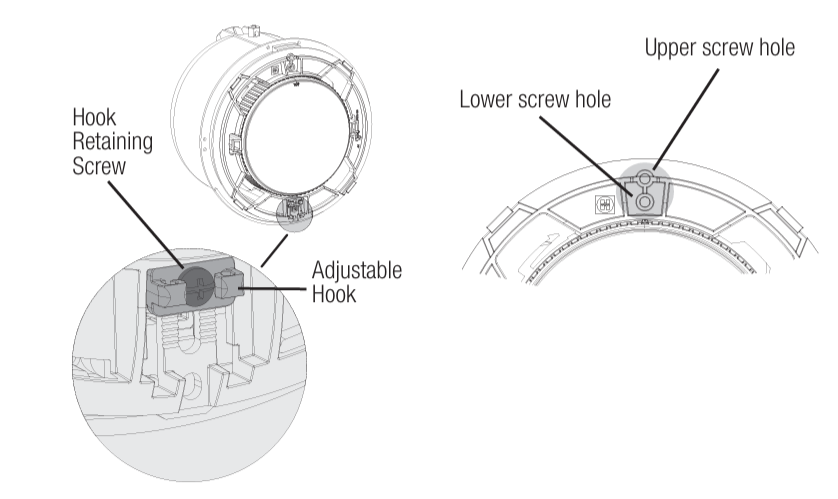
The optimum position for the hook is when it rests solidly on the niche while either of the two mounting screw holes lines up with the niche’s screw hole. In this position, the hook will retain the bottom of the light flange in the niche. Test fit the light into the niche to determine the best position for the hook. Once that position is found, tighten the hook retaining screw slightly to ensure that the adjustment won’t change during installation.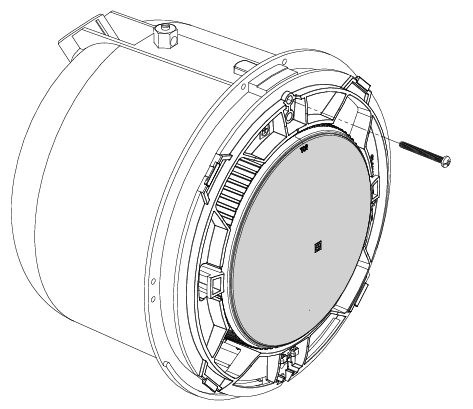
Coil up 3-4ft of extra cord and insert it in the niche behind the light flange. Position the hook so that it catches on the niche, and then pivot the top of the light into the niche. Install the plastic trim ring by locating the four tabs on the light flange and aligning the four cutouts on the trim ring. Gently snap the trim ring onto the light flange in all four locations.
If using the stainless steel trim ring, position it over the light and gray plastic trim ring and insert the two hooks on the bottom with the two recesses on the plastic trim ring. Tilt the stainless steel trim ring toward the light and then finish the installation by hand-tightening Hayward LPCUS22xxx LED Light Fixtures the screw into the hole at the top of the stainless steel trim ring. Be careful not to over-tighten.
Trim Ring Removal
Remove the mounting screw (if used) and then remove the trim ring by locating the tabs that have been inserted into the trim ring cutouts (shown above). With a small flat head screwdriver, gently pry the trim ring off of each tab until the trim ring comes free. Note: For some installations into Sta-Rite® and SwimQuip® niches, the bottom hook may need to be removed. If so, removing the hook retaining screw will allow you to remove the hook from the light flange.
Wiring
Considerations when Installing a Junction Box or Junction Box Transformer. When using a wall-mount low-voltage transformer, a junction box should be installed to make the connection to the pool/spa light. If using more than one light, an adequate number of single-or double-outlet junction boxes will be required. Alternatively, Hayward low-voltage junction box transformer kits (LTBUY11H65) can be used when in-line transformers are desired. Refer to page 13 for more information.
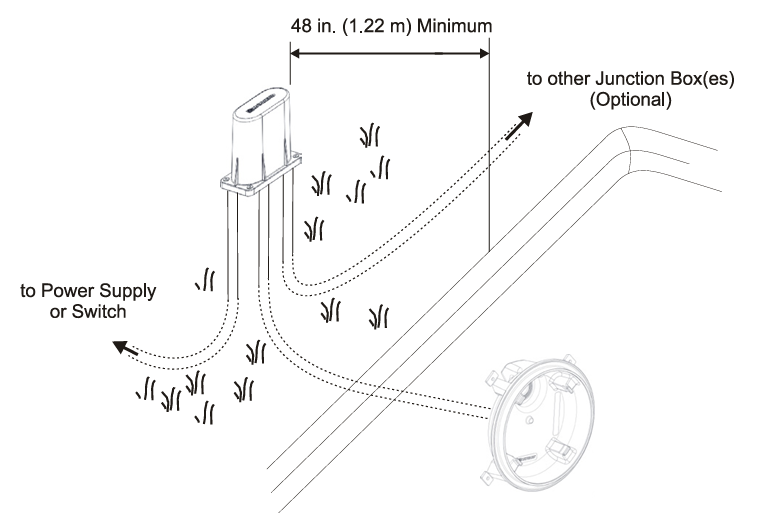
Junction boxes must be installed not less than 48 inches (1.22 m) from the edge of the pool or spa. Run conduit from the niche up to the junction box such that the junction box is not less than 8 inches (20 cm) above the maximum pool or spa water level, or not less than 4 inches (10 cm) above the ground, whichever is greater. Additional conduit should be run from the junction box Hayward LPCUS22xxx LED Light Fixtures to the power supply, switch panel, pool/spa controller, etc.
Wiring Connection to a Wall-mount Transformer
A suitable transformer that is agency listed for low-voltage swimming pool and spa lights (Hayward LTBUY11300, Intermatic® model PX100/PX300, or equivalent) must be used. The transformer must be rated at or above the total wattage used by all attached light fixtures. To ensure dependable operation, up to four Universal ColorLogic/CrystaLogic LED lights can be connected to a single Hayward LTBUY11300 transformer.
If using an LTSUY11300 Hayward Smart Power transformer, only one light can be connected per zone. Run conduit from the junction box to the low-voltage transformer, pool/ spa controller, or switch box. Snake 2 wires through the conduit from the junction box to the power supply. If multiple lights are being installed, run additional conduit/wires from the junction box to the additional junction box(es). When wiring multiple lights to the same 12-volt source, do not exceed the transformer’s total rated wattage. Refer to the manufacturer’s specifications and instructions for run length and wiring size. Use wire nuts to connect the field-installed wiring to the light fixture cord in the junction box.

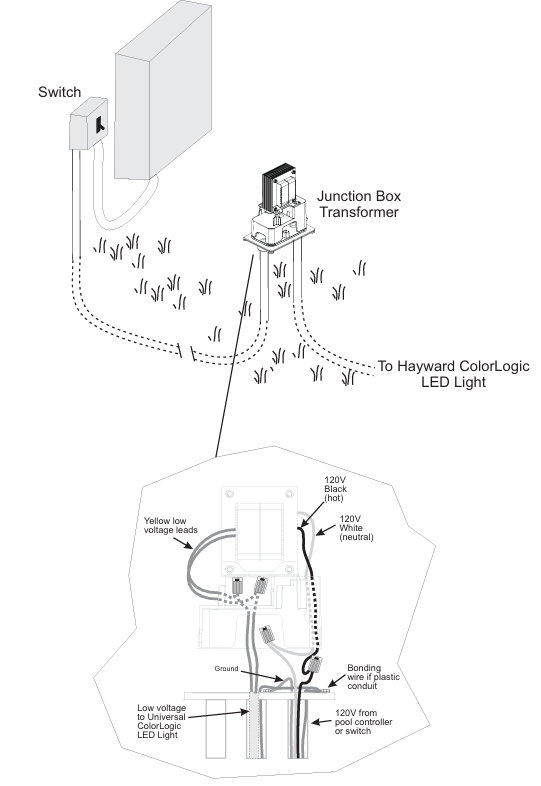
Wiring Connection to a Hayward Junction Box Transformer
Hayward offers pool/spa light transformers designed to fit into Hayward LPCUS22xxx LED Light Fixtures various manufacturers’ junction boxes. Refer to the table on the following page to determine which model transformer will fit your type of junction box. These transformers are designed to power a single Hayward ColorLogic/CrystaLogic LED light. If more than one light is installed, multiple junction box transformers must be used. Run conduit from the junction box transformer to the pool/spa controller or switch box.
Snake 3 wires through the conduit. Connect the ground wires to the ground terminal connections inside the junction box. Use wire nuts to connect the field-installed wiring to the 120V side of the transformer and the Universal ColorLogic/CrystaLogic LED light cord to the low-voltage side of the transformer. Refer to the wiring diagram on the following page.

Troubleshooting
If you have a problem with your Hayward Universal Color Logic/Crysta Logic light, please try the following tips before calling for service:
- PROBLEM: Universal ColorLogic Light will not advance Hayward LPCUS22xxx LED Light Fixtures to the next program when it is powercycled (turned “off” and then back “on”). SOLUTION 1: Do not power-cycle the switch too rapidly. Leave it off for at least 1 second before turning it back on.SOLUTION 22: Make sure that the light is in the proper mode (page 3).
- PROBLEM: Universal ColorLogic Light goes to white whenever it is power-cycled (turned “off” and then back “on”). SOLUTION: Be sure that you power-cycle the light for less than 10 seconds.
- PROBLEM: Multiple Universal ColorLogic Lights Hayward LPCUS22xxx LED Light Fixturesare not correctly synchronized. SOLUTION: Verify that the Universal ColorLogic light is in the proper mode (page 3). Follow the steps in these instructions to resynchronize the lights.
- PROBLEM: Light will not come on.
SOLUTION: Check the input power to the transformer and then the light. Check the ground fault and reset if necessary. PROBLEM: The Light will not come on, or the light cycles on and off. SOLUTION: Depending on cord length and operating voltage, the automatic thermal switch may be cycling due to excessive air/pool water temperatures (over 105ºF). Temporarily switch to a cooler color (Deep Blue Sea, Royal Blue, etc.) until air/water temperatures cool off. - PROBLEM: GFCI trips when lights are turned on or off. SOLUTION: Install a Hayward GLX-HAL-XSNUB snubber capacitor across the primary leads (line to neutral) of the transformer on the load side of the light switch or relay.
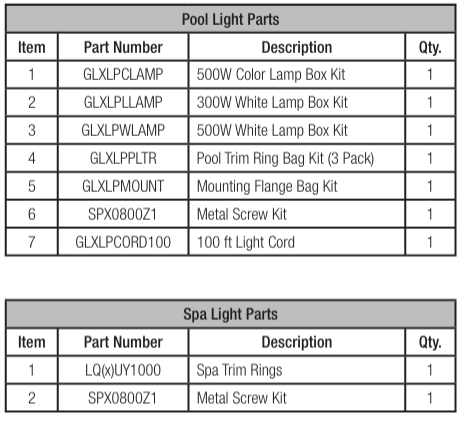
Replacement Parts
HAYWARD® Pool Products Limited Warranty
Hayward Pool Products, Inc., warrants the components of this product to be free from defects in materials and workmanship during the warranty period. Please Hayward LPCUS22xxx LED Light Fixtures visit https://hayward.com/support/resources/warranty for product warranty details.
The limited warranty excludes damage from freezing, negligence, improper installation, improper use or care, Acts of God, or as specified in the installation Hayward LPCUS22xxx LED Light Fixtures and operations manual. In the event proof of purchase is not available, the manufacturing date of the product will be the sole determination of the purchase date. To obtain warranty service, please contact the place of purchase or the nearest Hayward Authorized Service Center.
For assistance at your nearest Hayward Authorized Service Center, please visit us at https://hayward.com/dealerlocator. Hayward shall not be responsible for cartage, removal, repair, or installation labor, or any other such costs incurred in obtaining warranty replacements or repair. The Hayward Pool Products ‘ warranty does not apply to components manufactured by others. For such products, the warranty established by the respective manufacturer will apply. In no event shall Hayward Pool products be responsible for any consequential, special, or incidental damages of any nature.
Some states do not allow a limitation on how long an implied warranty lasts, or the exclusion of incidental or consequential damages, so the above limitation may not apply to you. This warranty gives you specific legal rights, and you may also have other rights, which vary from state to state. Hayward Industries, 1415 Vantage Park Dr., Suite 400, Charlotte, NC 28203 *Supersedes all previous publications
Customer Service
- Website: hfcsales@hayward.com
- Tel: 1-908-355-7995
FAQs
Q: What type of pools are these LED fixtures designed for?
Ans: When fitted in the appropriate niche or housing, these LED lights work well with fibreglass, vinyl, and gunite surfaces in inground pools and spas.
Q: Are the LPCUS22xxx lights compatible with all Hayward control systems?
Ans: Yes, you may coordinate lighting with other pool features because they are completely compatible with Hayward ProLogic®, OmniLogic®, and OmniHub® systems.
Q: What voltage do these fixtures operate on?
Ans: Low-voltage electricity of 12V AC powers the LPCUS22xxx series. Before installing, always confirm the electrical requirements in the handbook for your particular model.
Q: Can I install multiple LPCUS22xxx lights in one pool? Will they sync?
Ans: Indeed. Using a Hayward automation system or manually timing different switches is necessary for synchronising.
Q: What is the expected lifespan of these LED fixtures?
Ans: Under usual circumstances, Hayward LED pool lights have a 50,000-hour lifespan. Water chemistry, installation circumstances, and electricity quality can all affect lifespan.