
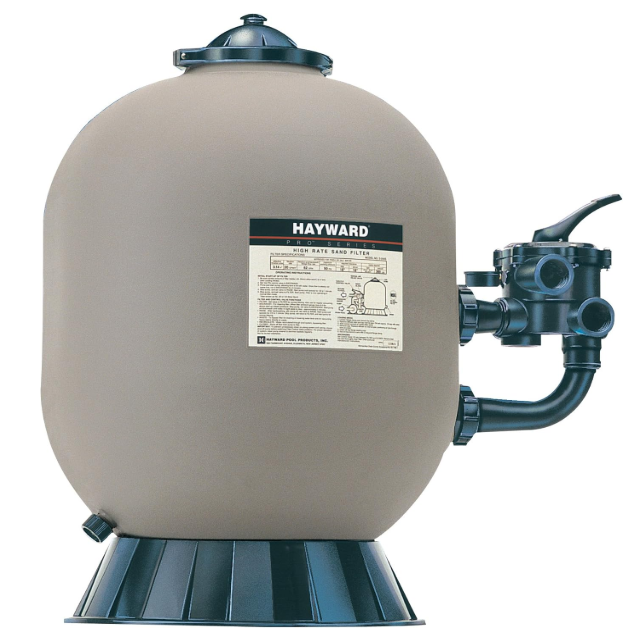
Hayward S311SX High Rate Sand Filter
IMPORTANT SAFETY INSTRUCTIONS
- Hair Entrapment: Hair can become entangled in suction outlet cover.
- Limb Entrapment: A limb inserted into an opening of a suction outlet sump or suction outlet cover that is damaged, broken, cracked, missing, or not securely attached can result in a mechanical bind or swelling of the limb. Body Suction Entrapment: A negative pressure applied to a large portion of the body or limbs can result in an entrapment.
- Evisceration/ Disembowelment: A negative pressure applied directly to the intestines through an unprotected suction outlet sump or suction outlet cover which is, damaged, broken, cracked, missing, or unsecured can result in evisceration/disembowelment.
- Mechanical Entrapment: There is potential for jewelry, swimsuit, hair decorations, finger, toe or knuckle to be caught in an opening of a suction outlet cover resulting in mechanical entrapment.
WARNING – To Reduce the risk of Entrapment Hazards
- When outlets are small enough to be blocked by a person, a minimum of two functioning suction outlets per pump must be installed. Suction outlets in the same plane (i.e. floor or wall), must be installed a minimum of three feet (3’) [1 meter] apart, as measured from near point to near point.
- Dual suction fittings shall be placed in such locations and distances to avoid “dual blockage” by a user.
- Dual suction fittings shall not be located on seating areas or on the backrest for such seating areas.
- The maximum system flow rate shall not exceed the listed flow rating.
- Never use Pool or Spa if any suction outlet component is damaged, broken, cracked, missing, or not securely attached.
- Replace damaged, broken, cracked, missing, or not securely attached suction outlet components immediately.
- Install suction outlets in accordance with latest ASME, APSP Standards and CPSC guidelines. Follow all applicable National, State, and Local codes.
- Installation of a vacuum release or vent system, which relieves entrapping suction, is recommended.
WARNING – Risk of Hyperthermia
- Spa or hot tub water temperatures should never exceed 104°F [40°C]. A temperature of 100°F [38°C] is considered safe for a healthy adult. Special caution is suggested for young children. Prolonged immersion in hot water can induce hyperthermia.
- Drinking of alcoholic beverages before or during spa or hot tub use can cause drowsiness, which could lead to unconsciousness and subsequently result in drowning.
- Pregnant women beware! Soaking in water above 100°F [38°C] can cause fetal damage during the first three months of pregnancy (resulting in the birth of a brain-damaged or deformed child). Pregnant women should adhere to the 100°F [38°C] maximum rule.
- Before entering the spa or hot tub, users should check the water temperature with an accurate thermometer; spa or hot tub thermostats may err in regulating water temperatures by as much as 4°F [2.2°C].
- Persons taking medications, which induce drowsiness, such as tranquilizers, antihistamines or anticoagulants, should not use spas or hot tubs.
- If the pool/spa is used for therapy, it should be done with the advice of a physician. Always stir pool/ spa water before entering to mix in any hot surface layer of water that might exceed healthful temperature limits and cause injury. Do not tamper with controls, because scalding can result if safety controls are not in proper working order.
- Persons with a medical history of heart disease, circulatory problems, diabetes or blood pressure problems should obtain a physician’s advice before using spas or hot tubs.
- Hyperthermia occurs when the internal temperature of the body reaches a level several degrees above normal body temperature of 98.6°F [37°C]. The symptoms of Hyperthermia include: drowsiness, lethargy, dizziness, fainting, and an increase in the internal temperature of the body.
The effects of Hyperthermia include
- Unawareness of impending danger.
- Failure to perceive heat.
- Failure to recognize the need to leave the spa.
- Physical inability to exit the spa.
- Fetal damage in pregnant women.
- Unconsciousness resulting in danger of drowning.
Introduction.
Your Hayward ProSeries™ high-rate sand filter is a high performance, totally corrosion-proof filter that blends superior flow characteristics and features with ease of operation. It represents the very latest in high-rate sand filter technology. It is virtually foolproof in design and operation and when installed, operated and maintained according to instructions, your filter will produce clear, sparkling water with only the least attention and care.
How It Works
Your filter uses special filter sand to remove dirt particles from the water. Filter sand is loaded into
the filter tank and functions as the permanent dirt removing media. The pool water, which contains suspended dirt particles, is pumped through your piping system and is automatically directed by the patented filter control valve to the top of the filter tank. As the pool water is pumped through the filter sand, dirt par¬ticles are trapped by the sand bed, and filtered out. The cleaned pool water is returned from the bottom of the filter tank, through the control valve and back to the pool through the piping system. This entire sequence is continuous and automatic and provides for total recirculation of pool water through your filter and piping system.
After a period of time, the accumulated dirt in the filter causes a resistance to flow, and the flow diminishes. This means it is time to clean (backwash) your filter. With the control valve in the Backwash position, the water flow is automatically reversed through the filter so that it is directed to the bottom of the tank, up through the sand, flushing the previously trapped dirt and debris out the waste line. Once the filter is backwashed (cleaned) of dirt, the control valve is manually sequenced to Rinse, and then Filter, to resume normal filtering.
Installation
Only simple tools (screwdriver and wrenches), plus pipe sealant for plastic adapters, are required to install and/or service the filter. Installation Steps
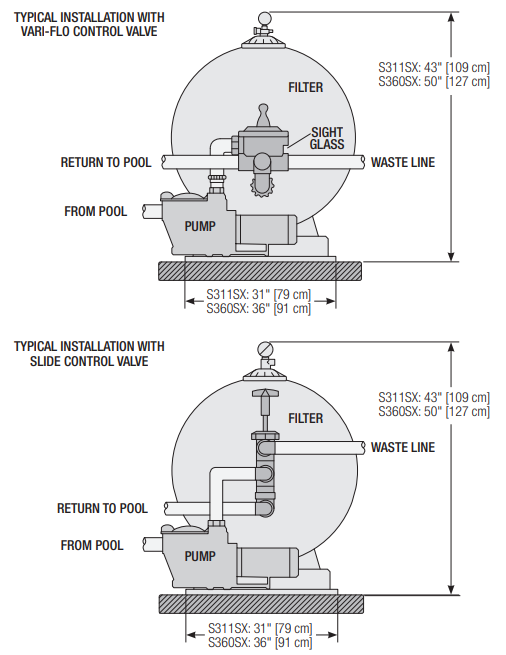
- The filter system should be installed, not more than 6 feet above pool water level, on a level concrete slab, very firm ground, or equivalent, as recommended by your pool dealer. Position the filter so that the piping connections, control valve, and winter drain are convenient and accessible for operation, service and winterizing.
- Assemble a filter control valve to filter. Align the two (2) valve pipe connections, with 0-rings in place, with the two openings in the side of the filter tank and press in firmly. Secure the assembly to the tank connections with the two bulkhead locknuts.

- Assemble pump and pump mounting base (if supplied) to the filter according to instructions packed with the base.
- Loading sand media. Filter sand media is loaded through the top opening of the filter.
- Remove the top diffuser from the internal diffuser elbow pipe and place flexible, automatic air relief tube to the side, out of the way, inside the tank.
- Cap the internal diffuser elbow pipe with the sand shield provided to prevent sand from entering it.
- It is good practice to fill tank approximately 1/2 way with water to provide
- cushioning effect when the filter sand is poured in. This helps protect the under-drain laterals from excessive shock. (Be sure the drain cap is securely in place on drain pipe.)
- Carefully pour in correct amount and grade of filter sand, as specified. Sand surface should be leveled and should come to about 6“ from the top of the filter tank. Use no more than recommended amount of sand.
- Remove the sand shield from internal diffuser elbow pipe.
- Replace diffuser on internal diffuser elbow pipe, positioning automatic air relief tube through the hole provided in the diffuser.
- Wipe filter flange clean.
- Insert top closure dome (with flange 0-ring in place) into the tank neck. Place clamp around dome flange and tank flange and tighten with screwdriver, tapping around clamp with screwdriver handle to help seat flange clamp.
- Connect pump to control valve opening marked PUMP according to instructions. (For Slide valve use PORT B, middle port.) Make return to pool pipe connection to control valve opening marked RETURN (Port E bottom Port for Slide Valve) and complete other necessary plumbing connections, suction lines to pump, waste, etc.
- Make electrical connections to pump per pump instructions.
- To prevent water leakage, be sure drain cap is securely in place and all pipe connections are tight.

Initial Start-Up of Filter
- Be sure correct amount of filter sand media is in tank and that all connections have been made and are secure.
- Depress VariFlo® control valve handle and rotate to BACKWASH position. (To prevent damage to control valve seat, always depress handle before turning.) For Slide Valve, set handle to BACKWASH position. (Handle full down and LOCKED by twisting clockwise.) For new concrete or gunite pools, or where there is a large amount of plaster dust or debris, start filter in FILTER position (not BACKWASH) to prevent clogging of underdrain laterals.
- Prime and start pump according to pump instructions. (Be sure all suction and return lines are open), allowing the filter tank to fill with water.
WARNING – Separation Hazard. All suction and discharge valves must be open when starting the system. Failure to do so could cause severe personal injury and/or property damage. - Once water flow is steady out the waste line, run the pump for at least 2 minutes. This initial backwashing of the filter is recommended to remove any impurities or fine sand particles in the sand media.
- Turn pump off and set VariFlo valve to RINSE position (Not available on slide valve.). Start pump and operate until water in sight glass is clear—about 1/2 to 1 minute. Turn pump off, set valve to FILTER position (For Slide Valve twist Handle fully counterclockwise to open and pull up fully). Start the pump. Your filter is now operating in the normal filter mode, filtering particles from the pool water.
- Adjust pool suction and return valves to achieve desired flow. Check system and filter for water leaks and tighten connections, bolts, and nuts as required.
- Note the initial pressure gauge reading when the filter is clean. (It will vary from pool to pool depending upon the pump and general piping system.) As the filter removes dirt and impurities from the pool water, the accumulation in the filter will cause the pressure to rise and flow to diminish. When the pressure gauge reading is 6-8 PSI (0.41-0.55 BAR) higher than the initial “clean” pressure you noted, it is time to backwash (clean) the filter (see BACKWASH under Filter Control Valve Functions).
Operation
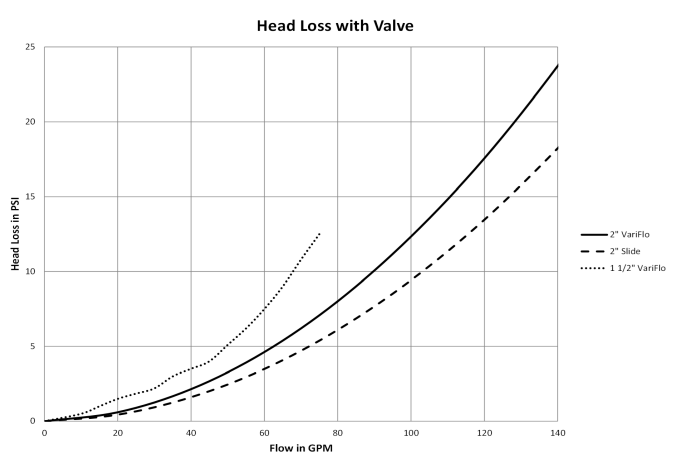
Filter Control Valve Functions
- FILTER: Set valve to FILTER for normal filtering. Also use for regular vacuuming. (Slide Valve handle up)
- BACKWASH: For cleaning filter. When filter pressure gauge rises 6-8 PSI (0.41-0.55 BAR) above start-up (clean pressure): Stop the pump, set valve to BACKWASH. (Slide Valve handle down and locked). Start pump and backwash approximately 2 minutes or less depending on dirt accumulation until water in sight glass is clear. Proceed to RINSE.
- RINSE: After backwashing, with pump off, set valve to RINSE. Start pump and operate for about 1/2 to 1 minute. This ensures that all dirty water from backwashing is rinsed out to the filter to waste, preventing possible return to the pool. Stop pump, set valve to FILTER, and start pump for normal filtering.
- WASTE: To bypass filter for draining or lowering water level and for vacuuming heavy debris directly to waste.
- RECIRCULATE: Water is recirculated through the pool system, bypassing the filter.
- CLOSED: Shuts off flow from pump to filter.
- VACUUMING: Vacuuming can be performed directly Hayward S311SX High Rate Sand Filter into the filter. When vacuuming heavy debris loads, set valve to WASTE position to bypass the filter and vacuum directly out to waste.
Winterization
- Completely drain tank by unscrewing drain Hayward S311SX High Rate Sand Filter cap at base of filter tank. Leave cap off during winter.
- Depress VariFlo control valve handle and rotate so as to set pointer on valve top between any two positions. This will allow water to drain from the valve. Leave valve in this “inactive” position.
- Drain and winterize pump according to pump instructions.
Maintenance
Consult your local authorized Hayward dealer or service center. No returns may be made directly to the factory without the expressed authorization of Hayward Pool Products, Inc.
Please Realize: Pure, clear swimming pool water is a combination of two factors—adequate filtration and proper water chemistry balance. One without the other will not give the clean water you desire. Your filter system is designed for continuous operation. However, this is not necessary for most swimming pools. You can determine your filter operation schedule based Hayward S311SX High Rate Sand Filter on your pool size and usage. Be sure to operate your filtration system long enough each day to Hayward S311SX High Rate Sand Filter obtain at least one complete turnover of your pool water. To properly sanitize your pool, maintain a free chlorine level of 1 to 3 ppm and a pH range of 7.2 to 7.6. Insufficient chlorine or an out of balance Hayward S311SX High Rate Sand Filter pH level will permit algae and bacteria to grow in your pool and make it difficult for your filter to properly clean the pool water.
| Specifications | |||||||||||
| Model Number | Effective Filtration Area | Maximum Working Pressure | Required Clearance | Media Required | |||||||
| Side | Above | Type | Amount | ||||||||
| ft2 | m2 | PSI | BAR | in. | mm | in. | mm | Filter Sand* | lbs | kg | |
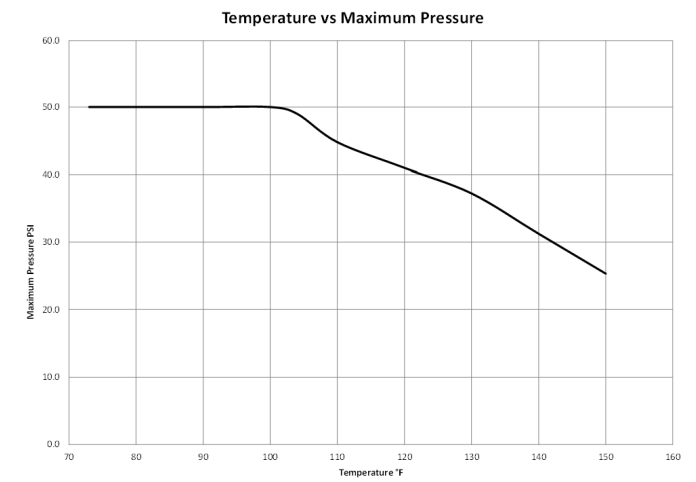
| S311SX | 5.0 | .46 | 50 | 3.45 | 18 | 460 | 18 | 460 | 0.45 to 0.55 mm | 350 | 160 |
| S360SX | 6.7 | .62 | 50 | 3.45 | 18 | 460 | 18 | 460 | 0.45 to 0.55 mm | 700 | 318 |
| Maximum Recommended System Flow Rate By Pipe Size | |||||
| Pipe Size in. [mm] | Flow Rate GPM [LPM] | Pipe Size in. [mm] | Flow Rate GPM [LPM] | Pipe Size in. [mm] | Flow Rate GPM [LPM] |
| 1 [32] | 20 [75] | 1-1/2 [50] | 45 [170] | 2-1/2 [75] | 110 [415] |
| 1-1/4 [40] | 30 [110] | 2 [63] | 80 [300] | 3 [90] | 160 [600] |
| Pool Chemical Guidelines | |||
| Suggested Pool Chemistry Levels | Action Required To Correct Pool Chemistry | ||
| To Raise | To Lower | ||
| pH | 7.2 to 7.6 | Add Soda Ash | Add Muriatic Acid or Sodium Bisulphate |
| Total Alkalinity | 100 to 130 ppm | Add Sodium Bicarbonate | Add Muriatic Acid |
| Chlorine (Unstabilized) | 0.3 to 1.0 ppm | Add Chlorine Chemical | No Action – Chlorine will naturally dissipate |
| Chlorine (Stabilized) | 1.0 to 3.0 ppm | Add Chlorine Chemical | No Action – Chlorine will naturally dissipate |
| Stabilizer (Cyanuric Acid) | 40 to 70 ppm | Add Stabilizer | Dilution – Partially drain & refill pool with water that has not been treated with Cyanuric Acid |
Troubleshooting
| Problem Solving List | |||
| Problem | Low Water Flow | Short Filter Cycles | Pool Water Won’t Clear Up |
| Remedy | • Check skimmer and pump strainer baskets for debris. • Check for restrictions in intake and discharge lines. • Check for air leak in intake line (indicated by bubbles returning to pool). • Backwash filter. | • Check for algae in pool and superchlorinate as required. • Be sure chlorine and pH levels are in proper range (adjust as required). • Check surface of filter sand for crusting or caking (remove 1 ” of sand if necessary). | • Check chlorine, pH and total alkalinity levels and adjust as required. • Be sure flow rate through filter is sufficient. • Operate filter for longer periods. • Be sure Vari-Flo valve is set on “Filter” position. |
Replacement Parts
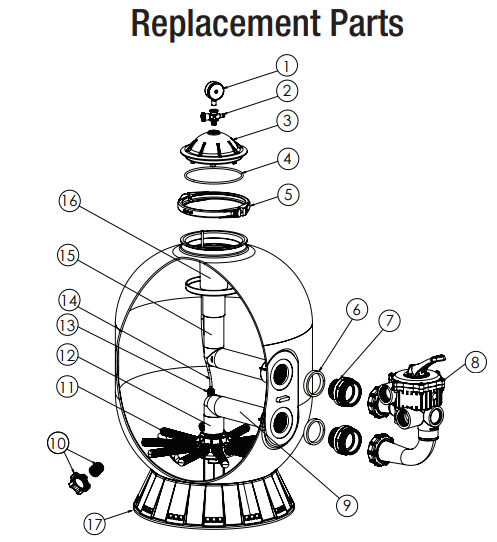
| Ref No | Part No | Description | Qty |
| 1 | ECX270861 | Pressure Gauge | 1 |
| 2 | DEX2400S | Air Relief Assembly | 1 |
| 3 | SX200Z5 | Top Closure Dome | 1 |
| 4 | GMX600F | Valve/tank O-ring | 1 |
| 5 | SX310N | Flange Clamp S310S | 1 |
| 6 | SX244PX | Bulkhead Fitting w Seal | 2 |
| 7 | SX244Z1 | Square Seal | 2 |
| 8a | SP0710X62 | 1.5″ VariFlo Control Valve Assembly | 1 |
| 8b | SP715X62 | 2″ VariFlo Control Valve | 1 |
| 8c | SP0410X602S | 2″ Slide Valve | 1 |
| 9a | SX311CD2FWS | Bottom elbow assembly S311 | 1 |
| 9b | SX360CDFWS | Bottom elbow assembly S360 | 1 |
| 10 | SX180LA | Drain Cap Assembly | 1 |
| 11 | SX310HNRPAK10 | Ribbed lateral pack of 10 | 1 |
| 12a | SX311DAS | Lateral Holder Assembly with Bottom vertical pipe (S311) | 1 |
| 12b | SX242MA3S | Lateral Holder Assembly with Bottom vertical pipe (S360) | 1 |
| 13 | X1010574 | Air tube locknut | 1 |
| 14a | SX244AT | New air tube for S311SX with locknut | 1 |
| 14b | SX360AT | New air tube for S360SX with locknut | 1 |
| 15a | SX311CD1FWS | Top Elbow Assembly with bottom diffuser | 1 |
| 15b | SX360CD1FWS | Top Elbow Assembly with bottom diffuser | 1 |
| 16 | SX244GS | New style diffuser assembly | 1 |
| 17 | SX310J | Filter stand | 1 |
| 9a+12a | SX311MAS | Lateral holder assembly, bottom vertical pipe, and bottom elbow assembly (S311SX) | 1 |
HAYWARD® Pool Products Limited Warranty
Hayward Pool Products, Inc., warrants the components of this product to be free from defects in materials and workmanship during the warranty period. Please visit https://hayward.com/support/resources/warranty for product warranty details. The Hayward S311SX High Rate Sand Filter limited warranty excludes damage from freezing, negligence, improper Hayward S311SX High Rate Sand Filter installation, improper use or care, Acts of God or as specified in installation and operations manual. Parts that fail or become defective during the warranty period shall be repaired or replaced, at our option. Proof of purchase is required for warranty service.
In the event proof of purchase is not available, the manufacturing date of the product will be the sole determination of the purchase date. To obtain warranty service, please contact the place of purchase or the nearest Hayward Authorized Service Center. For assistance on your nearest Hayward Authorized Service
Center, please visit us at https://hayward.com/dealerlocator. Hayward shall not be responsible for cartage, removal, repair or installation labor or any other such costs incurred in obtaining warranty replacements or repair. The Hayward Pool products warranty does not apply to components manufactured by others.
For such products, the warranty established by the respective manufacturer will apply. The express limited warranty above constitutes the entire warranty of Hayward Pool Products with respect to its pool products and is in lieu of all other warranties expressed or implied, including warranties of merchantability or fitness for a particular purpose. In no event shall Hayward Pool products be responsible for any consequential, special or incidental damages of any nature. Some states do not allow a limitation on how long an implied warranty lasts, or the exclusion of incidental or consequential damages, so the above limitation may not apply to you. This warranty gives you specific legal rights, and you may also have other rights, which vary from state to state. Hayward Industries, 1415 Vantage Park Dr., Suite 400, Charlotte, NC 28203 *Supersedes all previous publications
Register your product at https://hayward.com/support/resources/warranty/product-registration
FAQs
What is the Hayward S311SX Sand Filter used for?
For in-ground pools and spas, the S311SX is a high-capacity, high-performance sand filter. By forcing the water through a properly graded sand bed, it filters out particles, dirt, and debris.
What type of sand should I use in this filter?
Make use of #20 silica sand that is pool-grade and has a particle size of 0.45 to 0.55 mm. Your user manual will tell you how much sand you need, which is typically about 500 pounds (226 kg) for the S311SX model.
How do I know when to change the sand?
Even after backwashing, replace the sand every three to five years, or sooner if filtration performance noticeably declines.
Can I use the filter for a saltwater pool?
Indeed! The S311SX is compatible with salt chlorination systems since it is constructed of materials that are resistant to corrosion. Simply keep the water chemistry healthy and rinse it sometimes.
What is the normal operating pressure for the S311SX?
Clean pressure typically ranges from 10 to 15 psi, though this depends on the system. After the initial startup, note your clean pressure for future use.
Is it okay to run the filter 24/7?
Even though the filter is made to last, it’s not always required to run it constantly. The majority of pools only require 8–12 hours of filtration per day, depending on conditions and usage.
What happens if I move the multiport valve while the pump is on?
Never alter valve settings while the pump is operating as this could harm internal components or result in leaks. The pump should always be turned off first.
How do I clean the filter tank exterior?
Make use of a gentle soap and water mixture. Steer clear of aggressive chemicals that might harm the tank’s surface or other parts.