
Hayward W3HSCTRACCU Suction Side Pool Cleaner
IMPORTANT SAFETY INSTRUCTIONS
Basic safety precautions should always be followed, including the following: Failure to follow instructions can cause death and/or severe injury
- READ AND FOLLOW ALL INSTRUCTIONS
- If your pool has a dedicated suction port (“vac port”) for vacuuming or for an automatic pool cleaner, it must be covered when not in use. If not already installed, use a spring loaded Safety Vac-Loc cover on the suction port to prevent entrapment and injury.
- If the cover provided does not t, purchase one that does from your local pool store and install it instead. The cover should conform to IAPMO SPS4-99A.
- Always stop the pump before attempting to clean or service the pool vacuum.
- DO NOT use to remove large debris in new pools.
- REMOVE the cleaner before chemically shocking your pool.
- DO NOT allow swimmers in pool while pool cleaner is operating.
- Store the cleaner in a shaded safe area.
- Hoses must be stored straight. DO NOT coil the hoses.
- Keep away from children and pets.
- REMOVE cleaner when performing backwash.
Overview
Features
Hollow Turbine
This cleaner utilizes a hollow turbine which enables flow to bypass the blades in the event of large debris blockage. This ensures the pool system is always provided flow.
Steering System and Hose Swivel
The tracked suction cleaner has an internal programmed steering system, allowing it to turn and then move into another direction. This steering system has 6 different programmed turns settings at various degrees that allow the cleaner to fully navigate the entire pool. The external hose swivel allows the cleaner to turn freely without interference from the hose due to debris buildup as well as unwanted hose coiling
Robust Tracks
The TracVac’s patented track system and unique underbody ensures that the cleaner can easily negotiate main drains, uneven surfaces, strange shapes and steep corners on both the deep and shallow ends of the pool. This makes the Cleaner ideal for all pool surfaces and shapes.
Wall Climbing
The TracVac will only climb walls on pools with sufficient floor to wall radius. The cleaner has patented adjustable skirts that allow the cleaner to maintain optimal suction under the machine even when it encounters obstacles. When the cleaner encounters an obstacle, one or more of the skirts will lift up (adjust) over the obstacle while maintaining suction under the cleaner.
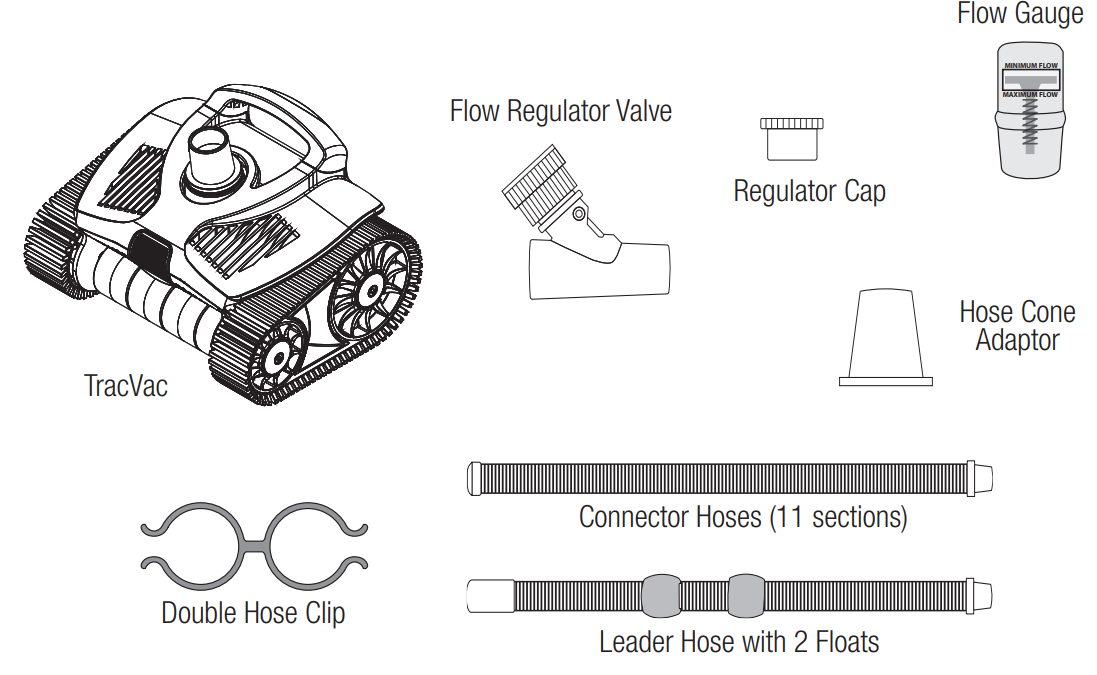
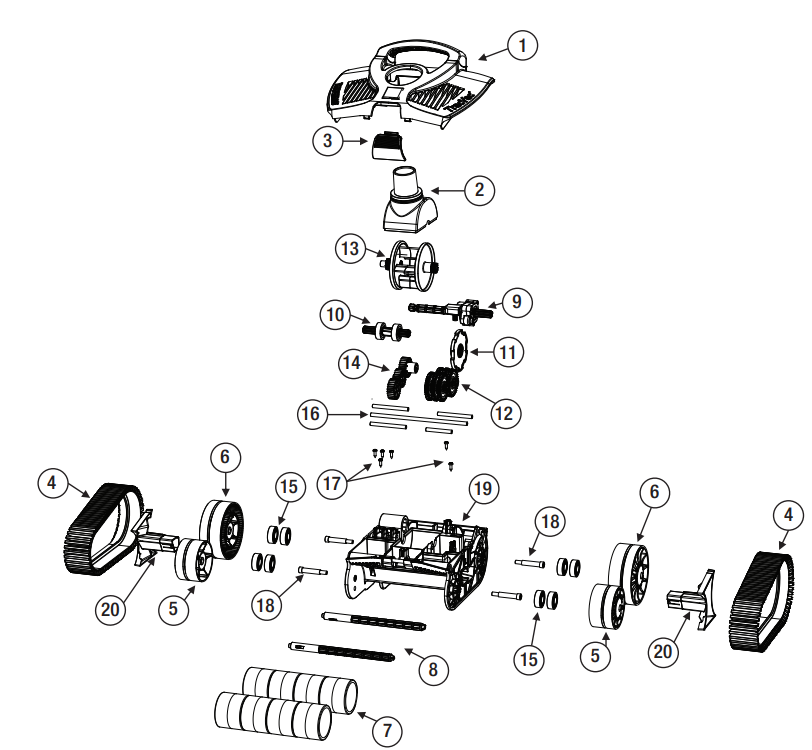
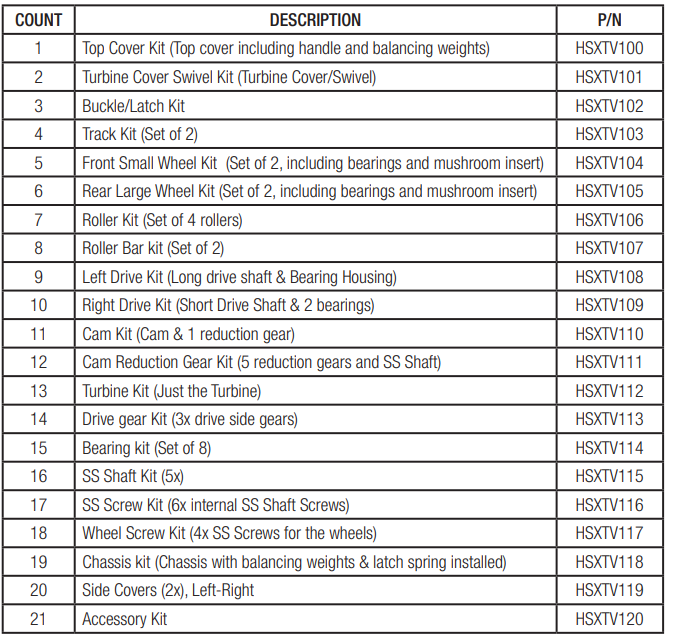
What’s Included
Installation
IMPORTANT: Pools with Variable Speed Pumps – The cleaner requires a minimum & maximum rate of flow to operate optimally. If the variable speed pump has multiple speeds programmed, use the Flow Gauge to calibrate the recommended flow rate at the pump’s highest programmed speed. This can be done by the using the Flow Regulator Valve and adjusting pump speed manually to attain the correct flow at the highest preset speed. See page 5 for more information. By using the highest preset speed, you’ll ensure that all other settings will never exceed the recommended maximum flow rate.
IMPORTANT: Pools with Solar Heating – Solar Heating must be turned OFF whenever the TracVac is in use. If using Solar Heating and the TracVac, always alternate schedules.
Pool Preparation
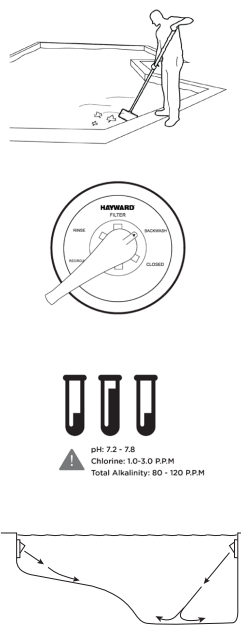
- Manually remove very large and excessive debris from pool
(ie. post- storm, spring cleaning/pool opening situations). - Perform a backwash or clean filter cartidges, clean your
filter, skimmer baskets and pump basket. - Check that chemical balance is correct. If not, take the time
to correct it before using the TracVac. If you chemically
shock the pool, wait 1-2 days before continuing. - Point all your return fittings downward to maximize cleaner
pool coverage.
IMPORTANT: Turn OFF Pool Pump before you begin the next steps.
Dedicated Suction Port Connection
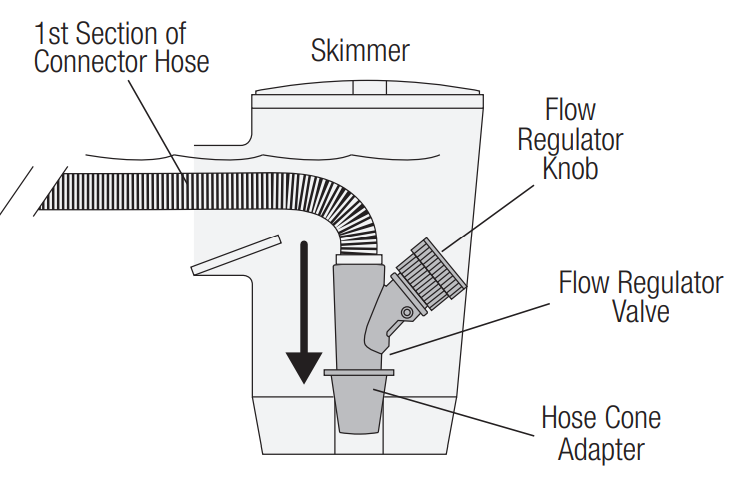
- With the pump turned off, insert the adjustable Flow Regulator Valve with the Regulator Cap into the skimmer. Use the Hose Cone Adapter to make a proper seal, if necessary.

- Install one section of hose into the Safety Vac-Lock fitting of your dedicated suction port, as shown. If your pool does not have a dedicated suction port, go to Skimmer Only Connection.
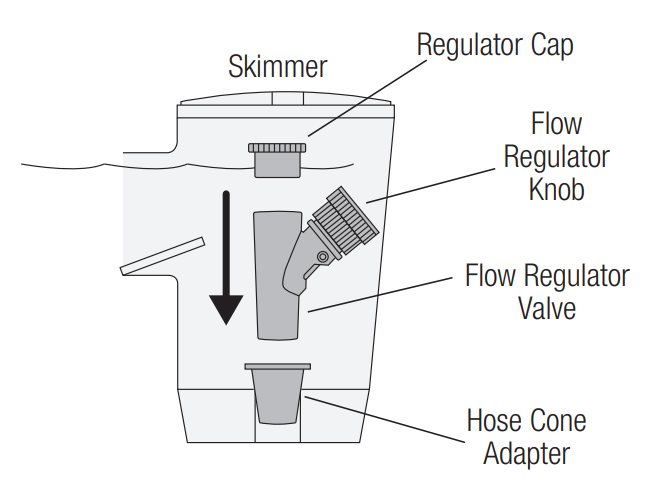

Skimmer Only Connection
If your pool does not have a dedicated suction port, install one section of hose into the skimmer together with the Flow Regulator Valve, as shown. If necessary, use the Hose Cone Adapter to provide a proper seal. NOTE: the Regulator Cap is not used in this installation.
Connecting the Hoses
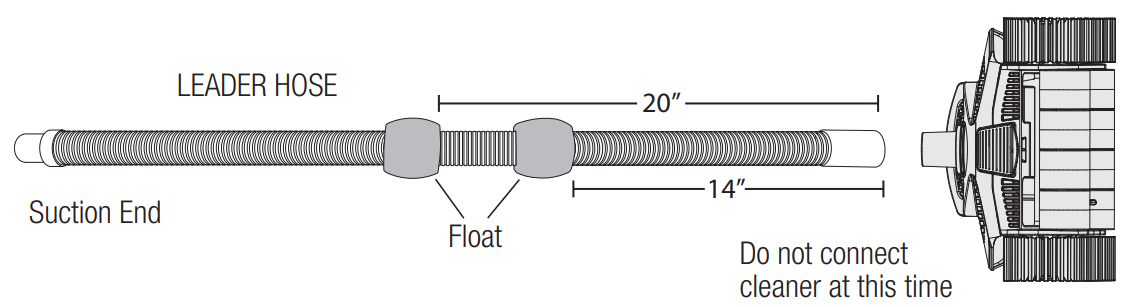
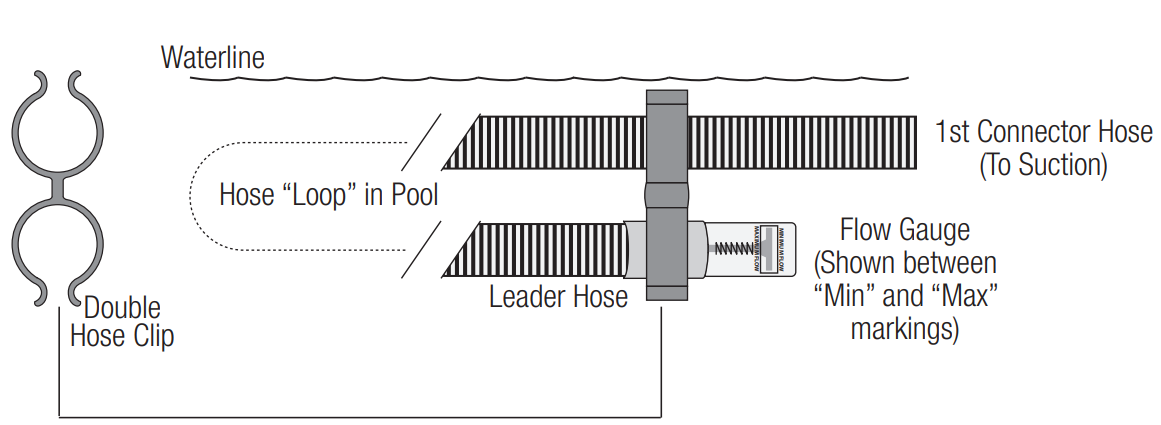
- Ensure that the two Floats are attached to the Leader Hose as shown below. Verify that the
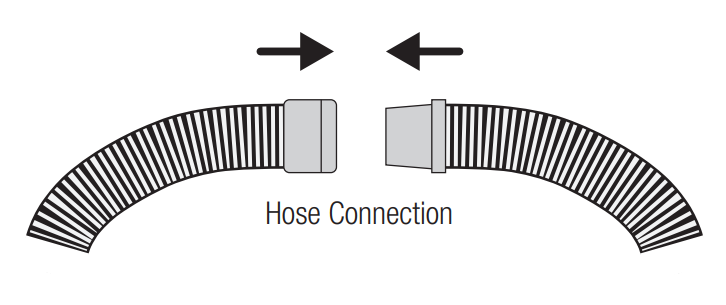
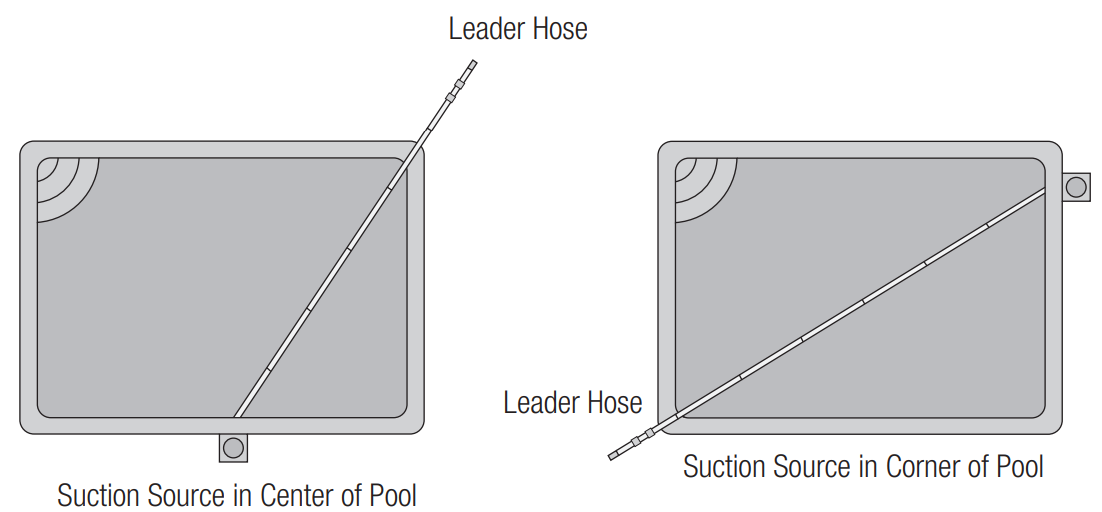
spacing is correct. Do not connect the cleaner at this time. - From the first section of hose at the suction source, connect together as many hose sections
as needed to reach the farthest point of the pool and then add the Leader Hose. Refer to the
diagram below and the top of page 6.
Use Flow Gauge to Check Water Flow
- Submerge the entire length of hose to expunge all air.
- Insert the Flow Gauge into the end of the Leader Hose.
- Attach one end of the Double Hose Clip to the Leader Hose and the other end to the first section of hose at the vacuum source. This will form a loop in the pool as shown below.
- With the air out of the entire hose, verify that the Leader Hose and Flow Gauge are underwater and turn the pump ON. Adjust Flow Regulator Valve knob “faster” or “slower” until the disc indicator in the Flow Gauge settles between “Maximum” and “Minimum” flow. NOTE: If you have an extraordinarily strong pump, you may need to open the main drain slightly.
- Turn off the pump. Remove the Double Hose Clip and Flow Gauge from the Leader Hose. Submerge the TracVac cleaner to remove all air and then connect the cleaner to the Leader Hose. Cleaner installation is now complete.
Operation
Before You Use The TracVac
Understanding how the TracVac works will help ensure the proper operation and maintenance of your cleaner.
- Before every use, visually inspect the TracVac and always check that the turbine moves freely and is not obstructed by debris. Water flowing through the turbine drives the tracks and moves the cleaner. If the TracVac moves slowly or stalls, the turbine may be partially or fully blocked with debris. Refer to “Removing Debris from the Turbine” on the following page.
- Check that the pool’s system is configured in a manner to maximize flow through the cleaner. Ensure that pool filter is clean, allowing for maximum flow. Make sure that supply and return valves are positioned properly and that the pump is running at the proper speed.
- The TracVac’s cleaning performance is optimized when operating at a flow rate that has been set with the Flow Gauge (Step 5 on previous page). This flow rate will ensure that the TracVac moves at the proper speed (see Cleaner Speed). Note that the TracVac draws debris from the pool floor and moves it to the pool filter where it’s trapped and later cleaned out through backwashing or cartridge cleaning. If the pool has a high debris load, you may notice a slow down in cleaner speed which is most commonly caused by the filter getting dirty. In these cases, you may have to clean your filter before the pool is entirely clean. Refer to your filter’s pressure gauge and speed of the cleaner to determine when it’s time for a filter cleaning.
Cleaner Speed
If the Flow Gauge is not available or you want to quickly check for proper operation, you can measure the TracVac’s speed as an indication for proper water flow. To do Hayward W3HSCTRACCU Suction Side Pool Cleaner this, raise the TracVac off of the pool floor and hold it by the handle just beneath the pool water surface.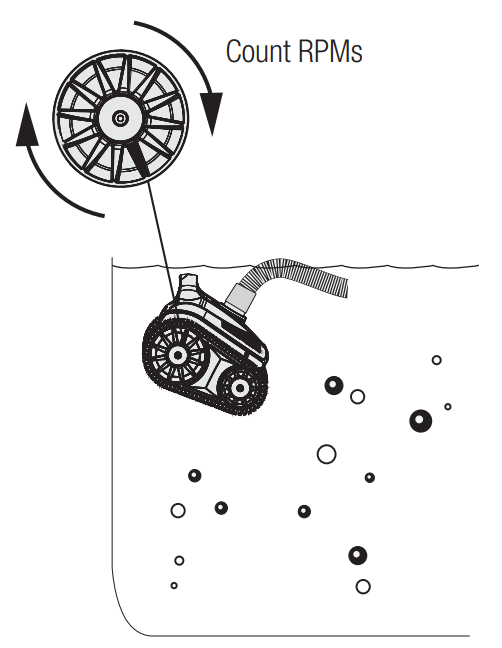
Min Flow: 33 RPM
Max Flow: 40 RPM
If the RPM is below 33, adjust the Flow Regulator Valve (rotate knob clockwise) and check cleaner speed again.
If the RPM is higher than 40, adjust the Flow Regulator Valve (rotate knob counterclockwise) and check cleaner speed again. If adjustments are ineffective, refer to TroubleShooting section of this manual.
If adjustments are ineffective, refer to TroubleShooting section of this manual.
Removing Debris from the Turbine
To clean debris out from the TracVac, perform the following: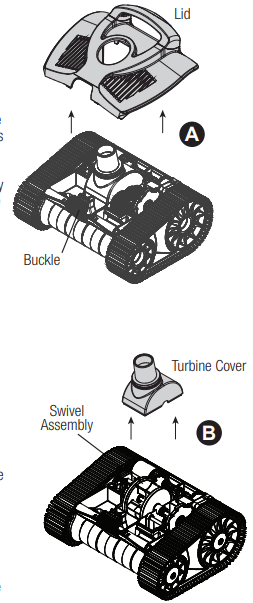
- Turn off the filter pump and remove the TracVac from the pool.
- A clog could be visable by looking into the turbine from where the leader hose connects. If no clog is seen, position the cleaner with the buckle facing you Hayward W3HSCTRACCU Suction Side Pool Cleaner and attempt to rotate the left side track forward. If the wheels rotate smoothly there probably is no obstruction. If the track feels “locked”, there is most likely a blockage.
- To clear an obstruction, place the TracVac on a flat work surface. Refer to image A. Open the buckle on the front of the cleaner by pressing it and lifting the lid. Lift the front of the lid up and then firmly pull it forward. This will separate the lid from the cleaner body and you will now be able to lift the lid straight up from the cleaner chassis.
- Pull the turbine cover straight up and off of the cleaner chassis. Refer to image B. Inspect the turbine cover for debris or obstructions.
- With the turbine cover off, you have full access to the turbine. You should be able to see and remove any visible obstructions from the turbine.
- Install the turbine cover back onto the chassis by reversing Step 4.
- Visually inspect the rest of the cleaner and remove any debris that may be in the gears, drive hafts, swivel assembly, etc.
- Repeat step 2 (turning the left track) to insure that the cleaner runs smoothly.
- Place the lid over the swivel assembly.
- Align the tabs on the back side of the top cover with the slots on the back side of the chassis, push down to engage the tabs. Firmly push the top cover backwards to fully engage the tabs.
- Lock the top cover onto the cleaner chassis with the locking buckle on the front of the
cleaner.
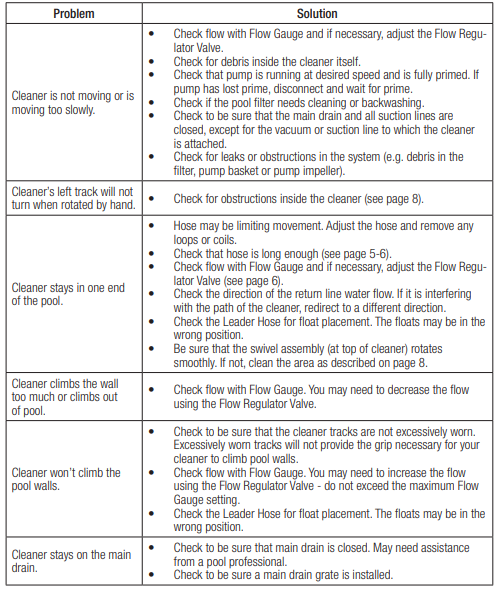
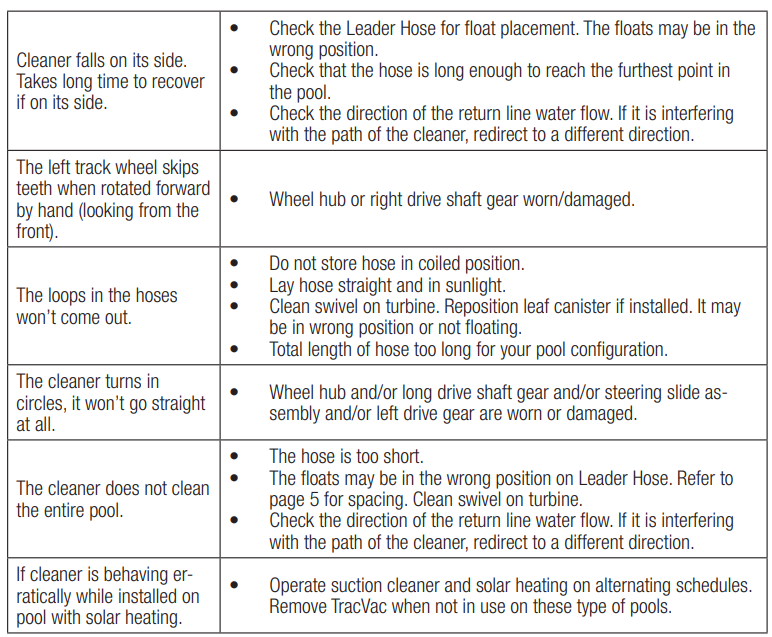
Troubleshooting
IMPORTANT: Always disconnect cleaner before servicing.
For further information or consumer technical support, visit our website at www.hayward.com
FAQs
What is the Hayward W3HSCTRACCU suction side pool cleaner used for?
The W3HSCTRACCU is a suction-side automatic pool cleaner that uses a specialised suction line or your pool’s skimmer to remove debris, leaves and filth from the walls and floor of your pool without the need for human labour.
How is this cleaner powered?
The W3HSCTRACCU is a suction-side automatic pool cleaner that eliminates dirt, debris, and leaves from your pool’s walls and floor without the need for human effort by using a specific suction line or your pool’s skimmer.
How much hose do I need?
Your pool’s hose should be long enough to reach the farthest point plus two feet. Modular hose pieces that can be added or deleted are included with the cleaner.
What type of pool surfaces does it work on?
Vinyl, concrete, gunite, tile, and fibreglass pools can all be used with the W3HSCTRACCU. For efficient coverage, it makes use of traction treads and a steering mechanism that is preset.
What parts of the pool does it clean?
mainly the pool floor, though it may also scale lower walls and coves according on the pool’s design and suction strength.
Can I run the cleaner while people are swimming?
In terms of efficacy and safety, it is not advised. When the pool is empty, always run the cleaner.
How long should I run the cleaner each day?
Cleaning most pools takes two to four hours each day. Pool size, debris load, and pump strength can all affect time.
Do I still need to manually vacuum my pool?
Although this cleaner reduces the need for regular vacuuming, steps, corners, and stubborn material may occasionally require manual cleaning.