

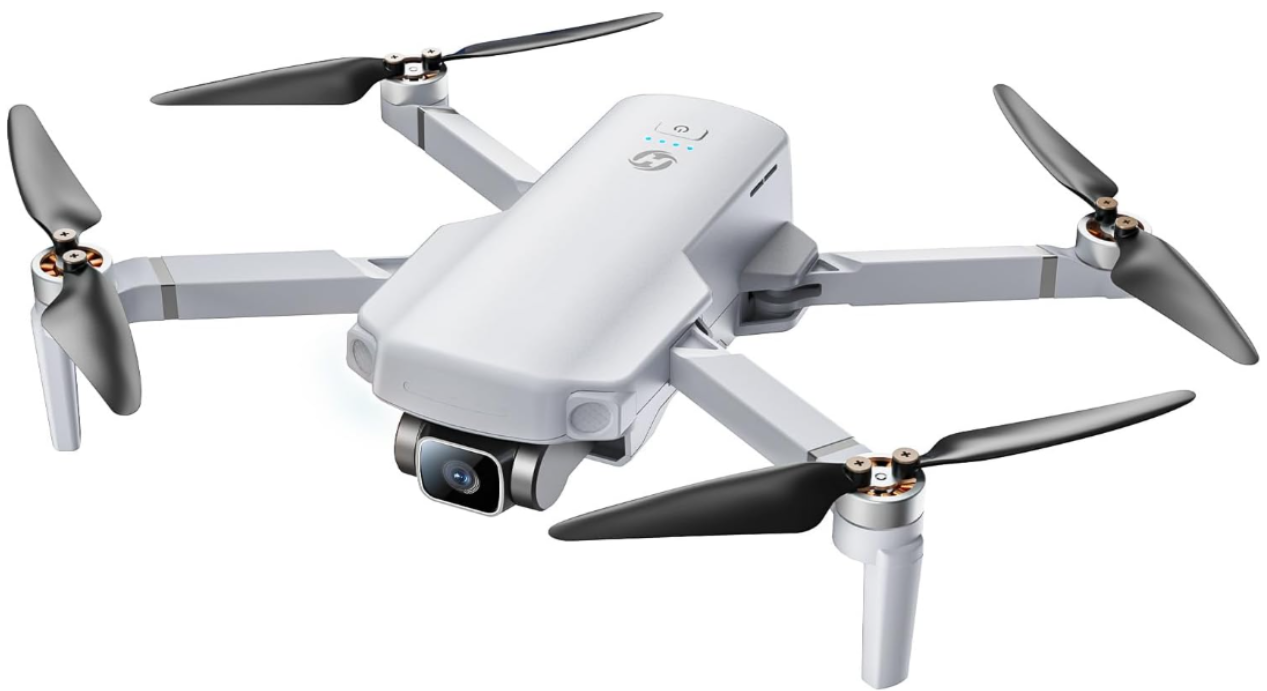
Holy Stone HS360E 20000ft Range GPS EIS Drone
Package Contents
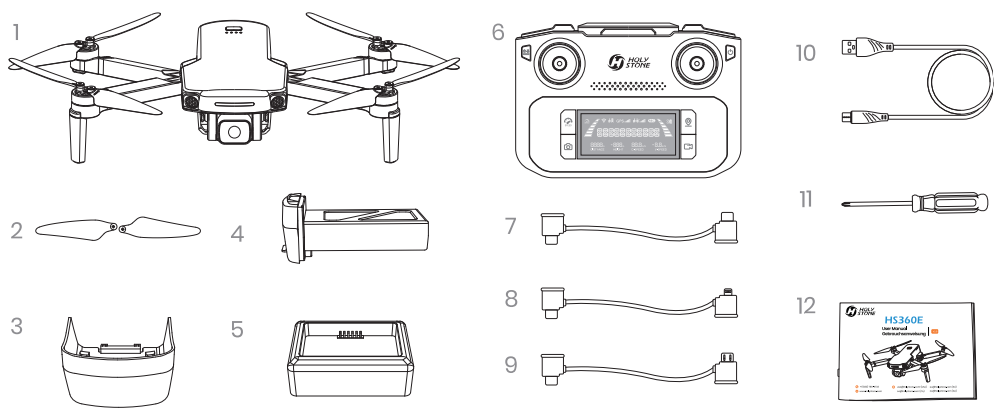
- Drone
- Propellers
- Camera Cover
- Drone Battery
- Charging hub
- Transmitter
- Connection Cable (type-c)
- Connection Cable (lightning)
- Connection Cable (micro-UsB)
- USB Charging Cable
- Screwdriver
- User Manual
Diagram of the Drone
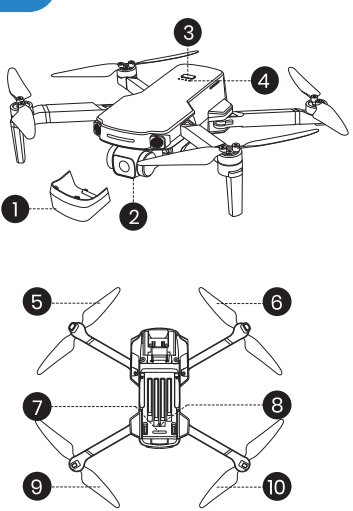
- Camera Cover
- Camera
- Power Switch
- Battery Level Indicators
- Propeller B
- Propeller A
- Drone Status Indicator
- Optical Flow Positioning Lens
- Propeller A
- Propeller B
Part Description
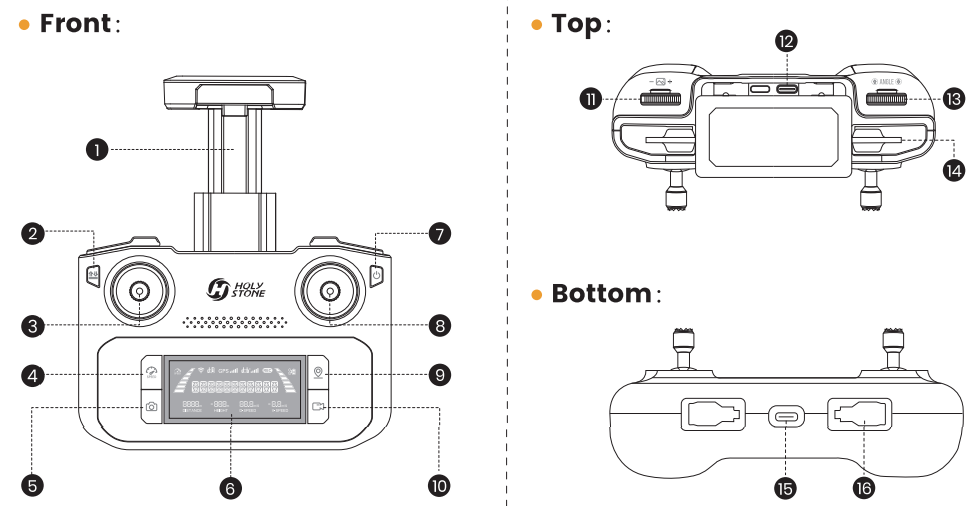
- Cellphone Holder
- Takeoff/Landing: Short Press
- Left Joystick
- Speed Switch: Short Press
- Take Photo
- LCD Screen
- Check Battery Level: Short-press Power Switch: Short-press, then hold
- Right Joystick
- Return to Home
- Record Video
- Zoom Dial
- Connection Port
- Camera Adjustment Dial
- Cellphone Slot
- Charging Port (Type-C)
- Storage Slots for Joysticks
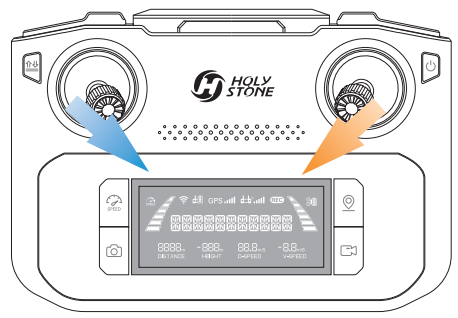
Diagram of the Transmitter
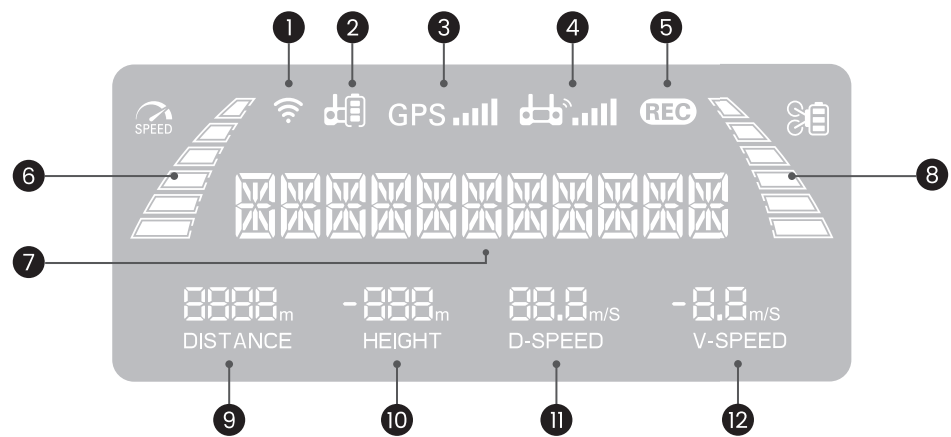
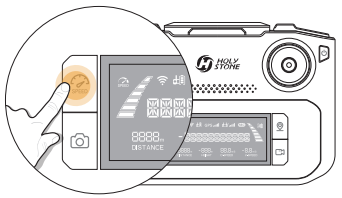
- Transmitter WiFi Signal
- Transmitter Battery Level
- GPS Signal Strength
- Transmitter Signal Strength
- Camera Status
- Flight Speed
- Drone Status
- Drone Battery Level
- Flight Distance
- Flight Height
- Horizontal Speed
- Vertical Speed
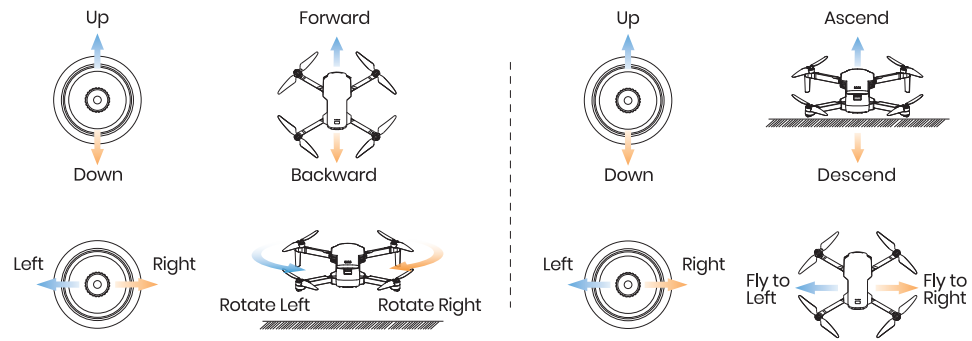
Joystick Mode
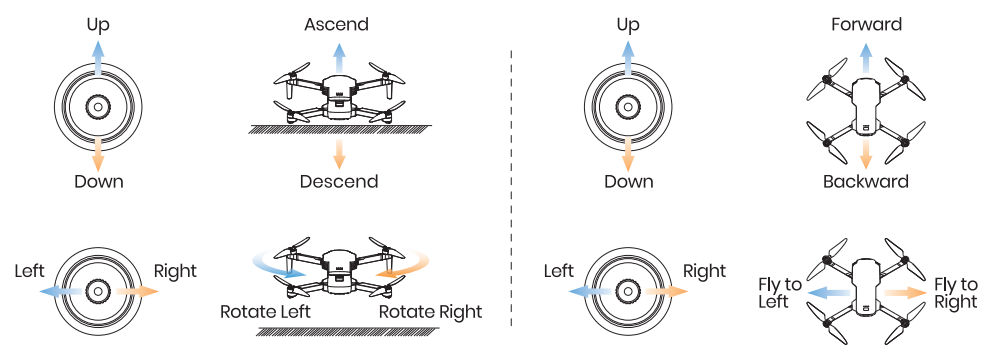
Hold the ( ) button, short-press the ( U ) button of the transmitter once, and hold the latter until the transmitter quickly beeps 3 times.
Charging of the Transmitter
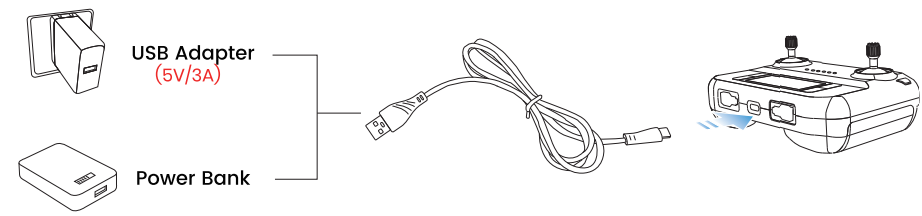
- Insert the Type-C plug of the charging cable into the Type-C port of the transmitter.
- Plug the other end of the cable into a USB adapter (5V/3A) or power bank to start charging.
- When charging, the cells in the battery level bar will light up in turn.
- It takes about 110 minutes to fully charge the transmitter.
- A fully charged transmitter offers about 2.5 hours of usage time.
Charging of the Drone Battery
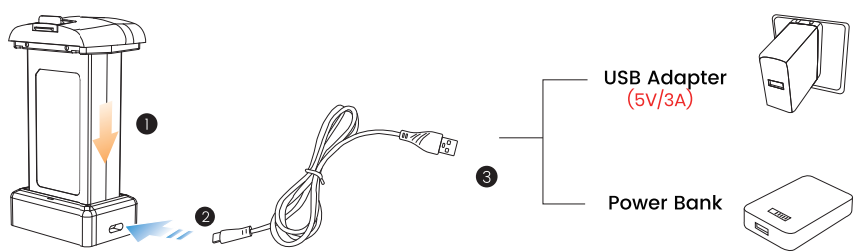
- Insert the batteries into the charging hub and connect the hub to aType-Cc charging cable.
- Plug the other end of the cable into a USB adapter (5V/3A) or power bank to start charging.
- During charging, the lights on the hub will flash green; when fully charged, they will turn solid green.
- If no battery is inserted, the light will remain solid red. It takes about 3 hours to fully charge a drone battery.
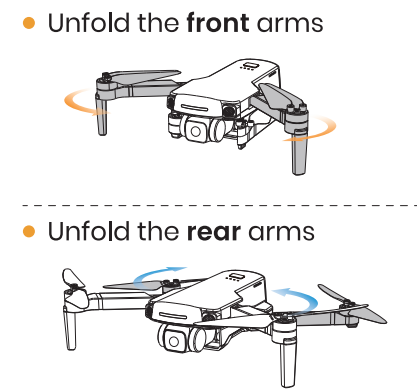
Arms
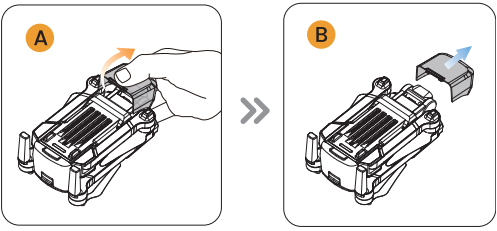
Camera Cover
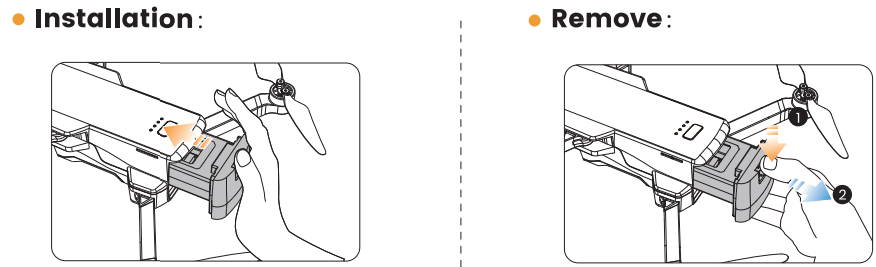
Drone Battery
Propeller
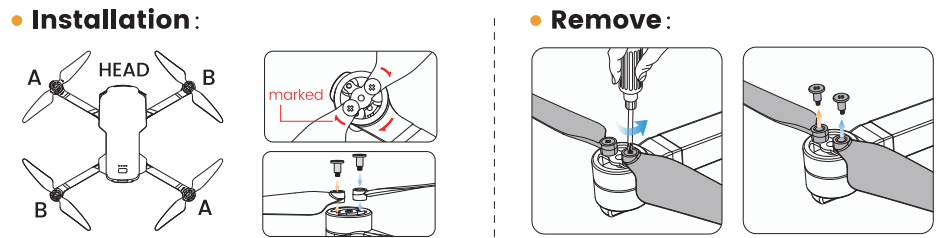
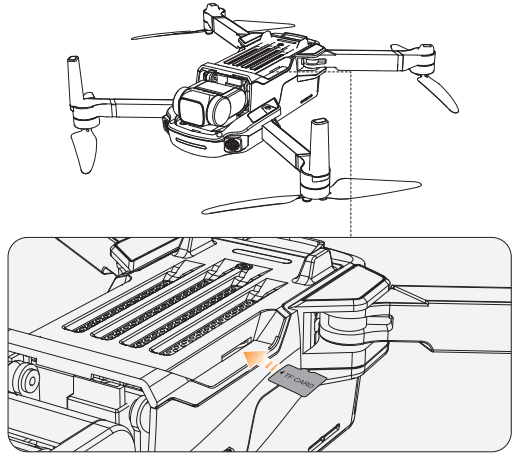
TF Card
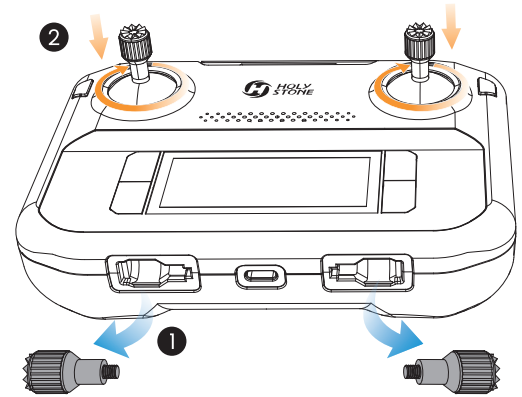
Joysticks
Pre-Flight Checklist


Pairing
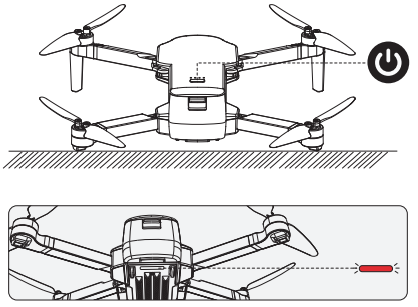
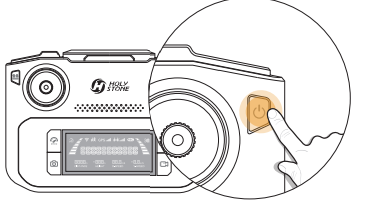
Turning on the drone
- Press and hold the Power Switch (U) for 3 seconds to turn on the drone.
- Place it on a level surface with its head pointing forward.
- The drone status indicator starts to blink red. The drone is now waiting to be paired.
- Turning on the transmitter Short press the power switch (U) once, then press and hold for 3 seconds to turn it on.
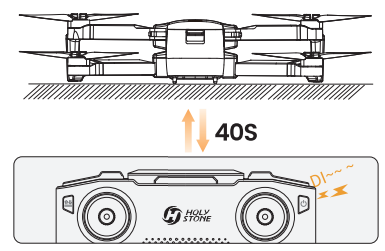
Auto-Pairing
- It takes about 40 seconds to pair the trans- mitter with the drone. During the pairing, the transmitter will keep on beeping. Finally, it will long beep once, indicating that the pairing is complete.
App Connection
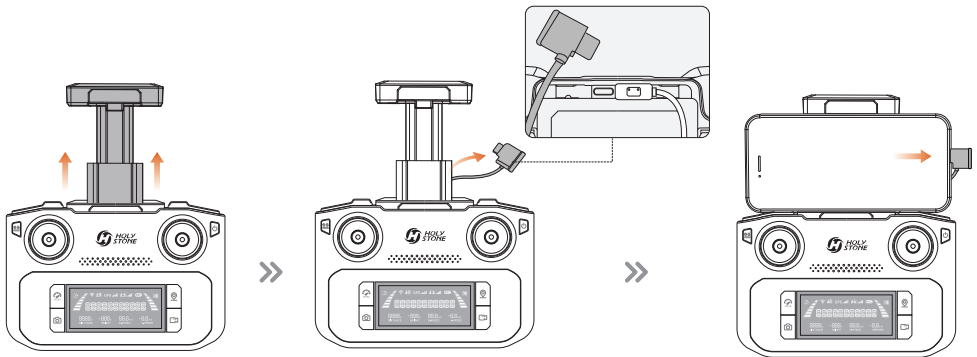
- Cellphone connection: Pull out the phone holder.
- Select the appropriate connection cable (Type-C, Micro-USB, or Lightning) from the package.
- Connect the end marked with a transmitter icon (©) to the transmitter and plug the other end into your cellphone.
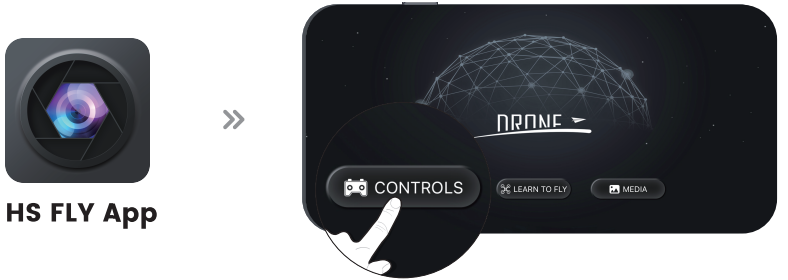
- Run the “HS FLY” app and open up the live-feed interface.
Compass Calibration
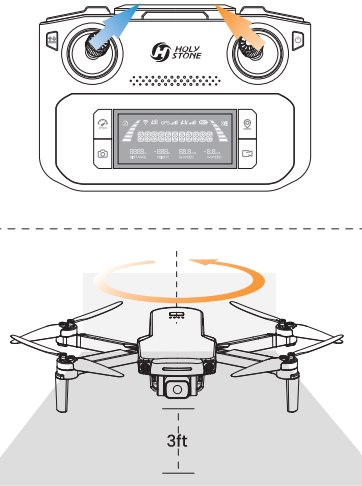
- STEP 1 Push both joysticks towards the inner, upper corners simultaneously to start the compass calibration.
- STEP 2 Rotate the drone horizontally (keeping it parallel to the floor) until the transmitter beeps once.
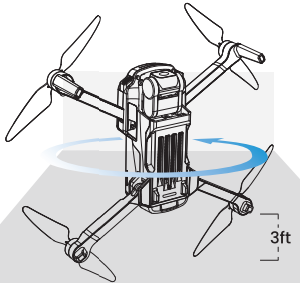
- STEP 3 Point the head of the drone upward and rotate it till the transmitter beeps again. The compass calibration is complete.

After calibrating the compass, put the drone on a flat surface. Make sure there are no external sources of signal interference around. The drone will automatically perform a search for GPS signals. The drone has successfully located the GPS signal when the drone status indicator turns solid blue.
Unlocking the Motors
Push both of the joysticks simultaneously toward the inner, lower corners. The motors start to spin, and the drone is unlocked.
Takeoff/Landing
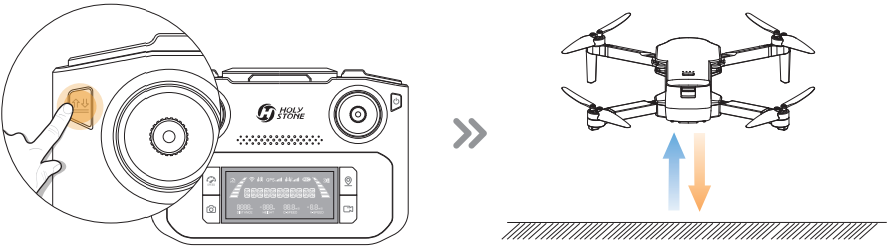
When operating the drone, it’s important to periodically adjust the orientation and distance between the transmitter and the drone to ensure that the drone always remains within the optimal communication range.

Camera Adjustment
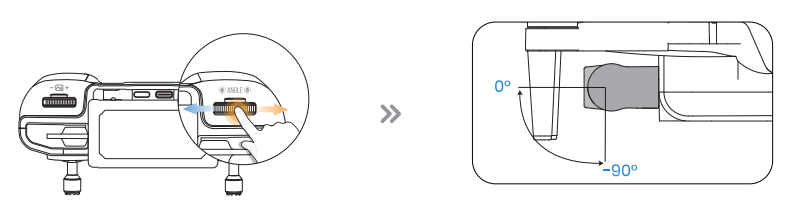
Zoom
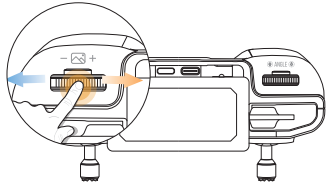
- To zoom in, scroll the zoom dial (-+) to the right. The LCD screen displays “ZOOM IN.”
- To zoom out, scroll the zoom dial (-i+) to the left. The LCD screen displays “ZOOM OUT.”
Photo/Video
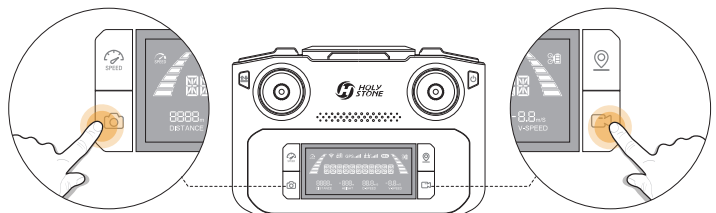
- Short-press the (0) button on the transmitter. The ( REC) on the LCD screen flashes once, which means that you have successfully taken a photo.
- SPressthe ( E) button on the transmitter. The ( REC) on the LCD screen starts to blink, which means the camera is recording. Pressing the button again will stop video recording.
Emergency Stop
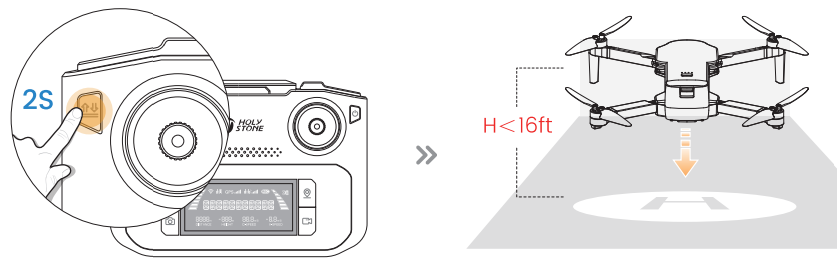
Hold the ( 1* ) button for 2 seconds to use Emergency Stop. This function only works when the drone’s altitude is lower than 16ft.
Speed Switch
Return to Home
- The Return to Home (RTH) function brings the drone back to the recorded Home Point.
- This function can only be triggered when the drone is in GPS mode.
- The drone’s default home point is the location where it first receives a strong GPS signal (When this occurs, the icon for GPS signal strength (GPS .ull) on the LCD screen lights up).
- The drone will record its takeoff position at that moment as the home point. During flight, if the drone lands at a new location, the position of the next takeoff will become the newly recorded home point.
- Smart RTH: Short-press the (© ) button to activate Smart RTH. The drone will fly back to the last recorded Home Point. During Smart RTH, the transmitter will keep on beeping. Short-press the ( © ) button again to exit Smart RTH
Failsafe RTH
- The Failsafe RTH will be activated when:
- The drone receives a strong GPS signal, and
- There is a pre-recorded Home Point, and
- The connection between the transmitter and the drone is lost, and
- The compass has no interference.
Low Voltage RTH
When the flight battery is too low or there is not enough power to return home, the pilot should land the drone as soon as possible to avoid damage to the drone or other hazards. To prevent unnecessary risks due to insufficient battery power, the low-voltage RTH function will be automatically triggered when the drone battery is low. According to the remaining power, there are two scenarios:
- The First Stage of Low Voltage RTH: The drone automatically flies back and hovers over the Home Point. While the drone is returning, the transmitter emits a continuous beep.
- The LCD screen displays “GOING HOME.” After the drone returns, you will be restricted to flying it within a “safety zone”, which is centered around the Home Point and has a radius of 98 ft and a height of 66 ft. The drone will not be able to exit this zone.
- The Second Stage of Low Voltage RTH: The drone returns directly to the Home Point and initiates an automatic landing.
The Interface

- Homepage •:
- System Status & Not Connected
- Interference Index of Compass Transmitter Battery Level (€90)
- Transmitter Battery Level
- GPS Signal
- Drone Battery Level (kar®)
- Settings
- Takeoff/Landing
- Return to Home
- Multi-functions
- Image Follow
- GPS Follow
- VR Screen-Split
- Point of Interest
- Catapult
- One-key Ascension
- Gesture Selfie (95)
- Gesture Selfie video
- TapFly (G3*)
- Camera Filter ( S)
- Spiral Up
- Portrait (EU)
- Camera Settings
- Shooting Mode
- Take Photo
- Record Video
- Time-lapse
- Slow Motion
- Panorama
- Shutter
- Album
- Voice Recording
- Mapl
- Flight Parameters
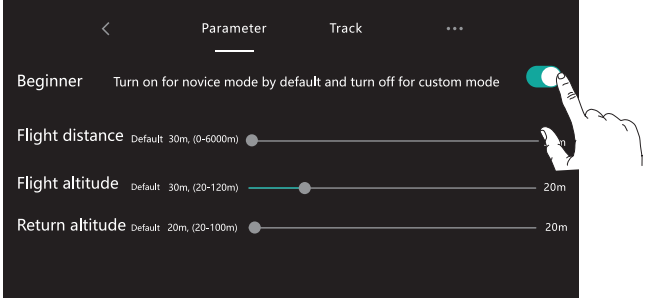
Beginner Mode
The beginner mode is the default operating mode. When in the Beginner mode:
- The flight distance can not exceed 98 ft.
- The flight altitude can not exceed 98 ft.
- The return altitude during RTH is 66ft.
- If you want to alter the above-mentioned parameters, please first turn off the beginner mode.
- You can go to the “Settings” to modify these parameters.
GPS Follow
When the GPS Follow function is enabled, the drone will track your movement by following the GPS signal on your cellphone. (Please make sure that the connection between the drone and the transmitter is strong and stable.)
- Make sure that the drone’s flight distance is within 164 ft. Tap the (8) icon first, then select the ( ) icon.
- Follow the prompt box to enter the GPS Follow function – the drone will now follow your cellphone’s coordinates.
- To exit the GPS Follow function, simply tap the ( ) icon on the app interface again.
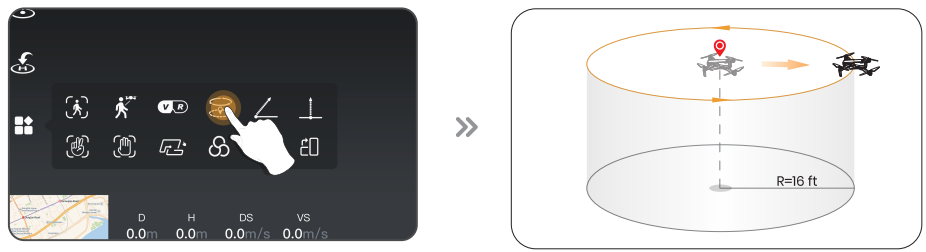
Point of Interest
- Tap the (* ) icon first, then select the ( ) icon, and follow the prompt box to activate the Point of Interest function. You can set the circling radius in the prompt box.
- The moment you activate this function, the drone will record its current flight position as the “point of interest”. It will then continuously circle that point. (default radius: 16 ft)
- To exit Point of Interest mode, simply tap the (S) icon again.
Catapult

- Make sure that the drone is at least 7 ft away from the target.
- Adjust the camera angle so it points directly at the target.
- Tap the (H) icon, then tap ( < ). Swipe in the prompt box to confirm.
- The drone will automatically start recording while flying about 82 ft away from the target.
- After this, it will fly back to the starting point.
- Tap the (< ) icon again, or push the right joystick to exit this function.
One-key Ascension

- Please make sure that the drone is at least 7 ft away from the target.
- Adjust the camera angle so it points directly at the target.
- Tap the (H:) icon, then tap (_ ). Swipe in the prompt box to confirm.
- The drone will start recording and climb 49 ft upwards.
- After this, the drone will fly back to the starting point.
- Tap the () icon again, or push the right joystick to exit this function.
Tap Fly
Before using Tapfly, pre-load the map by connecting your phone to the internet and ttappingthe map icon; auto-loading occurs. Enlarging the map for TapFly is advised.
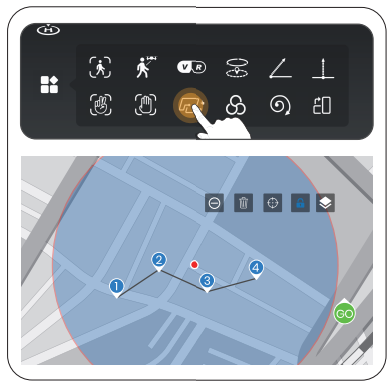
- Tap the (%) icon, then Tap (L*). You can tap a dozen times (but no more than 16) on the phone screen to create a flight path. Hit “GO” to submit the route.
- The drone will then fly along the path created by connecting the points you tap in order.
- You can exit Tapfly by tapping the (fr) icon again or pushing the right joystick in any direction.
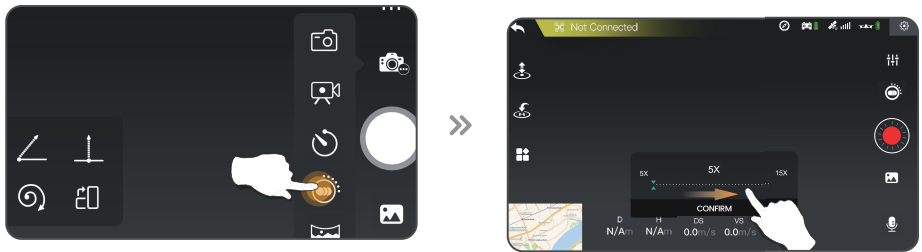
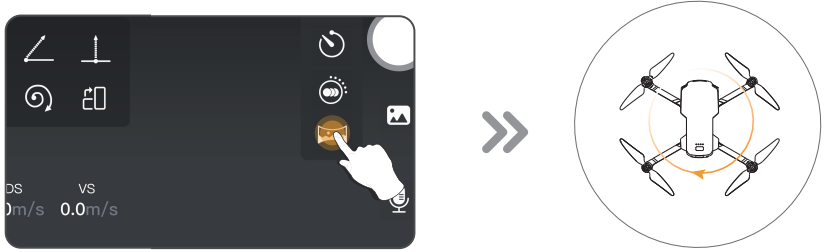
Spiral Up

- Make sure that the drone is about 16 ft away from the target. Adjust the camera angle so it points directly at the target.
- Tap the (%) icon, then tap (O). Swipe in the prompt box to confirm.
- The drone will automatically ascend and circle (max. radius: about 49 ft, and start recording.
- Tap the (O) icon again, or push the right joystick to exit this function.
- After this, it will fly back to the starting point.
Time-lapse

- Tap the (iC) icon, then tap ( ) to use time-lapse shooting
- Swipe to choose the video playback speed, tap again to confirm.
- Tap the shutter, and the time-lapse shooting begins.
- Tap the shutter again to stop recording.
Slow Motion
- Tap the (FO.) icon, then tap (©: to use slow motion shooting.
- Swipe to choose the video playback speed, tap again to confirm.
- Tap the shutter, and the slow-motion shooting begins.
- Tap the shutter again to stop recording.
Panorama
- Tap the (iồ.) icon, then tap (La) to use the Panorama function.
- Tap the shutter
- The drone will maintain its current position and rotate. A panorama picture is then auto-generated and saved to the album. A prompt box will pop up when this is done.
Optical Flow Positioning
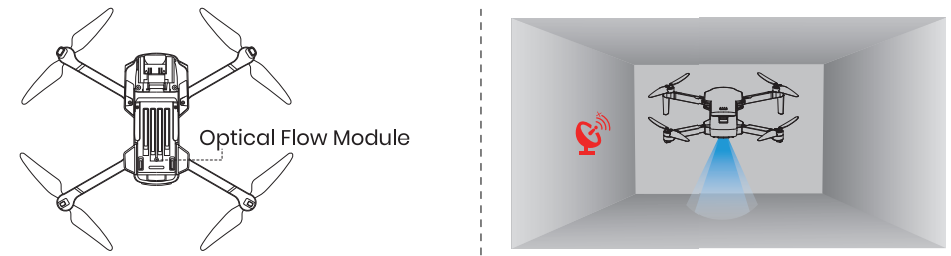
- The Optical Flow Positioning System consists of a camera module, which acquires the position information of the drone through visual images to ensure precise positioning of the drone.
- The Optical Flow Positioning System is typically used in an indoor environment when the GPS signal is weak or unavailable. The optimal usage height for Opti- cal Flow Mode is 1.6-9.8 ft.
Stabilization Function
Optical Flow Positioning
- Fly over surfaces without clear patterns or textures.
- Fly over extremely dark or bright surfaces.
- Fly in an area where the lighting changes dramatically and frequently.
- Fly over moving surfaces or objects.
- Fly over water or transparent surfaces.
- Fly over highly reflective surfaces. (e.g., mirrors).
- Fly over monochrome surfaces (e.g, pure black, red, or green).
- Flying over surfaces with repeating identical patterns or textures.
- Flying speed should be controlled so as not to be too fast.
Altitude-Hold Function
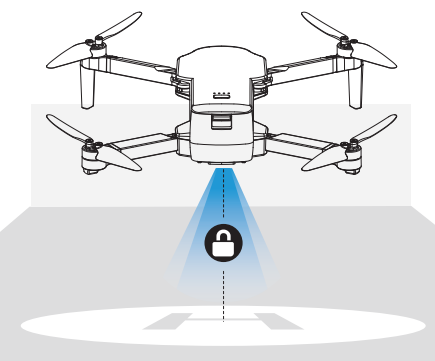
The drone is designed with an altitude-hold function to maintain its altitude afterreleasing the left joystick. (The left joystick will automatically spring back to the middle)
Specifications
DRONE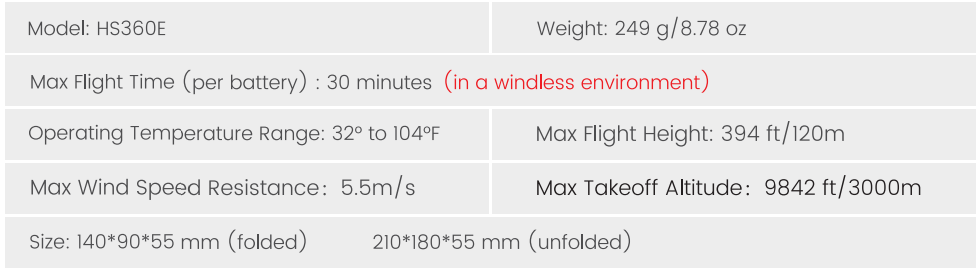
BATTERY
USB CHARGING CABLE![]()
TRANSMITTER
CAMERA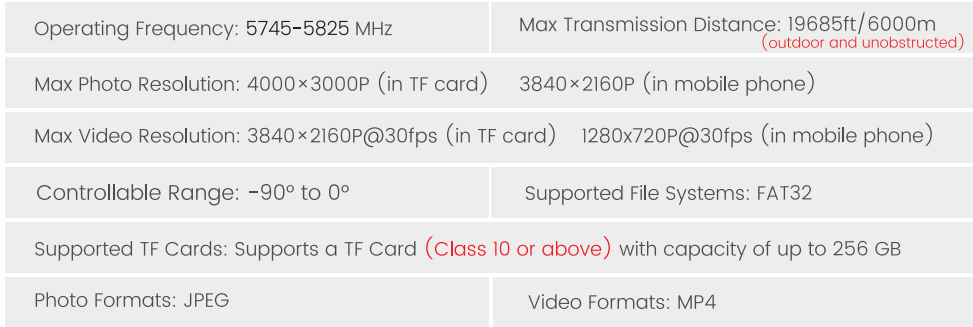
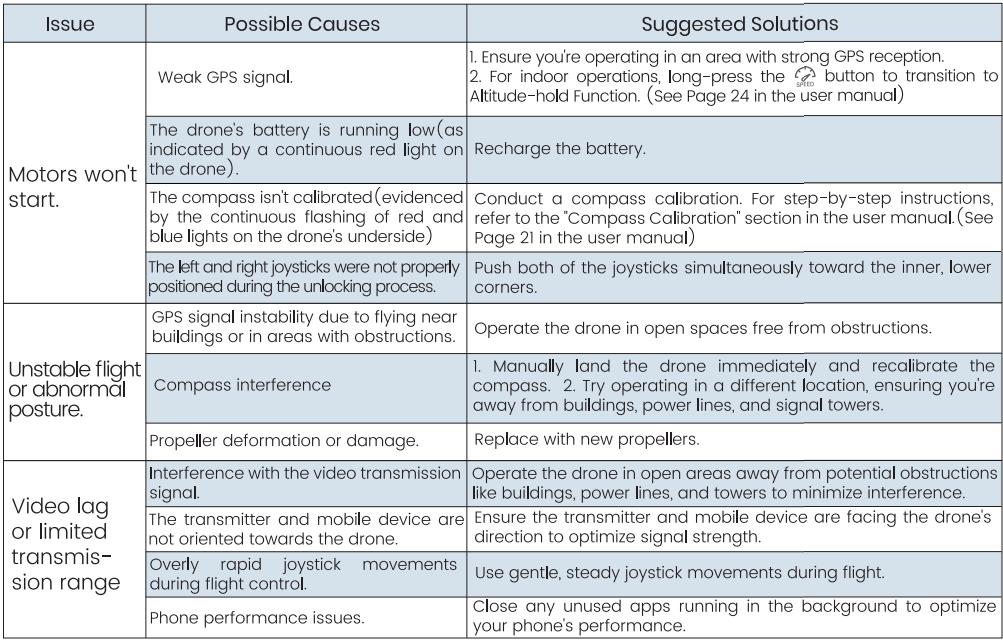
Troubleshootings
Using the Manual
Icon
- Essential precautions.
- Tips for operation and usage.
Recommended Steps
Our product offers both tutorial videos and the following resources:
- Disclaimer and Safety Guidelines
- Quick Start Guide
- User Manual
Access tutorial Videos
To ensure you’re using the product safely and correctly, scan the QR code below to view our tutorial videos.

Download the HS FLY App
Simply scan the QR code below.

FCC Notice
This device complies with part 15 of the FCC Rules. Operation is subject to the following two conditions:
- This device may not cause harmful interference, and
- This device must accept any interference received, including interference that may cause undesired operation.
Manufacturer Information
- Manufactured by Xiamen Huoshiquan Import & Export CO., LTD
List of Items including qualified accessories
- HS360E Propellers (1.5 g each propeller)
- HS360E Flight Battery (approx. 85 g)
- HS360E TF card (approx. 0.3 g)
List of Spare and Replacement Parts
- HS360E Propellers (1.5 g each propeller)
- HS360E Flight Battery (approx. 85 g)
Customer Support
- Ph: +1 (833) 766-4733
- Website: www.holystone.com
- Address: Unit 1, Room 501, Hongxiang Building, No.258 Hubin Nan Road, Siming District, Xiamen, China.