
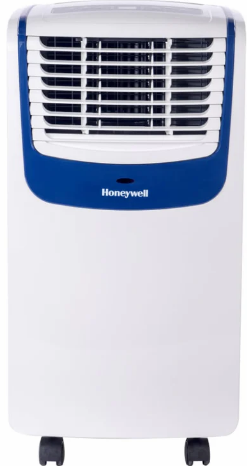
Honeywell MO08CESWS6 Portable Air Conditioner
Safety Instructions
- The remote control requires AAA (2 x 1.5V) batteries for replacement.
- Open the battery compartment at the back of the remote control and insert the batteries inside. Care must be taken to insert the batteries according to the correct polarity (+ / –) markings shown inside the battery compartment.
- Always point the remote control signal transmitter towards the unit when operating. Make sure that the signal path is not obstructed.
- Remove the batteries if the unit is not going to be used for an extended period of time.
- Do not drop the remote control.
- Do not mix different types of batteries, such as alkaline, carbon-zinc, or rechargeable batteries.
- Do not mix old and new batteries.
- Do not recharge the battery.
- Exhausted batteries are to be removed from the product and safely disposed of as per local regulations.
- Do not dispose of batteries in a fire. Batteries may explode or leak.
Parts Description
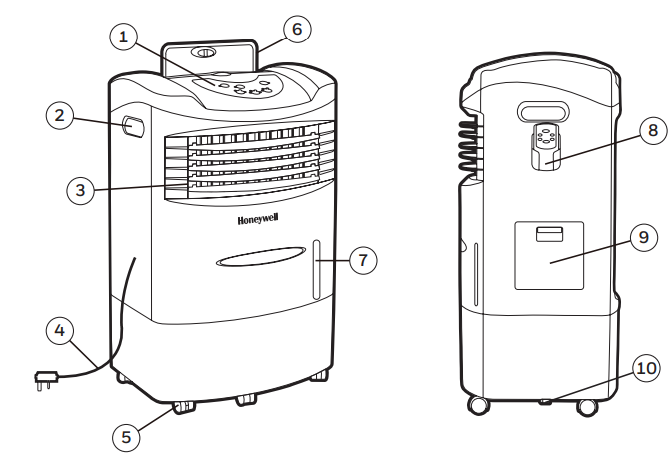
- Control Panel
- Handle
- Louvers
- Power Cord & Plug
- Casters
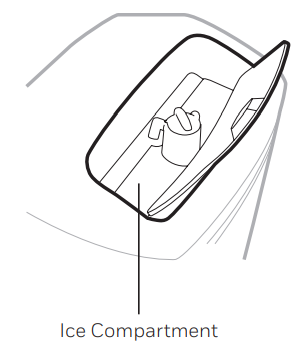
- Ice Compartment Lid
- Water Level Indicator
- Remote Control
- Water Fill Door
- Drain Plug
Use & Operation
Control Psnel
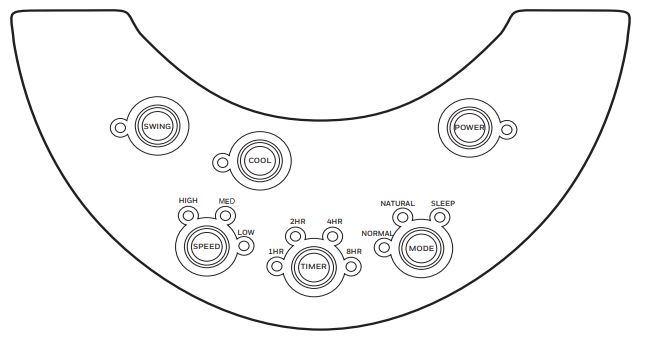
Function Buttons
Power
Press the POWER button to turn the unit on. The cooler will start automatically at medium speed. After a few seconds, the speed will switch to low. To turn the unit off, press the button again.
Mode
Press the MODE button to select your desired wind type: NORMAL – NATURAL – SLEEP.
- NORMAL: You can select either High, Medium, or Low fan speeds.
- NATURAL: The fan speed alternates between High, Medium, Lo, and Off to mimic a natural breeze.
- SLEEP: This mode is for comfort during the night. When the SLEEP mode is selected, the airflow will randomly vary between High, Medium, and Low.
Speed
Press the SPEED button repeatedly to change the speed between High, Med, and Low.
Timer
Press the TIMER button until the desired time duration setting is selected. When the set time has passed, the unit will automatically turn off (unit remains in Standby mode until the power cord is unplugged from the electrical socket). The TIMER function allows you to program the unit for up to 8 hours of use.
Swing
Press the SWING button until the SWING indicator light is illuminated on the control panel. The louvers will begin to move left to right automatically. Vertical Air Flow – You can manually adjust the louvers to change vertical air flow.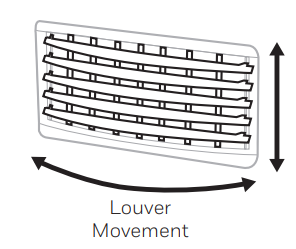
Cool
Press the COOL button until the COOL indicator light is illuminated on the control panel. This activates evaporative cooling. The water pump will operate, and you will feel the cooler air after the Honeycomb Cooling Media is completely wet. When the COOL indicator light is switched OFF, the unit can still function in a fan-only mode (without evaporative cooling).
Room Cooling & Humidifying
In cooling mode, Honeywell Air Coolers provide cool, moist air through the evaporation of water. There is a manual Water Regulator knob located in the ice compartment of the unit.
This allows you to adjust the amount of water pumped over the Honeycomb Cooling Media, thus helping to control cooling and humidification levels.
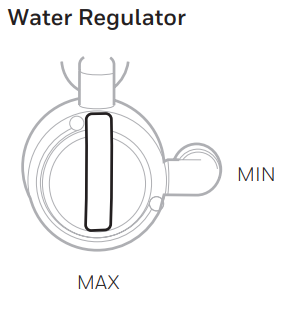
When the Water Regulator is set to MAX, the water pump distributes the maximum amount of water
to the Honeycomb Cooling Media. This results in maximum water evaporation and greater cooling performance.
Remote Control
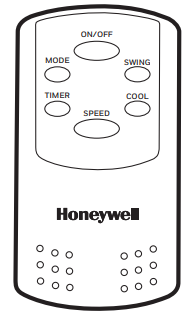
- POWER: ON / OFF
- SPEED: Low / Medium / High
- COOL: Controls cooling or fan option
- SWING: Controls the motion of the louvers
- TIMER: Controls the Timer function for automatic off
- MODE: Switch between Normal, Natural & Sleep
Cooler Location
Make sure to position the air cooler correctly before you set up and start using the product. Please refer to the COOLER LOCATION section of the separate Safety & Maintenance Guide.
Filling the Water
Open the Water Fill Door located on the side of the unit.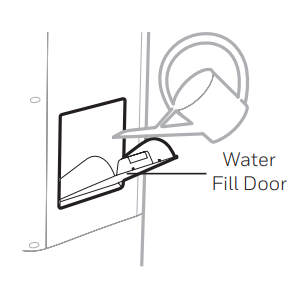
The Water Level Indicator is located at the front of the unit. Refill the water tank when the water level is low. Do not fill water above the “Max.” water level mark to avoid water droplets collecting on the louvers.
Check the water level in the tank before running the COOL function. Make sure that the water in the tank is above the minimum water level mark. Running the Honeywell CL201AE Series Portable Air Cooler unit in COOL mode with inadequate water may cause pump failure.
Low Water Alarm
The unit is equipped with a low water sensor. In Cooling Mode, when water in the tank is below the minimum level, you will hear a beeping sound and the indicator light will flash continuously. The unit will automatically pause evaporative cooling. Refill the water tank to deactivate the alarm in cooling mode. First, switch OFF the unit and unplug it from the power outlet. Fill the water tank with water above the minimum water level mark. Plug in and switch ON again.
To deactivate the alarm and continue using the unit as a fan (without evaporative cooling), switch the unit OFF and then ON again. The Low Water Alarm will not activate in Fan-only mode. The Low Water Alarm will sound again if the COOL function is activated while the water tank is still empty.
Cleaning & Maintainance
- Move the unit to a location where the water can be drained. Remove the cap from the Drain plug located at the bottom of the unit. Allow the tank to empty.
- Refill the water tank with clean water, up to the maximum level, and drain it completely.
- Use a damp cloth to remove the dirt and dust from the surface of the unit. Never use corrosive elements or chemicals to clean this product.
- When the product is not in use, store the unit in a dry place out of direct sunlight.
Cleaning the Filter
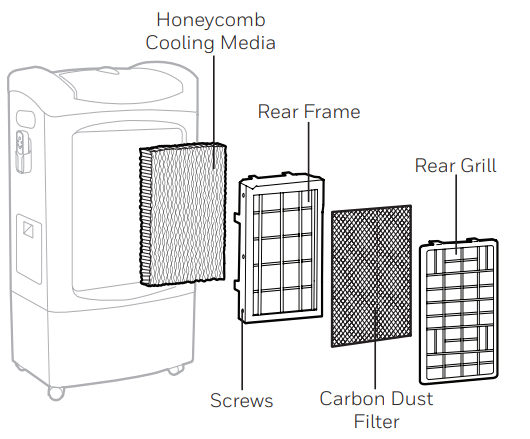
- The Carbon Dust Filter* and Honeycomb Cooling Media are located inside the Rear Grill. See Figure 1 for instructions on how to remove them from the unit for cleaning and maintenance.
- Do not run the unit in COOL mode with stale water in the tank. You must empty the water tank and refill it with fresh water, especially if the tank has not been cleaned in a long time.
- The cleaning frequency for the Honeycomb media depends on local air and water conditions. In areas where the mineral content of water is high, mineral deposits may build up on the Honeycomb Cooling Media and restrict air flow. Draining the water tank and refilling with fresh water at least once a week will help reduce mineral deposits.
- For best results, allow the Honeycomb Honeywell CL201AE Series Portable Air Cooler Cooling Media to dry after each use by turning off the cool function 15 minutes before turning the unit off.
Removing the Filter
- Carefully push down and pull out the rear grill from the cooler.
- Pull out the Carbon Dust Filter* and clean with water as needed.
- Remove all the screws from the Rear Frame and carefully pull it off the air cooler.
- To release the Honeycomb Media, remove the screws securing the Honeycomb on the Rear Frame and slide the Honeycomb out of the frame.
- Replace or clean media with water and a damp cloth as needed.
Warranty
THIS PRODUCT. Some states do not allow the exclusion of Honeywell RPLS541A Programmable Wall Switch or limitation of incidental or consequential damages, so this limitation may not apply to you. Some states do not allow limitations on how long an implied warranty lasts, so the above limitation may not apply to you. This warranty gives you specific legal rights, and you may have other rights which vary from state to state.
If you have any questions concerning this warranty, please write Honeywell Customer Relations, 1985 Douglas Dr, Golden Valley, MN 55422. In Canada, write Retail Products ON15-02H, Honeywell Limited/Honeywell Limitée, 35 Dynamic Drive, Scarborough, Ontario M1V4Z9.
Customer Service
- Go to https://www.honeywell.com/us/en/contact/support
- Toll-free at 1-800-468-1502.
FAQs
Q: What is the Honeywell MO08CESWS6?
A portable air conditioner for small to medium-sized spaces (up to about 80–100 square feet) is the Honeywell MO08CESWS6. It is a small, portable machine with an easy-to-use control panel that offers cooling, dehumidifying, and fan settings.
Q: Can I use the air conditioner without the exhaust hose?
No, heated air must be vented outside via the exhaust hose. Without it, the device may sustain damage and lose some of its cooling effectiveness.
Q: Can I use this unit in a high-humidity environment?
Indeed. To lower humidity levels, use the dehumidify mode. For continued operation, either manually empty the tank or keep the drain hose attached.
Q: What is the recommended temperature range for operation?
The ideal temperature range for the unit is between 18°C and 35°C (64°F and 95°F). Operating outside of this range could result in decreased productivity.
Q: Can I leave the unit running while I sleep?
Indeed. For comfort, many users run it in auto temperature setting or with a low fan overnight. You may avoid wasting energy by using the timer feature.
Q: Can I use the unit without the remote control?
Indeed. The control panel at the top of the device can be used to regulate every function.
Q: Do I need to drain water in dehumidify mode continuously?
Yes, if you run in extreme humidity for long periods of time. When the tank is full, manually empty it or use the drain hose to continually remove water.
Q: Can I use an extension cord with this unit?
It is not advised. To avoid voltage loss or overheating, the device should be plugged straight into a designated power socket.