
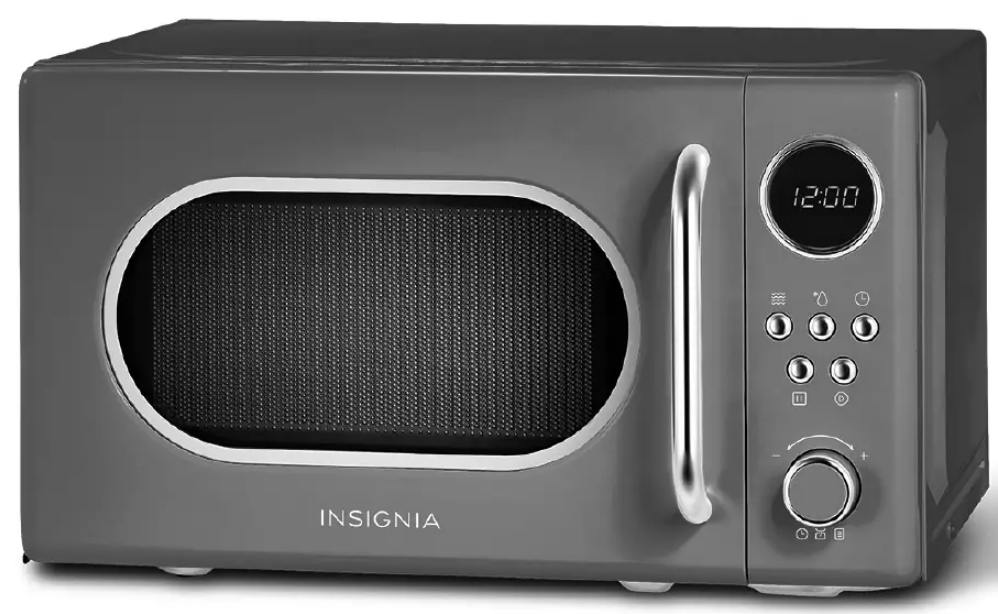
INSIGNIA NS-MWR07R2 7 Cu. Ft. Microwave Oven
Safety Instructions
- Read all instructions before using the oven.
- As with any cooking appliance, close supervision is necessary to reduce the risk of a fire in the oven cavity or when used by children.
- To reduce the risk of fire in the oven cavity:
- Do not overcook food. Carefully attend the oven when paper, plastic, or other combustible materials are placed inside the oven to facilitate cooking.
- Remove wire twist-ties and metal handles from paper or plastic containers/bags before placing them in the oven.
- If materials inside the oven ignite, keep the oven door closed.
- Turn the oven off and unplug the oven or shut off power at the fuse or circuit breaker panel.
- Do not use the oven cavity for storage purposes. Do not leave paper products, cooking utensils, or food in the cavity when not in use.
- This oven must be grounded. Connect only to a properly grounded outlet.
- Install or locate this appliance only by the provided installation instructions.
- Do not cover or block any openings on the oven.
- Do not store or use this oven outdoors.
- Do not use this oven near water (for example, near a kitchen sink, in a wet basement, near a swimming pool, or similar locations).
- Do not immerse the cord or plug in water.
- Keep the cord away from heated surfaces.
- Do not let the cord hang over the edge of a table or counter.
Package contents
- 7 Cu. Ft. Retro Microwave Oven
- Glass tray
- Turntable ring assembly
- User Guide
Features
- Cook or reheat meat, vegetables, pasta, and more using a 700 W output at the touch of a button
- Cherry red or mint green color, a round viewing window, and chrome details provide a fun retro touch
- Compact design fits on your countertop or kitchen cart, while the 3.3 ft (1 m) cord reaches to an outlet
- Nine preset cooking functions easily cook your favorites
- Ten power levels heat your food to your exact preference
- 10 in. (25.5 cm) glass turntable automatically rotates to evenly heat food
- Lock function prevents children from changing your microwave settings
- Eco mode helps you conserve electricity and save money
Grounding Instructions
This oven must be grounded. In the event of an electrical short circuit, grounding reduces the risk of electric shock by providing an escape wire for the electric current. This oven is equipped with a cord having a grounding wire with a grounding plug.
The plug must be plugged into an outlet that is properly installed and grounded. DO NOT alter the plug for use in a 2-prong receptacle. If the plug will not fit into a receptacle, have the proper receptacle installed by a qualified electrician.
Consult a qualified electrician or serviceman if the grounding instructions are not completely understood or if doubt exists as to whether the oven is properly grounded.
If it is necessary to use an extension cord, use only a 3-wire extension cord that has a 3-pronged grounding plug and a 3-slot receptacle that will accept the plug on the oven. The marked rating of the extension cord shall be equal to or greater than the electrical rating of the oven.
- A short power-supply cord is provided to reduce the risks resulting from becoming entangled in or tripping over a longer cord.
- Longer cord sets or extension cords are available and may be used if care is exercised in their use.
- If a long cord set or extension cord is used:
- The marked electrical rating of the cord set or extension cord should be at least as great as the electrical rating of the oven.
- The extension cord must be a grounding-type 3-wire cord.
- The longer cord should be arranged so that it will not drape over the countertop or tabletop, where it can be pulled on by children or tripped over unintentionally.
Radio Interference
- Operation of the microwave oven may cause interference to your radio, TV, or similar equipment.
- When there is interference, it may be reduced or eliminated by taking the following measures:
- Clean the door and the sealing surface of the oven.
- Reorient the receiving antenna of the radio or television.
- Relocate the microwave oven with respect to the receiver.
- Move the oven away from the receiver.
- Plug the oven into a different outlet so that the oven and receiver are on different branch circuits.
Cookware and cooking materials
Cookware and other materials must fit on the turntable. Always use oven mitts or pot holders because cookware may become hot.
Refer to the Materials you can use on page 6 and Materials to be avoided on page 7 tables as a guide, then test before using. There may be certain non-metallic utensils that are not safe to use for microwaving. If in doubt, you can test the utensil in question following the procedure below.
Utensils test
- Fill a microwave-safe container with 1 cup (250 ml) of cold water, along with the utensil in question.
- Cook on maximum power for one minute. Do not exceed one minute cooking time.
- Carefully feel the utensil. If the empty utensil is warm, do not use it for microwave cooking.
- To prevent the risk of fire, do not put hot pads, blankets, clothes, or other textiles in the oven.
Materials you can use
| MATERIAL | REMARKS |
| Browning dish | Follow the manufacturer’s instructions. The bottom of the browning dish must be at least 3/16-in. (5 mm) above the turntable. Incorrect usage may cause the turntable to break. |
| Dinnerware | Use microwave-safe only. Follow the manufacturer’s instructions. Do not use cracked or chipped dishes. |
| Glass jars | Always remove the lid. Use only to heat food until just warm. Most glass jars are not heat-resistant and may break. |
| Glassware | Use heat-resistant oven glassware only. Make sure that there is no metallic trim. Do not use cracked or chipped dishes. |
| Oven cooking bags | Follow the manufacturer’s instructions. Do not close with a metal tie. Make slits to let steam escape. |
| Paper plates and cups | Use for short–term cooking/warming only. Do not leave your microwave unattended while cooking. |
| Paper towels | Use to cover food for reheating and absorbing fat. Use with supervision for short-term cooking only. |
| Parchment paper | Use as a cover to prevent splattering or a wrap for steaming. |
| Plastic | Use only if labeled “Microwave Safe.” Follow the manufacturer’s instructions. Some plastic containers soften as the food inside gets hot. “Boiling bags” and tightly closed plastic bags should be slit, pierced, or vented, as indicated on the package. |
| Plastic wrap | Use microwave-safe only. Use to cover food during cooking to retain moisture. Do not let plastic wrap touch food. |
| MATERIAL | REMARKS |
| Thermometers | Use microwave-safe only (such as meat and candy thermometers). |
| Wax paper | Use as a cover to prevent splattering and retain moisture. |
Materials to be avoided
| MATERIAL | REMARKS |
| Aluminum foil | May cause an electric spark. Transfer food into a microwave-safe dish. |
| Aluminum tray | May cause an electric spark. Transfer food into a microwave-safe dish. |
| Food carton with a metal handle | May cause an electric spark. Use a microwave-safe dish instead. |
| Metal or metal-trimmed utensils | Metal shields the food from microwave energy. The metal trim may cause arcing. |
| Metal twist ties | It may cause an electric spark and could cause a fire in your microwave. |
| Paper bags | It may cause a fire in your microwave. |
| Plastic foam | Plastic foam may melt or contaminate the liquid inside when exposed to high temperatures. |
| Textiles | Hot pads, blankets, clothes, or other items may cause burns or a fire. |
| Wood | Wood will dry out when used in your microwave and may split or crack. |
Components
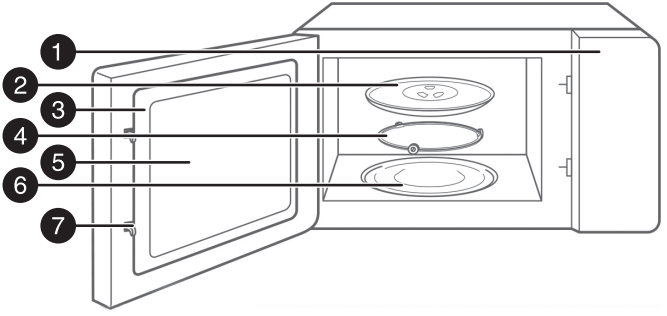
| # | ITEM | DESCRIPTION |
| 1 | Control panel | Use to set cooking times and enter other information as needed. |
| 2 | Glass tray | Let food cook evenly. |
| 3 | Door assembly | Protects you from exposure to excessive microwave energy. |
| 4 | Turntable ring assembly | Let the turntable rotate to cook food evenly. |
| 5 | Observation window | Lets you view the item being cooked. |
| 6 | Turntable shaft | Rotates the turntable assembly. |
| 7 | Safety interlock system | Prevents your microwave from operating when the door is open. |
Control panel

| # | ITEM | DESCRIPTION |
| 1 | Display | In standby mode, it displays the time. In cooking mode, it displays cooking time, weight, and other information. |
| 2 | (defrost) | Press once, then enter the weight of the item you want to defrost. The cooking time is set automatically. See Defrosting by weight on page 16. Press twice, then enter the amount of time you want to defrost. See Defrosting by time on page 16. |
| 3 | (microwave) | Press repeatedly to select the power level. You can select between 100% and 10%. The power levels (PL10, PL9, PL8, PL7, PL6, PL5, PL4, PL3, PL2, and PL1) appear in sequence on the display. See Cooking in your microwave on page 13. |
| # | ITEM | DESCRIPTION |
| 4 | (stop/clear) | Press to stop the cooking process. Press again to clear the cooking operation. In standby mode, press and hold for three seconds or more to set the child lock. See Using the child-lock on page 17. |
| 5 | (adjustment) knob | Turn to adjust settings. |
| 6 | (kitchen timer/clock) | Press once to set the timer. See Using the kitchen timer on page 13. Press twice to set the time. See Setting the clock on page 13. |
| 7 | (start/ +30 sec.) | Press to start cooking. In the wait state, press one or more times to specify the cook time in 30-second increments. Maximum time is 95 minutes. |
Setting up your microwave
- Remove your microwave and all materials from the carton and the microwave cavity.
- Examine your microwave for any damage, such as dents or a broken door. Don’t install or use your microwave if you find any damage.
- Remove any protective film from the microwave cabinet surface, the door, and the control panel.
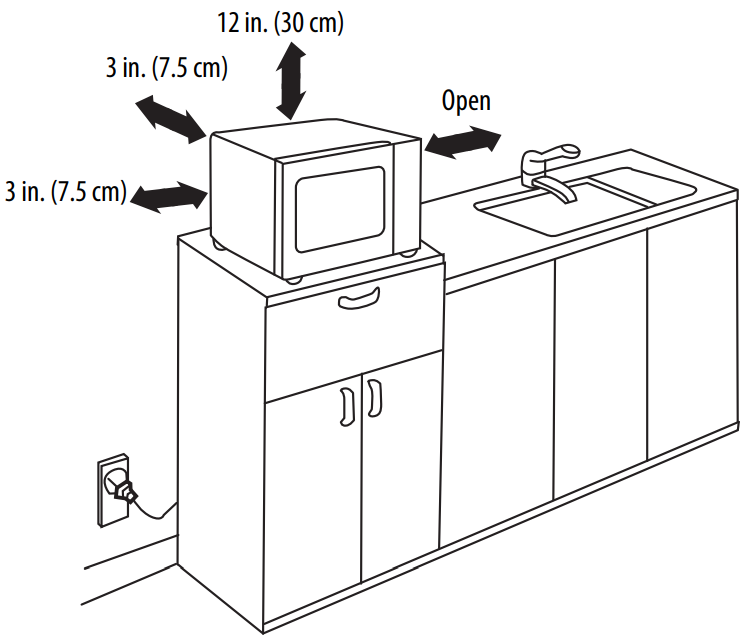
- Place your microwave on a level surface that provides enough open space for the air vents.
- Plug your microwave into a standard household outlet. Make sure that the voltage and the frequency are the same as the voltage and the frequency on the rating label.
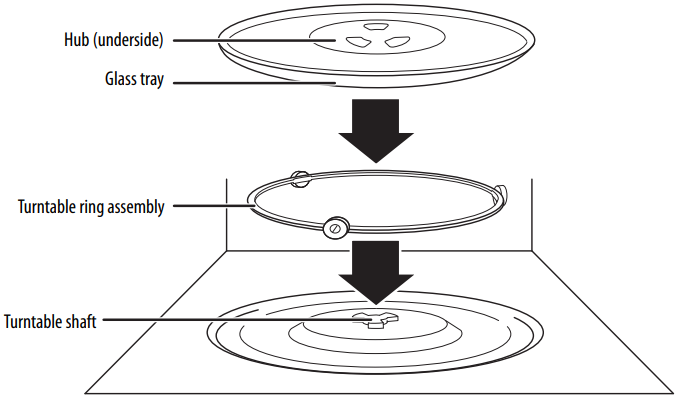
Installing the turntable
- Place the turntable ring assembly in the round depression in the bottom of your microwave so that it turns freely.
- Place the glass tray (flat side up) on the turntable assembly so that the hub engages the turntable shaft in the bottom of your microwave. The glass turntable shouldn’t turn freely when it is correctly installed.
Using your microwave
Setting the clock
- Plug the power cord into an outlet. 0:00 flashes on the display, and the buzzer sounds once.
- Press (kitchen timer/clock) twice. The hour flashes on the display.
- Turn the adjustment knob to select the hour. You can select from 1 to 12. The hour you select appears on the display.
- Press (kitchen timer/clock). The minutes flash on the display.
- Turn the adjustment knob to select the minutes. You can select from 0 to 59. The minutes you select appear on the display.
- Press (kitchen timer/clock) to confirm the setting. The: symbol flashes on the display.
Using the kitchen timer
- Press (kitchen timer/clock) once. 00:00 flashes on the display.
- Turn the adjustment knob to select the amount of time. You can select from 1 to 95 minutes. The time you select appears on the display.
- Press (start/+30sec.) to confirm the setting. When the time reaches 0, the buzzer sounds five times and the display shows the current time.
Cooking in your microwave
- Press (microwave). PL10 appears in the display.
- Press repeatedly or turn the adjustment knob to select the power level. You can select between 100% and 10%. The power levels (PL10, PL9, PL8, PL7, PL6, PL5, PL4, PL3, PL2, and PL1 appear in sequence on the display. The available power levels are:
1 TIME
2 TIMES
3 TIMES
4 TIMES
5 TIMES
6 TIMES
7 TIMES
8 TIMES
9 TIMES
10 TIMES Power 100% 90% 80% 70% 60% 50% 40% 30% 20% 10% Display PL10 PL9 PL8 PL7 PL6 PL5 PL4 PL3 PL2 PL1 - Press (start/+30sec.) to confirm the setting.
- Turn to adjust the cooking time between 0:05 and 95:00. When you turn the knob to set the cooking time, each click of the knob adds a specific amount of time. When you start turning the knob, each click adds 5 seconds. When you reach one minute on the timer, each click adds 10 seconds. After the timer reaches five minutes, each click adds 30 seconds.
AMOUNT OF TIME TIME ADDED WITH EACH CLICK 0 to 1 minutes 5 seconds 1 to 5 minutes 10 seconds 5 to 10 minutes 30 seconds 10 to 30 minutes 1 minute 30 to 95 minutes 5 minutes - Press (start/+30sec.) to start cooking.
Cooking quickly
- In standby mode, press (start/+30sec.) to cook at 100% power for 30 seconds. Each time you press (start/+30sec.), the time increases by 30 seconds. The maximum cooking time is 95 minutes.
- In standby mode, turn the adjustment knob left to select the cooking time, then press (start/+30sec.) to start cooking. Your microwave cooks at 100% power.
- While your microwave is cooking or when you are using the time defrost function, press (start/+30sec.) to increase the cooking time.
Using the Auto menu
- In standby mode, turn the adjustment knob right to choose the menu from A-1 to A-9 or turn left to choose the menu from A-9 to A-1. The auto menu number appears in the display.
- Press (start/+30sec.) to confirm your menu selection.
- Turn the adjustment knob to choose the weight of food.
- Press (start/+30sec.) to start cooking. When cooking is done, the buzzer sounds five times.
Auto menus
| MENU | AMOUNT | DISPLAY |
| A1 Popcorn | 1.75 oz. 3.0 oz. 3.5 oz. | 1.75 3.0 3.5 |
| A2 Beverage | 1cup (120 ml/cup) 2 cups 3 cups | 1 2 3 |
| A3 Fresh vegetables | 4 oz. 8 oz. 16 oz. | 4 8 16 |
| A4 Meat | 9 oz. 12 oz. 16 oz. | 9 1216 |
| A5 Pizza | 4 oz. 8 oz. 14 oz. | 4 8 14 |
| A6 Potato | 1 (about 8 oz.) 2 3 | 1 2 3 |
| A7 Pasta | 1.75 oz. (with 450 ml cold water) 3.5 oz. (with 800 ml cold water) | 1.75 3.5 |
| A8 Soup | 1 cup (8 oz.) 2 cups 3 cups | 1 2 3 |
| A9 Reheat | 9 oz. 12 oz. 18 oz. | 9 12 18 |
Popping popcorn in your microwave
- When selecting 3.0 or 3.5 oz. of popcorn, we suggest that you fold down a triangle on each corner of the bag before cooking, as shown.
- When the popcorn bag expands and no longer rotates properly, press (stop/clear) bonce, open the oven door, then adjust the bag position to ensure even cooking.
- Press (start/+30sec.) to resume cooking.

Defrosting in your microwave
Defrosting by weight
- Press (defrost) once. dEF1 appears on the display.
- Turn the adjustment knob to select the weight of the food. The weight range is 4 to
54 oz. 3 Press (start/+30sec.) to start defrosting. Defrosting over time - Press (defrost) twice. dEF2 appears on the display.
- Turn the adjustment knob to select the cooking time.
- Press (start/+30sec.) key to start defrosting.
Using multi-stage cooking
You can set up a two-stage cycle to cook your food. For example, you can defrost a meal, then cook it. In this example, the food is defrosted for five minutes, then 80% power for 7 minutes.
- Press (defrost) twice. dEF2 appears on the display.
- Turn the adjustment knob to set the defrost time to five minutes.
- Press (microwave) once. PL10 appears on the display.
- Turn the adjustment knob to set the power level to 80%. PL8 appears on the display.
- Press (start/+30sec.) to confirm.
- Turn the adjustment knob to set the cooking time to seven minutes.
- Press (start/+30sec.) to start cooking.
Using the energy-saving (Eco) mode
- Energy saving (Eco) mode turns off the LED display to save power.
- In standby mode, press (stop/clear) for less than three seconds. The display turns off, and your microwave enters power-saving mode.
- To exit the power saving mode, press any button, then open the door. The display turns on and the buzzer beeps once.
Checking the time and power level
- While cooking, press (microwave). The current power level appears on the display for three seconds.
- While cooking, press (kitchen timer/clock). The current time appears on the display for three seconds.
Using the child lock
To lock your microwave — Press and hold (stop/clear) for three seconds. Your microwave sounds a long beep to indicate that the lock is turned on. To unlock your microwave — When your microwave is locked, press and hold (stop/clear) for three seconds. Your microwave sounds a long beep to indicate that the lock is turned off.
Turning off the buzzer
In standby mode, press and hold (kitchen timer/clock) for three seconds. A long beep sounds, and the buzzer is turned off. To turn the buzzer back on, press and hold (kitchen timer/clock) for three seconds. A long beep sound, and the buzzer is turned back on.
Resetting the turntable
- If the turntable isn’t in its initial position when cooking is done, the turntable enters the turntable reset function. During the reset, the lamp, fan, and turntable continue working and appear on the display.
- When the reset function is complete, your microwave stops cooking, and the buzzer sounds five times to indicate cooking is done.
Maintaining your microwave
Keep your microwave clean, especially the interior.
- Clean the exterior with a damp cloth or sponge.
- Don’t let water or cleaning solution drip into the air vents.
- Clean the interior with a damp cloth or sponge.
Specifications
- Rated voltage 120 V~60 Hz
- Rated input power (microwave) 1,050 W
- Rated output power (microwave) 700 W
- Oven capacity: .7 cu. Ft.
- Turntable diameter 10.3 in. (25.5 cm)
- External dimensions (H×W×D) 10.2 × 17.3 × 14.1 in. (25.9 × 44 × 35.9 cm)
- Internal dimensions (H×W×D) 8.1 × 12 × 11.9 in. (20.5 × 30.6 × 30.3cm)
- Certifications UL approved
- Power cord length 39.4 in. (1 m)
- Net weight 21.2 lbs. (9.6 kg)
Troubleshooting
| PROBLEM | POSSIBLE CAUSE | POSSIBLE SOLUTION |
| Arching or sparking in my microwave | You’re using incorrect materials in your microwave. | Use only microwave-safe materials. See the Materials you can use on page 6. |
| You’re trying to use your microwave when it’s empty. | Don’t operate your microwave when it’s empty. | |
| Spilled food remains in your microwave. | Clean your microwave with a wet towel. | |
| Unevenly cooked foods | You’re attempting to use incorrect materials in your microwave. | Use only microwave-safe materials. See the Materials you can use on page 6. |
| The food isn’t defrosted completely. | Defrost the food completely before cooking it. | |
| The cooking time or power level isn’t adequate to cook the food. | Use the correct cooking time and power level. | |
| The food isn’t turned or stirred. | Turn or stir the food. | |
| Overcooked foods | The cooking time or power level isn’t adequate to cook the food. | Use the correct cooking time and power level. |
| Undercooked foods | You’re attempting to use incorrect materials in your microwave. | Use only microwave-safe materials. See the Materials you can use on page 6. |
| The food isn’t defrosted completely. | Defrost the food completely before attempting to cook it. | |
| The cooking time or power level isn’t adequate to cook the food. | Use the correct cooking time and power level. | |
| Your microwave air vents are blocked or restricted. | Make sure that the air vents aren’t blocked or restricted. | |
| Incorrect defrosting | You’re attempting to use incorrect materials in your microwave. | Use only microwave-safe materials. See the Materials you can use on page 6. |
| The cooking time or power level isn’t adequate to cook the food. | Use the correct cooking time and power level. | |
| The food isn’t turned or stirred. | Turn or stir the food. | |
Legal notices
FCC Statement
This device complies with Part 15 of the FCC Rules. Operation is subject to the following two conditions: (1) this device may not cause harmful interference, and (2) this device must accept any interference received, including interference that may cause undesired operation.
FCC Caution
Changes or modifications not expressly approved by the party responsible for compliance could void the user’s authority to operate this equipment.
EMC guidance
- Don’t use near active HF Insignia NS-GLSBFSCW1 Glass Scale surgical equipment or the RF shielded room of an ME system for magnetic resonance imaging, where the intensity of EM disturbances is high.
- Use of accessories, transducers, and cables other than those specified or provided by the manufacturer of this equipment could result in increased electromagnetic emissions or decreased electromagnetic immunity of this equipment and result in improper operation.
- Otherwise, degradation of the performance of this equipment could result.
One-Year Warranty
Definitions
The Distributor* of Insignia-branded products warrants to you, the original purchaser of this new Insignia-branded product (“Product”), that the Product shall be free of defects in the original manufacturer of the material or workmanship for one (1) year from the date of your purchase of the Product (“Warranty Period”).
How to obtain warranty service?
If you purchased the Product at a Best Buy retail store location or from a Best Buy online website, please take your original receipt and the Product to any INSIGNIA NS-MWR07R2 7 Cu. Ft. Microwave Oven Best Buy store. Make sure that you place the Product in its original packaging or packaging that provides the same amount of protection as the original packaging. To obtain warranty service, in the United States and Canada, call 1-877-467-4289. Call agents may diagnose and correct the issue over the phone.
Where is the warranty valid?
This warranty is valid only in the United States and Canada at Best Buy branded retail stores or websites to the original purchaser of the product in the country where the original purchase was made.
Customer Support
- Ph: 1-877-467-4289
- Website: www.insigniaproducts.com
INSIGNIA is a trademark of Best Buy and its affiliated companies. Distributed by Best Buy Purchasing, LLC 7601 Penn Ave South, Richfield, MN 55423 U.S.A.
©2021 Best Buy. All rights reserved.
FAQs
What type of microwave is the NS-MWR07R2?
A 7.0 cu. .. countertop microwave oven, the NS-MWR07R2, is perfect for office break rooms, dorm rooms, and tiny kitchens. For dependable and easy operation, it has mechanical dial controls.
Is this microwave digital or analog?
Instead of a computerised keypad, this variant has manual rotary dials. It is intended for those who want straightforward operation free of intricate programming.
What size plates or containers can fit inside?
Its interior accommodates tiny casserole dishes, bowls, and regular dinner plates. The diameter of the glass turntable is roughly 9.6 inches.
Does it have a defrost function?
Food can be manually defrosted using the low power setting (Power Level 1 or 2) even if there isn’t an automatic defrost button.
How do I change the power level?
To choose one of the six power levels—which range from High (100%) to Low (about 17%)—turn the “Power” dial.
Can I cook popcorn or ready meals in this microwave?
Yes, but you’ll have to manually time your stuff because it doesn’t have any preset buttons. To prevent overcooking, start with shorter periods and adhere to the package’s directions.
Does it have a turntable, and can it be removed for cleaning?
Yes, a detachable glass turntable that turns while cooking is included with the microwave. It is simple to remove and gently wash.
What’s the wattage of this microwave?
Operating at 700 watts, the NS-MWR07R2 is appropriate for cooking light meals, reheating, and defrosting.