
Labnet BioPette Plus 12-channel Pipettors User Manual
Introduction
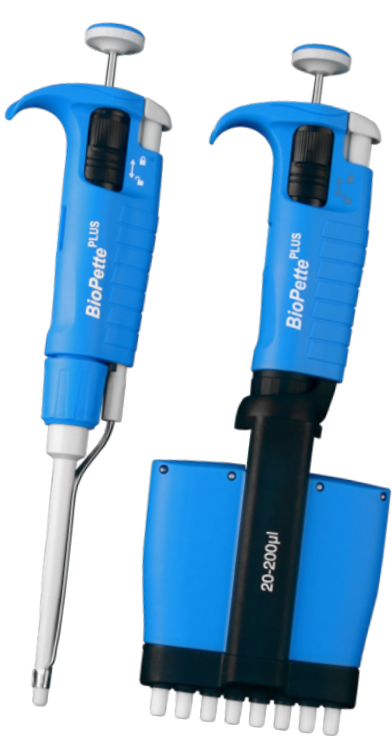
It can work with all types of glass or plastic pipets in the volume range from 0.5 mL to 100 mL. Two dispensing modes permit selection of dispensing intensity depending on the user’s needs (Figure 1D). The FastPette V-2 features a two-speed control system, which enables very fast dispensing of large volumes and precise measuring of small volumes. Figure 1 shows the external parts of the pipet controller with a description of the materials used.
Safety Information
Risk of damage to the device or errors in the pipetting of liquids. Before starting the work with the pipet controller, every user should read these operating instructions carefully. Using the device inconsistently with the operating instructions may result in damaging the device.
Product Description
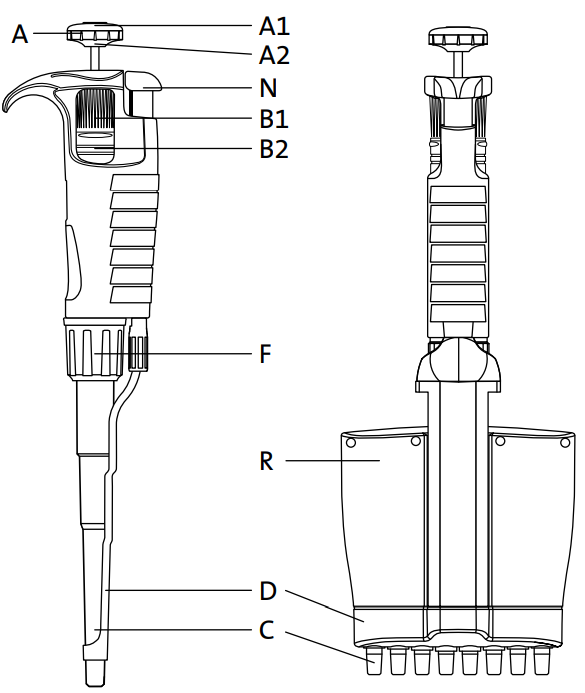
- A. Pipetting pushbutton
Consists of 2 parts: the pushbutton (A1) and the knob (A2). - B1. Volume adjustment knob:
Used to set the volume. - B2. Locking Ring
Allows the volume setting to be locked by pushing the ring upwards. - C. Shaft
Manufactured using high-quality plastic, ensuring high chemical and mechanical strength. - D. Tip ejector
For multi-channel pipettors, the tips are ejected sequentially, reducing the required force. - F. Shaft nut
- N. Ejector pushbutton
- R. Multi-channel manifold
Contains a set of plungers and a set of flexible-suspension shafts, which function to reduce the force required to attach the tip.
Switching On
The pipet controller is switched on by pressing the trigger buttons (Figure 1A, B, C, D). Charge the batteries before the first use. Full charging cycle takes at least 11 hours.
- The pipet controller may be charged only with the original charger.
- The mains voltage shall conform to the specification on the charger.
- Charging shall be done in accordance with section 8 of the instruction manual.
Aspirating and Dispensing Liquids
Attaching a pipette
Check whether the gripping part is dry. Do not apply excessive force so as not to damage thin pipets and avoid the risk of injury. After attaching a pipette, hold the pipette controller in a vertical position.
Filling the pipette
Before aspirating is started, set the speed by using the SPEED switch.
- HIGH speed – fast aspirating,
- LOW speed – slow aspirating.
Setting the volume
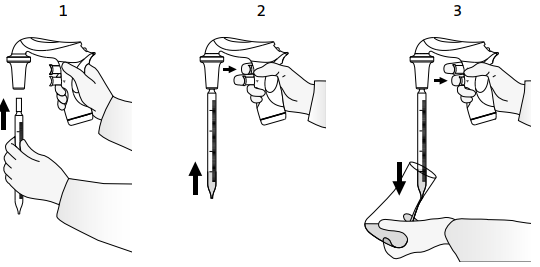
After the pipette is filled, dry the outside surface with absorbent paper that does not
leave impurities. Then set the required liquid volume precisely. Pressing the dispense
button gently (Figure 3.3), dispense the excessive liquid from the pipette until the
meniscus of the liquid aligns exactly with the required volume mark on the pipette.
Emptying the pipette
Holding the vessel in an inclined position, place the pipet end in contact with the vessel wall and press the dispense button gently (Figure 3.3).
- Gravity mode – dispensing is effected in gravity mode, which means that the liquid flows out of the pipette by its own weight.
- Blow out mode – dispensing is effected in gravity mode; however, when the dispense button is pressed to the middle position, the pump is started, and fast emptying of the pipette with a blow out is effected.
Replacing the Filter
The direct reason may be a dirty filter after a long period of use. To replace the filter:
- Remove the pipette.
- Unscrew the nose piece (Figure 4.1).
- Remove the membrane filter (Figure 4.1) and the pipette holder (Figure 4.2).
- Rinse the holder using a wash bottle (Figure 4.3).
- Blow liquid out of the holder and set it aside until it is completely dry.
- Install a new membrane filter (Figure 4.4) and assemble the device in reverse order.
Charging the Batteries
Using chargers other than the original one may damage the battery.
- Charging temperature: 10°C to 55°C.
- Full charging time: 11 to 14 hours..
- If the pipet controller starts to indicate a low battery level during work, connect it to the charger to continue working.
- Do not leave the pipet controller discharged for a long period of time.
Intended Use
The pipette controller is a device intended for general laboratory use only, for pipetting liquids with the use of measuring pipettes. It can work with all types of glass or plastic pipets in the volume range from 0.5 mL to 100 mL
Battery Charge
The batteries may be charged only with the original charger. Using chargers other than the original one may damage the battery. Fastepette™ Pro: 3 NiHM type AAA are delivered with the product and need to be installed before the first use.e
FastPette V2A: Use country country-specific adapter. Charge the batteries either on a charging stand or by directly connecting the charger to the socket. Input: 100-240V, 50/60Hz, 0.2A; output: DC 9V.
The charging process is indicated by: FastPette Pro: successive lighting of “bars”. Full charging time: 7 to 8 hours. The batteries are charged when all 3 “bars” are displayed simultaneously. Full charging time: up to 11 hours.
Speed Setting
FastPette™ Pro: Press the SPEED button until the display shows the correct speed – HIGH or LOW. FastPette V2: Change the position of the SPEED switches.
- HIGH speed – fast aspirating recommended for pipets <5 mL
- LOW speed – slow aspirating recommended for pipets >5 mL and foaming liquids
Manual Speed Control
- Speed can be controlled manually by pressing the trigger buttons
Mode Control
FastPette Pro: Press the MODE button until the display shows the correct mode – BLOW OUT (arrow) or GRAV (drop). FastPette V2: Change the position of the MODE switches. NOTE: The Pump is not working when in GRAV mode.
Maintenance
Cleaning
- The outer body of the pipet controller is UV resistant; the recommended distance from the radiation source to the exposed element should be not less than 50 cm.
- Prolonged and very intense UV exposure can cause de-coloration of pipet controller parts, without affecting its performance.
Ultraviolet (UV) sterilization
The recommended distance from the radiation source to the exposed element should be not less than 50 cm. Prolonged and very intense UV exposure can cause de-coloration of pipet controller parts, without affecting its performance.
Storage
The pipet controller should be stored in a dry place. The allowable storage temperature: -20°C to +50°C. During breaks in the work, the pipet controller can be stored on the wall hanger or bench stand.
Components
- Universal charger with a set of adapters
- PTFE filter 0.2 µm
- Instruction manual
- Bench stand
- QC certificate
Troubleshooting
If during your work the pipet controller is not functioning correctly, check the cause and correct the fault.
| Problem Possible Cause | Action | |
| The pipette falls out. The pipette holder (Figure 1G) (the holding force of which is dirty or wet. | Take out the pipette holder, and clean, wash, and dry it. | |
| The pipette is too small, or it tilts to the side too. | Replace the pipette holder with a new one. | |
| The pump is working. The filter (Figure 1H) is dirty. But the pipet controller | Take out the pipette holder, take out the filter; if it is dirty, replace it with a new one. | |
| Aid does not draw liquid or draws liquid very slowly. | The pipet holder and/or the connector gasket (Figure 1J) is damaged. | Replace the mechanically damaged elements with new ones. |
Ordering Information
The Labnet FastPette V2 Pipet Controller comes with a universal charger and a set of adapters in different versions: EU, US, UK, and AU. Choose your country’s adapter and connect to the housing.
To remove or change the adapter, simply press the “PUSH” button in the direction of the arrow, hold the button down, and remove the adapter in the direction of the arrow.
Spare Parts
| Item in Figure 1 | Description | Cat. No. | Qty/Pk |
| F | Nose piece | SP9022 | 1 |
| G | Silicone pipette holder | SP29054 | 1 |
| H | PTFE filter 0.2 µm | SP9143 | 5 |
| PTFE filter 0.45 µm | SP9144 | 5 | |
| M | Bench stand | SP19030 | 1 |
| N | Universal charger, 9V with a set of adapters: EU, US, UK, AU | SP29100 | 1 |
| P | Wall mount | SP9029 | 1 |
Limited Warranty
Corning Incorporated (Corning) warrants that this Labnet BioPette Plus 12-channel Pipettors product will be free from defects in material and workmanship for a period of one (1) year from the date of purchase. Corning’s sole obligation shall be to repair or replace, at its option, any product or part thereof that proves defective in material or workmanship within the warranty period, provided the purchaser notifies Corning of any such defect. Corning is not liable for any incidental or consequential damages, commercial loss, or any other damages from the use of this product.
Corning’s Customer Service team will help arrange local service where available or coordinate a return authorization number and shipping instructions. Corning may elect for on-site service for larger equipment. Some states do not alllimitationsion on the length Labnet BioPette Plus 12-channel Pipettors of implied warranties or the exclusion or limitation of incidental or consequential damages. This warranty gives you specific legal rights. You may have other rights that vary from state to state. No individual may accept for, or on behalf of Corning, any other obligation of liability, or extend the period of this warranty.
Warranty/Disclaimer
Unless otherwise specified, all products are for research use or general laboratory use only.* Not intended for use in diagnostic or therapeutic procedures. Not for use in humans. Corning Life Sciences makes no claims regarding the performance of these products for clinical or diagnostic applications. *For a listing of US medical devices, regulatory classifications, or specific information on claims, visit www.corning.com/resources.
Equipment Disposal
Consequently, the buyer shall follow the instructions for reuse and recycling of waste electronic and electrical equipment (WEEE) provided with Labnet BioPette Plus 12-channel Pipettors the products and available at www.corning.com/weee.
Customer Service
- Website: www.labnetlink.com.
- Visit: www.corning.com/lifesciencs
- Visit: www.corning.com/resources
- USA/Canada: 1.800.492.1110
- Others: +1.978.442.2200
- North America: 978.442.2200
- Australia/New Zealand: 61 427286832
FAQs
How do I adjust the volume setting on the pipettor?
To adjust the volume, use the plunger dial or thumbwheel. Always make adjustments within the model’s range after checking the digital volume display. Never push the dial past its lowest or maximum setting.
Can I use the BioPette Plus pipettor with all types of tips?
No. Use Labnet BioFree® tips or other universal-fit tips that work with multichannel pipettors for the best results and a good seal. Poor precision or leaking might result from improper tips.
How do I eject all 12 tips at once?
Near the plunger, press the tip ejector button. To avoid contamination, expel tips over a rubbish container.
Is the BioPette Plus 12-channel pipettor autoclavable?
Before autoclaving, always remove the lower section and let it completely dry and cool before reassembling.
What is the warranty period for the BioPette Plus pipettor?
Under normal use, Labnet usually provides a one-year limited warranty that covers manufacturing defects. Verify the terms and status of your warranty by consulting your purchase paperwork or getting in touch with Labnet directly.
Is there a way to lock the volume setting?
To avoid unintentional modifications, certain models have a volume locking feature. If this feature is absent from your pipettor, steer clear of holding the volume adjustment dial while pipetting, or choose a model with a locking mechanism for applications requiring a high degree of precision.