
![]()
Labnet I5110A Mini Microbiology Incubator
Introduction
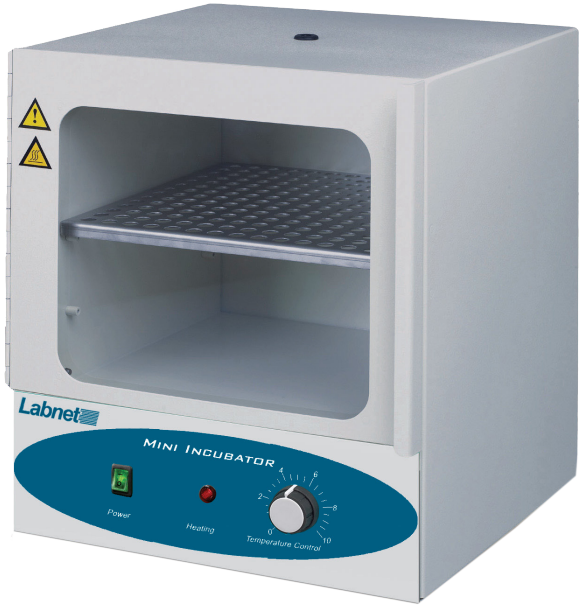
The Labnet Mini Incubator is a compact general-purpose convection incubator capable of uniformly heating samples up to a maximum of 70°C. The unit comes with a movable shelf and has a door window area so samples can be observed without opening the door, causing heat loss.
Symbols and Conventions
The electrical warning symbol indicates the presence of a potential hazard that could result in electrical shock. This symbol indicates a potential risk and alerts you to proceed with caution.
Indicates to take care to avoid coming into contact with a hot surface. Be careful if the unit has been used to heat samples because the internal components can be extremely hot and can cause burns to uncovered skin. Always check the handle temperature before changing the platform
Safety Information
To ensure safe operation of the unit, please follow the guidelines below and read this manual in its entirety.
To avoid electrical shock, do not use the incubator near water sources. Be sure that water doesn’t get on the device, especially during the cleaning procedures. To avoid damage to the instrument, do not expose the incubator to aggressive vapors (e.g., organic solvents).
Packaging
Product Quantity Labnet Mini Incubator 1 Shelf (Cat. No. I5110-SHELF) 1 Instruction Manual
Unpacking
Before starting the installation, carefully examine the incubator.
- Open the box and carefully remove the padding.
- Check that the incubator has not been visibly damaged during transportation.
- Keep the packing material until you are sure that the incubator works properly.
- Carefully lift the device out of the box.
- Be sure that the following information is included on the serial label located on the back of the unit: serial number, product number, and electrical rating.
- Check that the power cord plug has a pin configuration that matches a wall socket according to the local standard. Should any kind of dam
Installation
Place the incubator on a horizontal, level, and stable surface. Connect the plug end of the cord to a grounded wall socket. Avoid lines on which powerful electric motors, refrigerators, and similar devices are connected. Use the Power switch to control power to the incubator. Use caution when plugging into a grounded wall socket. Do not touch the plug with wet hands. Do not unplug by pulling on the cord.
Getting Started
Install the shelf at the desired height, shelf edges down.
Operation
Push the Power switch to the ON position. The switch should illuminate. Set the temperature controller to 10. When the thermometer reaches the desired operating temperature, turn the control down until the heating light turns off. Wait for the temperature to stabilize.
Make small adjustments up and down as required until the desired operating temperature is obtained. Allow the unit to stabilize between each adjustment. Temperature stability is obtained when the HEATING lamp is going on and off automatically, and the temperature remains constant.
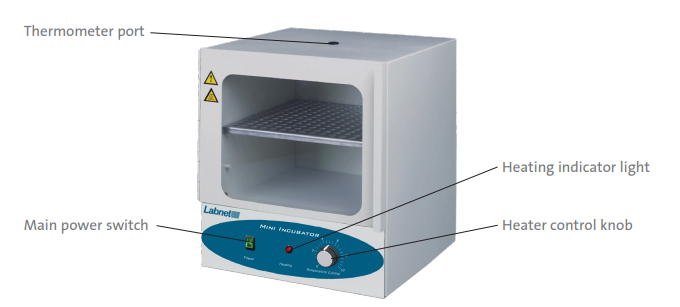
Optional: The oven has a port in the back of the unit for passing a power cord out of the rear of the unit. This is for powering a small piece of equipment (shaker, etc.) in the incubation chamber. To pass a cord through, rotate the inner and outer doors up to reveal the pass-through. Then, slide the end of the power cord through the port. Then, close both doors, resting the cord in the notch.
Cleaning and Maintenance
No routine maintenance is required. The outside housing can be cleaned with a soft, damp cloth when needed. Do not use any aggressive or abrasive cleaners (acetone, nitro, polish, etc.) This may permanently damage the finish.
Specifications
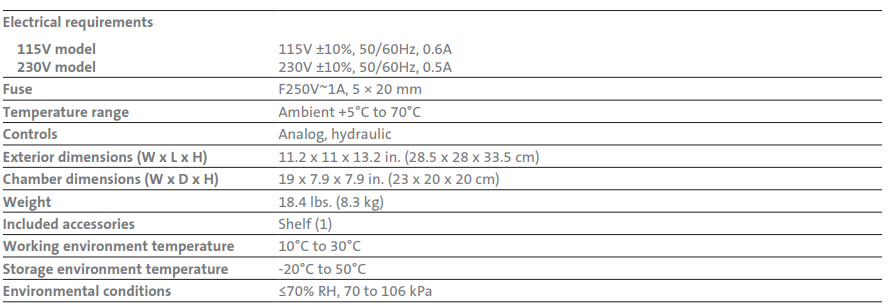
The Labnet Mini Incubator is designed to be safe at least when operated under the following conditions:
Indoor use Pollution Degree 2: Inspect the unit and accessories thoroughly upon receipt. If any item is damaged, contact the carrier immediately. The carrier is responsible for shipping damage. Also, verify that all accessories are included and that the unit is in working order before discarding any shipping packaging.
Troubleshooting
Should you have a question about the Labnet Mini Incubator or require service for the unit, contact Corning Customer Service at 800.492.1110 or 978.442.2200. Do not send a unit for service without first calling to obtain a repair authorization (RA) number. The unit should be properly packed to avoid damage. Any damage resulting from improper packaging shall be the responsibility of the user.
Problem Cause Solution: Oven does not heat. Power connection: Check the power connection. Fuse Check fuse. The temperature is set too low. Adjust the temperature control knob higher.
Limited Warranty
Corning Incorporated (Corning) warrants that this product will be free from defects in material and workmanship for a period of one (1) year from the date of purchase. Corning’s sole obligation shall be to repair or replace, at its option, any product or part thereof that proves defective in material or workmanship within the warranty period, provided the purchaser notifies Corning of any such defect.
Corning is not liable for any incidental or consequential damages, commercial loss, or any other damages from the use of this product. This warranty does not cover damage caused by accident, neglect, misuse, improper service, natural forces, or other causes not arising from defects in original material or workmanship.
This warranty does not cover motor brushes, fuses, light bulbs, batteries, or damage to paint or finish. Corning’s Customer Service team will help arrange Labnet I5110A Mini Microbiology Incubator local service where available or coordinate a return authorization number and shipping instructions.
Corning may elect for on-site service for larger equipment. Some states do not allow limitations on the length of implied warranties or the exclusion or limitation of incidental or consequential damages. This warranty gives you specific legal rights. You may have other rights that vary from state to state. No individual may accept for, or on behalf of Corning, any other obligation of liability, or extend the period of this warranty. For your reference, make a note of the serial and model number, date of purchase, and supplier here.
Serial No. __________________________________________
Model No. ________________________________________
Date Purchased _______________________________________
Supplier _____________________________________________
13.0 Equipment Disposal
Consequently, the buyer shall follow the instructions for reuse and recycling of waste electronic and electrical equipment (WEEE) provided with the products and available at www.corning.com/weee. To request certificates, please contact us at www.labnetlink.com. Warranty/Disclaimer: Unless otherwise specified, all products are for research use or general laboratory use only.
Not intended for use in diagnostic or therapeutic procedures. Not for use in humans. Corning Life Sciences makes no claims regarding the performance of these products for clinical or diagnostic applications. *For a listing of US medical devices, regulatory classifications, or specific information on claims, visit www.corning.com/resources.
Customer Service
- Website: www.labnetlink.com.
- Visit: www.corning.com/lifesciencs
- Visit: www.corning.com/resources
- USA/Canada: 1.800.492.1110
- Others: +1.978.442.2200
- North America: 978.442.2200
- Australia/New Zealand: 61 427286832
FAQs
What is the primary purpose of the Labnet I5110A Mini Microbiology Incubator?
The purpose of the I5110A is to facilitate scientific, clinical, and educational applications by offering a stable and regulated environment for the incubation of microbiological cultures, including bacteria and yeast.
What temperature range does the I5110A support?
The incubator is appropriate for the majority of common microbiological incubation procedures since it can maintain temperatures between 5°C above ambient and 60°C.
How accurate is the temperature control?
With a microprocessor-based PID controller and consistent air circulation, the I5110A boasts accurate temperature regulation of ±0.5°C.
What is the internal volume and size of the incubator?
About 10 litres of usable volume are available in the inside chamber, making it appropriate for test tubes, petri dishes, and tiny culture bottles.
Does the incubator have a built-in fan for air circulation?
Indeed, a silent internal fan ensures constant incubation conditions by distributing air throughout the chamber and avoiding temperature stratification.
Can I set the incubator to a specific temperature and time?
Yes, you may preset the temperature and timer settings on the digital control panel to achieve a variety of incubation times, ranging from minutes to days.
Can the door be opened without affecting the temperature?
The temperature inside will change momentarily when the door is opened. Reduce the number of door openings to preserve constant conditions, particularly during crucial incubation stages.
Is the incubator suitable for use with CO₂ or humidity control?
No, the I5110A lacks humidity and CO2 control. It is solely intended for incubation at basic temperatures. Think about using specialised incubators for more sophisticated environmental control.