
Labnet PS1000 AccuSeal Plate Sealer
Introduction
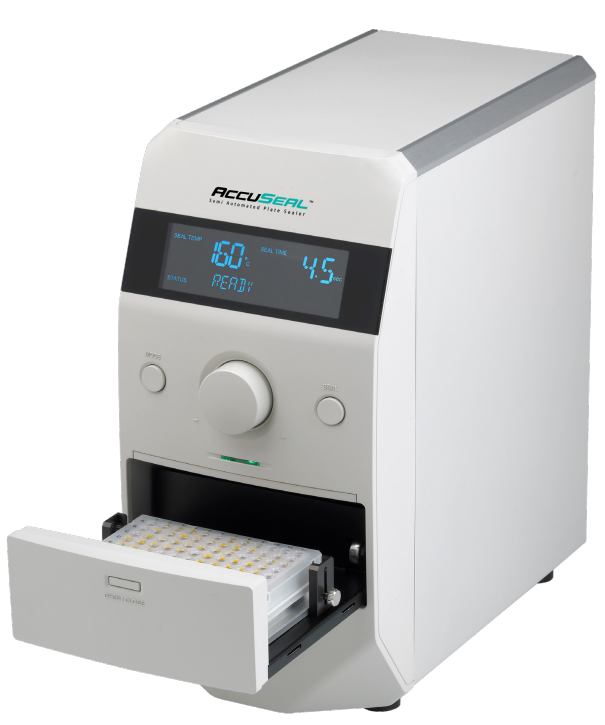
The Labnet AccuSeal™ semi-automated plate sealer is used for heat sealing of a wide variety of microplates to store samples, prevent evaporation, and minimize contamination. It thermally bonds seals and foils to a wide variety of microtiter, cell culture, PCR, and deep well plates.
The digital temperature and timer control allows user selection of parameters for combinations of plates and seals. A plate sensing system allows the plate sealer to provide uniform force, transferring heat evenly to the sealing surface, whether using shallow PCR plates or deep well plates.
Safety Information
This instruction manual contains important operating and maintenance instructions that must be read, understood, and followed by the product user. Failure to use this product according to this instruction manual may degrade or defeat the protection normally provided by this product. Read this instruction manual before using the product.
- Do not use this product in a manner other than as stated in the Operating Conditions section of this manual, as the protection provided by the equipment may be impaired.
- Always wear safety glasses and other appropriate protective equipment when operating this product.
- This product must be connected to a grounded power outlet for safe functioning.
- Use only the power cord supplied with the product.
- The power cord is the device available for disconnection from the mains input.
- Disconnect the power cord before moving or cleaning the unit.
- Keep the product dry and clean.
- Do not immerse the product in liquid for cleaning.
- These units are not explosion- or spark-proof.
- Do not operate this product near volatile or flammable materials.
Installation
- Unpack the instrument carefully and place it on a level, stable surface that can withstand its weight. Do not block ventilation openings on the back.
- Remove and identify all components from the box.
- Power cord
- Seal frame
- Plate sealer
- PCR plate adapter block for 96- or 384-well microplates
- Support block for storage plates
- Instruction manual
- Remove the protective plastic bag and any protective film.
- Plug the power cord into the back of the instrument, and plug the other end into a properly rated outlet. Confirm the voltage rating listed on the instrument is properly labeled to 110V or 230V as required.
- Always use PPE, gloves, eye-wear, etc. accordingly to your experiment protocols’ requirements.
- Switch the main power to ON.
- The front control panel display will illuminate.
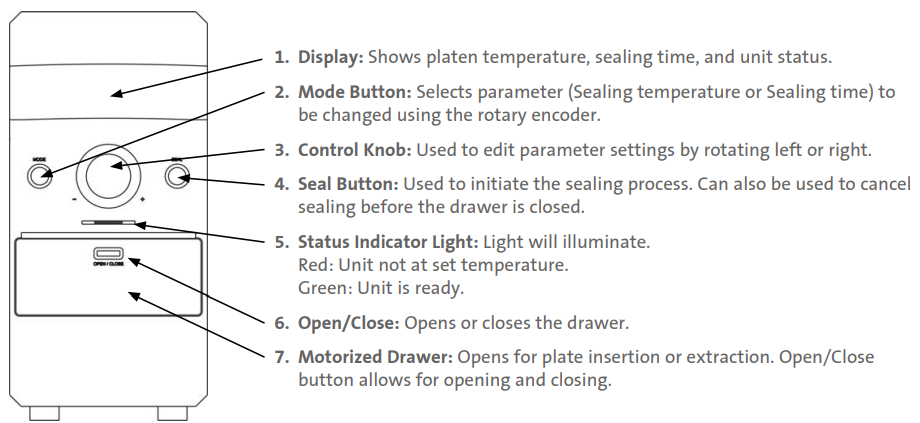
Display Overview
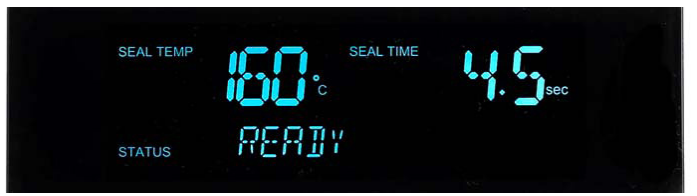
- SEAL TEMP
Indicates sealing platen temperature. - SEAL TIME
Displays sealing time. - STATUS
Shows Heating, Cooling, Read, or Error states.
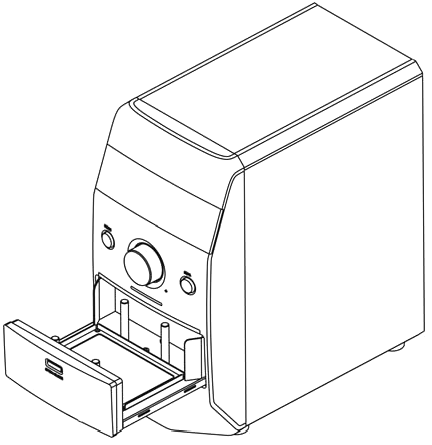
Unit Overview
Operation
After installing the unit, you will need to power it up using the power switch in the back, then choose your sealing settings.
- Proper heat sealing of microplates requires the proper temperature and time settings. Contact your consumable manufacturer for recommended time and temperature parameters.
- Many polypropylene plates and sealing films seal well using a sealing temperature of 165°C and a sealing time of 4.5 seconds.
Temperature Settings
- Press the Mode button until the Seal Temp text is flashing. Use the control knob to adjust the display to the desired temperature.
- Press the control knob or wait 10 seconds to set the selected temperature. When the temperature of the heating platen reaches the set temperature, the display will show Ready, and the indicator LED will be a steady green.
Set the Time
- Press the Mode button until the Seal Time text is flashing. Use the control knob to adjust the display to the desired sealing time.
- Press the control knob or wait 10 seconds to set the selected time.
Using Plate Adapters
PCR microplates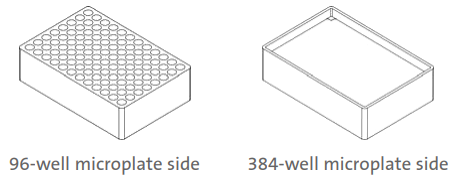
- One side (96 holes) accommodates 96-well microplates, and the other side accommodates 384-well PCR microplates.
Storage plates
- A thin block that is designed to support the center portion of assay and storage plates.
Using the Seal Frame
A sealing frame is provided with the unit to assist in securing the thermal seal in the proper position before sealing the plate.
This ensures proper positioning of the seal and prevents any curling or undesired movement of the thermal seal before the sealing process.
Tabs at either end of the frame secure the thermal seal in place. There are 4 metal posts around the plate, which serve as indexing points for the frame

Sealing a Plate
- Consult the seal manufacturer for recommended settings.
- If the plate you are using requires an adapter, place it into the recessed area in the middle of the drawer. This will prevent the adapter from shifting position during sealing.
- Next, position your plate on top of the adapter or directly in the drawer.
- Depending on the settings chosen, the unit may require some time before the heating platen has reached the desired temperature.
- Keep hands and fingers clear of the drawer, and press the Seal button.
Sealing a Plate
- Set the Sealing temperature and time.
- Insert the Adapter (if required).
- Place the plate in the drawer.
- Place the seal on top of the plate.
- Place the sealing frame on top of the seal.
- Press the Seal when the light is green – the drawer will close, seal the plate, and the drawer will open automatically.
- Remove the sealing frame.
- Remove the sealed plate.
Accessing and Cleaning the Heating Platen
In the event that a seal becomes stuck to the heating platen, the following steps will allow you to clean the platen. Be sure to turn the unit off and unplug it from the power source before attempting to clean the platen. The heating platen can reach temperatures in excess of 190°C. Allow the unit to cool for at least 1 hour before attempting to clean the platen.
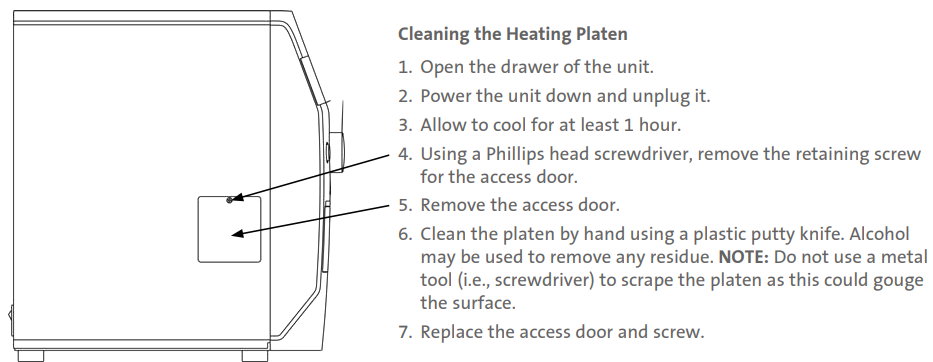
Cleaning the Heating Platen
Power Save Mode
If the unit is left on but inactive for long periods, it will Labnet PS1000 AccuSeal Plate Sealer enter a power-saving mode. These modes are described below.

Specifications
- Dimensions (W x D x H): 6.75 x 12.75 x 14.25 in. (17.1 x 32.4 x 36.2 cm)
- Weight: 27 lbs. (12 kg)
- Sealing Temperature: Off, 100°C to 190°C (increments of 1.0°C)
- Temperature Accuracy: ±1.0°C
- Temperature Uniformity: ±1.0°C
- Sealing Time: 0.5 to 10 sec. (increments of 0.1 sec.)
- Compatible Plate Materials
- PP (Polypropylene)
- PS (Polystyrene)
- Compatible Plate Types
- Standard assay plates
- Deep well storage plates
- PCR plates: skirted, semi-skirted, non-skirted
- Maximum Plate Height: 1.77 in. (4.5 cm)
- Compatible Sealing Film Types
- Foil polypropylene laminate
- Clear polyester-polypropylene laminate
- Clear polymer
- Thin clear polymer
- Foil laminate
- Foil
- Electrical Requirements PS1000 PS1000-230V:
- 120V ±10%, 50/60 Hz, 450W, 3.15A
- 230V ±10%, 50/60 Hz, 450W, 2A
- Overvoltage Category: Category II
- Environmental Conditions: 15°C to 30°C, ≤80% RH
- Storage Temperatures: 0°C to 60°C
Troubleshooting

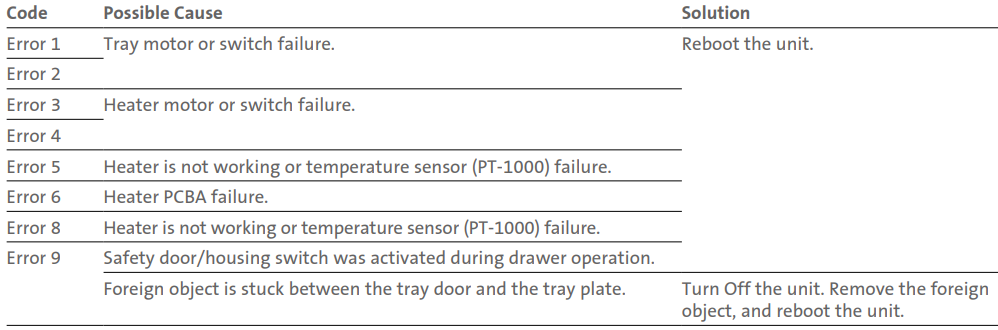
Error Codes
Limited Warranty
Corning Incorporated (Corning) warrants that this product will be free from defects in material and workmanship for a period of one (1) year from the date of purchase. Corning’s sole obligation shall be to repair or replace, at its option, any product or part thereof that proves defective in material or workmanship within the warranty period, provided the purchaser notifies Corning of any such defect. Corning is not liable for any incidental or consequential damages, commercial loss, or any other damages from the use of this product.
Corning’s Customer Service team will help arrange local service where available or coordinate a return authorization number and shipping instructions. Corning may elect for on-site service for larger equipment. Some states do not alllimitationsion on the length of implied warranties or the exclusion or limitation of incidental or consequential damages. This warranty gives you specific legal rights. You may have other rights that vary from state to state. No individual may accept for, or on behalf of Corning, any other obligation of liability, or extend the period of this warranty
Warranty/Disclaimer
Unless otherwise specified, all products are for research use or general laboratory use only.* Not intended for use in diagnostic or therapeutic procedures. Not for use in humans. Corning Life Sciences makes no claims regarding the performance of these products for clinical or diagnostic applications. *For a listing of US medical devices, regulatory classifications, or specific information on claims, visit www.corning.com/resources.
Equipment Disposal
According to Directive 2012/19/EU of the European Parliament and of the Council of 4 July 2012 on waste electrical and electronic equipment (WEEE), this product is marked Labnet PS1000 AccuSeal Plate Sealer with the crossed-out wheeled bin and must not be disposed of with domestic waste. Consequently, the buyer shall follow the instructions for reuse and recycling of waste electronic and electrical equipment (WEEE) provided with the products and available at www.corning.com/weee.
Customer Service
- Website: www.labnetlink.com.
- Visit: www.corning.com/lifesciencs
- Visit: www.corning.com/resources
- USA/Canada: 1.800.492.1110
- Others: +1.978.442.2200
- North America: 978.442.2200
- Australia/New Zealand: 61 427286832
FAQs
What is the Labnet PS1000 AccuSeal Plate Sealer used for?
The AccuSeal PS1000 is an automated microplate heat sealer that uses heat-sealable films to reliably and consistently seal a variety of microplates. It is perfect for processes involving PCR, qPCR, storage, and assays.
What types of plates are compatible with the AccuSeal PS1000?
Standard 96-well, 384-well, deep-well, and various SBS-format microplates are supported by the device. It instantly adapts to plates that are up to 45 mm high.
What types of sealing films can be used?
Heat-sealable films composed of foil, polyester, or polypropylene are compatible with the AccuSeal. These ought to be appropriate for the temperature and kind of sample being used.
What is the temperature range of the sealer?
To meet the needs of the film and plate material, the heating element can be adjusted in 1°C increments from 100°C to 200°C.
How do I operate the plate sealer?
Simply place the plate with film into the digital touchscreen interface, set the required temperature and sealing duration, and the automatic mechanism will seal it in a matter of seconds.
Is the sealing time adjustable?
Indeed, you may optimise for various sealing film materials and plate kinds by varying the sealing stay period from 0.5 to 10 seconds.
How long does it take for the unit to heat up?
Depending on the setpoint, it takes around ten minutes for the sealer to achieve operational temperature.