
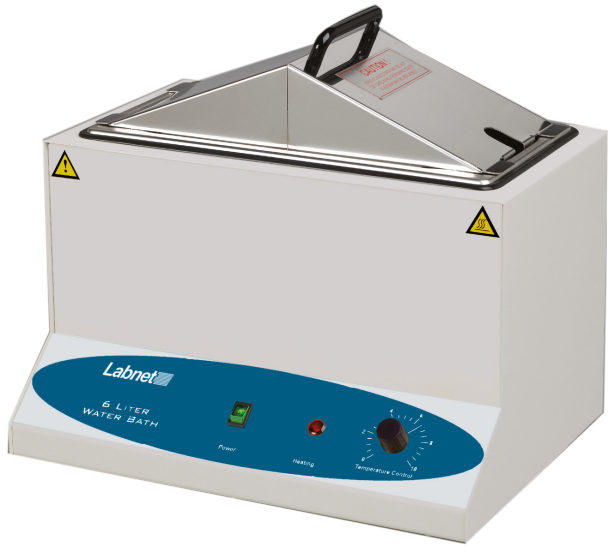
Labnet W1106A 6 Liter Water Bath
Specifications
The Labnet 6 Liter Water Bath is a general-purpose 6 Liter Water Bath capable of heating liquids and accurately maintaining temperatures up to 100°C.
| Temperature range | Ambient to 100°C |
| Controls | Analog, hydraulic |
| Chamber size (W x D x H) | 13 x 6.7 x 6.9 in. (32 x 17 x 17.5 cm) |
| Capacity | 6 liters |
| Unit size (W x D x H) | 14 x 11 x 13 in. (36 x 27.5 x 32 cm) |
| Unit weight | 17 lbs. (7.7 kg) |
| Accessories included | Stainless gabled lid, thermometer clip |
| Electrical | 115V ±10%, 50/60Hz, 4.8 amps 230V ±10%, 50/60Hz, 2.4 amps |
| Fuse | 250V, 3A, 5 x 20mm |
| Working environment temperature | 10°C to 30°C |
| Storage environment temperature | -20°C to 50°C |
| Environmental conditions | ≤70% RH, 70 to 106 kPa |
The Labnet 6 Liter Water Bath is designed to be safe at least when operated under the following conditions:
- Indoor use
- Pollution Degree 2
Inspect the unit and accessories thoroughly upon receipt. If any item is damaged, contact the carrier immediately. The carrier is responsible for shipping damage. Also, verify that all accessories are included and that the unit is in working order before discarding any shipping packaging.
Symbols and Conventions
- The electrical warning symbol indicates the presence of a potential hazard that could result in electrical shock.
- This symbol indicates a potential risk and alerts you to proceed with caution.
- CAUTION: To avoid accidental bodily harm or burning, be very careful when touching the metal parts of the unit. It can be very hot after it is used at high temperatures. Allow the metal parts to cool down before handling.
Installation
Local city, county, or other ordinances may govern the use of this equipment. If you have any questions about local requirements, please contact the appropriate local agency. Installation may be performed by the end user.
Power Source
Check the data plate for voltage, cycle, wattage, and ampere requirements. If matched to your power source, plug the power cord into a grounded outlet. Voltage should not vary more than 10% from the data plate rating.
Location
In selecting a location, consider all conditions that might affect performance, such as heat from radiators, autoclaves, etc. Avoid direct sun, fast-moving air currents, heating/cooling ducts, and high traffic areas. Allow a minimum of 5cm between the unit and walls or partitions that might obstruct free airflow.
Lifting/Handling
When full, this unit may be heavy for some people, and care should be taken to use appropriate lifting devices that are sufficiently rated for these loads. Units should only be lifted from their bottom surfaces. Handles and knobs are not adequate for lifting or stabilization. The unit should be completely restrained from tipping during lifting or transport. All parts, such as covers, thermometer, and line cord, should be removed during transfer to prevent shifting and damage.
Before First Use
This unit was cleaned at the factory, but not sterilized. It is recommended that you clean the water bath with a disinfectant that is suitable for your application (refer to Section 5).
- DO NOT USE chlorine-based bleaches or abrasives, as this can discolor the stainless steel tank.
- DO NOT USE spray cleaners that might leak through openings and cracks and get on electrical parts or that may contain solvents that will harm the coatings.
Controls Overview (Front Panel)
Power Switch
- The main power switch is on the front panel and controls all power to the unit. The switch will light when the unit is energized.
Temperature Controller
- This control knob is marked TEMPERATURE. It controls the water bath operating temperature on a scale of 1 to 10.
Heating Lamp
- When the unit is heating, the light is ON. When the unit has reached the set point temperature, the light will only be ON when the unit is calling for heat to maintain temperature.
Operation
If the tank boils dry while containing plasticware, the plastic will melt. If you intend to use test tube racks, remember that wire racks or plastic-coated racks may wear and expose metal, which can cause damage. Preferably, only use all plastic racks.
- Place the unit on a level surface and plug the unit into a properly grounded electrical outlet of appropriate voltage.
- Do not use tap water or deionized water. Note that normal depth is two-thirds full, but depth must be at least two inches.
- Place the user-supplied thermometer in the desired position. A clip is provided for holding the thermometer (see Figure 1).
- Push the power switch to the ON position. The switch will light.
- Set the temperature controller10. When Labnet W1106A 6 Liter Water Bath the thermometer reaches the desired operating temperature, turn the control down until the heating light turns off.
- Wait for the temperature to stabilize, and adjust the controller as necessary until the desired operating temperature is obtained.
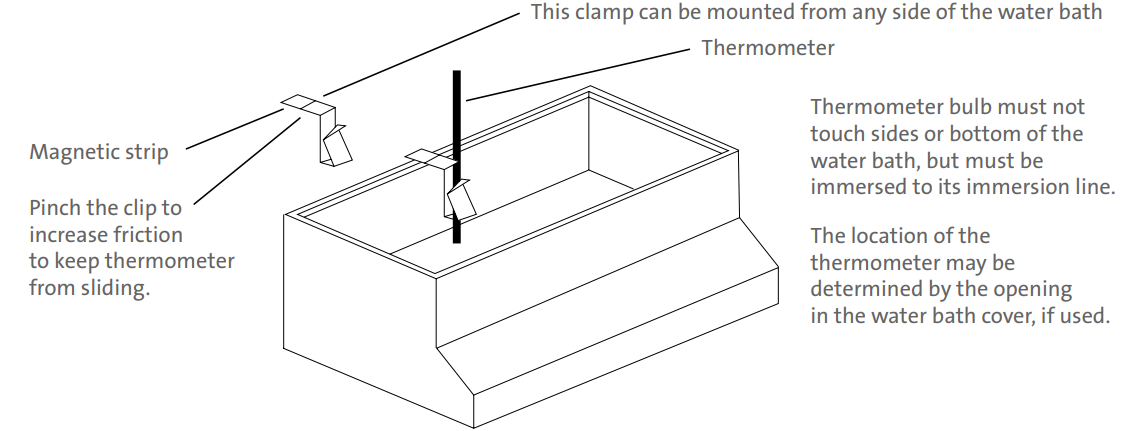
Figure 1. Water bath thermometer assembly
Cleaning and Maintenance
Prior to any cleaning or servicing on this unit, disconnect the power cord from the unit.
Heavy water bath use causes soiling. Clean the bath with a mild soap and water solution, rinse with clean water, and wipe dry with a soft cloth.
Stainless steel does not rust, but foreign Labnet W1106A 6 Liter Water Bath materials in the tank may rust or leave rust spots. If corrosion is seen, scrub out the stains with a mild abrasive, never steel wool. Failure to keep the instrument clean of corrosion can damage the stainless steel components.
Troubleshooting and Service
Finally, check the fuses. Should you have a question about the Labnet 6 Liter Water Bath or require service for the unit, contact Corning Customer Service at 800.492.1110 or 978.442.2200. Do not send a unit for service without first calling to obtain a repair authorization (RA) number. Any damage resulting from improper packaging shall be the responsibility of the user.
Limited Warranty
Corning Incorporated (Corning) warrants that this product will be free from defects in material and workmanship for a period of one (1) year from the date of purchase. Corning’s sole obligation shall be to repair or replace, at its option, any product or part thereof that proves defective in material or workmanship within the warranty period, provided the purchaser notifies Corning of any such defect. Corning is not liable for any incidental or consequential damages, commercial loss, or any other damages from the use of this product.
Corning’s Customer Service team will help arrange local service where available or coordinate a return authorization number and shipping instructions. Corning may elect for on-site service for larger equipment. Some states do not alllimitationsion on the length of implied warranties or the exclusion or limitation of incidental or consequential damages. This warranty gives you specific legal rights. You may have other rights that vary from state to state. No individual may accept for, or on behalf of Corning, any other obligation of liability, or extend the period of this warranty
Warranty/Disclaimer
Unless otherwise specified, all products are for research use or general laboratory use only.* Not intended for use in diagnostic or therapeutic procedures. Not for use in humans. Corning Life Sciences makes no claims regarding the performance of these products for clinical or diagnostic applications. *For a listing of US medical devices, regulatory classifications, or specific information on claims, visit www.corning.com/resources.
Equipment Disposal
According to Directive 2012/19/EU of the Labnet W1106A 6 Liter Water Bath European Parliament and of the Council of 4 July 2012 on waste electrical and electronic equipment (WEEE), this product is marked with the crossed-out wheeled bin and must not be disposed of with domestic waste. Consequently, the buyer shall follow the instructions for reuse and recycling of waste electronic and electrical equipment (WEEE) provided with the products and available at www.corning.com/weee.
Customer Service
- Website: www.labnetlink.com.
- Visit: www.corning.com/lifesciencs
- Visit: www.corning.com/resources
- USA/Canada: 1.800.492.1110
- Others: +1.978.442.2200
- North America: 978.442.2200
- Australia/New Zealand: 61 427286832
FAQs
What is the maximum volume capacity of the Labnet W1106A water bath?
With a maximum capacity of 6 litres, the water bath is appropriate for a range of incubation and heating requirements for laboratory samples.
How do I set and control the temperature?
The water bath has an easy-to-read digital temperature controller that allows for exact temperature settings, usually between room temperature and 99°C.
How long does the water bath take to reach the set temperature?
Although the heating duration varies depending on the setpoint and initial water temperature, it usually takes 15 to 30 minutes to reach the desired temperature.
How should I clean and maintain the water bath?
Regularly drain the water and use a soft cloth and mild detergent to clean the interior.
Can I use this water bath with organic solvents?
To avoid risks, exercise caution and stay away from volatile or combustible materials.