
Lenovo Legion Go S 8ARP1 Gaming Console
Read this first
Before using this documentation and the product it supports, ensure that you read and understand the following:
- Generic Safety and Compliance Notices
- Safety and Warranty Guide
- Setup Guide
Meet your Legion Go S 8ARP1
Front view
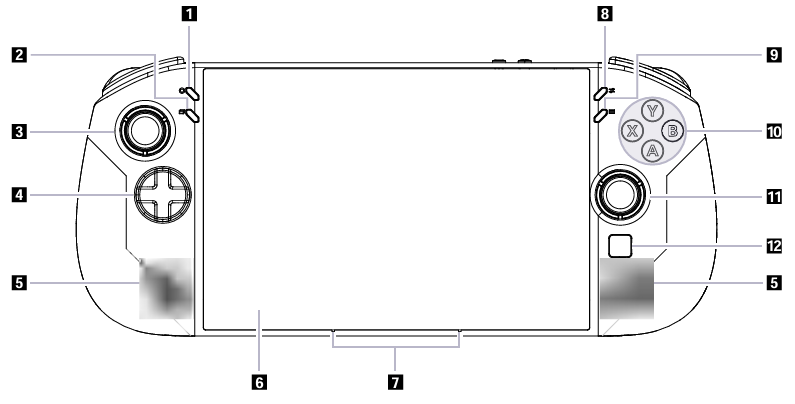
Figure 1. Front view of Legion Go S 8ARP1
Table 2. Components seen from the front view
| No. | Description |
| 1 | View button |
| 2 | Legion L |
| 3 | Left joystick/LS |
| 4 | D-pad |
| 5 | Speakers |
| 6 | Screen |
| 7 | Microphones |
| 8 | Menu button |
| 9 | Legion R |
| 10 | ABXY buttons |
| 11 | Right joystick/RS |
| 12 | Touchpad |
Controls seen from the front view
The View, Legion L, left joystick/LS, D-pad, Menu, Legion R, ABXY, and right joystick/RS controls are visible at the front of the console and perform different functions in different games. You can find their function descriptions in the controls guide of a specific Legion Go S game.
Copyright Lenovo 2024
The left joystick and the right joystick are used to interact with games, apps, and the console interface. You can use a joystick to move an object on the screen in any direction. When you press down on a joystick, it can also function as a clickable button, and it is then named LS/RS.
The D-pad is a directional pad that allows you to indicate four directions—up, down, left, and right.
Speakers
The speakers are the built-in sound output devices.
Screen
The screen of the built-in display is the area where text, graphics, and videos are displayed.
Touch-enabled screens allow you to intuitively interact with your console by touching buttons, icons, and menu commands displayed on the screen. Touch-enabled screens also support multi-finger gestures.
Microphones
The microphones are the built-in sound input devices. They capture your voice and ambient sound and convert them into digital form. Microphones are essential components when you use your console for video conferencing or voice recording.
Touchpad
The touchpad is the console’s built-in pointing device, which provides the basic functionality of an external mouse. Slide your finger on the touchpad to move the pointer on the screen and tap or double-tap to select or execute a screen item.
Back view
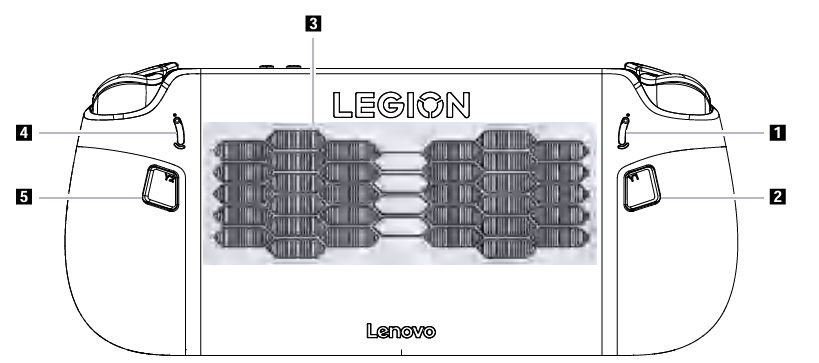
Figure 2. Back view of Legion Go S 8ARP1
Table 3. Components seen from the back view
| No. | Description |
| 1 | LT button range switch |
| 2 | Y1 button |
| 3 | Air vents (intake) |
| 4 | RT button range switch |
| 5 | Y2 button |
LT and RT button range switch
The switch is used to adjust the press range of the LT and RT buttons. After you toggle this switch to the top, the press range is small, suitable for FPS games. After you toggle this switch to the bottom, the press range is large, suitable for racing games.
Controls seen from the back view
The Y1 and Y2 controls are visible at the back of the console and perform different functions in different games. You can find their function descriptions in the controls guide of a specific Legion Go S game.
Air vents (intake)
The air vents allow air to be sucked into the console to cool the internal components.
Important: When the console is operating, do not place it flat on a bed, sofa, carpet, or other flexible surfaces. Otherwise, the air vents will be blocked, and the console may overheat, reducing performance or causing the console to be unresponsive or even shut down.
Top view
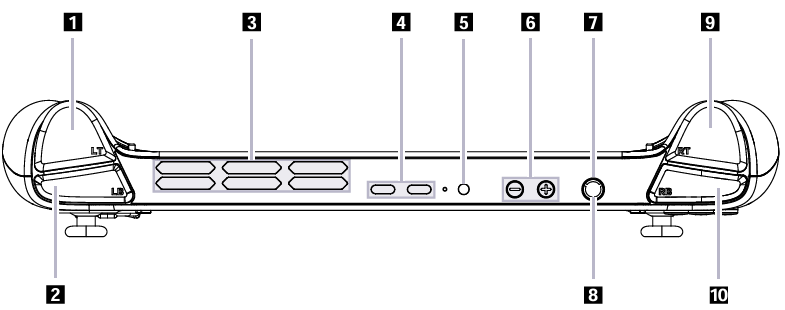
Figure 3. Top view of Legion Go S 8ARP1
Table 4. Components seen from the top view
| No. | Description |
| 1 | LT button |
| 2 | LB button |
| 3 | Air vents (outlet) |
| 4 | Multi-purpose USB Type-C connector |
| 5 | Combo audio jack |
| 6 | Volume buttons |
| 7 | Power button |
| 8 | Power light |
| 9 | RT button |
| 10 | RB button |
Controls seen from the top view
The controls that can be seen from the top view, including the LT, LB, RT, and RB buttons, perform different functions in different games. You can find their function descriptions in the controls guide of a specific Legion Go S game.
Air vents (outlet)
The air vents allow hot air to be discharged from the console.
Important: When the console is operating, do not place it on a bed, sofa, carpet, or other flexible surfaces. Otherwise, the air vents will be blocked and the console may overheat, reducing performance or causing the console to be unresponsive or even shut down.
Multi-purpose USB Type-C connector
This USB Type-C® connector is the power input connector. Use the included power adapter and this connector to supply power to the console.
When this connector is not used by the included power adapter, it can also be used to connect:
- Storage or peripheral devices that follow the USB specification for data transfer and device interconnection
- Display devices
Note: When you connect the console to display devices, you need to use appropriate cables and adapters (if needed) according to the connection capabilities of the display device.
- Thunderbolt™-enabled docks or devices
Combo audio jack
The combo audio jack is used to connect single-plug headsets, headphones, or external speakers.
Volume buttons
The volume buttons are the built-in volume controls. Press to turn the volume down and press to turn it up.
Power button
Press the power button to turn on your console.
Note: By default, on a Windows product, pressing the power button when the product is turned on will put it into sleep mode.
Power light
The power light indicates the current power state when it is not connected to the AC adapter: powered off, in sleep mode, or in hibernation mode.
Table 4. Components seen from the top view
| Light status | Power state | Battery charge level |
| White (Blinking slowly) | In sleep mode | 91%–100% |
| Amber (Blinking slowly) | In sleep mode | 1%–90% |
| Off | Powered off or in hibernation mode |
The color of the power light can indicate the active thermal mode when it is powered on.
Table 6. Power light color and the console’s active thermal mode
| Light color | Thermal mode |
| White | Balance mode |
| Blue | Quiet mode |
| Red | Performance mode |
| Purple | Custom mode |
Bottom view
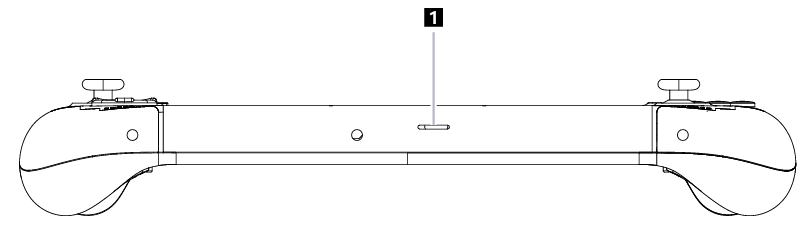
Figure 4. Bottom view of Legion Go S 8ARP1
Table 7. Components seen from the bottom view
| No. | Description |
| 1 | microSD card slot |
microSD card slot
The microSD card slot is used to insert a microSD, microSDHC, or microSDXC memory card to transfer data between the memory card and your console.
Specifications
Dimensions
| Length | 298.5 mm |
| Width | 127.55 mm |
| Thickness | 22.6 mm |
Display
| Type | LCD |
| Screen size (diagonal) | 8 inches |
| Resolution | 1920 × 1200 |
| Supported refresh rates | 120 Hz |
| Brightness | 500 nits |
Connectors and slots
| Combo audio jack | • Diameter: 3.5 mm
• Supported plug: – 3-pole, TRS – 4-pole, TRRS (CTIA and OMTP) |
| microSD card reader | • Quantity: 1
• Interface: UHS-I |
| USB Type-C | • Quantity: 2
• Maximum power output: 5 V, 1 A • Supported signaling protocols: – USB 2.0 480 Mbps – SuperSpeed+ USB 10 Gbps – DisplayPort 1.4 – Thunderbolt 3 40 Gbps – USB4 40 Gbps |
AC power adapter
| Input | 100 V ac–240 V ac, 50 Hz–60 Hz |
| Output voltage | 20 V |
| Maximum output current | 3.25 A |
| Maximum output power | 65 W |
Rechargeable battery pack
| Capacity | 55.5 Wh |
| Cell type | Lithium-polymer |
| Number of cells | 3 |
Note: The battery capacity is the typical or average capacity as measured in a specific test environment. Capacities measured in other environments may differ, but are no lower than the rated capacity (see product label).
Memory
| Type | LPDDR5X |
| Installation | Onboard |
Mass storage device
| Type | Solid-state drive (SSD) |
| Slot type | M.2 (2242) |
| Number of slots | 1 |
| Interface | PCIe Gen4 |
Networking
| Wi-Fi® | Wi-Fi 6E or Wi-Fi 6 |
| Bluetooth® |
Statement on USB transfer rate
Depending on many factors such as the processing capability of the host and peripheral devices, file attributes, and other factors related to system configuration and operating environments, the actual transfer rate using the various USB connectors on this device will vary and will be slower than the data rate listed below for each corresponding device.
Table 8. USB device and the corresponding data rate
| USB device | Data rate (Gbit/s) |
| USB 3.2 Gen 1 | 5 |
| USB 3.2 Gen 2 | 10 |
| USB4 | 40 |
Avoid constant body contact with specific hot sections
CAUTION:
When the console is operating, it should be placed on a hard and flat surface with its back area not in contact with the user’s bare skin. Under normal operating conditions, the temperature of the back surface will remain within an acceptable range as defined in IEC 62368-1, but such temperatures can still be high enough to cause discomfort or harm to the user if directly touched for over 10 seconds at a time. As such, it is recommended that users avoid prolonged direct contact with the back of the console.
Operating environment
Maximum altitude (without pressurization) 3048 m (10 000 ft)
Temperature
- At altitudes up to 2438 m (8000 ft)
- Operating: 5°C to 35°C (41°F to 95°F)
- Storage: 5°C to 43°C (41°F to 109°F)
- At altitudes above 2438 m (8000 ft)
- Maximum temperature when operating under the unpressurized condition: 31.3°C (88°F)
Note: When you charge the battery, its temperature should be no lower than 10°C (50°F).
Relative humidity
- Operating: 8% to 95% at wet-bulb temperature 23°C (73°F)
- Storage: 5% to 95% at wet-bulb temperature 27°C (81°F)
Appendix A. Notices and trademarks
Notices
Lenovo may not offer the products, services, or features discussed in this document in all countries. Consult your local Lenovo representative for information on the products and services currently available in your area. Any reference to a Lenovo product, program, or service is not intended to state or imply that only the Lenovo product, program, or service may be used. Any functionally equivalent product, program, or service that does not infringe any Lenovo intellectual property right may be used instead. However, it is the user’s responsibility to evaluate and verify the operation of any other product, program, or service.
Lenovo may have patents or pending patent programs covering the subject matter described in this document. The furnishing of this document does not give you any license to these patents. You can send license inquiries, in writing, to:
Lenovo (United States), Inc.
8001 Development Drive, Morrisville, NC 2756,0 U.S.A.
Attention: Lenovo Director oof fLicensingi.In some jurisdictions, disclaimers of express or implied warranties in certain transactions;n s, therefore, this statement may not apply to you.
Changes are made periodically to the information herein; these changes will be incorporated in new editions of the publication. To provide better service, Lenovo reserves the right to improve and/or modify the products and software programs described in the manuals included with your computer, and the content of the manual, at any time without additional notice.
The software interface and function, and hardware configuration described in the manuals included with your computer might not match exactly the actual configuration of the computer that you purchase. For the configuration of the product, refer to the related contract (if any) or product packing list, or consult the distributor for the product sales. Lenovo may use or distribute any of the information you supply in any way it believes appropriate without incurring any obligation to you.
The products described in this document are not intended for use in implantation or other life support applications where malfunction may result in injury or death to persons. The information contained in this document does not affect or change Lenovo product specifications or warranties. Nothing in this document shall operate as an express or implied license or indemnity under the intellectual property rights of Lenovo or third parties. All information contained in this document was obtained in specific environments and is presented as an illustration. The result obtained in other operating environments may vary.
Lenovo may use or distribute any of the information you supply in any way it believes appropriate without incurring any obligation to you.
Any references in this publication to non-Lenovo websites are provided for convenience only and do not in any manner serve as an endorsement of those websites. The materials at those websites are not part of the materials for this Lenovo product, and use of those websites is at your own risk.
© Copyright Lenovo 2024
Any performance data contained herein was determined in a controlled environment. Therefore, the result obtained in other operating environments may vary significantly. Some measurements may have been made on development-level systems, and there is no guarantee that these measurements will be the same on generally available systems. Furthermore, some measurements may have been estimated through extrapolation. Actual results may vary. Users of this document should verify the applicable data for their specific environment.
This document is copyrighted by Lenovo and is not covered by any open-source license, including any Linux agreement(s) which may accompany software included with this product. Lenovo may update this document at any time without notice.
For the latest informationn or any questions or comments, contact or visit the Lenovwebsitete:
Trademarks
Lenovo and the Lenovo logo are trademarks of Lenovo. Thunderbolt is a trademark of Intel Corporation or its subsidiaries. Microsoft, Windows, OneDrive, Outlook, Skype, Office 365, and Cortana are trademarks of the Microsoft group of companies. DisplayPort is a trademark of the Video Electronics Standards Association. Wi-Fi is a registered trademark of Wi-Fi Alliance. USB Type-C is a registered trademark of USB Implementers Forum. All other trademarks are the property of their respective owners.