
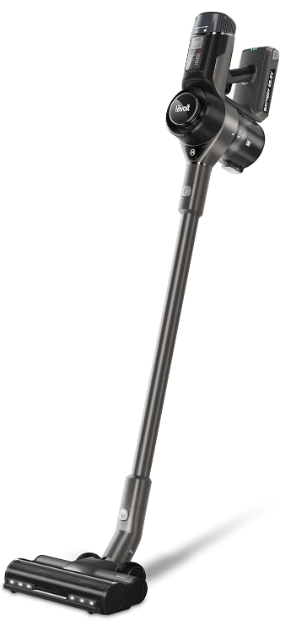
Levoit LSV-VF401-AUS VortexIQ Stick Vacuum
Package Contents
- 1 × Vacuum Body
- 1 × Stick
- 1 × Vacuum Head
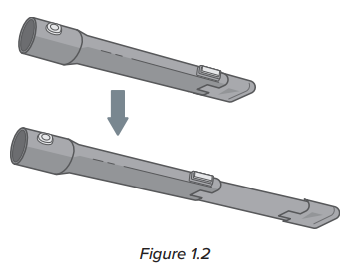
- 1 × Telescoping Crevice Tool
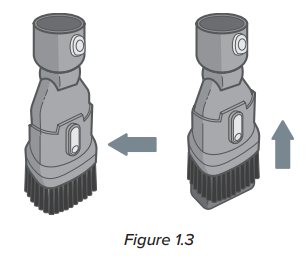
- 1 × 2-in-1 Dusting Brush
- 1 × Charging Dock with Accessory Holder
- 3 × Screws
- 3 × Wall Anchors
- 1 × Charger
- 1 × User Manual
- 1 × Quick Start Guide
Specifications
| Battery Type | DC 25.9V, 2500mAhm Li-ion battery |
| Charging Input | AC 100–240V, 50/60Hz 0.5A |
| Charging Time | 4–5 hours |
| Dimensions | 9.8 × 9.1 × 46.1 in / 25 × 23 × 117 cm |
| Weight | 7.1 lb / 3.2 kg |
| Dust Bin Capacity | 2.5 cups / 0.6 L |
| Runtime | 40 minutes (Low) |
| Rated Power | 400W |
| Suction Power | 130AW |
Safety Instructions
- Do not use outdoors or on wet surfaces.
- The vacuum is not a toy. Do not allow children to play with the vacuum.
- Only use the vacuum as described in this manual.
- Do not handle the charger or vacuum with wet hands.
- Do not put any object into any opening.
- Do not use the vacuum with any opening blocked.
- Keep free of dust, lint, hair, or anything that may reduce air flow.
- Keep hair, loose clothing, fingers, and all body parts away from openings and moving parts.
- Use extra care when cleaning on stairs.
- Do not vacuum the following or use where they may be present:
- Large or sharp objects such as glass shards
- Flammable or combustible liquids such as solvents or detergents
- Inflammable or explosive substances such as gasoline or alcohol
Know Your Product
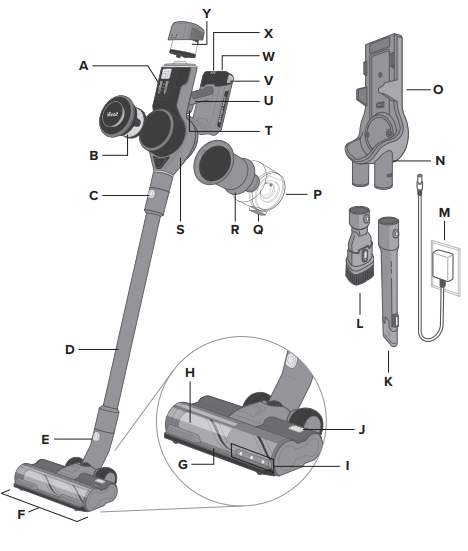
- Control Panel
- HEPA-Type Pre-Filter
- Vacuum Body Release Button
- Stick
- Vacuum Head Release Button
- Vacuum Head
- Roller Brush Cushion
- Roller Brush
- LED Lights
- Roller Brush Release Button
- Telescoping Crevice Tool
- 2-in-1 Dusting Brush
- Charger
- Charging Port (Dock)
- Charging Dock with Accessory Holder
- Dust Bin
- Dust Bin Release Button
- Metal Filter
- Vacuum Body
- On/Off Trigger
- Handle
- Battery Release Button
- Charging Port (Body)
- Battery Indicator Lights
- HEPA-Type Main Filter
Control Panel
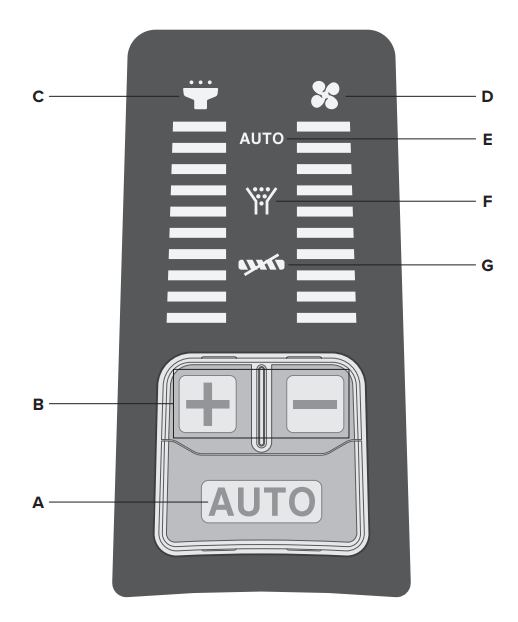
- Auto Mode Button
- Press to turn on Auto Mode (see
- Increase/Decrease Power
- Press or to manually increase or decrease suction power.
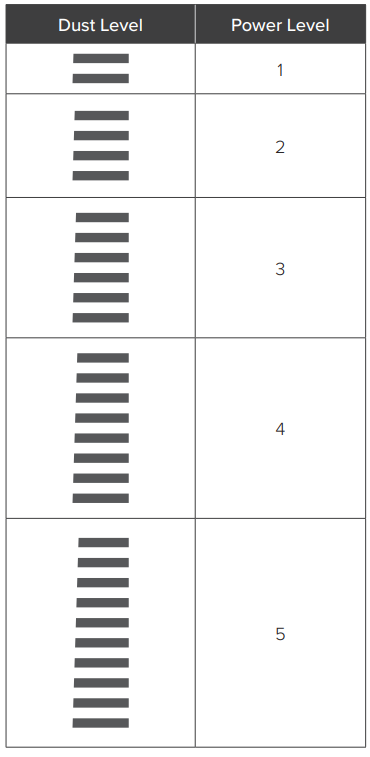
- Dust Level Indicator
- Indicates the level of dust detected by the dust sensor.
- Power Level Indicator
- Indicates the level of vacuum suction power.
- Auto Mode Indicator
- Indicates when Auto Mode is active.
- Airflow Blockage Indicator
- Indicates that the vacuum airflow is blocked.
- Roller Brush Blockage Indicator
- Indicates that the roller brush is blocked (see Cleaning the Roller Brush, page 15).
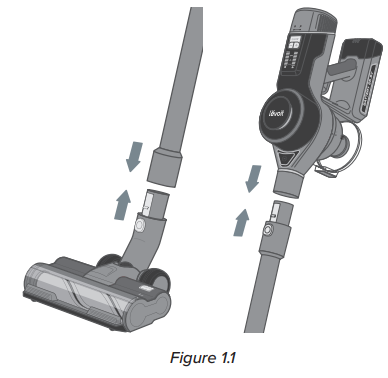
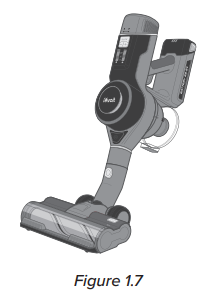
Using the Device
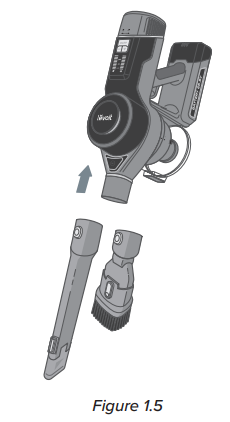
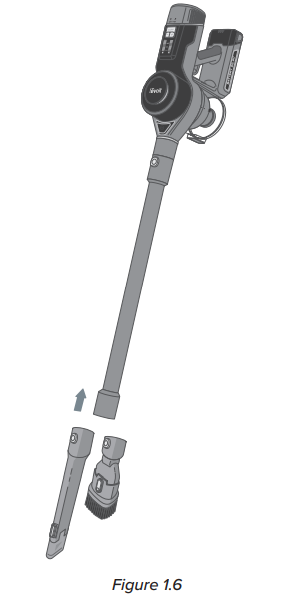
- Attach the vacuum head or nozzle attachment to the bottom of the stick and attach the vacuum body to the top of the stick.

- Charge the vacuum (see page 10).
- Press the On/Off Trigger to turn the vacuum on.
- Press to use Auto Mode, or press or to manually control suction power.
- Press the On/Off Trigger to turn the vacuum off.
Battery Indicator Light Chart
| Battery Level | Battery Indicator |
| 70–100% | 3 lights |
| 50–70% | 2 lights |
| 20–50% | 1 light |
| 0–20% | 1 flashing light |
Nozzle Attachments
- Your vacuum comes with nozzle attachments to help you tackle almost any cleanup job.
Telescoping Crevice Tool
- Press the button to extend the crevice nozzle.
- Use to clean hard-to-reach places.
- Good for reaching small cracks and crevices in furniture, the corners of a room, or a car.
2-in-1 Dusting Brush
- Press the button to slide the bristles up/down and switch between the upholstery brush and the duster.
- Use an upholstery brush to clean soft furnishings and upholstery.
- Use bristles to dust and clean hard surfaces.
Nozzle Attachments (cont.)
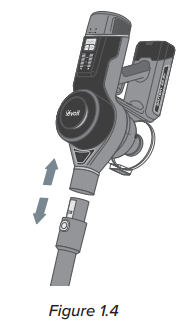
To use a nozzle attachment:
- Press and hold the Vacuum Body Release Button and gently pull the vacuum body from the stick.
- Slide the crevice tool or dusting brush onto the vacuum body.
- Optionally, leave the stick attached to the vacuum body and press the Vacuum Head Release Button to remove the vacuum head. Then, attach the nozzle or brush to the end of the stick.
Auto Mode
Auto Mode utilizes DPC Technology™ (Dynamic Power Control Technology), which uses infrared sensors to automatically detect the amount of dust and debris that is traveling through the vacuum, and then adjusts the suction power to accommodate the amount of dust. If there is more dust, the suction power will be higher, and if there is less dust, the suction power will be lower.
Care & Maintainance
- Turn the vacuum off. Press the Battery Release Button and remove the battery.
- To reinstall, slide the battery into the slot in the vacuum body. There will be a clicking sound when the battery is properly installed.
- To maintain the life of the battery, store the vacuum in a cool, dry place.
- Store the battery in a semi-charged state (at least half charged)

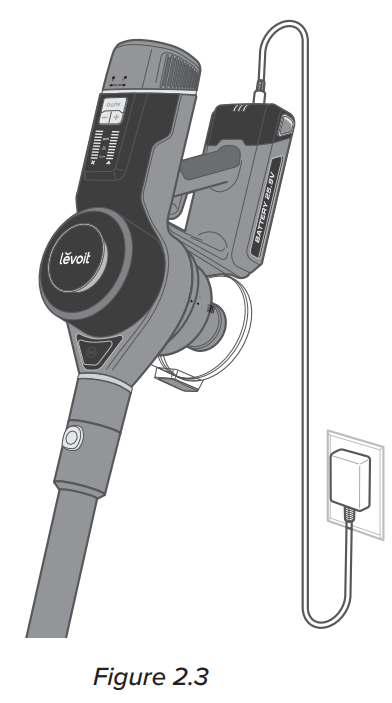
Charging the Vacuum
Your vacuum uses a 2500mAh Li-ion battery. On a full charge, the battery lasts approximately 40 minutes on power level 1. Use the included charger/charging dock to charge the vacuum.
- Insert the charger into the charging port on the vacuum body.
- Plug the charger into an outlet. The battery indicator lights will blink while charging.
- When the vacuum is fully charged, the 3 battery indicator lights will turn solid and turn off after 1 minute.

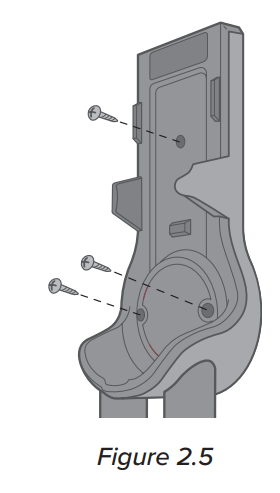
- Mount the charging dock by screwing it into the wall near a power outlet [Figure 2.5].
- The charging dock must be high enough on the wall to allow the vacuum to stand up.
- Make sure that the wall is free of gas pipes, water pipes, electrical cables, and wires.
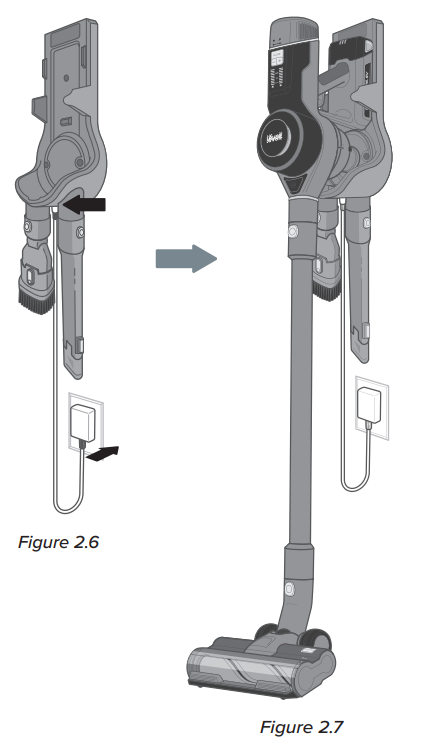
- Insert the charger into the charging port on the dock. Plug the charger into the outlet [Figure 2.6].
- Hang the vacuum on the charging dock [Figure 2.7]. The battery indicator lights will blink while charging.
- When the vacuum is fully charged, the 3 battery indicator lights will turn solid and turn off after 1 minute.
Battery Indicator Light Chart (While Charging)
| Battery Level | Battery Indicator |
| 0–30% | 3 flashing lights |
| 30–60% | 1 solid light & 2 flashing lights |
| 60–85% | 2 solid lights & 1 flashing light |
| 85–100% | 3 solid lights |
Emptying the Dust Bin
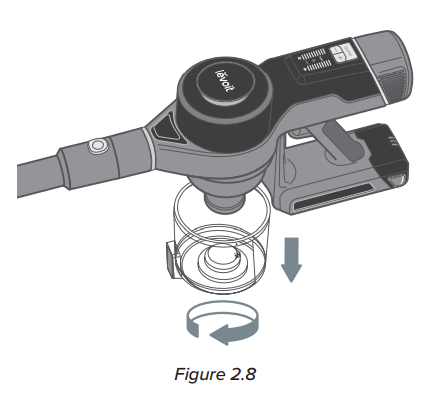
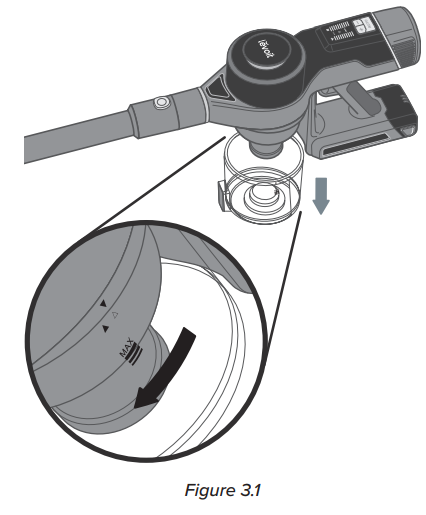
When the dust in the dust bin reaches the MAX line, empty the dust bin.
- Turn the vacuum off. Remove the vacuum body by pressing the Vacuum Body Release Button.
- Hold the dust bin over a trash can and press the Dust Bin Release Button [Figure 2.8]. Use caution, as the door will automatically open when the release button is pushed.
- Empty out debris and dirt, then close the door
Cleaning
Cleaning the Vacuum Body
- Turn the vacuum off.
- Wipe the vacuum body down with a damp cloth.
- Allow the vacuum body to completely dry before using.
Dust Bin & Metal Filter
- Make sure the vacuum is off and the dust bin is empty before cleaning (see Emptying the Dust Bin,
- Rotate the dust bin clockwise to remove it. Empty out any remaining dust and debris.
- Rotate the metal filter clockwise to remove it.
- Rinse the dust bin and metal filter with water and allow them to dry.
- Make sure the parts are completely dry before using.
- Reattach the metal filter and dust bin to the vacuum body.
Cleaning the HEPA-Type Filters
To maintain the performance of your filters, they should be routinely washed and replaced.
- The pre-filter should be washed once a month and replaced after 6 months.
- The main filter should be washed once every 6 months and replaced after 1 year.
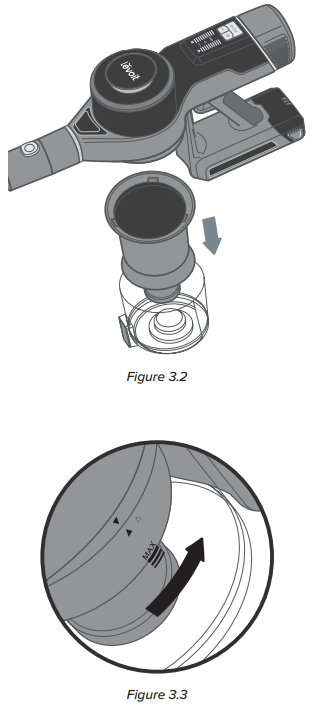
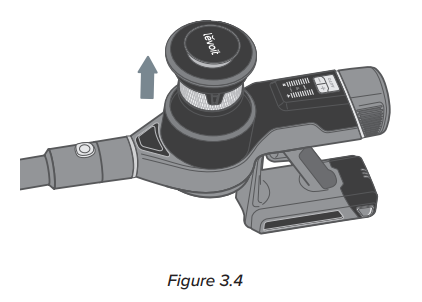
HEPA-Type Pre-Filter
- Pull up on the pre-filter housing to remove it from the top of the vacuum body.
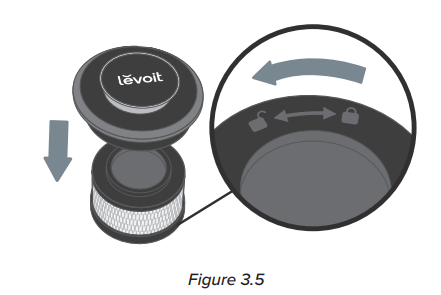
- Rotate the pre-filter counterclockwise to remove it from the housing [Figure 3.5]
- Gently tap the pre-filter over a trash can to remove dust and debris.
- If necessary, run the pre-filter under running water to wash it. Allow it to dry for 24 hours before reinstallation.
HEPA-Type Main Filter
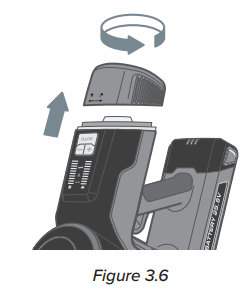
- Rotate the main filter housing counterclockwise to remove it from the back end of the vacuum body [Figure 3.6].
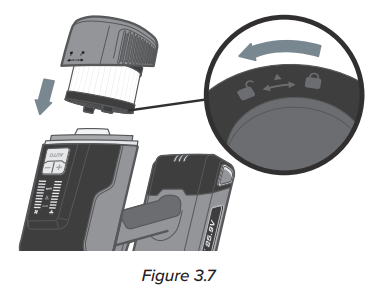
- Rotate the main filter counterclockwise to remove it from the housing [Figure 3.7]
- Gently tap the main filter over a trash can to remove dust and debris.
- If necessary, run the main filter under running water to wash it. Allow it to dry for 24 hours before reinstallation.
Cleaning the Roller Brush
Clean the roller brush every 4–5 uses to avoid blockage or jamming.
- Turn the vacuum off. Detach the vacuum head from the stick by pressing the Vacuum Head Release Button.
- Press the Roller Brush Release Button and pull out the roller brush [Figure 3.8]
- Carefully use a pair of scissors or a sharp knife to remove any hair or debris tangled around the roller brush.
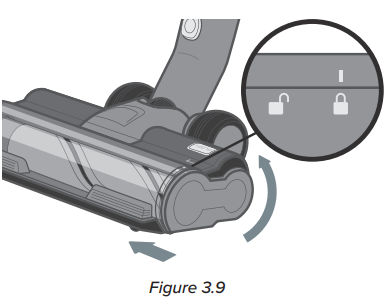
- Insert the roller brush back into the vacuum head. Slide the side panel up to lock it in place [Figure 3.9]
Storage
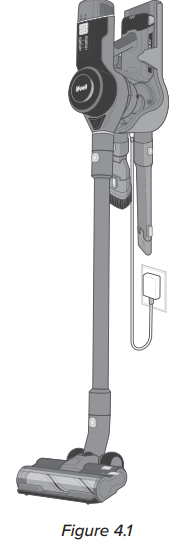
When the vacuum is not in use, store it on the charging dock
- Mount the charging dock by screwing it into the wall (see Charging the Vacuum, page 10).
- Hang the vacuum on the charging dock [Figure 4.1].
- Place the nozzle attachments in the slots on the charging dock.
Disposing of the Battery
- The battery contains materials that are harmful to the environment and must be removed from the vacuum before it is discarded.
- When removing the battery, the vacuum must be turned off.
- Discarded batteries should be handled properly. Do not put batteries into fire, water, or soil.
- If battery leakage touches skin or clothing, flush with water immediately to avoid skin injury and seek medical help.
Troubleshooting
| Problem | Possible The vacuum |
| m will not turn on | The battery is not installed correctly (see Battery Installation, page 10). |
| Recharge the vacuum (see Charging the Vacuum, page 10). | |
| The vacuum motor overheated. Empty the dust container and check for blockage inside the vacuum head and the stick. Remove any blockage and clean the filters (see Cleaning, page 13). Allow the vacuum to cool for 1 hour before turning it back on. | |
| The vacuum is not charging. | The charger is not properly plugged in (see Charging the Vacuum, page 10).The roller |
| The brush is not turning. | Clean the roller brush and remove any debris blocking the brush (see Cleaning the Roller Brush, page 15). |
| The vacuum makes an abnormal noise. | Clean the roller brush and remove any debris blocking the brush (see Cleaning the Roller Brush, page 15). |
| Check for blockage inside the vacuum body, vacuum head, and stick. Remove any blockage (see Cleaning, page 13). A vacuum | |
| m has low suction power. | The battery may be low. Recharge the battery to a full charge (see Charging the Vacuum, page 10). |
| Clean the Levoit LSV-VF401-AUS VortexIQ Stick Vacuum roller brush and remove any debris blocking the brush (see Cleaning the Roller Brush, page 15). | |
| The dust bin and filters may be full. Empty the dust bin and clean the filters (see Cleaning, page 13). | |
| Check for blockage inside the vacuum body, vacuum head, and stick. Remove any blockage (see Cleaning, page 13). |
Federal Communications Commission Interference Statement
This device complies with Part 15 of the FCC Rules. Operation is subject to the following two conditions:
- This device may not cause harmful interference, and
- This device must accept any interference received, including interference that may cause undesired operation.
This equipment generates, uses, and can radiate radio frequency energy and, if not installed and used in accordance with the instructions, may cause harmful interference to radio communications. However, there is no guarantee that interference will not occur in a particular installation.
- Reorient or relocate the receiving antenna.
- Increase the separation between the equipment and receiver.
- Connect the equipment to an outlet on a circuit different from that to which the receiver is connected.
- Consult the dealer or an experienced radio/TV technician for help.
FCC Radiation Exposure Statement
This equipment complies with FCC radiation exposure limits set forth for an uncontrolled environment. End users must follow the specific operating instructions to satisfy RF exposure compliance. To maintain compliance with FCC RF exposure compliance Levoit LSV-VF401-AUS VortexIQ Stick Vacuum requirements, please follow the operation instructions as documented in this manual.
This transmitter must not be located or operate in conjunction with any other antenna or transmitter. The availability of some specific channels and/or Levoit LSV-VF401-AUS VortexIQ Stick Vacuum operational frequency bands is country-dependent and firmware programmed at the factory to match the intended destination. The firmware setting is not accessible by the end user.
Limited Warranty
| Product Name | Vital 100S Smart True HEPA Air Purifier |
| Model | LAP-V102S-WUS |
| Date of Purchase | |
| Order ID |
Terms & Policy
Arovast Corporation (“Arovast”) warrants this product to the original purchaser to be free from defects in material and workmanship, under normal use and conditions, for a period of 2 years from the date of original purchase.
Arovast agrees, at our option during the warranty period, to repair any defect in material or workmanship or furnish an equal product in exchange without charge, subject to verification of the defect or malfunction and proof of the date of purchase.
There is no other express warranty. This warranty does not apply
- To damages or defects caused by accident, abuse, misuse, or improper or inadequate maintenance;
- To damages or defects exceeding Levoit LSV-VF401-AUS VortexIQ Stick Vacuum the cost of the product.
Arovast will not be liable for indirect, incidental, or consequential connection with the use of the product covered by this warranty.
This warranty does not extend pto roducts purchased from unauthorized sellers. Arovast’s warranty extends only to products purchased from authorized sellers that are subject to Arovast’s quality controls and have agreed to follow its quality controls.
This warranty gives you specific legal rightsand you may also have other rights which vary from state to state. Some states do not allow the exclusion or limitation of incidental or consequential damages, so the above limitation or exclusion may not apply to you.
Once our Customer Support Team has approved your request, please return the product with a copy of the invoice and order ID. Miller St., Suite A, Anaheim, CA 92806
Customer Support
- Distributed by Arovast Corporation 1202 N. Miller St., Suite A Anaheim, CA 92806
- Email: support@levoit.com
- Tel: (888) 726-8520
- Support Hours: Mon–Fri, 9:00 am–5:00 pm PST/PDT.
- Website: LEVOIT.COM
FAQs
Q: What makes the VortexIQ vacuum “smart”?
A built-in dust sensor that gauges particle concentration powers the vacuum’s Intelligent Auto Mode. It maximises cleaning efficiency and battery life by automatically increasing suction when more dirt is found and lowering power while cleaning lighter surfaces.
Q: How long does it take to fully charge the vacuum?
Usually, charging takes four to five hours. The battery’s LED indicators will display the charging status. After the battery is fully charged, unplug it for the longest possible battery life.
Q: Can I replace the battery?
Indeed. With the removable and replaceable battery pack of the VortexIQ LSV-VF401-AUS, you may change the batteries for longer cleaning sessions or future replacements. For compatibility and safety, only use approved Levoit replacement batteries.
Q: Can I use the vacuum on all types of floors?
Indeed. Hardwood, laminate, tile, and carpet can all be safely vacuumed. The LED lights aid in illuminating dirt on dark floors, and the multi-surface motorised brush automatically adapts.
Q: How do I maintain the brush roll?
Remove the hair and dirt from the roller, disconnect the floor brush head, and, if a cleaning instrument is available, use it. To keep the suction functioning and avoid tangling, clean it every one to two weeks.
Q: Can the VortexIQ be used as a handheld vacuum?
Indeed! For cleaning furniture, car interiors, stairs, and confined spaces, it effortlessly transforms into a portable, lightweight device. For focused cleaning, use the 2-in-1 dusting brush or crevice tool.
Q: How do I know when the filter needs replacing?
It’s time to clean or replace the filter if you observe a decrease in suction, a lingering smell, or a filter alert icon (if visible). For optimal fit and filtration, only use authentic Levoit filters.