
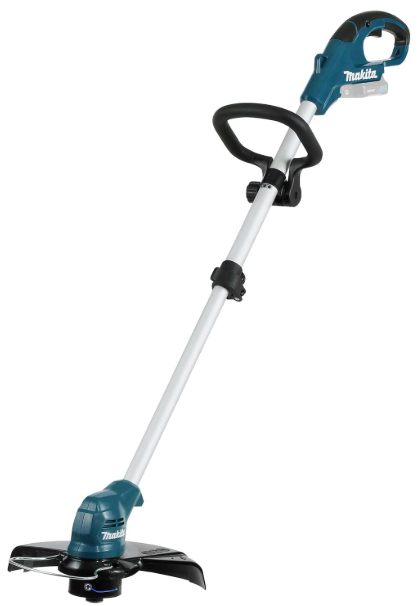
Makita UR100D Cordless Grass Trimmer
Safety Instructions
- Be familiar with the controls and proper use of the equipment.
- Cutting elements continue to rotate after the motor is switched off.
- Never allow children or people unfamiliar with the instructions to use the machine.
- Local regulations may restrict the age of the operator.
- Stop using the machine while people, especially children, or pets are nearby.
- Only use the machine in daylight or good artificial light.
- Avoid using the machine in bad weather conditions, especially when there is a risk of lightning.
- Take care against injury from any device fitted for trimming the filament line length.
- Never fit metal cutting elements.
- Children should be supervised to ensure that they do not play with the appliance.
- Use the tool with the utmost care and attention.
- Operate the tool only if you are in good physical condition. Perform all work calmly and carefully.
- Never operate the tool when tired, feeling ill, or under the influence of alcohol or drugs.
- The tool should be switched off immediately if it shows any signs of unusual operation.
- Keep fingers away from the switch trigger when not operating the tool and when moving from one operating position to another.
Description
Nylon cutting head

| 1 | Switch trigger | 2 | Battery cartridge |
| 3 | Lock lever | 4 | Protector |
| 5 | Nylon cutting head | 6 | Nylon cord |
| 7 | Wire guard | 8 | Thumb nut |
| 9 | Front grip | 10 | Hanger for shoulder harness |
| 11 | Indication lamp | 12 | Lock-off button |
Plastic blade

| 1 | Switch trigger | 2 | Battery cartridge |
| 3 | Blade holder | 4 | Lock lever |
| 5 | Protector | 6 | Plastic blade head |
| 7 | Plastic blade | 8 | Wire guard |
| 9 | Thumb nut | 10 | Front grip |
| 11 | Hanger for shoulder harness | 12 | Indication lamp |
| 13 | Lock-off button |
Noise
Applicable standard: EN50636
| Type | Sound pressure level average | |
| LPA(dB(A)) | Uncertainty K (dB(A)) | |
| Nylon cutting head | 74 | 0.74 |
| Plastic blade | 75.8 | 2.84 |
- Even if the sound pressure level listed above is 80 dB (A) or less, the level under working conditions may exceed 80 dB (A). Wear ear protection.
Vibration
Applicable standard: EN50636
| Type | Left hand | Right hand | ||
| ah, W (m/s2) | Uncertainty K (m/s2) | ah, W (m/s2) | Uncertainty K (m/s2) | |
| Nylon cutting head | 2.5 | 0.1 | 2.5 | 0.5 |
| Plastic blade | 2.5 | 0.1 | 2.5 | 0.1 |
Personal Protective Equipment
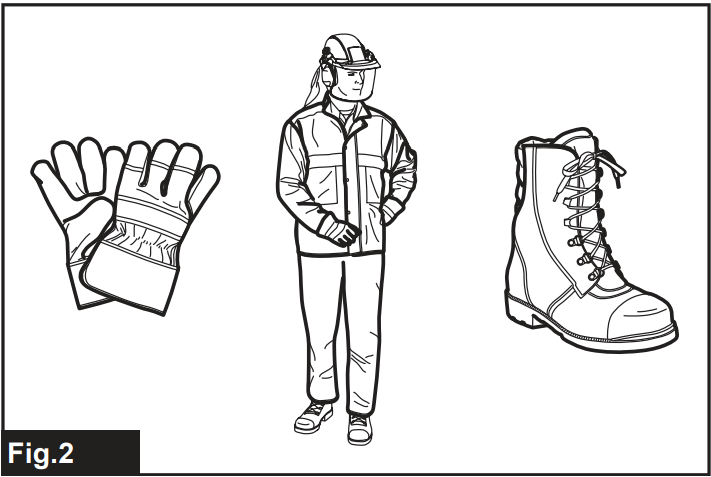
- Dress Properly. The clothing worn should be functional and appropriate, i.e., it should be tight-fitting but not cause hindrance. Do not wear either jewelry or clothing that could become entangled with high grass. Wear a protective hair covering to contain long hair.
- When using the tool, always wear sturdy shoes with a non-slip sole. This protects against injuries and ensures a good footing.
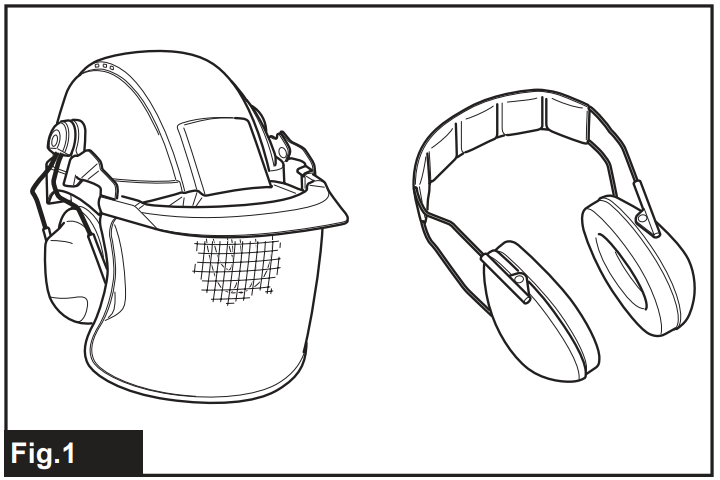
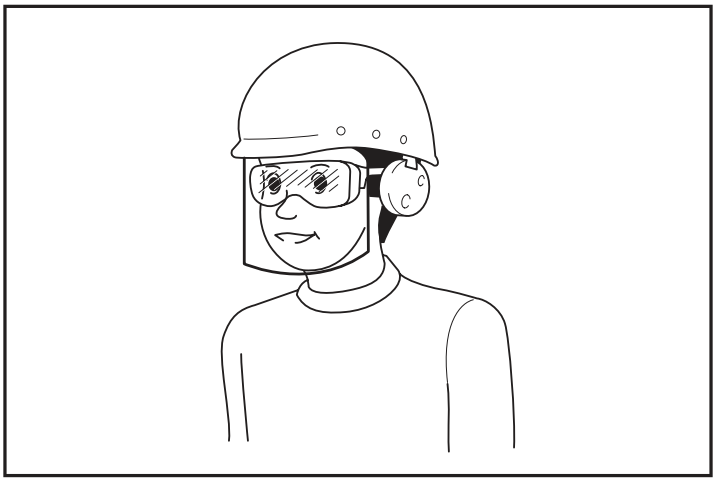
- Always wear protective goggles to protect your eyes from injury when using power tools. The goggles must comply with ANSI Z87.1 in the USA, EN 166 in Europe, or AS/NZS 1336 in Australia/New Zealand. In Australia/New Zealand, it is legally required to wear a face shield to protect your face, too.
It is an employer’s responsibility to enforce the use of appropriate safety protective equipment by the tool operators and by other persons in the immediate working area.
Starting up
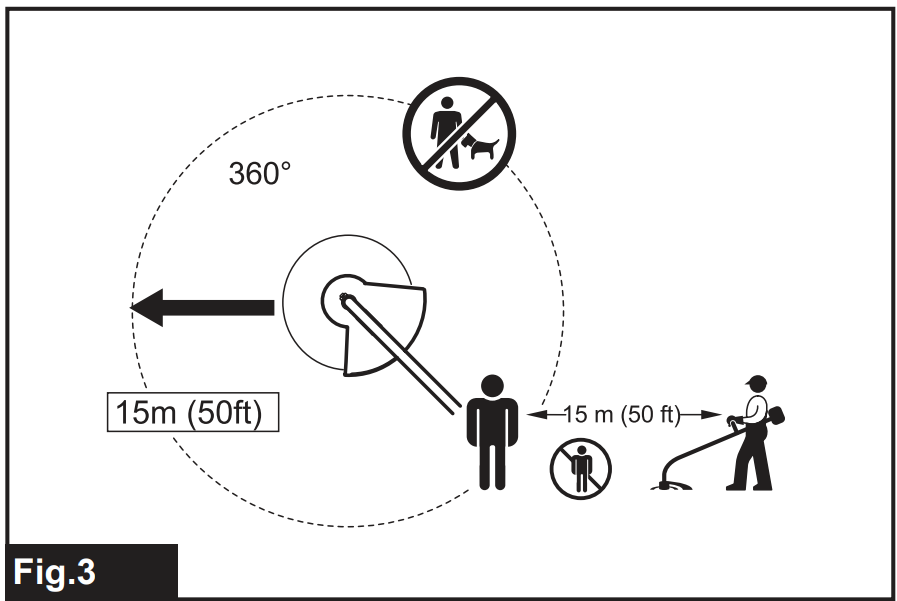
- Make sure that there are no children or other people within a working range of 15 meters (50 ft), also pay attention to any animals in the working vicinity. Otherwise, stop using the tool.
- Check for alignment of moving parts, binding of moving parts, breakage of parts, mounting, and any other condition that may affect its operation.
- A guard or other part that is damaged should be properly repaired or replaced by our authorized service center unless indicated elsewhere in this manual.
- Switch on the motor only when hands and feet are away from the cutting tool.
- Before starting, make sure that the cutting tool has no contact with hard objects such as branches, stones, etc., as the cutting tool will revolve when starting.
- Make sure there are no electrical cables, water pipes, gas pipes, etc. That could cause a hazard if damaged by the use of the tool.
Functional Description
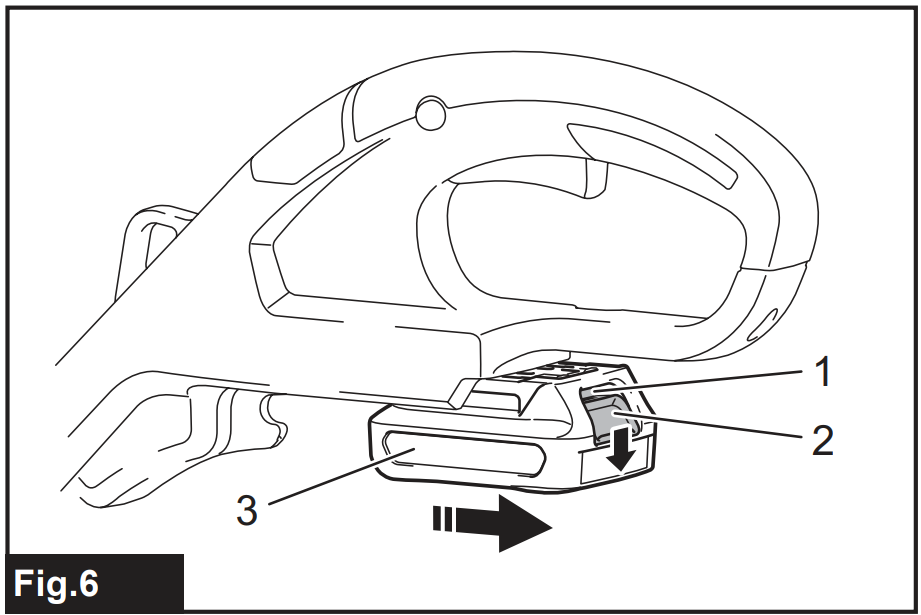
- Red indicator
- Button
- Battery cartridge
To remove the battery cartridge, slide it from the tool while pressing the button on the front of the cartridge. To install the battery cartridge, align the tongue on the battery cartridge with the groove in the housing and slip it into place. Insert it all the way until it locks in place with a little click. If you can see the red indicator on the upper side of the button, it is not locked completely.
Battery protection system
The tool is equipped with a battery protection system. This system automatically cuts off power to the motor to extend battery life. The tool will automatically stop during operation if the tool and/or battery are placed under one of the following conditions:
Overloaded
The tool is operated in a manner that causes it to draw an abnormally high current. In this situation, turn the tool off and stop the application that caused the tool to become overloaded. Then the tool is on to restart. If the tool does not start, the battery is overheated. In this situation, let the battery cool before turning the tool on again.
Low battery voltage
The remaining battery capacity is too low, and the tool will not operate. If you turn the tool on, the motor runs again, but stops soon. In this situation, remove and recharge the battery.
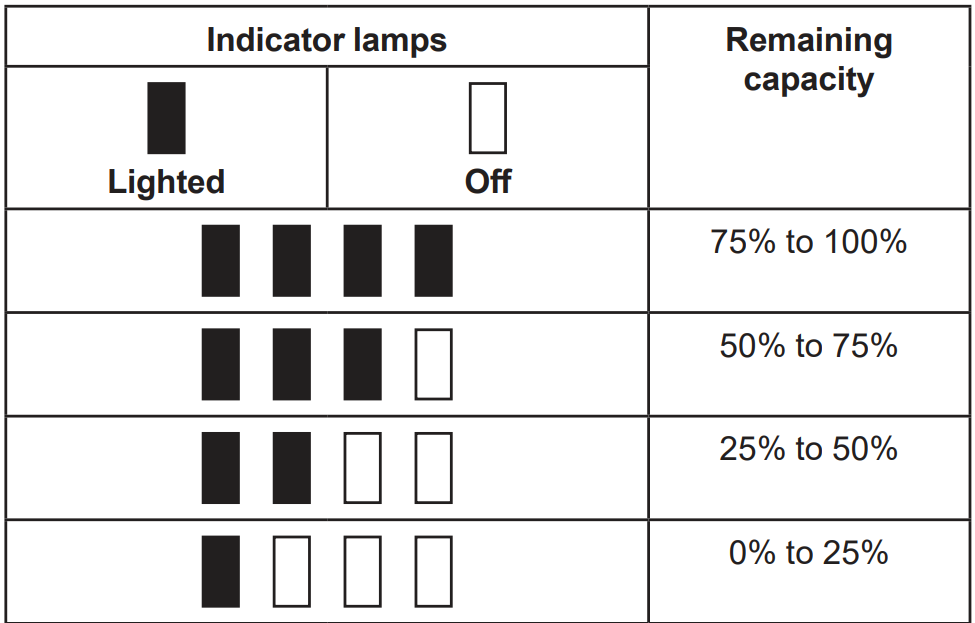
Indicating the remaining battery capacity
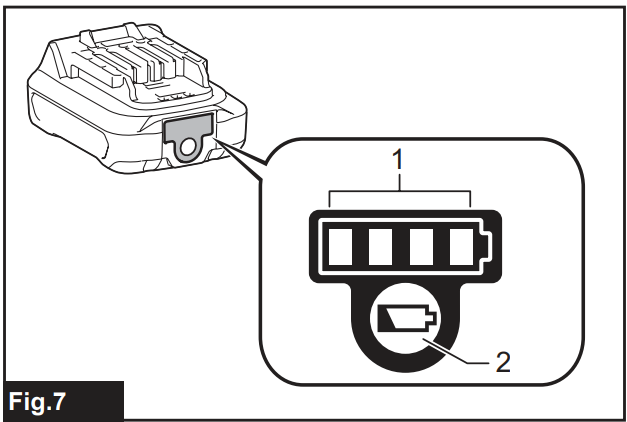
- Indicator lamps
- Check button
Press the check button on the battery cartridge to indicate the remaining battery capacity. The indicator lamps light up for a few seconds.
Switch Action

- Switch trigger
- Lock-off button
To prevent the switch trigger from being accidentally pulled, a lock-off button is provided. To start the tool, press the lock-off button and pull the switch trigger. Release the switch trigger to stop. The lock-off button can be pressed from either the right or left side.
Indication Lamp
Running the tool allows the indicator lamp to show the battery cartridge capacity status.
- Lamp
When the tool is also overloaded and has stopped during operation, the lamp lights up in red. Refer to the following table for the status and action to be taken for the indication lamp.
| Indication lamp | Status | Action to be taken |
| The lamp blinks in red. | This indicates the appropriate time to replace the battery cartridge when the battery power becomes low. | Recharge the battery cartridge. |
| The lamp lights up in red. (Note 1) | This function works when the battery power is almost used up. At this time, the tool stops immediately. | Recharge the battery cartridge. |
| The lamp lights up in red. (Note 1) | Autostop due to overload. | Turn off the tool. |
Nylon Cutting Head
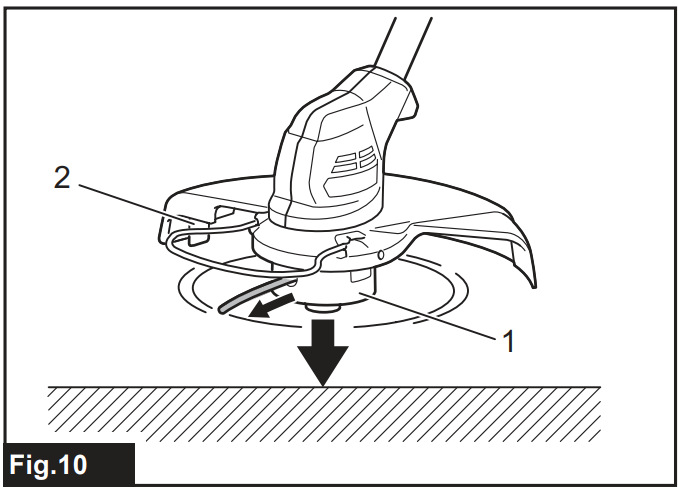
- Nylon cutting head
- Cutter
The nylon cutting head has a bump and feed mechanism. To feed the nylon cord, bump the cutting head against the ground while the tool is running. As the nylon cord is feeding out, it will automatically be cut to the proper length by the cutter.
Plastic Blade Storage
- Plastic blade
- Blade holder
A plastic blade for replacement can be stored in the blade holder of the tool. When storing or taking out the blade, remove the battery cartridge.
Adjusting the Position
Adjust the length of the shaft so that you can hold the handle when lowering your right hand.
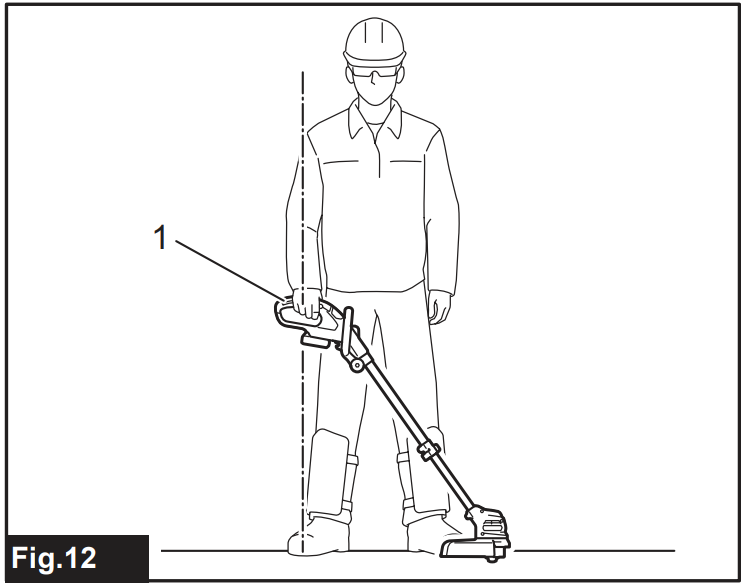
- Handle
To adjust the shaft length, open the lock lever, then adjust the length of the shaft, and then close the lock lever.
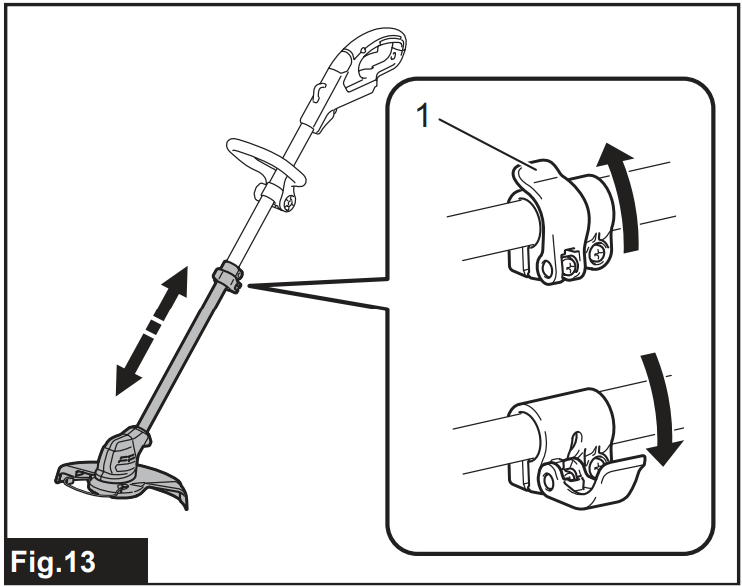
- Lock lever
Adjust the position of the front grip so that you can hold the front grip when lowering your left hand.
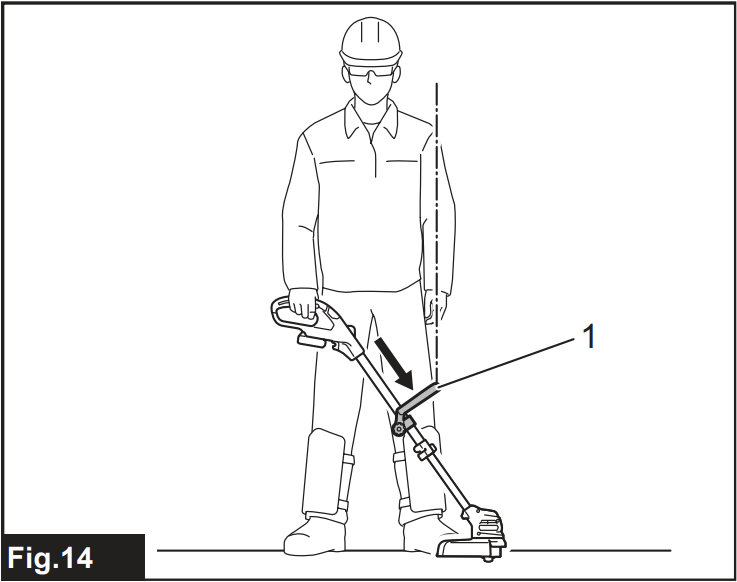
- Front grip
Assembly
Front grip
Attach the front grip to the front grip holder and secure it with a hex bolt and the thumb nut, as shown in the figure.
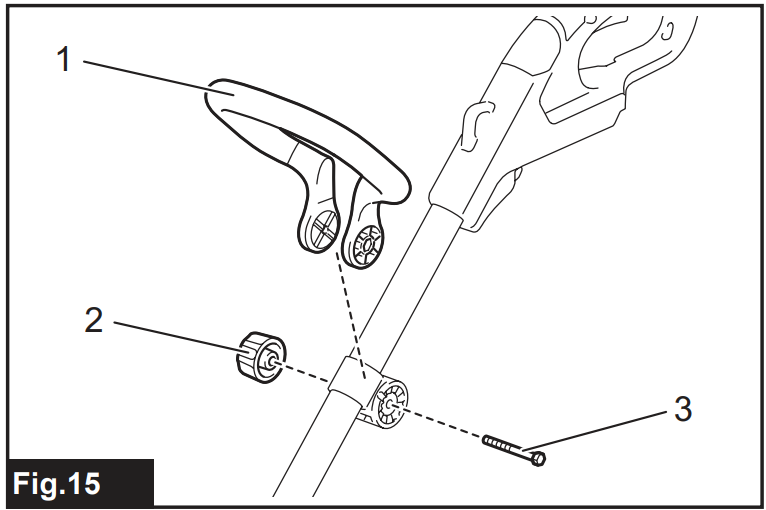
- Front grip
- Thumb nut
- Hex bolt
Wire guard
To reduce the risk of damaging the objects in front of the cutting head, attach the wire guard to the protector so that it controls the cutting range. Slightly expand the wire guard outward and then insert it into the holes of the protector.
It goes into the holes of the protector.
For the nylon cutting head: Attach the wire guard to the holes on the front side of the protector. The nylon cord mark on the protector indicates the hole to be used.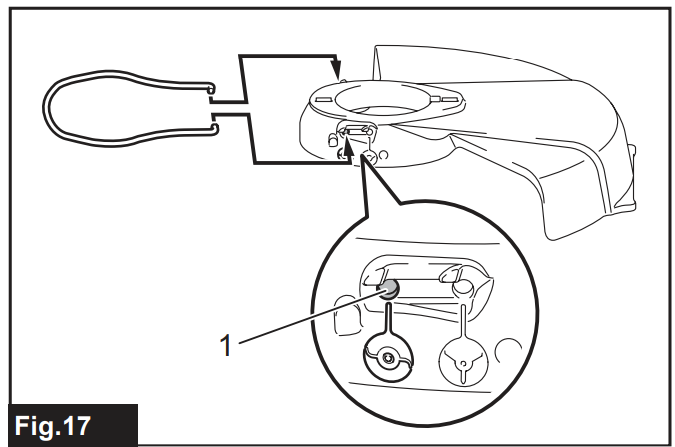
- Hole
For a plastic blade head
Attach the wire guard to the holes on the rear side of the protector. The blade mark on the protector indicates the hole to be used.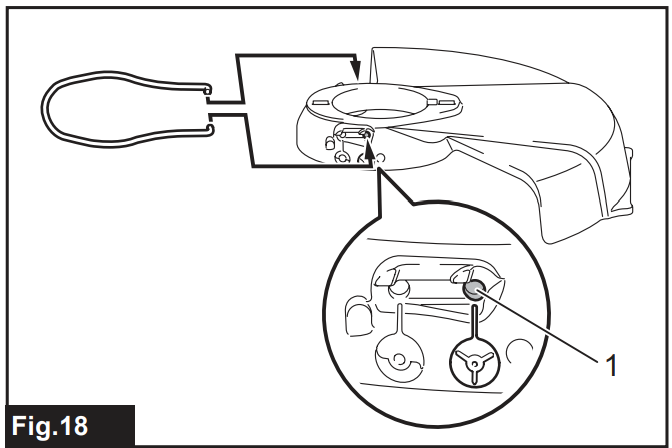
- Hole
When the wire guard is not in use, lift it to the idle position
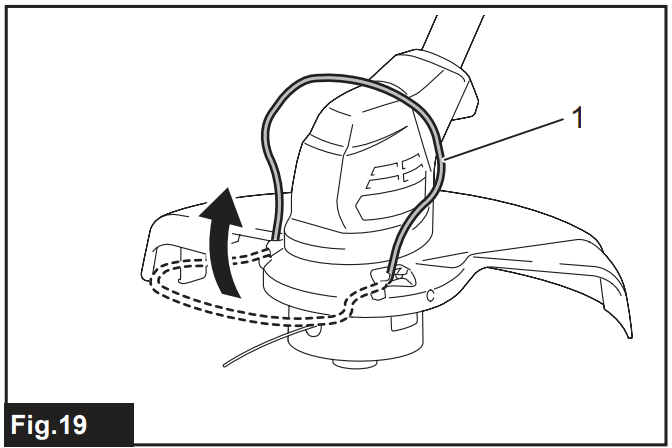
- Wire guard
Installing the protector
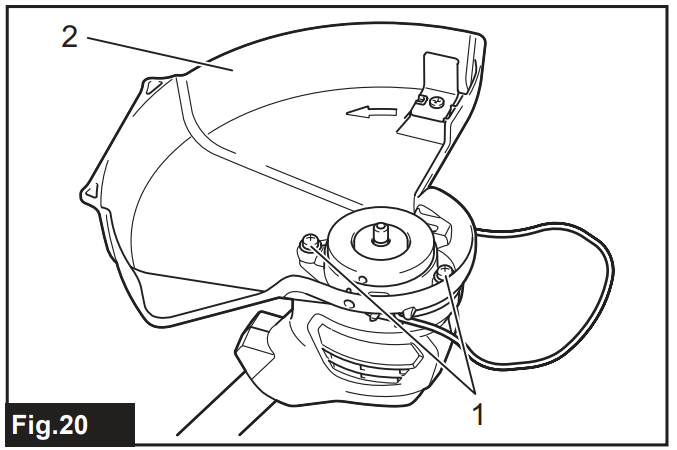
- Screw
- Protector
Mount the protector by fitting it onto the motor housing, and then secure it with two screws.
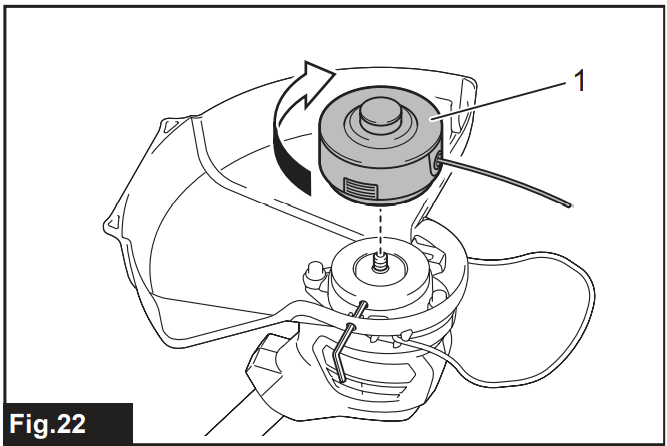
Nylon Cutting Head
Optional accessory
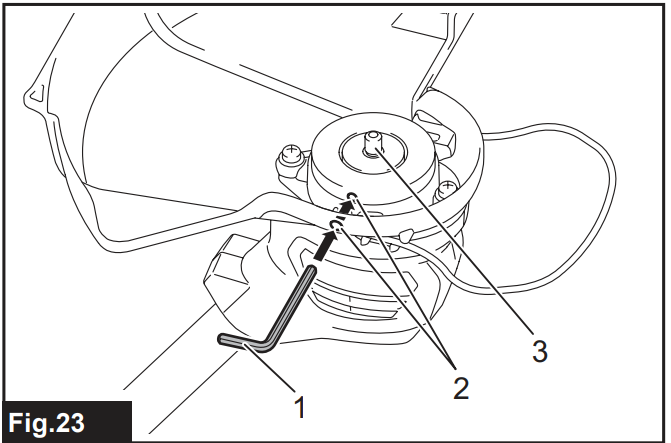
- Turn the tool upside down so that you can replace the cutting tool easily.
- Insert the hex wrench through the hole in the motor housing and rotate the spindle until the spindle is locked.

- Hex wrench
- Hole
- Spindle
- Place the nylon cutting head onto the spindle and tighten it by turning it clockwise.
- Nylon cutting head
- Remove the hex wrench.
To remove the nylon cutting head, turn it counterclockwise while locking the spindle with the hex wrench.

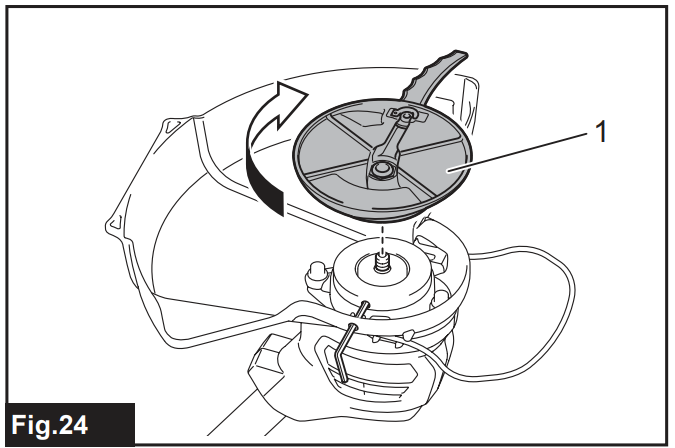
Installing a Plastic Blade Head
Optional accessory
- Turn the tool upside down so that you can replace the cutting tool easily.
- Insert the hex wrench through the hole in the motor housing and rotate the spindle until the spindle is locked.
- Hex wrench
- Hole
- Spindle
- Place the plastic blade head onto the spindle and tighten it by turning it clockwise.
- Plastic blade head
- Remove the hex wrench.
To remove the plastic blade, turn it counterclockwise while locking the spindle with the hex wrench.
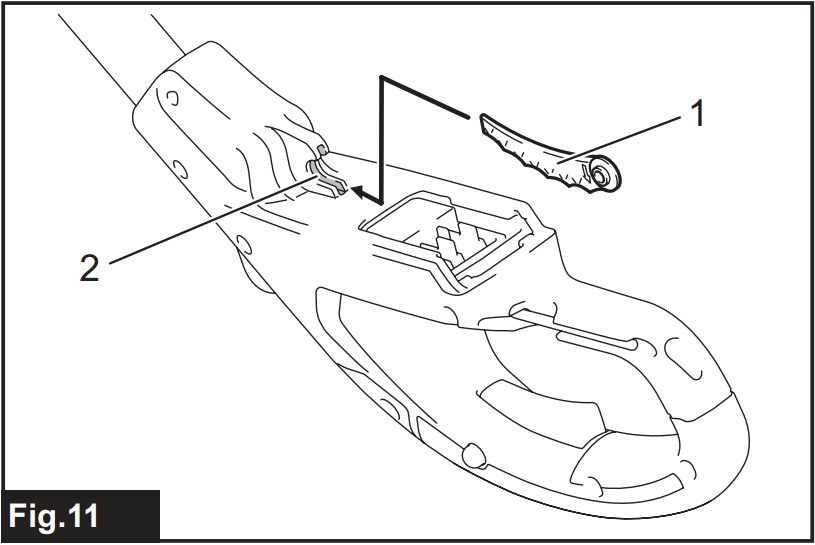
Attaching the Shoulder Harness
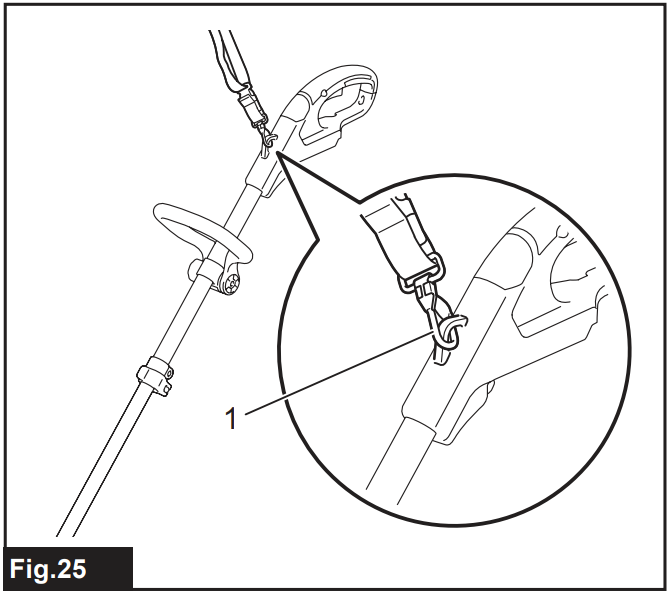
- Hook
Attach the hooks of the shoulder harness to the tool as shown in the figure.
Operation
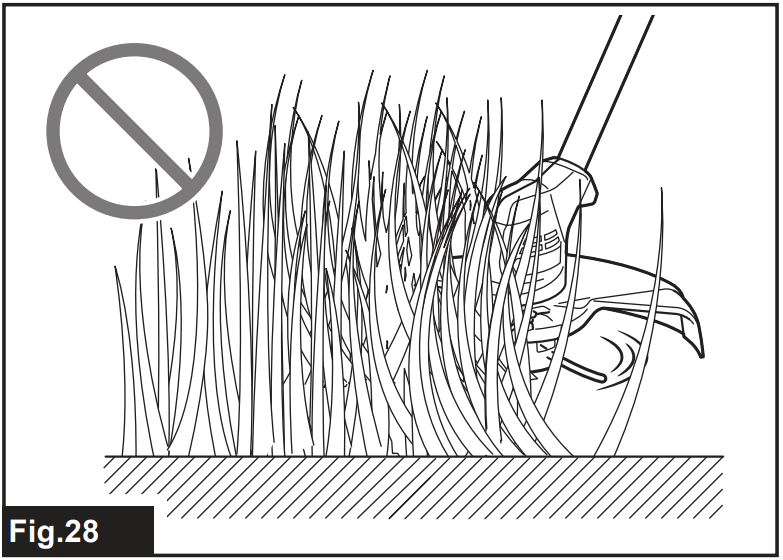
Cutting the grass
Hold the grass trimmer at an angle of about 50° to the ground. Move the grass trimmer from right to left slowly. Cut the grass a few times from the top of the grass at the tip of the nylon cord or with the blade.
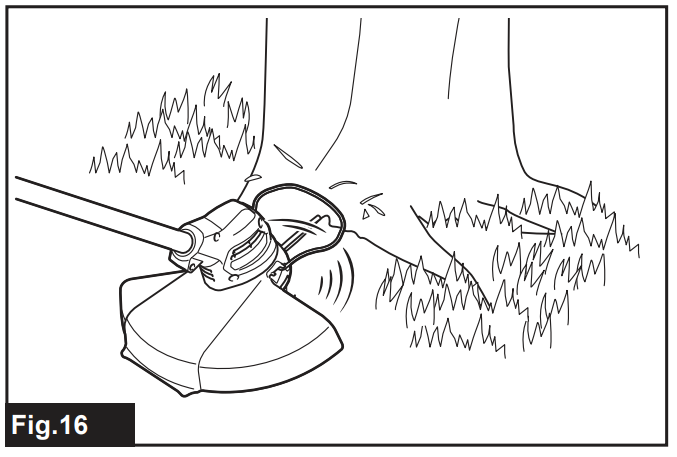
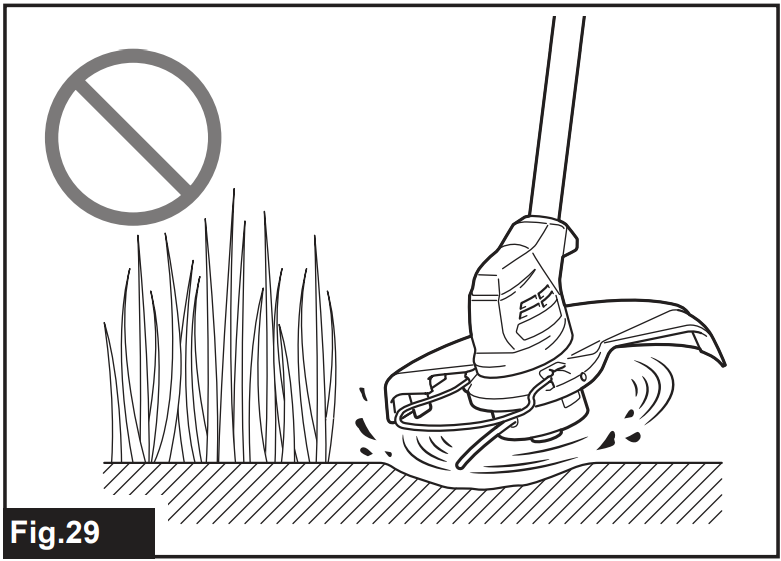
Cutting the grass near a tree, block, brick, or stone
Hold and tilt the grass trimmer at a height where the spool or blade does not touch the ground. Cut the grass using the nylon cord tip or a plastic blade, like knocking the ground.
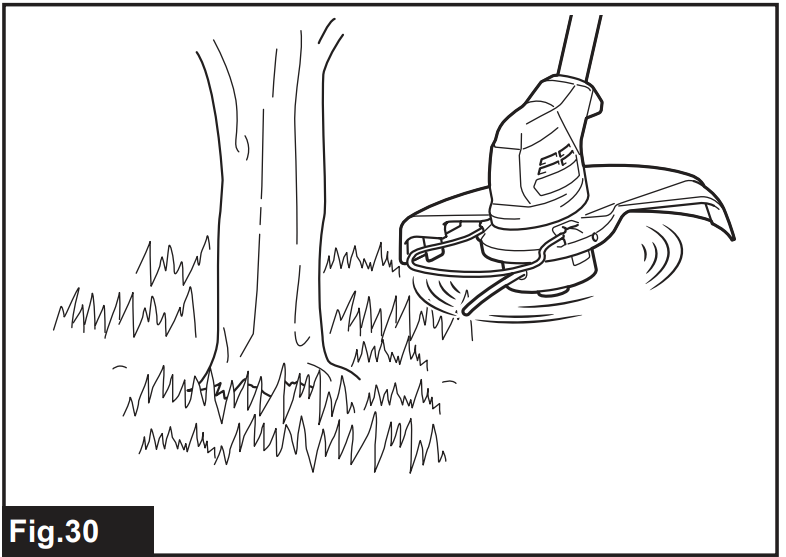
Cutting the grass near a tree, block, brick, or stone
Hold and tilt the grass trimmer at a height where the Makita UR100D Cordless Grass Trimmer spool or blade does not touch the ground. Cut the grass using the nylon cord tip or a plastic blade, like knocking the ground.
Using the grass trimmer as an edger
Using the grass trimmer as an edger is suitable for cutting the grass growing along the bricks or blocks. Pull down the wire guard and rotate the grass trimmer 180°. As shown in the figure, while contacting the wire guard with the ground, move the grass trimmer to cut the grass. You can cut the grass efficiently by walking in parallel along the bricks or blocks.
Detaching the Shoulder Harness
The shoulder harness features a means of quick release. Squeeze the Makita UR100D Cordless Grass Trimmer the sides of the buckle to release the tool from the shoulder harness.
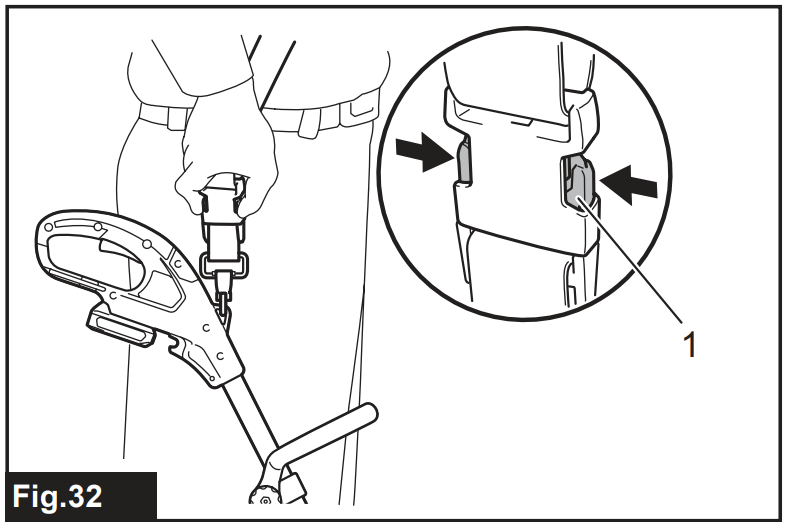
- Buckle
Maintainance & Cleaning
Clean the tool by wiping off dust, dirt, or cut off grass with a dry cloth or one dipped in soapy water and wrung out. If the cut-off grass adheres to the motor housing, be sure to remove it.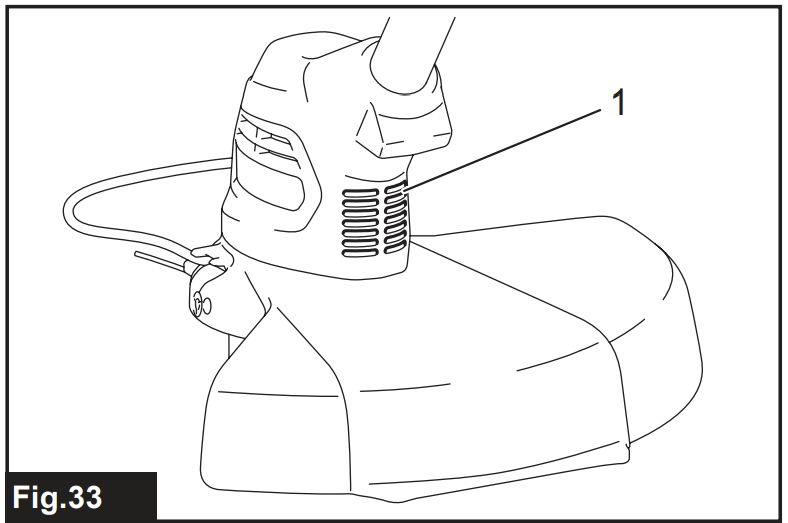
- Motor housing
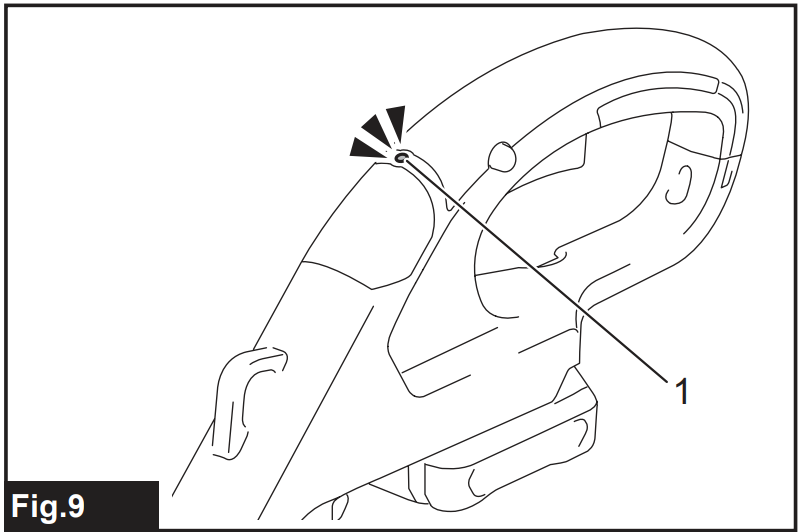
Storage
The hole in the handle is convenient for hanging the tool from a nail or screw on the wall. Before storing the tool, raise the wire guard, shorten the shaft, Makita UR100D Cordless Grass Trimmer and then fold the front grip.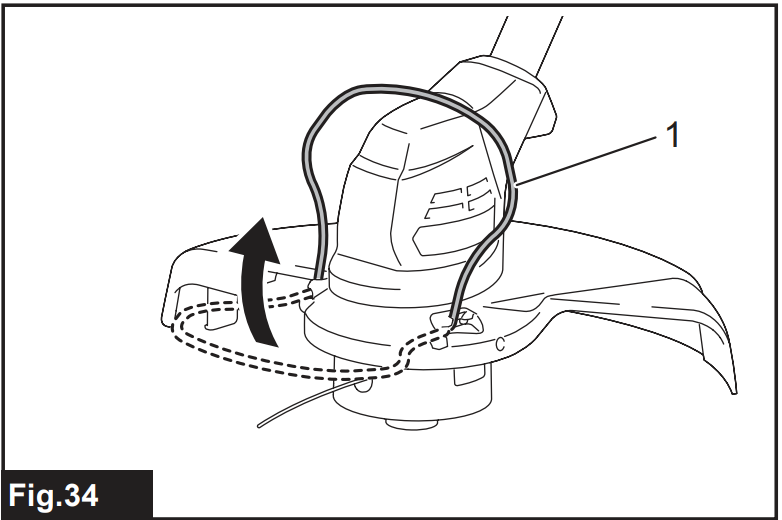
- Wire guard
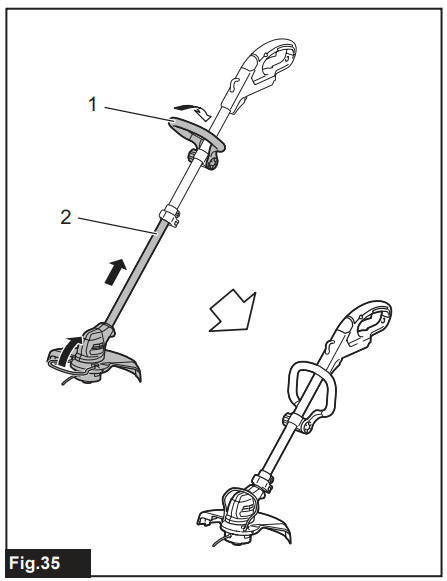
- Front grip
- Shaft

- Hole
Replacing the Plastic Blade
If the plastic blade is worn out, replace it with a Makita UR100D Cordless Grass Trimmer with a new one. To install the plastic blade, align the direction of the blade with the mark on the plastic blade head, and then insert it all the way until it locks in place with a little click. To remove the plastic blade, perform the installation procedure in reverse.
- Blade
- Mark
Replacing the Nylon Cord
Replace the nylon cord if the cord is not feeding anymore
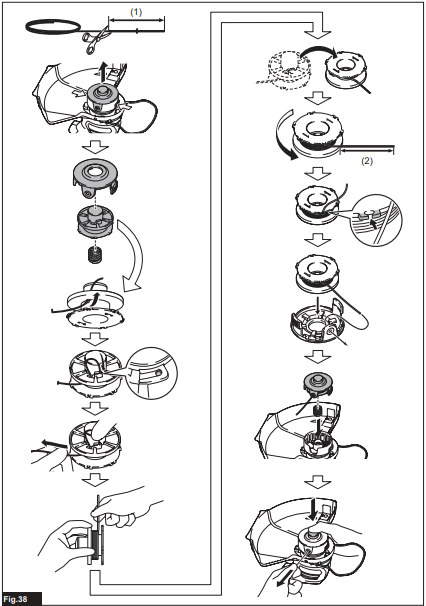
- Up to 8 m
- 70 – 80 mm
Specifications
| Model: | UR100D | |
| No load speed (without cutting tool) | 10,000 min-1 | |
| Overall length (without cutting tool) | 835 – 1,185 mm | |
| Nylon cord diameter | 1.65 mm | |
| Applicable cutting tool and cutting diameter | Nylon cutting head (P/N 198852-2 / 198853-0) | 260 mm |
| Plastic blade head (P/N 198847-5 / 198848-3) | 230 mm | |
| Rated voltage | D.C. 10.8 V – 12 V max | |
| Standard battery cartridge | BL1015 / BL1016 / BL1020B / BL1021B / BL1040B / BL1041B | |
| Net weight | 1.9 – 2.1 kg |
Troubleshooting
| State of abnormality | Probable cause (malfunction) | Remedy |
| The motor does not run. | The battery cartridge is not installed. | Install the battery cartridge. |
| Battery problem (under voltage) | Recharge the battery. If recharging is not effective, replace the battery. | |
| The drive system does not work correctly. | Ask your local authorized service center for repair. | |
| The motor stops running after a little use. | The battery’s charge level is low. | Recharge the battery. If recharging is not effective, replace the battery. |
| Overheating. | Stop using of tool to allow it to cool down. | |
| It does not reach maximum RPM. | The battery is installed improperly. | Install the battery cartridge as described in this manual. |
| Battery power is dropping. | Recharge the battery. If recharging is not effective, replace the battery. | |
| The drive system does not work correctly. | Ask your local authorized service center for repair. | |
| Cutting tool does not rotate: Stop the machine immediately! | A foreign object, such as a branch, is jammed between the guard and the nylon cutting head. | Remove the foreign object. |
| The drive system does not work correctly. | Ask your local authorized service center for repair. | |
| Abnormal vibration: Stop the machine immediately! | One end of the nylon cord has broken. | Tap the nylon cutting head against the ground while it is rotating to cause the cord to feed. |
| The drive system does not work correctly. | Ask your local authorized service center for repair. | |
| The cutting tool and motor cannot stop: Remove the battery immediately! | Electric or electronic malfunction. | Remove the battery and ask your local authorized service center for repair. |
Optional Accessories
If you need any assistance for more details Makita UR100D Cordless Grass Trimmer regarding these accessories, ask your local Makita Service Center.
- Nylon cutting head
- Nylon cord (cutting line)
- Plastic blade head
- Plastic blade
- Makita genuine battery and charger
Customer Service
- Website: https://www.makitauk.com/
- Ph: 1-800-462-5482
FAQs
Q: What type of battery does the Makita UR100D use?
A Makita 12V max CXT lithium-ion battery powers the UR100D. For safe and effective operation, only use authentic Makita batteries and chargers.
Q: How long does the battery last on a full charge?
The usual runtime for a full charge is 20 to 45 minutes, depending on the trimming mode and grass density.
Q: How do I know when the battery is fully charged?
After charging is finished, the Makita CXT charger will display a continuous green light. It usually takes 50 to 65 minutes to charge.
Q: Can I adjust the length of the shaft?
Indeed. The telescopic shaft of the UR100D enables you to change the working height for more comfortable use.
Q: Does this model support edging?
Indeed. The tool can be used as an edger to create neat lines on driveways and sidewalks by rotating the trimmer head.
Q: What type of cutting line does it use?
The 1.65 mm nylon line used by the UR100D is compatible with Makita’s bump-feed spool mechanism.
Q: How do I feed more line from the spool?
To release more line while the trimmer is operating at full speed, just tap the spool head on the ground.
Q: Is any maintenance required for the motor?
No, the UR100D has a brushless, maintenance-free motor; however, debris should be kept out of the air vents.
1 Comment
Pingback: Makita DUB362 Cordless Leaf Blower | Specs, Safety & Guide