
Meec Tools 004841 Eectric Pruning Saw
SAFETY INSTRUCTIONS
WORK AREA
- Keep the work area clean and well lit. Dark and cluttered work areas increase the risk of accidents and injuries.
- Do not use the appliance in explosive environments, such as in the vicinity of flammable liquids, gases or dust. The appliance produces sparks, which can ignite dust and fumes.
- Keep children and onlookers at a safe distance when using the appliance. You can lose control of the appliance if you are distracted.
ELECTRICAL SAFETY
- The plug on the appliance must match the power point. Never modify the plug in any way. Never use an adapter with earthed power tools. Unmodified plugs and matching outlets reduce the risk of electric shock.
- Avoid body contact with earthed surfaces such as pipes, radiators, cookers and refrigerators. There is an increased risk of electric shock if your body is earthed.
- Do not expose the appliance to rain or moisture. If water gets into the appliance this will increase the risk of electric shock.
- Be careful with the power cord. Never use the power cord to carry or pull the appliance, or to pull out the plug from the power point. Keep the power cord away from heat, oil, sharp edges and moving parts. Damaged or tangled power cords increase the risk of electric shock.
- If using the appliance outdoors, only use an extension cord approved for outdoor use. Cords intended for outdoor use reduce the risk of electric shock.
- If it is absolutely necessary to use the appliance in damp conditions, use a mains connection protected by a residual current device (RDC). Using an RCD reduces the risk of electric shock.
PERSONAL SAFETY
- Avoid accidental starting. Make sure the power switch is in the OFF position before plugging in the plug or inserting the battery, or lifting/carrying the appliance. Carrying the appliance with your finger on the switch or connecting appliances to the mains supply when the switch is in the ON position increases the risk of accidents and injuries.
- Remove adjuster keys/spanners before switching on the appliance. Allen keys, or the like, left in a rotating part of the machine can cause personal injury.
- Do not overreach. Always maintain a firm footing and good balance. This ensures better control over the power tool in unexpected situations.
- Wear suitable clothing. Do not wear loose-fitting clothing or jewellery. Keep your hair, clothing and gloves away from moving parts. Loose-fitting clothing, jewellery and long hair can get caught in moving parts.
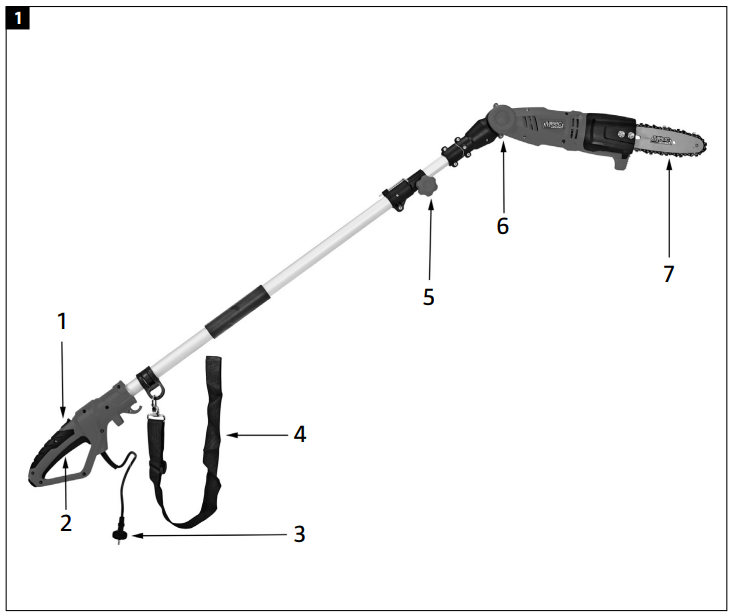
DESCRIPTION
- Start inhibitor
- Power switch
- Plug
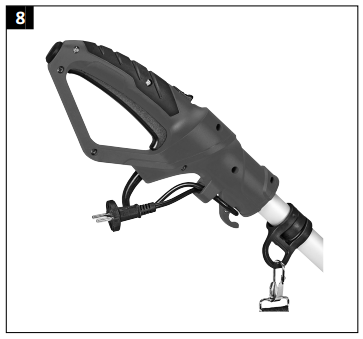
- Shoulder strap
- Lock knob for telescopic function
- Knob to adjust sawing angle
ASSEMBLY
Fitting the telescopic handle
- Put the telescopic handle in the opening in the motor unit and tighten the locking screw.
- Undo the knob to adjust the length and adjust the telescopic handle to the required length.
- Firmly tighten the knob.
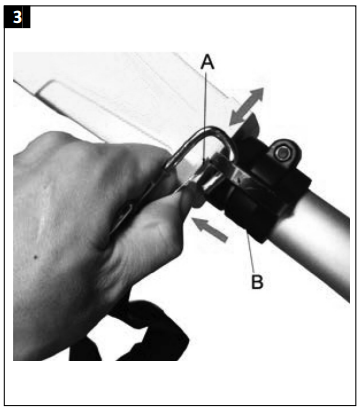
Fitting the shoulder strap
- Press the catch (A) and put the hook in the fastener (B).
- Adjust the strap to the required length with the clasp. Swing the switched off pruning saw around a few times to check the balance.
- Put the shoulder strap over your right shoulder and carry the pruning saw on the right side of your body.
- Release the shoulder strap in the reverse order.
IMPORTANT
- Never use the shoulder strap diagonally over your chest, only on the right shoulder. This makes it easier to move the pruning saw away from your body in a dangerous situation.
- Switch off the pruning saw, pull out the plug and wait until all moving parts have completely stopped before cleaning and/ or maintenance.
- Do not plug in the plug until the pruning saw is fully assembled. Failure to follow these instructions can result in the risk of fatal or serious personal injury and/or material damage.
Fitting the bar and chain
Always wear safety gloves when handling the chain.
- Undo the nuts that hold the guard and bar in place.
- Remove the guard by pulling it straight out. This can require a certain amount of effort.
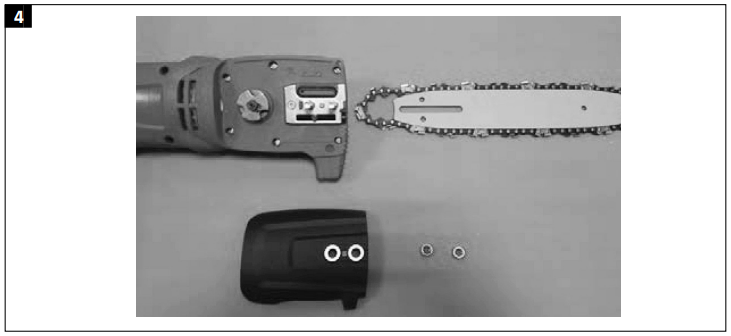
- Put the chain round the bar. Make sure that the chain is put in the correct direction of rotation.

- Put the bar on the bolts and put the chain round the sprocket behind the coupling. Make sure to align the links between the teeth on the sprocket.
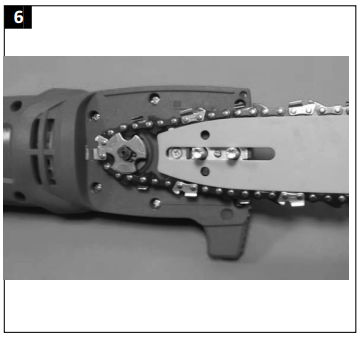
- Replace the guard and tighten the nuts by hand.
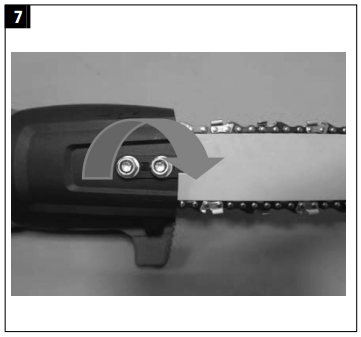
- Tension the chain by turning the adjuster screw for the chain tensioning. Tension the chain according to the instructions in the section Checking and adjusting the chain tension.
- Use a combination spanner and tighten the nuts holding the guard.
USE
Before starting
- Check the oil level. Fill the reservoir for the chain oil to about half of the level glass. Use chain oil of good quality.
- Check the chain tension and tighten the chain, if necessary, as described in the instructions for tensioning the chain.
Connection to mains
- Put the power cord for the pruning saw in the de-tensioner before connecting to the mains.
- Use an extension cord for outdoor use.
Starting
- Start the pruning saw by first pressing forward the start inhibitor and then pressing the power switch.
- Release the start inhibitor when the motor starts

WARNING
- Never starting the pruning saw if the bar and chain are not correctly fitted.
- Check that the chain and bar are properly lubricated when sawing.
Switching of
- Switch off the pruning saw by releasing the power switch.
- The chain continue to move for a few seconds after the motor is switched off.
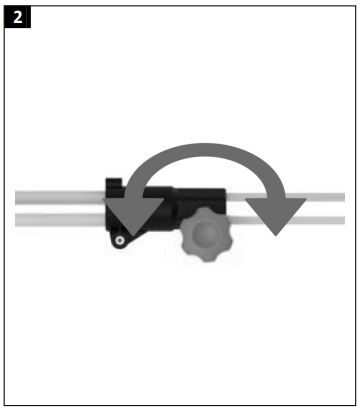
Adjusting the length of the telescopic handle
- Switch off the pruning saw, pull out the plug and wait until all moving parts have completely stopped.
- Release the knob for the telescopic function and adjust the telescopic handle to the required length.
- Firmly tighten the knob.
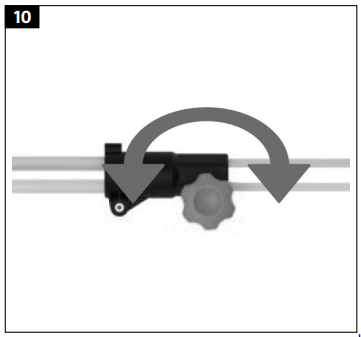
Adjusting the sawing angle
- Switch off the pruning saw, pull out the plug and wait until all moving parts have completely stopped.
- Press in the lever to adjust the sawing angle and adjust the angle of the bar.
- Make sure that the bar is locked in the required position.
TECHNICAL DATA
- Rated voltage 230 V ~ 50 Hz
- Output 750 W
- Safety class II
- Volume, oil tank 100 ml
- Bar length 8″
- Drive links 33
- Drive link width 1.1 mm
- Pitch 3/8
- Sound pressure level, LpA 88.7 dB(A), K = 3 dB
- Measured sound power level, LwA 100.3 dB(A), K = 3 dB
- Guaranteed sound power level, LwA 104 dB(A), K = 3 dB
- Vibration level Back handle: 1.353 m/s², K = 1.5 m/s²
- Front handle: 2.134 m/s², K = 1.5 m/s²
MAINTENANCE
WARNING
Switch off the pruning saw, pull out the plug and wait until all moving parts have completely stopped before cleaning and/or maintenance.
- Always check the condition of the pruning saw before using it.
- Keep the ventilation opening on the pruning saw clean.
- Never clean the pruning saw with water. Clean the motor casing with a damp cloth. Never use detergents or solvents – thesecan damage the plastic parts on the pruning saw.
- Store the pruning saw with the supplied bar guard fitted.
- Only use accessories and spare parts recommended by the manufacturer.
Checking and adjusting the chain tension
IMPORTANT
- Always check the tension of the chain before starting and during the work. The chain is correctly tensioned when it rests against the underside of the bar, but can still be pulled along the bar by hand.
- A new chain must be tensioned after no more than five cuts. Once the chain has been run in it does not need to be adjusted as often.
- Lift the tip of the bar and turn the adjuster screw for the chain tension clockwise to tension the chain.
- Turn the adjuster screw anticlockwise to reduce the tension.
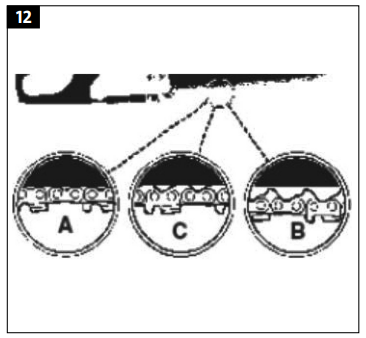
- Check that the chain fits flush with the barall round.

NOTE
If it is difficult to pull the chain round by hand then it is too tight. Follow the instructions below to reduce the tension.
- Undo the lock nuts for the bar.
- Reduce the tension of the chain by slowly turning the adjuster screw anticlockwise.
- Pull the chain backwards and forwards on the bar. The chain is correctly tensioned when it rests against the underside of the bar, but can still be pulled along the bar by hand. Increase the tension of the chain by turning the adjuster screw clockwise.
- When the chain is correctly tensioned, hold up the tip of the bar and firmly tighten the two lock nuts.
Checking and filling the chain oil
- Check at regular intervals that the automatic lubrication system is working properly.
- Always check the oil level before use.
- Fill the oil reservoir to about half of the level glass. Proper lubrication is essential to minimise the friction to the bar.
- Start the pruning saw and run the chain about 20 cm over a suitable surface for 15 seconds. If the chain lubrication is working properly there should be splashing of oil on the surface. If there is no splashing, clean the oil outlet behind the bar and check that the flow of oil is not blocked. Check the oval seal is in place between the oil outlet and the bar.
Lubricating the sprocket
IMPORTANT
- Wear heavy-duty safety gloves when handling the bar and chain.
- Switch off the pruning saw, pull out the plug and wait until all moving parts have completely stopped before lubricating it.
The bar sprocket should be lubricated at intervals of 25 working hours, or once a week during intensive Use.
- Clean the sprocket.
- Press grease from the nozzle of the grease gun into the lubrication hole (see arrow) until it comes out by the edge of the bar. A grease gun with a slim nozzle simplifies effective lubrication.

- Pull round the chain by hand. Repeat until all the sprocket has been lubricated.
NOTE
- It is not necessary to remove the chain to lubricate the sprocket.
- Clean the sprocket before lubricating it.
- Failure to follow the instructions for lubricating the sprocket can cause it to seize, and will invalidate the warranty
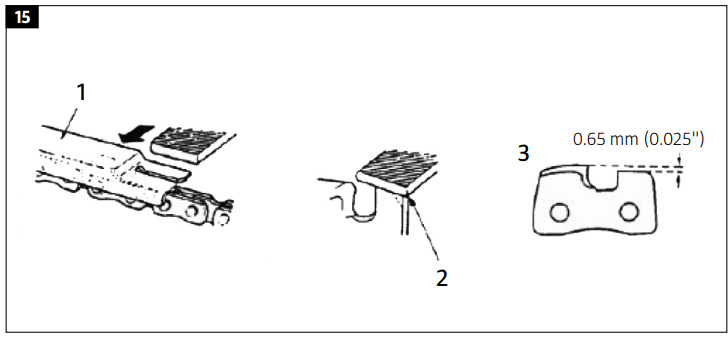
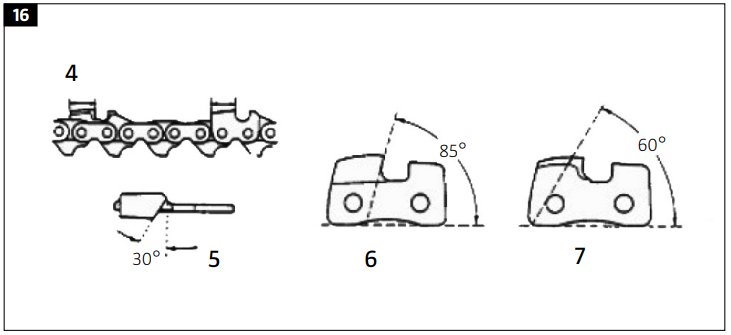
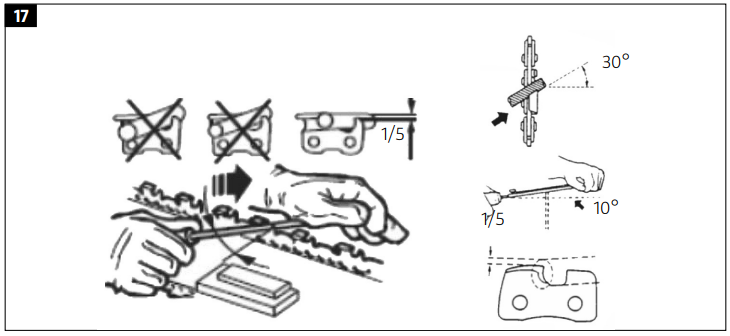
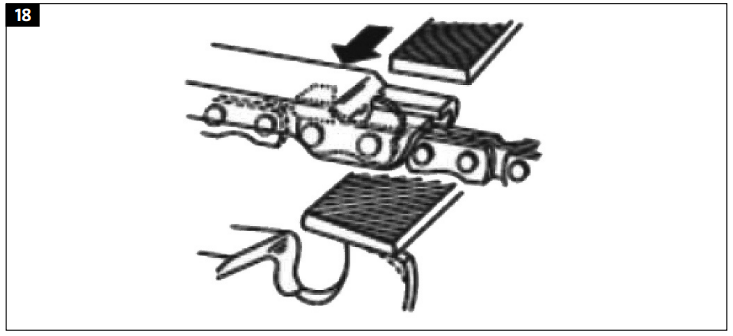
Sharpening the chain
WARNING
- Wear heavy-duty safety gloves when handling the bar and chain.
- The filing should be done with a special tool to ensure that the chain has the right angles and height.
- All the drive links should have the same height. Different heights of the drive links will cause the chain to run out of balance and damage it.
- The minimum height of the drive links is 4 mm. Discard the chain if they are less.
- File the chain with a round file. Always file the cutting edges from inside and out. Pay attention to the values given in the diagrams. After filing all the drive links should have the same width and height.
- If necessary, file down the rakers with a file template and flat file.
Customer Services
Website Visit:
Email:
Tell: