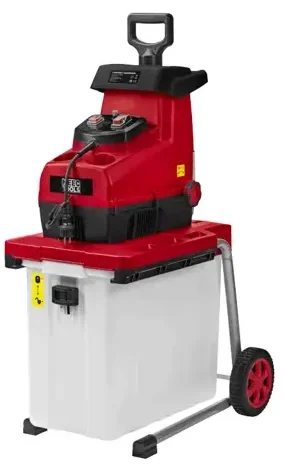
Meec Tools 017934 2800 W Compost Shredder
SAFETY INSTRUCTIONS
PREPARATIONS
- Do not allow children to use the product. Keep children under supervision to make sure they do not play with the product.
- Keep onlookers, especially children, and pets at a safe distance when using the product.
- Wear ear protection and safety glasses.
- Do not wear loose-fitting clothing, ties, scarves, etc., that can get caught in moving parts.
- Only use the product in an open area (not near a wall or other fixed object) and on a firm, level surface.
- Do not use the machine in areas where ejected material could cause personal injury.
- Replace any stickers that have become illegible or lost.
- Place the product on a level, stable surface.
HOW TO USE
- Risk of personal injury as a result of parts being ejected. Keep at a safe distance. The minimum safe distance for onlookers is 15 metres when the product is in use.
- Check before starting that the infeed is empty.
- Keep your head and other parts of your body away from the infeed opening.
- Keep your hands and other parts of your body, including your clothing, away from the infeed, the ejector, and moving parts.
- Always maintain a firm footing and good balance. Do not overreach. Never stand higher up than the product when feeding.
When feeding, make sure that no metal, stones, glass, soil, plastic or other foreign objects get into the product. - If the roller knocks against a foreign object, or if the product starts vibrating or making an abnormal noise, switch off the product immediately, pull out the plug, and wait until all moving parts have completely stopped. Pull out the plug and take the following precautions.
DESCRIPTION
FIG. 1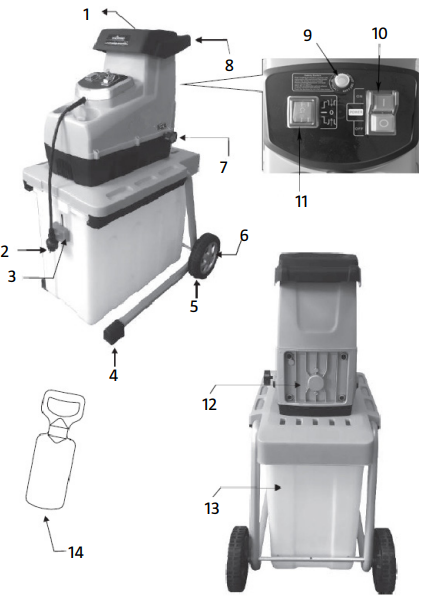
- Infeed funnel
- Plug
- Lock button
- Foot
- Wheel
- Wheel face
- Knob to adjust the blade plate
- Handle
- Safety switch
- Power switch
- Rotation selector
- Back cover
- Collection container
- Feeder
ASSEMBLY
- Turn the product upside down and bring up the legs.
- Put the wheel axle through the openings.
FIG. 2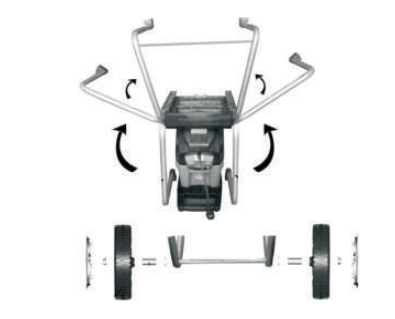
- Put the supplied washer and sleeve on the wheel axle.
FIG. 3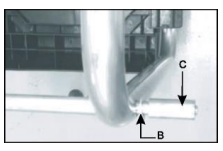
- Put the wheels on, fit the nuts and tighten by hand.
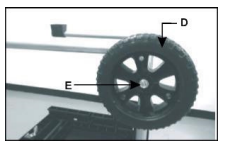
- Hold the wheel axle with the supplied spanner and firmly tighten the nut with the spanner.
FIG.5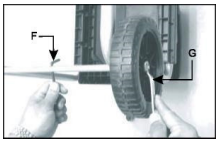
- Put the wheel faces over the hubs.
FIG.6
FITTING THE BIN
- Press the lock button and put the bin in the bottom part of the product.
FIG.7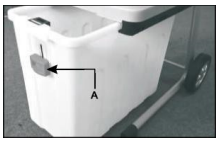
- Press the lock button.
IMPORTANT
Be careful when tilting the product to transport it on the wheels – the weight is unevenly balanced.
USE
STARTING/STOPPING
- Move the rotation selector (A) to position
- Press the I button on the power switch (B) to start the motor.
- Press the O button on the power switch (B) to stop the motor.
FIG.8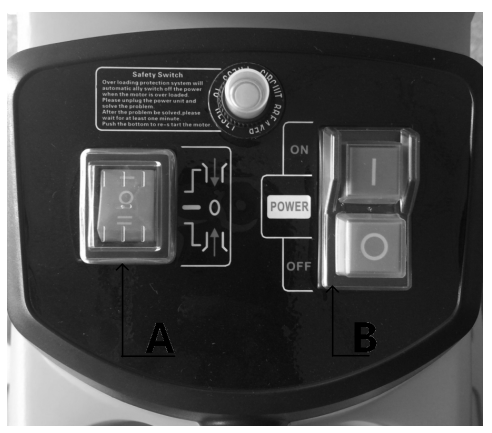
IMPORTANT
Incorrect handling can result in material damage. Always start the product before feeding in material. Do not feed in material after the product has been stopped.
NOTE
The product has a safety switch to prevent it from starting automatically after a power cut.
OVERLOAD PROTECTION
The product has an overload protection, which switches off the motor automatically when overloaded. Wait at least 1 minute and then try to start again by first pressing the O button and then the I button. Follow the instructions below if the motor does not start.
- Press the safety switch (A).
- Move the rotation selector (P) to position –.
- Press the I button on the switch (C) button to remove any material blocking the blades.
FIG.9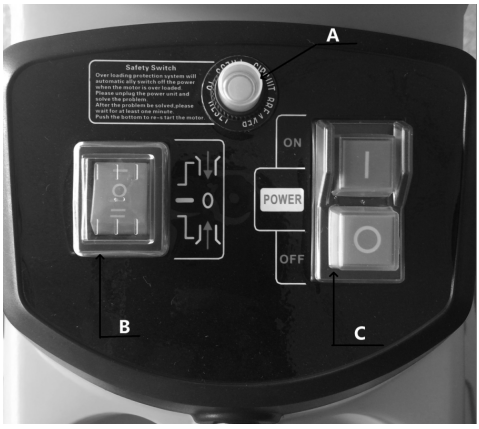
HOW TO USE
- Do not fill the opening; this can cause the product to become blocked.
- Feed wet garden waste intermittently with branches to avoid the risk of blocking.
- Wet kitchen waste must not be run through the product and should be composted.
- Branches with leaves must pass all the way through and out from the product before more material is fed in. Check that the shredded material can drop freely down into the bin without blocking the outlet.
- Make sure that the ventilation openings are not blocked by shredded material.
- The feeding of thick branches can cause the product to become blocked.
- Soft material, such as leaves and shoots, can block the inlet. Feed it in with the feeder.
MAINTENANCE AND CLEANING
WARNING!
Switch off the product and pull out the plug before maintenance and/or cleaning. Always wear gloves when handling the blade plate. Keep the product clean for the best functionality and life span.
- Clean the product after it has been used.
- Do not allow material to dry out on the surface of the product; this reduces the shredding capacity.
- Keep the inlet and outlet clean and free from waste and residue.
- Check that all screw unions are properly tightened at regular intervals.
- Worn or damaged parts should be repaired or replaced by qualified personnel.
- Do not use detergents or solvents that can damage the plastic parts.
ADJUSTING THE BLADE PLATE
The blade plate must be adjusted regularly for best results and to avoid damage. The blade plate must also be adjusted if the material often gets stuck.
- Turn the knob to adjust the blade plate (A) anticlockwise until a faint scraping noise is heard and small aluminium shavings come out through the outlet.
FIG.10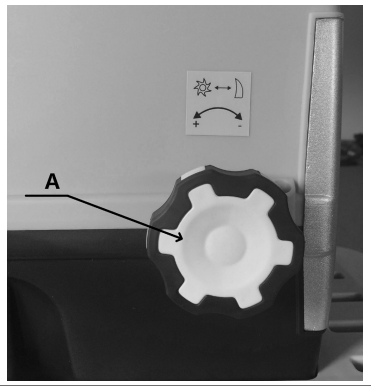
FIG.11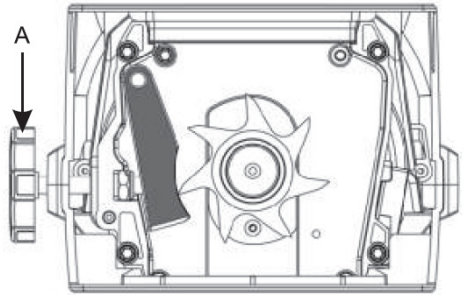
- The product should then shred normally again.
IMPORTANT
Remove dirt and residue after use. Do not rinse the product with water or use a high-pressure washer. Do not use detergents or solvents. Use a soft brush or cloth when cleaning.
REPLACING BLADE PLATE
- Undo the 4 screws (A) and open the back cover.
FIG.12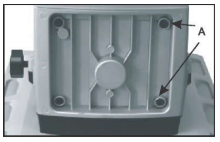
- Take out the blade plate (B) and fit a new one.
FIG.13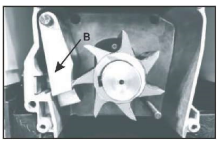
TECHNICAL DATA
- Rated voltage 230 V ~ 50 Hz
- Power consumption 2800 W
- Speed, no load 60 rpm
- Maximum cutting diameter. 44 mm
- Safety class II
- Protection rating IPX4
- Bin 60 l
- Weight 19.4 kg
- Sound pressure level, LpA 79.1 dB(A), K= 3 dB
- Sound power level, LwA*91.7 dB(A), K= 2.67 dB
- Sound power level, LwA** 94 dB(A)
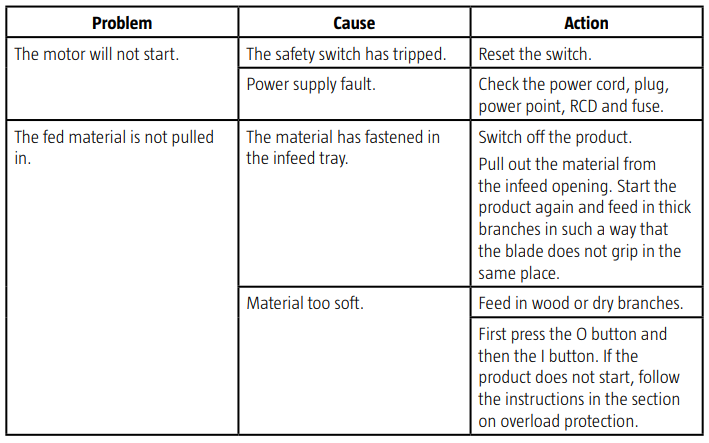
TROUBLESHOOTING