
Palmer PSUPSOAK Supreme Analogue Dynamic Tube
Safety Instructions
- Do not open the Palmer PSUPSOAK Supreme Analogue Dynamic Tube, and do not make any modifications.
- If your Palmer PSUPSOAK Supreme Analogue Dynamic Tube no longer functions properly, if liquids or objects get inside it, or if it has been damaged in any other way, switch it off immediately and disconnect it from the mains.
- The device may be repaired only by authorised repair technicians.
- For devices of protection class 1, the protective conductor must be connected correctly.
- Never disconnect the protective conductor.
- Devices of protection class 2 do not have a protective earth conductor.
- Ensure that live cables are not kinked or otherwise mechanically damaged.
- The device must not be used if it shows obvious signs of damage.
- The device may only be installed in a voltage-free state.
- Permanently connected power cables may only be replaced by a qualified person.
Packaging Content
Remove the Palmer PSUPSOAK Supreme Analogue Dynamic Tube from the packaging and remove all packaging material. Please check the completeness and integrity of the delivery and notify your distribution partner immediately after purchase if the delivery is not complete or if it is damaged. The packaging content includes:
- 1 x Supreme Soaker
- 1 x external power supply unit
- User manual
Analogue Dynamic Tube Amp Hub!
Thank you for choosing the Palmer PSUPSOAK Supreme Analogue Dynamic Tube, your all-in-one solution for pure analogue sound! With the Palmer PSUPSOAK Supreme Analogue Dynamic Tube, you can maximise the potential of your tube amp in a way that has never been possible before – until now. This device is a reactive power reducer and load box with a finely tuned analogue loudspeaker simulator.
It allows you to permanently dial in the sweet spot of your amp – at any volume – and will quickly become your favourite device in any musical situation, from playing and recording at home to rehearsing with a band to playing live – without sacrificing the least bit of your good tone! With others – or all at the same time – the Supreme Soaker is the perfect tool to ensure that your signal always remains pure and analogue.
Advantages of the Supreme Soaker
- The choice is yours, and of course, without a speaker cabinet!
- Fine-tuned analogue speaker simulator: Change the sound of your amplifier at will with the Palmer PSUPSOAK Supreme Analogue Dynamic Tube – you’ll never need a microphone for a speaker again!
- Speaker output with unique tone control: Change the sound palette of your speaker cabinet to create new, distinctive soundscapes.
- Microphone/line input (can be mixed with the speaker simulator): Combine your favourite miked speaker with the Palmer PSUPSOAK Supreme Analogue Dynamic Tube for an analogue sound experience that‘s in a class of its own.
- Headphone output on the front: perfect for silent practice when inspiration strikes.
- Stereo FX Loop: Do you love your pedals? Us too! That‘s why the Supreme Soaker has a stereo FX loop.
- Aux input on the front: Want to jam to backing tracks or even play to a click? The Supreme Soaker makes it very easy.
- Balanced stereo XLR line outputs: When it comes to recording, the whole world is open to you.
- Compatible with 8- and 16-ohm setups: Works perfectly with 99% of all tube amplifiers.
- Designed for amplifiers up to 150 watts RMS: perfect for taming even the large, arena-filling tube amplifiers of yesteryear! With the Palmer PSUPSOAK Supreme Analogue Dynamic Tube, you finally have a reason again to dust off your full stack!
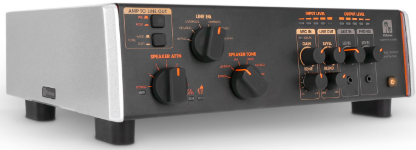
Connections, Operating and Display Elements
The connect and the con,trols and display elements are colour-coded for easier orientation:
- Orange: Signal path of the amplified signal from the amp to the speaker
- Yellow: Signal path that leads to the LINE OUT and RE-AMP OUT
- Grey: Signal path that leads to the headphone output (PHONES)
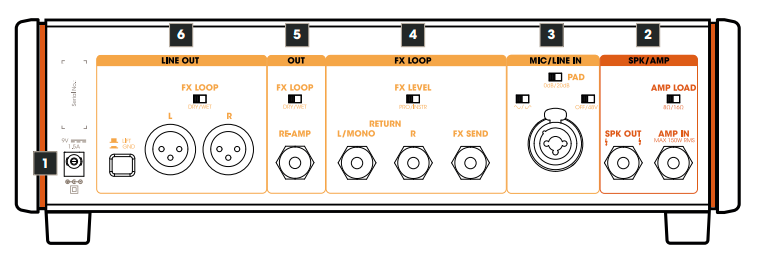
Power Input
Low-voltage socket for supplying power to the device. To prevent damage to the device, please use only the original power supply (included) or one of the Palmer power supplies, PWT06IEC and PWT12IEC.
SPK/AMP
AMP IN
Amplifier input with a 6.3 mm jack socket. Use a high-quality speaker cable (min. 2 x 1.5 mm²) to connect the speaker output of a guitar amplifier to the amplifier input AMP IN. Caution when using guitar amplifiers with an output power of over 100 watts:
Make sure that the ventilation openings of the housing are not covered and that the device receives sufficient air circulation. Monitor the heat development of the device regularly and keep a close eye on the “Burning Bus” LED (see section 13, Overheating warning!). If this LED lights up, stop playing and allow the device to cool down.
AMP LOAD: Adjust the impedance required for your amplifier using the AMP LOAD switch before switching on the amplifier (8Ω/16Ω).
SPK OUT
6.3 mm jack socket for connecting a guitar speaker. As the Supreme Soaker has internal load resistors, a guitar cabinet does not necessarily have to be connected to the SPK OUT speaker output. When using a guitar speaker, the impedance of the speaker should correspond to the impedance required for the amplifier. Use a high-quality speaker cable (min. 2 x 1.5 mm²) to connect the SPK OUT speaker output to the input of a guitar cabinet.
MIC/LINE IN: Combo socket XLR / jack Audio input for a microphone (also suitable for a line playback source).
XLR input
Connect a suitable microphone using a microphone cable and pick up a guitar speaker. Set the volume ratio between the amp and microphone signals on the front panel (LINE OUT, BLEND, AMP <-> MIC).
TRS jack input (-20 dB): Connect the line output of the amplifier using a line cable. Set the volume ratio between the amp and line signals on the front panel (LINE OUT, BLEND, AMP <-> MIC).
PAD (Passive Attenuation Device)
The PAD circuit can be used to adjust the level range of the input stage to the level of the input signal. Distortion of the audio signal can thus be effectively avoided.
- 0dB: No attenuation of the audio signal.
- 20dB: Attenuation of the audio signal by 20 dB.
Select the 0dB position if the gain of the input signal can be adjusted using the GAIN control on the front of the device so that no distortion occurs in the signal and a sufficient signal level is achieved.
Select the 20dB setting if the lowest setting of the GAIN control on the front panel is not sufficient to avoid distortion in the signal (SGN/PK indicator LED lights up red continuously or flashes red at peak levels, PK = Peak).
OFF/48V
48 V phantom power for use with a condenser microphone. Only switch on the phantom power after connecting the microphone (switch in position 48V) and switch it off again before disconnecting the microphone (switch in position OFF).
POLARITY
When mixing the amplifier and microphone signals, inverting the polarity of the microphone signal can prevent unwanted cancellations (switch in position = standard polarity, switch in position = inverted polarity).
FX LOOP
Serial loop-in path (unbalanced) for integrating an external effects unit (reverb, delay, etc.). Set the volume ratio between the direct and effect signals (dry/wet) on the effect device. NOTE: If only the send socket is used and the return sockets remain unused, the signal path is interrupted.
FX SEND
6.3 mm jack socket for sending the signal to the external effects unit (FX SEND -> effects unit INPUT). Use a high-quality line cable with TS jack plugs.
RETURN L/MONO – R
6.3 mm jack sockets for returning the effect signal (mono signal: effect unit OUTPUT -> RETURN L/MONO, stereo signal: effect unit OUTPUT L + R -> RETURN L + R). Use high-quality line cables with TS jack plugs.
FX LEVEL PRO/INSTR
Switch for adjusting the send level. Recommendation: PRO level = for rack effects in the studio, INSTR level = for effect pedals. Select the appropriate setting for your effect device. Make sure that the input stage of the effect device is sufficiently driven but not overdriven.
OUT: High-impedance output path (unbalanced) for driving a (second) guitar amplifier.
RE-AMP: 6.3 mm jack socket. Use a high-quality instrument cable with TS jack plugs to connect a guitar amplifier.
FX LOOP DRY/WET
- Switch in position DRY: Outgoing signal without effect (No. 4. FX LOOP).
- Switch in position WET: Outgoing signal with effect (No. 4. FX LOOP).
LINE OUT
Balanced stereo line output with XLR sockets for the left and right channels, Ss L + R. Use the LINE OUT to connect a mixing console or audio interface, etc.
FX LOOP DRY/WET
Switch in position DRY: Outgoing signal without effect (No. 4. FX LOOP). Switch in position WET: Outgoing signal with effect (No. 4. FX LOOP).
LIFT/GROUND
Switch for disconnecting the ground connection between the input and output (ground lift). In the non-pressed position, the ground connection is disconnected; the connection is established when the switch is pressed. The ability to prevent a humming loop using the ground lift switch depends on the grounding of the connected devices. It is therefore possible that either switch position effectively reduces or eliminates humming.
POWER
As soon as the Supreme Soaker is connected to the mains using the external power supply, the illuminated power symbol on the power button (standby) pulsates. Press the button to end standby mode and put the device into operation. To switch back to standby mode, press the power button again.
INPUT LEVEL
- 5-segment LED display for the signal level at the AMP IN amplifier input.
- 9. OUTPUT LEVEL 5-segment LED display for the signal level at the loudspeaker output SPK OUT.
LINE OUT
LEVEL
Volume control for the LINE OUT stereo output. TIP: When connecting a mixing console, audio interface or similar, select the centre position (0 dB) as the default setting and only increase or decrease the signal level if necessary (+/- 12 dB).
BLEND: Controls the volume ratio between the AMP and MIC signals.
MIC IN
GAIN: Adjusts the pre-amplification of the MIC/LINE IN audio input.
SGN/PK
The two-colour LED indicates whether a signal is present at the MIC/LINE audio input (lights up amber) and whether the input stage is operating at the distortion limit or in the distortion range (flashes red or lights up red continuously). In this case, reduce the pre-amplification using the GAIN control and, if necessary, activate the 20 dB PAD (rear of the device, see section 3 PAD).
TONE
Tone control with a hi-shelf filter. Boost (turn to the right) or attenuate (turn to the left) the high frequencies. In the centre position, the audio signal is not processed.
SPEAKER TONE: 6-way switch for setting the sound characteristics in the loudspeaker signal path (5 presets plus bypass).
SPEAKER ATTN (Attenuation)
8-way switch for gradual attenuation of the volume at the SPK OUT loudspeaker output. BYPASS (with indicator LED) = no attenuation. 1 – 6 = level 1 (slight attenuation) to level 6 (strong attenuation). FULL ATTN (with indicator LED) = maximum attenuation, SPK OUT loudspeaker output muted
LINE EQ: 6-way switch for setting the sound characteristics for the LINE OUT line output (5 presets plus bypass).
AMP TO LINE OUT
PRE/POST
Switch not pressed (position PRE: The audio signal for the LINE OUT line output is tapped BEFORE the SPEAKER TONE filter. Switch pressed (position POST): The audio signal for the LINE OUT line output is tapped BEHIND the SPEAKER TONE filter.
TONE HARD/SOFT
Switch not pressed (position HARD). Recommendation: Use this setting with a distorted guitar signal. Switch pressed (position SOFT). Recommendation: Use this setting with a “clean” guitar signal.
- PHONES: Stereo headphone output with a 3.5 mm jack socket for the sum signal.
- LEVEL: Volume control for the headphone output (turn to the left = quieter, turn to the right = louder).
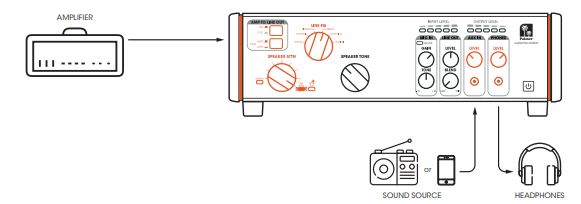
AUX IN
Stereo line input with a 3.5 mm jack socket. The line input may be used to connect a playback device such as an MP3 player for play-alongs, for example.
LEVEL: Volume control for the AUX IN input channel (turn to the left = quieter, turn to the right = louder).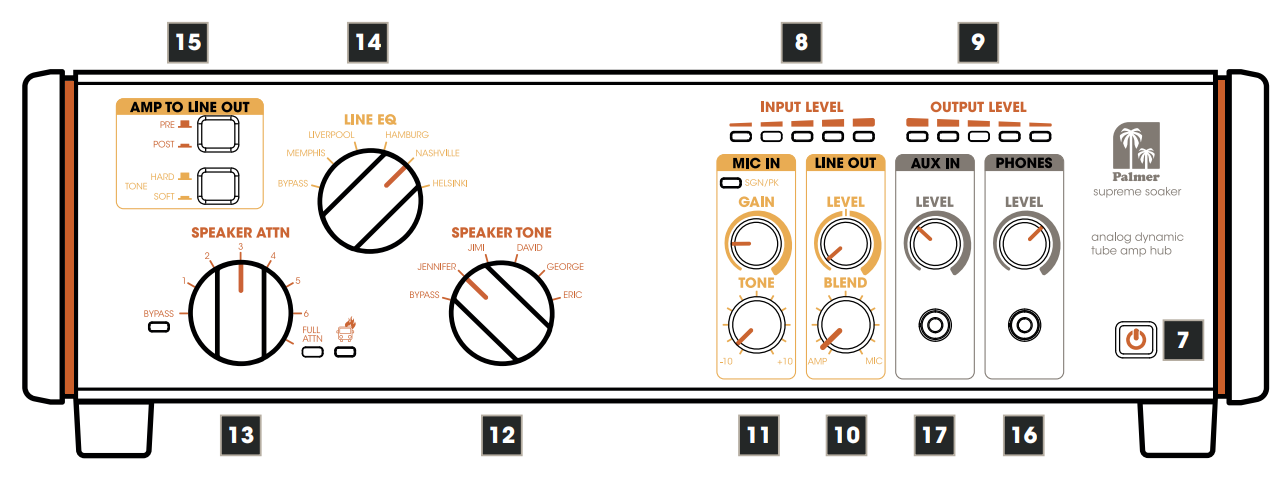
Care, Maintenance & Repair
In order to ensure the long-term, proper functioning of the Palmer PSUPSOAK Supreme Analogue Dynamic Tube, it must be regularly cleaned and, if necessary, serviced. The maintenance requirement depends on the intensity of use and the environment in which it is used.
We recommend a visual inspection before each operation of the Palmer PSUPSOAK Supreme Analogue Dynamic Tube. Furthermore, we recommend carrying out all the applicable maintenance measures specified below once every 500 operating hours or, in the case of a lower intensity of use, at the latest after one year. Warranty claims may be limited should defects result from inadequate service and maintenance.
- Housing surfaces must be cleaned with a clean, damp cloth.
- Make sure that no moisture can penetrate the device.
- Air inlets and outlets must be regularly cleaned of dust and dirt.
- Cables and connectors must be cleaned regularly, and dust and dirt must be removed.
- Solvents in particular, such as alcohol, can impair the function of housing seals.
- Devices must generally be stored dry and protected from dust and dirt.
- In general, no cleaning or disinfection agents or abrasive agents may be used, as they may damage the
surface finish.
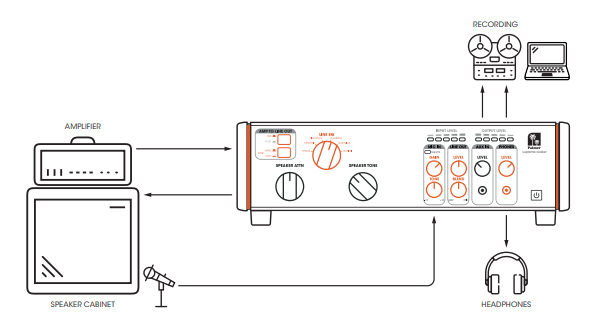
Wiring Example
Power Reduction
Reduce the power output from the tube amplifier to the loudspeaker to play the amplifier in the range where it sounds best without losing dynamics. For silent operation, set to FULL ATTN. The Supreme Soaker delivers a continuous load to your amplifier at every attenuation level – even without attenuation (power reduction). CHANGE SPEAKER TONE Amplifiers and speakers interact. SPEAKER TONE changes the impedance curve that your amplifier “sees” and thus gives your loudspeaker different sound variations. EISTUNGS
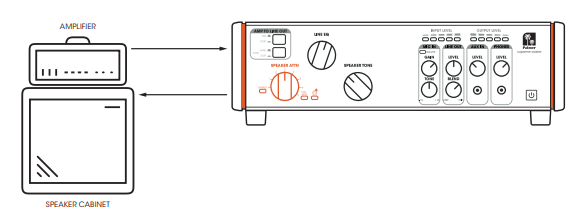
Speaker Tone
Amplifiers and speakers interact. SPEAKER TONE changes the impedance curve that your amplifier “sees” and thus gives your loudspeaker different sound variations.

SPEAKER SIMULATION (LINEE®)
Activate an analogue LINE EQ – also known as speaker simulation – at the balanced line outputs and the headphone output. The LINE EQ works both at full power reduction and at all other reduction levels. If you bypass it (BYPASS), you will hear the dry signal from your amplifier. You can use the Tone button to apply a “harder” or ‘softer’ LINE EQ curve: Select HARD for distorted sounds and SOFT for clean sounds. Attention: The signal will not pass through to the LINE OUT and PHONES if the PRE/POST switch is set to POST and you have selected FULL ATTN.
MIC/LINE INPUT
Mic your guitar speaker and feed the signal to the Supreme Soaker. The TONE control applies a high-shelf EQ of +/- 100 dB to the microphone or line signal. A phantom power switch for operating condenser microphones and a polarity switch are located on the rear of the device. You can use the GAIN control to adjust the pre-amplification of the input. You can use the BLEND control to adjust the volume ratio between the microphone signal and speaker simulation (LINE EQ).
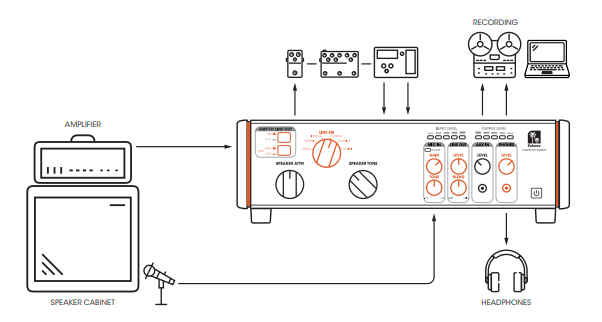
INSERT YOUR STEREO EFFECTS
Insert your favourite effect pedals into the serial FX LOOP. The effects inserted into the effects loop are looped in behind the LINE EQ (speaker simulation) and the MIC/LINE IN. You can set it to instrument or pro level (PRO/INST) using a switch on the back.
ADD THE SPEAKER TONE TO THE LINE OR HEADPHONE OUTPUT
For even more sound variations, you can activate the POST button and try out different combinations with our LINEEQ and SPEAKER TONE settings. Note 1: All of this happens before the FX loop. Note 2: When the POST button is activated and FULL ATTN is activated, no signal is output from the LINE OUT or PHONES
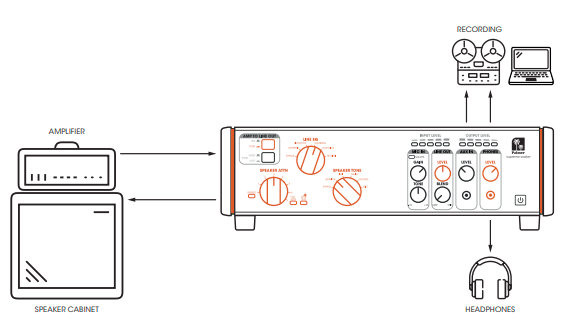
ZERO-LATENCY RECORDING / MONITORING SET-UP
The perfect recording setup for your amplifier with zero latency. Feed the sound from your Supreme Soaker into the recording system and from the recording system back into the AUX IN of your Supreme Soaker. Make sure that you mute the activated track (your guitar track) to hear the sound from your Supreme Soaker. This allows you to monitor your guitar sound with zero latency, along with the backing tracks from your recording system.
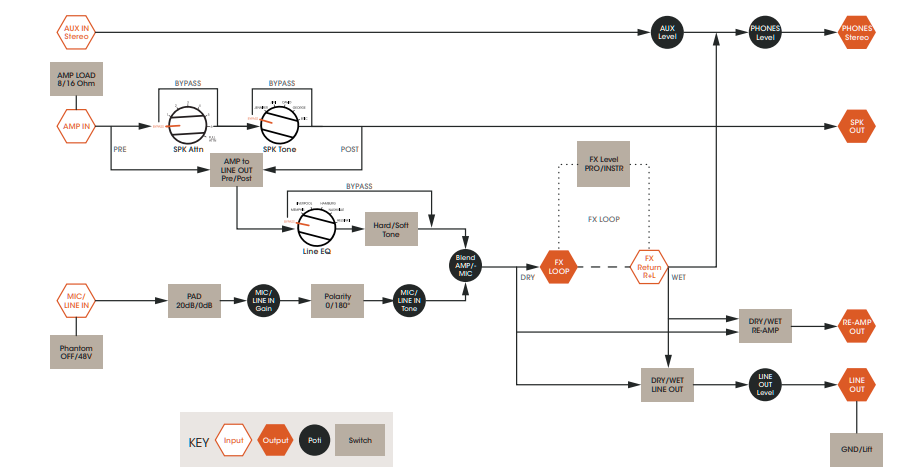
Signal Flow Diagram
Specifications
| GENERAL | |
| Product type | Power reducer, attenuator, load box, DI box, speaker simulator, microphone preamplifier, headphone amplifier, re-amping device |
| Signal processing | Analogue |
| Controls, front | 7-stage power reduction, Line EQ (5 voicings), Speaker Tone (5 voicings), MIC gain, MIC Tone, Line Out Level, Line Out Blend, Aux In Level, Phone Level, Pre/Post Switch (Amp to Line Out), Hard/Soft Tone Selector. |
| Controls, rear | FX Level (Pro/Instrument), FX Loop Line Out, FX Loop Re-Amp, GND/Lift, MIC/ LINE Input PAD, phantom power, polarity, amplifier load impedance switch |
| No. of inputs | 5 |
| Input type | balanced, unbalanced |
| Input connectors | 3.5 mm jack, 6.3 mm jack, XLR |
| No. of outputs | 6 |
| Output type | balanced, unbalanced |
| Output connectors | 3.5 mm jack, 6.3 mm jack, XLR |
| Ground/lift switch | yes |
| Transformer-isolated outputs | yes |
| Internal load impedance | 16 Ohm, 8 Ohm |
| Min. load when switched off | 16 Ohm |
| Max. input power | 150 W |
| Power reducer | 7-stage |
| Voicing filter | 5-stage speaker tone and 5-stage line EQ |
| Display | Output level, bypass, power reducer, input level, MIC signal/clip, overheating, full power reduction |
| Power supply | +9 V DC socket – 1.5 A |
| Polarity of the power supply | Centre-negative |
| Power connection | 2 x 5.5 mm |
| Maximum power consumption | 13.5 W |
| Power consumption in standby mode | 0.3 W |
| Dimensions (W x H x D) | 334 x 108 x 274 mm |
| Weight | 6.6 kg |
| Ambient temperature (in operation) | -20°C – 25°C |
| Relative air humidity | <80 % (non-condensing) |
Manufacturer’s Declarations
Herstellergarantie und Haftungsbeschränkung Manufacturer’s warranty & limitation of liability Adam Hall GmbH Adam-Hall-Str. 1 61627 Neu-Anspach, Germany.
CE Conformity
Adam Hall GmbH hereby confirms that this product, Palmer Pan16 19“ DI-bo,x meets the following guidelines (where applicable): Low-Voltage Directive (2014/35/EU), EMC Directive (2014/30/E/U), RoHS (2011/65/EU), RED (2014/53/EU)
FCC Statement
This device complies with Part 15 of the FCC Rules. Operation is subject to the following two conditions: (1) This device may not cause harmful interference, and (2) This device must accept any interference received, including interference that may cause undesired operation.
UKCA- Conformity
Hereby, Adam Hall Ltd. declares that Palmer Naab 2-Kanal Media DI-Bo,x this product, Palmer Pan16 19“ DI-bo,x meets the following guidelines (where applicable): Electrical Equipment (Safety) Regulations 2016, Electromagnetic Compatibility Regulations 2016 (SI 2016/1091). The Restriction of the Use of Certain Palmer Pan16 19“ DI-box Hazardous Substances in Electrical and Electronic Equipment Regulation 2012 (SI 2012/),32,) Radio Equipment Regulations 2017 (SI 2016/2015), Adam Hall Ltd. | The Seedbed Bus. Centre | SS3 9QY Essex | UK
Customer Support
- Email: Info@adamhall.com
- Website: www.adamhall.com/compliance
- Ph: +49 (0)6081 / 9419-0
FAQs
Q: What does the “Speaker Tone” control do?
The “Speaker Tone” knob modifies the impedance curve that the amplifier “sees,” which in turn modifies the behaviour of the speaker/amp interaction. By choosing one of the five settings (voices), you can change the sound’s tonal character.
Q: What about using an FX pedalboard or stereo effects loop?
The device has a stereo FX loop. The FX Loop Line Out and Re-Amp outputs, as well as an FX Level switch (PRO/INST) to match line or instrument levels, are located on the back panel.
Q: What if my amp is higher wattage than 150 W?
For the amp signal entering the device, the technical specification specifies input handling up to 150 W (peak).
Q: What is a “reactive load,” and why does this matter?
A reactive load mimics the intricate behaviour of a genuine speaker—its frequency-dependent impedance—in contrast to straightforward resistor-based attenuators.
Q: What does the “Mic/Line In” function do?
Through the circuitry of the Supreme Soaker, you can combine or reamp another signal (such as a DI guitar track, microphone, or secondary amplifier) using the rear Mic/Line In.
Q: Can I use impulse responses (IRs) instead of the built-in speaker simulator?
Indeed. Just run the Line Out into your interface or IR loader (hardware or plugin) after disabling the Speaker Simulator (put the LINE EQ switch to Bypass).
1 Comment
Pingback: Palmer PAN 04 A Active Two-channel DI Box | Specs & Guide