
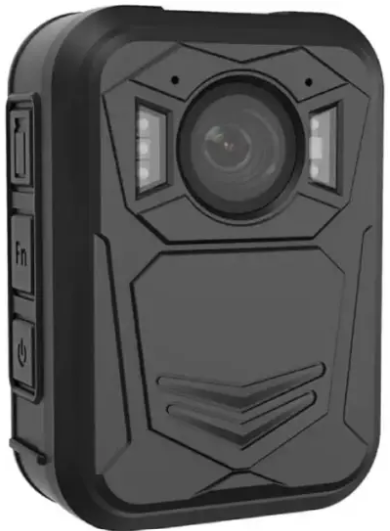
Papago B100 High Definition Body Camera
Safety Instructions
- Please stay away from fire.
- Please do not use this product near strong magnetic fields because electromagnetic waves of specific frequencies may affect the image quality.
- Before you start working with the product, please make a trial video to get familiar with it.
- Be sure to use the power adapter and USB cable equipped with the recorder to charge the unit.
- Stop charging it after it is fully charged.
- Please do not continuously charge it for a long time, to prevent the floating charging of the battery.
- When the machine breaks down, please do not disassemble and repair it arbitrarily.
- Only authorized maintenance personnel can repair the machine.
- Our company shall not be responsible for any loss of data or content during operations.
- The Company reserves the right to change the software and hardware specifications described in this manual at any time without prior notice for upgrades or improvements of the product. The product specifications and information mentioned in this manual are for reference only.
Parameters
| Item | Parameters |
| Maximum pixel size | 3M/5M/8M/10M/12M/27M/32M/48M |
| Video recording resolution | 3840*2160 2560*1440 2304*1296 1920*1080 1280*720 848*480 |
| Display screen | 1.54 寸 TFT-LCD High definition color display |
| Angle of lens | Wide-angle lens 140° |
| Medium of storage | Built-in 32GB/64GB/128GB/256GB optional |
| Working hours | More than 8 hours |
| Dimensions and specifications | 70mm*47mm*31.5mm |
Quick Operating Instructions
- Long-press [On-off] to start the machine and enter the standby screen
- ShShort-pressREC] to start recording. Long-press [REC] to switch resolution ratio.
- Short-press [Photo] to take pictures. Long-press [Photo] to enable the red and blue flash function.
- Short-press [Video] to take videos. Long-press [Video] to enable laser positioning.
- Short-press [Light Key] to start infrared night vision. Long-press [Light Key] to start white light.
- Short-press [M] to set machine functions and parameters.
- Press [OK] to enter the audio and video folder. When the video is recorded, long-pressing [OK] will enable the key mark.
Short-press [REC] to return to the previous screen during operation.
Basic Operating Instructions
Starting up
- Press and hold [ON/OFF key] for 3 seconds, the sound will be prompted; the green standby indicator
will light up, and the screen will enter the standby state.
Recording
- In the power off/standby state, short-press [REC] and the voice prompt “Start recording” yellow recording indicator light will flash. Then, short-press [REC] again to stop recording, and the yellow recording indicator light will go off. After that, the record will be saved.
Photo
- Under the standby state, short-press [Photo] to take and save photos.
Video
- In the power off/standby state, short-press Video] the voice prompts “Start recording” and the red Video indicator flashes; that is, the recording starts. The Short press
To stop recording again, the red video indicator goes off, and the recording ends and is saved.
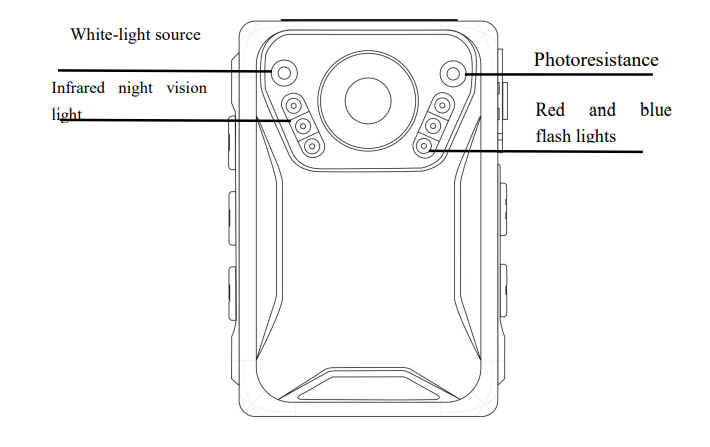
LED white-light
- In standby state and during recording, long-press [Light Key] to turn on the white light. Long-press ait gain to turn off the white light.
Infrared night vision function
- In standby state and during the recording process, short-press [Light Key] to turn off the infrared night vision. After the infrared night vision light is turned on, it can meet the shooting demand in a dark environment at night. Then, short-press [Light Key] again to turn it off.
Quick playback key
- In standby state, short-press [playback] to quickly replay and browse the audio and video files recorded by the previous operation.
OK
- Under the standby state, short-press [OK] to select audio and video data from the video, photo, and audio binders and press Confirm to play them.
Key mark key
- Under the recording state, long-press OK to see video files marked, and a key mark will then appear on the LCD screen to distinguish them from other common videos.
Return
- In the menu setting and file browsing stateshort-pressss REC to return.
Menu selection
- Under the standby state, short-press [Menu] to set machine functions and parameters. Short-press [0K] to confirm related operations. Press [up browse key] or [down browse key] to select related items. The
Settings
- Video resolution: Select 3840*2160, 2560*1440, 2304*1296, 1920*1080, 1280*720, 848*480 respectively.
- Photo resolution: Choose machine photo quality definition as 3M/5M/8M/10M/12M/27M/32M/48Mrespectively.
- Video coding: H.264/H.265 can be selected.
- Video quality: Select video effects of the machine, including high, medium, and low levels.
- Extended recording: You can choose to turn it off or on.
- Delayed photograph: Off, 2 seconds, 5 seconds, 10 seconds can be selected. Press the shutter button to take pictures and save pictures after the set time.
- Timed photograph: Off, 2 seconds, 5 seconds, 10 seconds can be selected to take pictures continuously and save them at the set time.
- Loop recording: You can choose off or on. In the open state, when the recording card is full, the earliest file will be automatically overwritten. Video
- segmentation time Select video files of the machine in 4 modes: 5 minutes, 10 minutes, 15 minutes, and 30 minutes.
- Slide play: Off, 2 seconds, 5 seconds, and 8 seconds can be chosen.
Motion Detection
- This function can be turned on or off. In the open state, the still picture will
automatically stop recording after it is recorded for 30 seconds. Dynamic pictures can be recorded continuously, and you can canshort-presss Video can stop the recording. - Vehicle mode: Open mode or closed mode is available. When on-board mode is enabled and the machine is off, it will automatically start recording when connected to the power supply. After the power supply is disconnected, it will automatically save the video and close the machine.
- Automatic shutdown: Automatic shutdown options can be set: off, 1 minute, 2 minutes, 3 minutes, 5minutes, 10 minutes.
- Key sound: It can be set on or off. In the off state, there is no sound prompt when the key is pressed.
- Language setting: The machine language can be set in this interface.
- Infrared switch: Manual or automatic can be selected. Under the manual mode, you need to press the infrared light key to turn on the infrared. Under the automatic mode, you can automatically switch to infrared night vision for shooting in a dark environment.
- Screen saver: Off, 1 minute, 3 minutes, 5 minutes, and 10 minutes can be
- selected. Indicator: There are two options: off and on. Under the off state, there is no indicator for recording or video recording.
- Voice broadcast: You can choose to turn it off or on. In the off state, there is no voice prompt for video and recording.
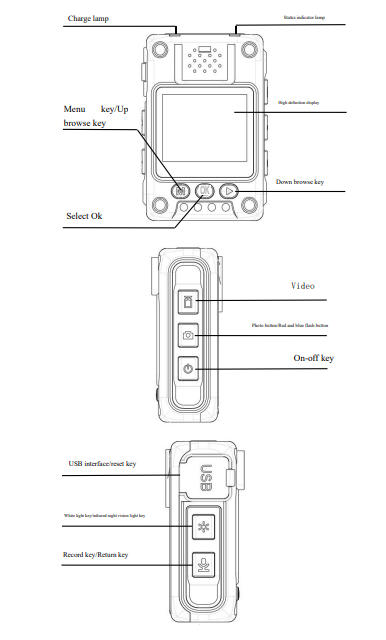
Indicator Light/key and Instructions for Use
- Standby Indicator: This light is green, and it will light up when it enters the real-time monitoring standby state after power is on
- Charging indicator: This light is red when charging, and the green light is always on when it is fully charged.
- Video indicator: Red indicator. This light will flash when the video is recorded.
- Recording indicator light: Yellow indicator light. This light will flash in recording state.
- In case of a crash caused by the incorrect operation of the reset key, press this key to reset.
- Menu button: Under the standby state, you can short-press it to enter the system setting interface.
- OK Confirm: Press this button to enter the video/photo/recording file browsing mode, and there is a confirm operation function; under recording state, long-press OK to mark the video with one key.y
- Recording function button. Press this button to start recording. Then, short-press it again to stop recording. Under the menu setting and file browsing status, short-press this button to return. In the preview interface, long-press this key to switch the resolution ratio.
Photo function key
- Press this key to take photos. In standby state, long-press [Photo] to start the red and blue flash and alarm sound function; long-press [Photo] for the second time, and the red and blue lights flash, and the alarm sound will be off. Ss [Photo] for the third time, and the red and blue flash functions will be closed.
- Video recording key
Press this key to start recording. Press this key again to end the video. Long-press it to start
Laser positioning and then long-press it again to turn off the laser positioning function. - Up/down/left/right key
In the menu selection interface and file browsing interface, you can adjust the selection object up and down or left and right. - Light Key
In the standby state and recording process, short-press press Light Key to enable the infrared night vision function; short-press it again to end the infrared night vision function. In standby state and during recording, long-press the Light Key to turn on the white light. Long-press it
again to end the white light function. - USB interface
This interface is connected with the computer to read machine data and charge. - On-off key
When the machine is turned off, long-press this key to start the machine. Long-press this key to close the machine in standby or video state. In the standby state or video state, you can short-press this key to close the screen. Short-press this key again to open the screen.
PC Connection
- Input the password (the password contains 6 zeros by default; press the up and down keys to input numbers or letters) and then press the “Confirm” button to confirm your setting.
- Abnormity warning
This machine has two kinds of abnormal state alarm prompts, and they are:
① When the power is insufficient, the battery power display on the machine screen will flash, and there is a warning sound. ② When the machine memory is full, “storage is full” will appear on the machine screen, and there will be a prompt sound alarm. - Power saving mode
This unit has a screen saver mode. The LCD screen can be automatically closed after 1 minute, 3 minutes, 5 minutes, or 10 minutes. After pressing the n-off key, the LCD will be on. Under the preview state, short-press press [on-off] key to close the LCD screen. Then, short-press it again, and the LCD screen will be on. - Charging method:
- Connect it to the computer by USB.
- Charge it with a power adapter.
Matters Nneeding Attention
- When the machine screen has a color difference (red), please turn on/off [red light key] once again to restore the normal color.
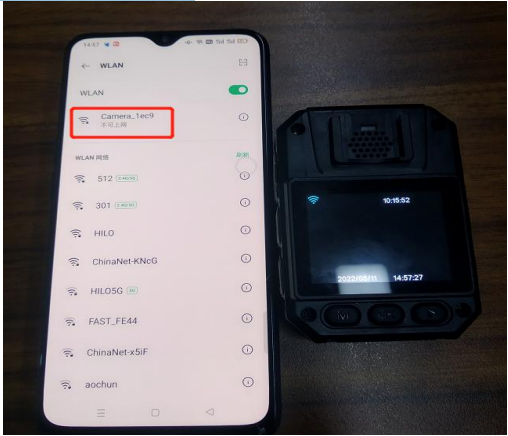
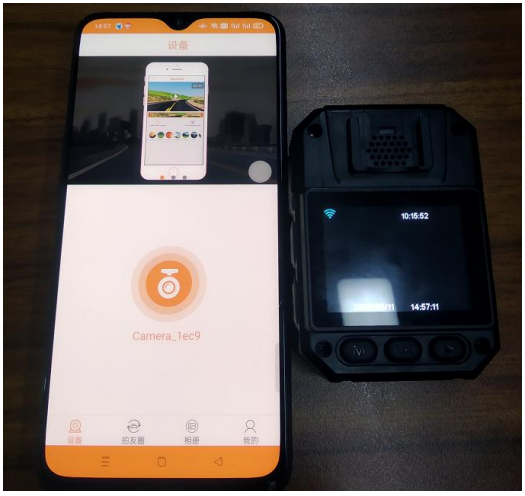
Method to Connect
Search RoadCam in the app store and download and install it on your mobile phone, or scan this QR code to download and install it.

- Turn on the WiFi of the law enforcement recorder (Long-press OK and voice prompt: WiFi on will be given); find the corresponding names (Camera_1ec9) in the WIFI interface of the phone and connect it (password 12345678). As shown below:

- Turn on the RoadCam downloaded to the mobile phone for operation.
User Notice
To better protect the interests of users and avoid some unnecessary problems, please read the following points in detail:
- When purchasing the machine Papago B100 High Definition Body Camera, please ask the sales unit to fill in the relevant contents of the “WarrantyCard” and stamp the official seal of the sales unit.
- The company only provides paid service for the artificial damage of the faulty machine (such as water, damp, improper use, etc.), private modification or damage caused by the maintenance of non-authorized service organizations, as well as law enforcement recorder products beyond the warranty period. Users need to pay some money.
FCC Caution
This device complies with part 15 of the FCC Rules. The operation is subject to the following two
conditions: (1) This device may not cause harmful Papago B100 High Definition Body Camera interference, and (2) this device must accept any interference received, including interference that may cause undesired operation.
Any Changes or modifications not expressly approved by Papago B100 High Definition Body Camera by the party responsible for compliance could void the user’s authority to operate the equipment.
This equipment generates and uses can radiate radio frequency energy and, if not installed and used in accordance with the instructions, may cause harmful Papago B100 High Definition Body Camera interference to radio communications.
However, there is no guarantee that interference will not occur in a particular installation.
- Reorient or relocate the receiving antenna.
- Increase the separation between the equipment and receiver.
- Connect the equipment to an outlet on a circuit different from that to which the receiver is
connected. - Consult the dealer or an experienced radio/TV technician for help.
Customer Service
- Email Support: papago.store@hotmail.com
- Phone Support: +02-2659-3008
FAQs
Q: What is the Papago B100 Body Camera?
The Papago B100 is a small, high-definition body camera intended for professional, law enforcement, and personal security applications.
Q: How do I power on the Papago B100?
To turn on the indicator light, press and hold the power button for two to three seconds.
Q: What is the video recording resolution?
The B100 produces crisp, fluid video playback by recording in Full HD 1080p at 30 frames per second. In order to conserve storage space, it also enables 720p recording.
Q: Can the Papago B100 record audio only?
Indeed. The options menu allows you to switch to audio-only mode. T
Q: How much storage does the B100 support?
The camera supports microSD cards up to 128GB and includes 16GB of built-in memory. For supported card types, refer to the guide’s specs.
Q: How do I charge the camera?
Connect the camera to a power source (computer, power bank, or wall adapter) using the included USB cord. Usually, a full charge takes two to three hours.
Q: How do I transfer videos to my computer?
Use the USB cord to connect the camera to a computer. It will show up as a detachable drive. Just transfer the video files to your computer by copying and pasting them.