
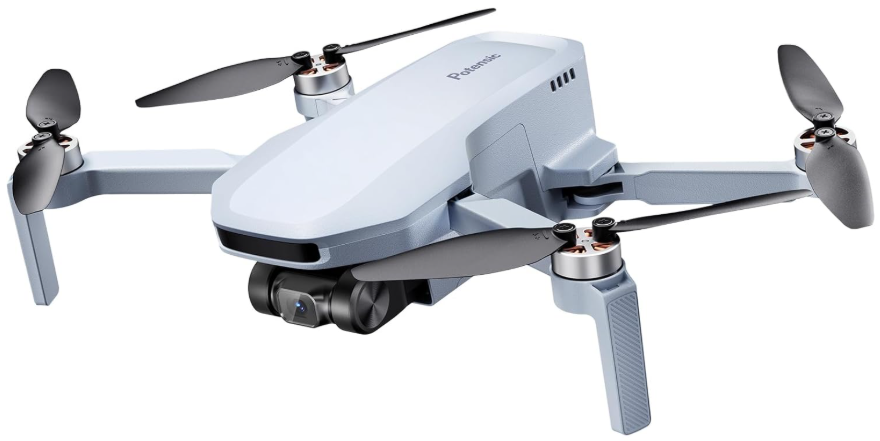
Potensic ATOM SE 4K EIS Camera GPS Drone
Introduction
With foldable arms and a weight below 250g, the product is portable and easy to use. With a th 1/3″ Sony CMOS image sensor, the product can shoot 4K/30FPS HD video and 1.2-megapixel pictures. Atom SE uses self-developed ShakeVanish electronic stabilization technology to make the picture clear and stable.
By using the brand new PixSync 2.0™ 2.4G digital image transmission technique, the Atom SE remote control can realize 4 km communication distance and 720P HD image transmission maximally at ideal conditions. Open the pull-type and the foldable remote controller to contain your mobile device. Connect the remote controller and mobile device with a USB data cable, to operate and set the product through App andthe appsplay HD image transmission. The built-in lithium battery of the remote controller can work for approximately. 2.3h maximally. Atom SE uses proprietary SurgeFly™ flight control technology, with a maximum horizontal flight speed of 16m/s (52ft/s), a maximum flight time of about 31 minutes, and the ability to withstand winds of up to level 5.
Safety Instructions
While the product’s propellers are revolving at a high speed, keep it away from crowds and animals to avoid scratches or disturbance. Do not touch the revolving propellers with your hands.
- The product should be assembled by an adult.
- Users aged below 16 should not handle the product alone.
- The battery should be charged under the supervision of an adult and by avoiding inflammables.
- Keep the product out of children’s reach to avoid eating it by mistake, for it contains small parts.
- Do not use the product on the road or in water to avoid an accident.
- The remote controller has a built-in 3.7V lithium battery, which needs no replacement.
- Do not short-circuit or squeeze the battery to avoid an explosion.
- Please master local laws and regulations to avoid violations of regulations.
- Avoid low-altitude flight above the water surface.
- Keep it away from airports, airlines, and other no-fly zones.
Using the Manual
Symbols
- Prohibited
- Important
- Operation & use prompts
- Technical Terms and Reference Information
Suggestions of Use
- User is highly suggested to watch the tutorial video and the Quick Operation Guide before consulting the Manual.
- Make sure to read the Disclaimer & Precautions first when consulting the Manual.
Tutorial Video / Download App
Scan the QR code on the right and you can:
- Download PotensicPro App (hereinafter referred to as “the App”).
- Watch the tutorial videos.
- Access the latest User Manual.
- Learn about the frequently asked questions(FAQ)
Registration & Help
Make sure to register a personal account in the n App before the first flight to get a better user experience. Steps of Registration Please fill inemailE-ail and password, check the protocol, and click “Register”. You can log in to the system after registration. (Note: Keep the mobile phone online during registration) Help Thanks for purchasing the Atom SE drone. Please read the Manual carefully. Please contact our support team at support@potensic.com if anything needs help. When requesting after-sales service, it is required to submit the order ID and details of the issues.
Technical Terms
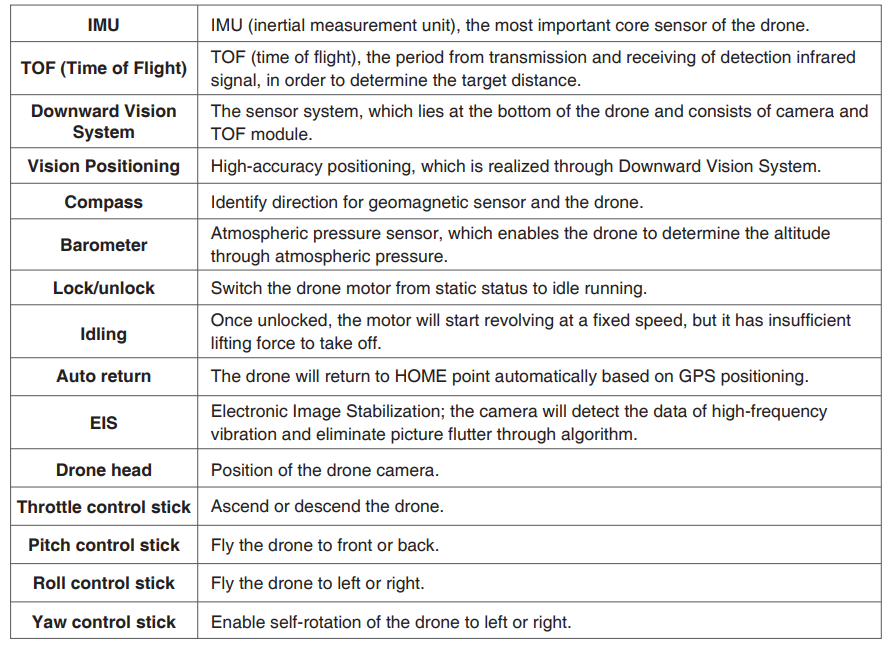
Overview
This chapter introduces the functional characteristics of Atom SE, as well as the component names of the drone and the remote controller.
Pre-Flight Checklist:
- Pay attention to the local weather forecast and make sure it is suitable for flying the drone.
- Make sure the battery is fully charged.
- Make sure the firmware is updated to the latest version.
- Make sure the flight environment is open and free of interference.
- Before takeoff, make sure the battery is secured, the buckle pops out correctly, and no deformed propellers or loose screws.
- Power on the drone on open and level ground, wait for the drone to enter GPS Mode before takeoff, and pay attention to the HOME point.
Drone Diagram
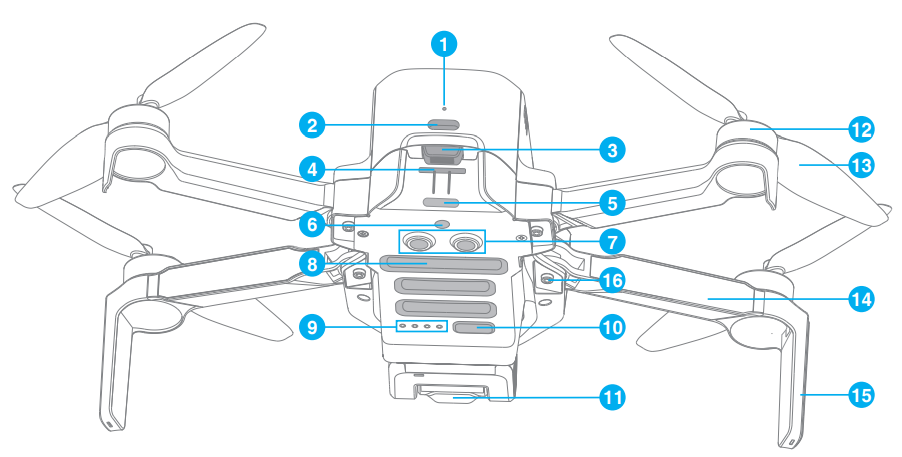
- Charging indicator
- TYPE-C charging port
- Battery buckle
- SD card slot
- Tail indicator
- Monocular visual module
- TOF module
- Bottom cooling hole
- Power indicator
- Power/frequency pairing button
- Integrated single-axis gimbal camera
- Brushless motor
- Propeller
- Arm
- Antenna tripod
- Arm shaft
Remote Controller Diagram
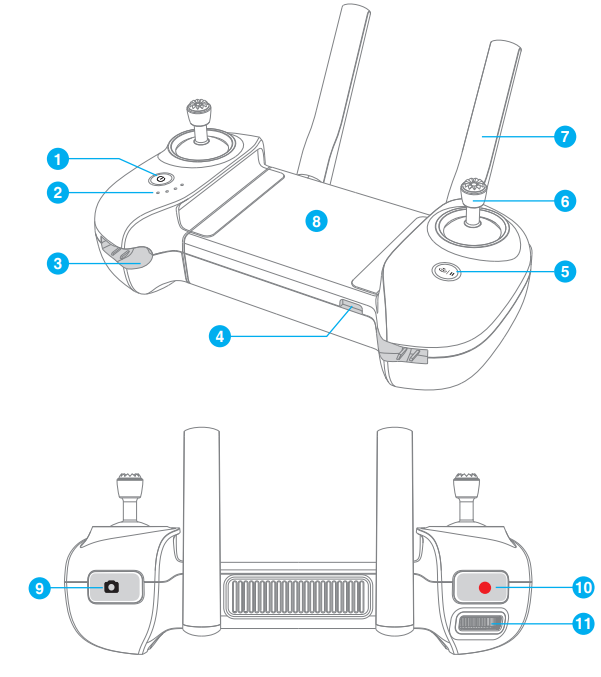
- Power button: Long-press it for 2s to power on/off.
- Power indicator: Indicate the power level or other status of the remote controller
- Control stick slot: One slot each at the left and right sides, which are used to store the sticks
- TYPE-C interface: To charge the remote controller/connectthe mobile device
- RTH / Pause button: Long-press for 1s to return to the HOME point automatically.
- Control stick
- Foldable double antennas
- Installation position of the mobile device: To place a mobile device.
- Shoot button: Press it short to shoot one picture
- Record button: Short-press it to start/stop recording
- Thumbwheel: Dial the thumbwheel horizontally to control the tilt of the gimbal.
Preparing the Drone
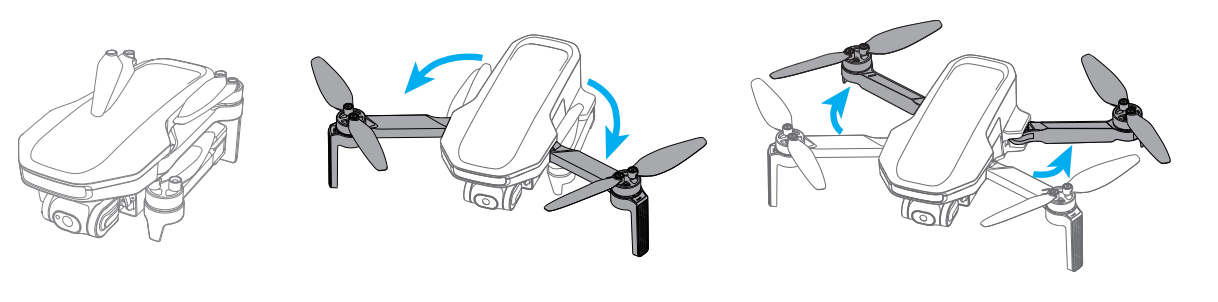
The product is delivered under a folded status. Please unfold it as follows:
- Unfold the front arm before the rear arm.
- Unfold the propeller blades.
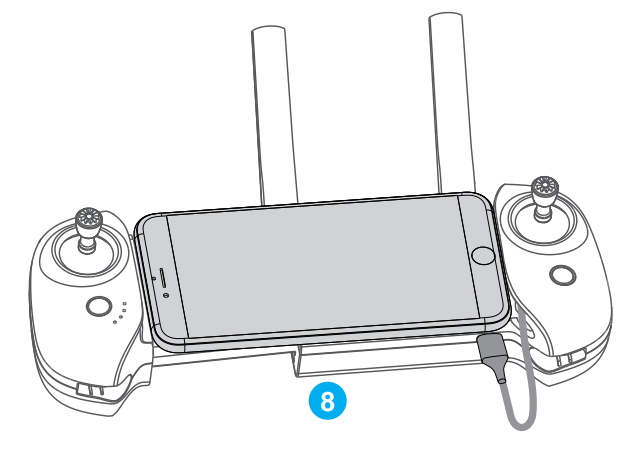
Preparation of the Remote Controller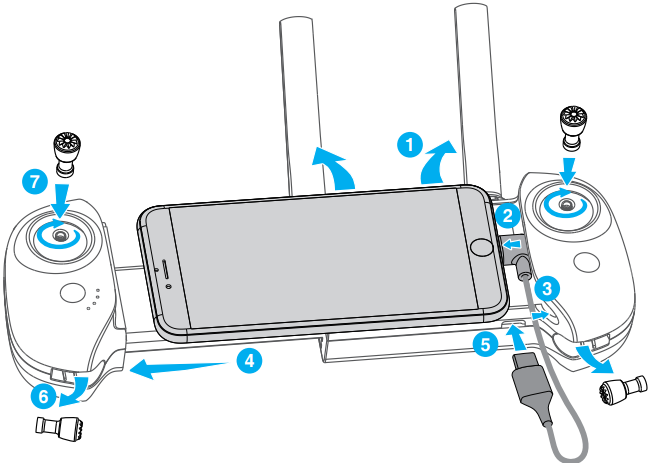
Installation of the mobile phone and the control stick
- Unfold the antenna.
- Connect your mobile phone to the USB cable.
- Insert the part of your mobile phone with the USB cable into the slot of the remote controller.
- Pull and open the remote control with both hands and fix your mobile phone stably.
- Connect the other end of the USB cable to the remote controller.
- Take out the sticks.
- Screw in both control sticks clockwise.
- Installation completed.
Charging / Startup and Shutdown
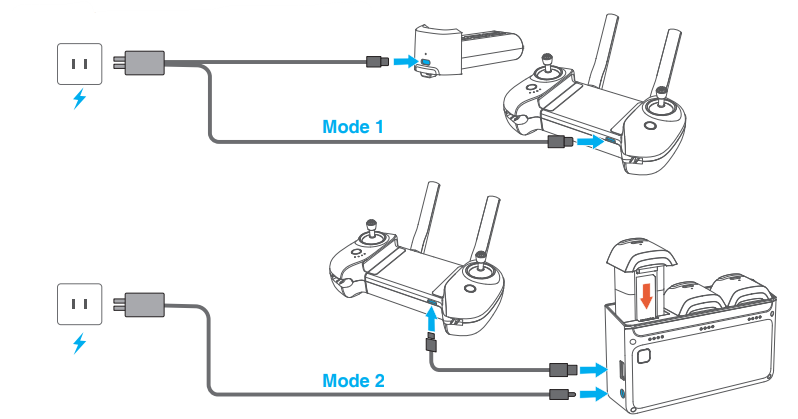
When receiving a new drone battery, it is required to charge it to wake it use the drone won’t start. Connect the TYPE-C charging port of the battery and a USB charger to the AC power supply to finish a one-time charging (USB charger is not included in the package). The user can use the charger that conforms to FCC/specifications to charge the battery. The red indicator will stay on during charging and turn off automatically after charging is done. Users can charge the battery with the Parallel Charging HUB if a fly expansion kit is purchased. For more details, please refer to the User’s Manual of Parallel Charging HUB. The Parallel Charging HUB can also charge the remote controller.
Startup
Drone: Make sure the battery is inserted in the battery bin. Short-press and then long-press the power button until all indicators are on, and then release the button to start up. Remote controller: Long-press the “Power” button until all indicators are on, and then release the button to finish startup. Shutdown Drone: Short-press and long-press the power button of the drone until all indicators are off, and then release the button to shut down. Remote control: Long-press the power button until all indicators are off, and then release the button to shut down.
Drone
The product consists of a flight control system, a communication system, a positioning system, a power system,m and a smart flight battery. This chapter sets down the functions of all parts of the drone.
Positioning
Atom SE adopts Potensic’s new SurgeFly™ flight control technology, which supports the following two positioning modes: GPS positionProvidessovide precise positioning and navigation supportsdrone; supports precise hovering, smart flight, and auto return. Vision positioning: It can realize high-precision positioning at a low altitude based on the Downward Vision System. The visual positioning can be realized without a GPS signal, so that the product can be used indoors.
How to switch: The flight control system will switch automatically according to the environment of the drone. If both the GPS and lower visual system fail, the flight control will be switched to attitude mode, under which the drone fails to realize stable hover,, ing and the user needs to correct the flight gesture manually through the control stick. The difficulty of drone handling will be increased greatly in the attitude mode; make sure to master the behaviors and operation of the drone in this mode before using this mode; avoid flying the drone at a long distance, to avoid risks due to the failed judgment of drone gestures.
Downward Vision System
The Atom SE is equipped with a downward vision system, which is located beneath the drone. The Downward Vision System consists of a monocular camera and a TOF module. The TOF module includes a transmitter tube and a receiver tube; it can precisely calculate the fly height above the ground by calculating the transmission and reception times. In com of the infrared signalsbination with the monocular camera, the system can help achieve high-precision positioning at low altitudes.
Detection Fileds
The Downward Vision System works best when the drone is at an altitude of 0.3 to 5 m, and its operating range is 0.3 to 10 m. When GPS is unavailable, the Downward Vision System is enabled if the surface has a discernible surface and sufficient light. The Downward Vision System works best when the drone is at an altitude of 0.3 to 5 m. If the drone’s altitude is above 5 m, the Vision System may be affected, so extra caution is required.
How to Use
The Downward Vision Systeisas enabled automatically if the positioning conditions are satisfied. The drone tail indicator blinks cyan twice, which indicates the Downward Vision System is working. Speed limit: To ensure positioning accuracy and flight safety during visual positioning flight, the drone will actively limit its flight speed.
The Vision System cannot work properly in any of the following situations
- Pure-color surface.
- Surfaces with strong reflection, such as smooth metal surfaces.
- Transparent object surface, such as water surface and glass.
- The moving texture, such as running pets and moving vehicles.
- Scenarios with a drastic change of light.
- For example, the drone flies to outan door space with strong light from an indoor space.
- Places with weak or strong light.
- Ithas aace with highly repetitive texture, such as floor tile with the same texture anda small size,
and a highly consistent strip pattern. For the sake of safety, please check the camera and TOF transceiver tube before the flight, and clean it with a soft cloth if there is any dirt, dust, or water on it; Contact Potensic Support if there is any damage to the Vision System.
Drone Status Indicator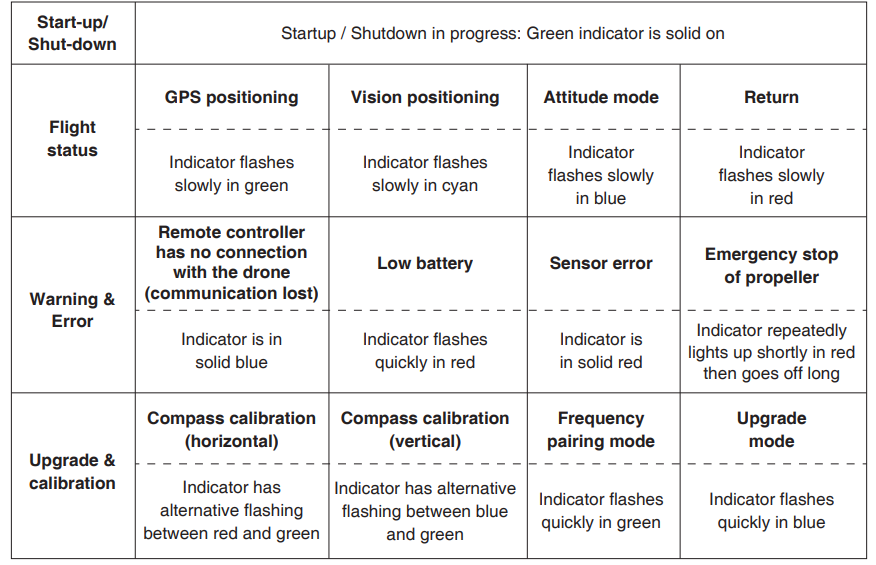
Smart Battery Function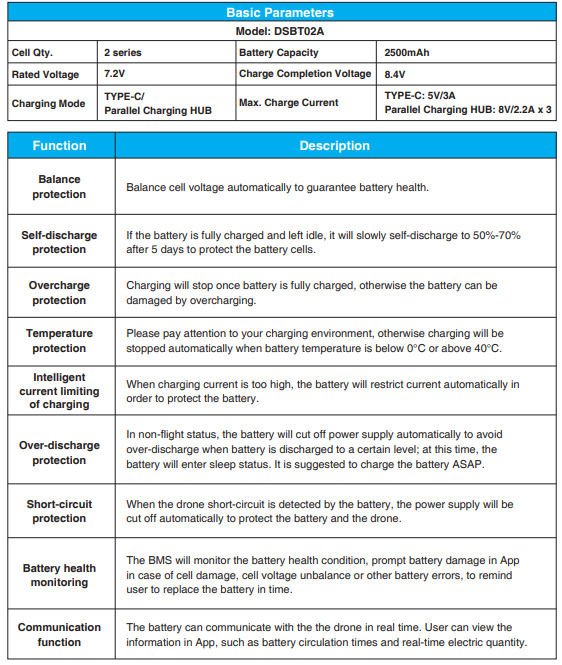 Battery Installation & Removal
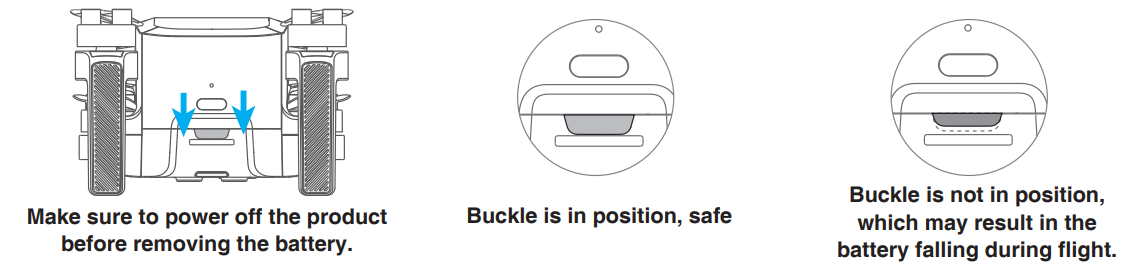
Push the battery into the product’s battery bin horizontally as shown in the picture below. The battery buckle is bounced and locked when hearing a “click” sound.
Firstly, press the buckle of the smart battery, and hold the upper cover of the battery to pull out the battery
 View Power Level
Once the battery is inserted in the drone, short prshort-presser button to view the power level of the smart battery, as shown in the picture below: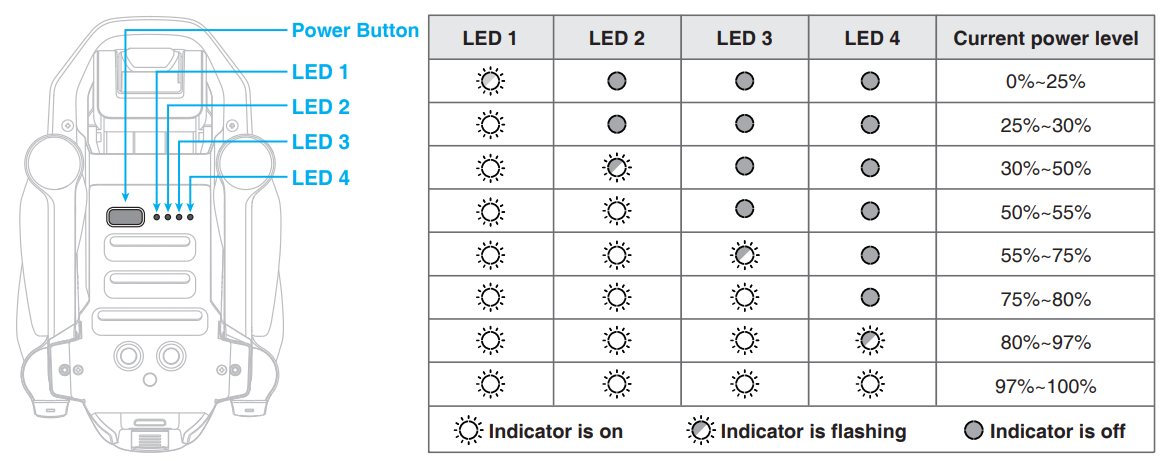
Operation Instructions
Smart Battery at High / Low Temperature
When the battery temperature is <5°C, the App will prompt a low temperature warning of the battery, and the battery needs to be preheated before flying. When the battery temperature is >60°C, the App will prompt a high temperature of the battery, and the drone will not be able to fly.
Propellers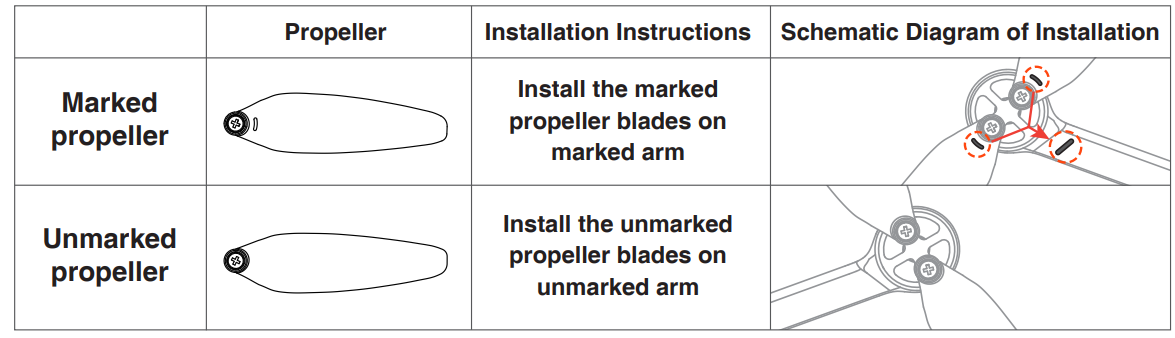
There are two types of Atom SE propellers, which are designed to spin in different directions. Marks are used to indicate which propellers should be attached to which motors;ors, the two blades attached to one motor are the same.
Flight Data
Atom SE supports the recording of flight data. The user can view the data in the app. “Flight record” can display the basic data for each flight of the user. “Flight log” can record the detailed flight data of the user. For any abnormal circumstance in flight, the user can report it in the app and, if necessary, upload the flight log to seek assistance.
Single Axis Gimbal Camera
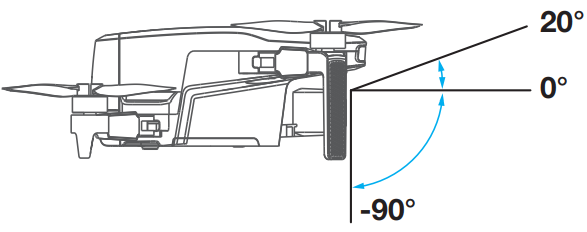
The Atom SE camera is mounted with a single-axis gimbal to adjust pitch angle freely from +20° to -90° (horizontal direction is 0°). The angle of the gimbal can be adjusted by scrolling the left thumbwheel of the remote controller.
Camera
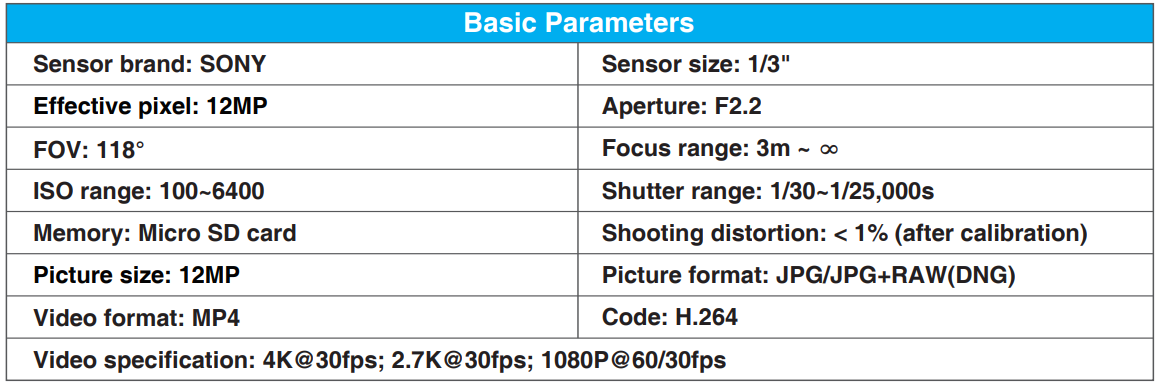
Image Storage
The videos and pictures recorded by Atom SE will be stored inthe SD card, instead of the App or the user’s album. Make sure to insert the SD card before the flight. Otherwise, it is unable to record and shoot. (SD card is not included in the product’s pack list!) The user can preview and download the videos and pictures (the drone and the remote controller should be connected).
SD Card Requirements
File format: FAT32, e4 GB- 256 GBpacity: 4G-256G Speed requirements: It is suggested to use an SD card above U1 (UHS Speed Class 1) or C10 (Class 10)
Remote Controller
Overview
Potensic Atom SE is equipped with the DSRC02A Remote controller, which boasPotensic’ssic long-range PixSync 2.0™ image transmission technology, offering a maximum transmission range of 4km/13,123ft and 720p when displaying video from the drone to PotensicPro on your mobile device. Easily control the drone and camera using the onboard buttons.
The detachable control sticks make the remote controller easier to store. Thanks to the 2.4Ghz dual band antenna, in a wide-open area with no electromagnetic interference, PixSync 2.0™ smoothly transmits video feed at up to 720p at a max altitude of 120m. The built-in battery has a capacity of 3000mAh and a maximum run time of 2.3 hours. TheUSB-C a USB-C port for device connection. The remote controller charges the mobile device with a charging ability of 500mA@5V.
When used with different drone hardware configurations, the remote controller will automatically select the corresponding firmware version for updating and support the following transmission technologies enabled by the hardware performance of the connected drone models:
- Atom SE: PixSync 2.0™
- Atom: PixSync 3.0™
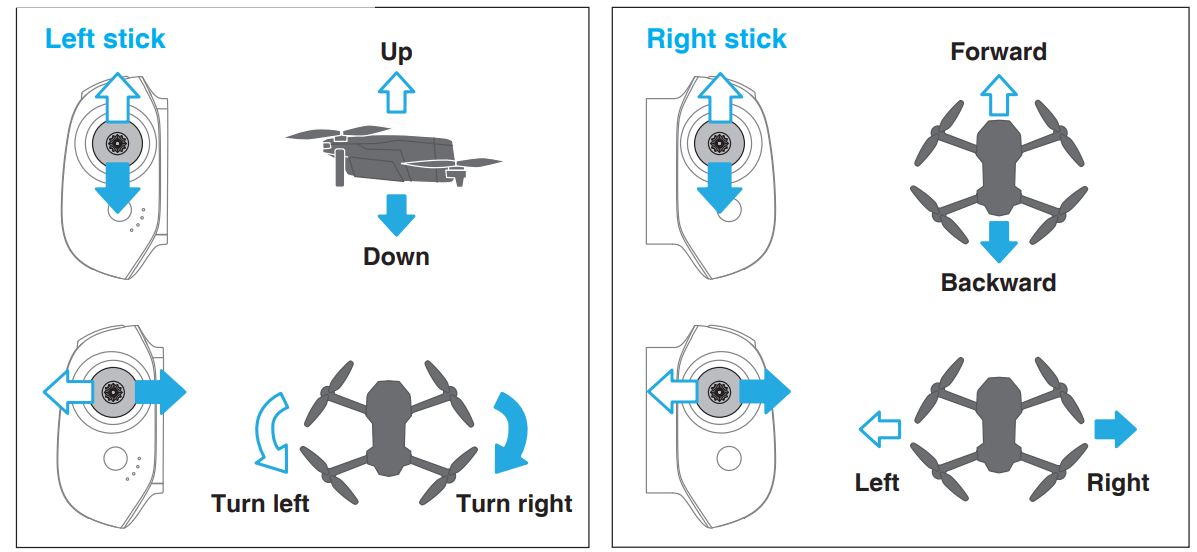
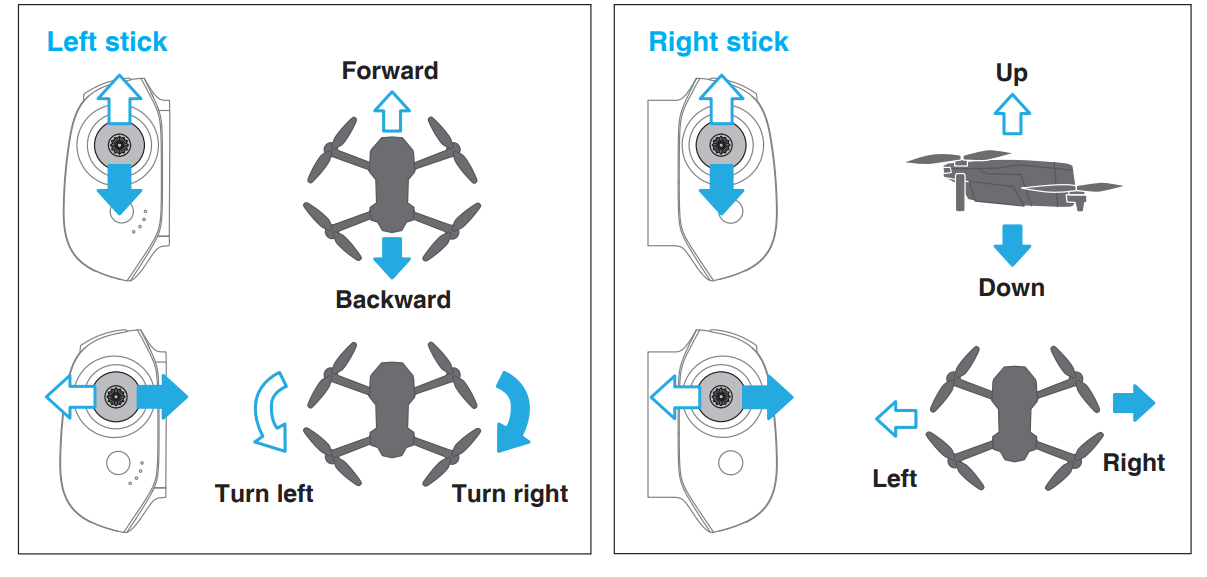
Control Stick Mode
Left Hand ThrottleRight Hand ThrottleFunction
Indicator

As shown in the picture below, the remote controller is fitted with 4 white LED indicators to indicate the power level and other status.
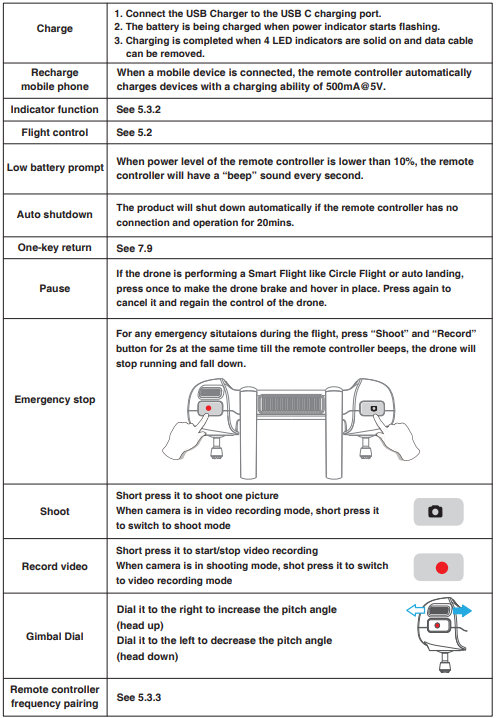
Charging indication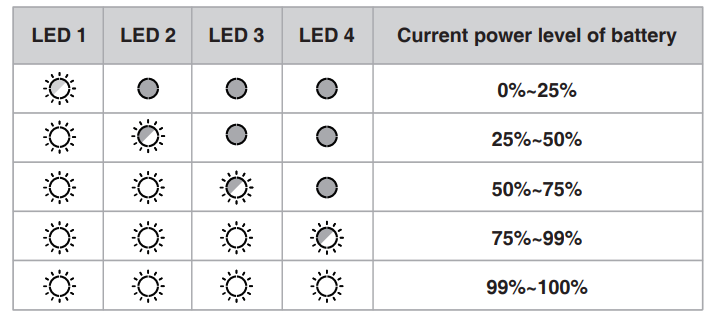
Power indication (in use)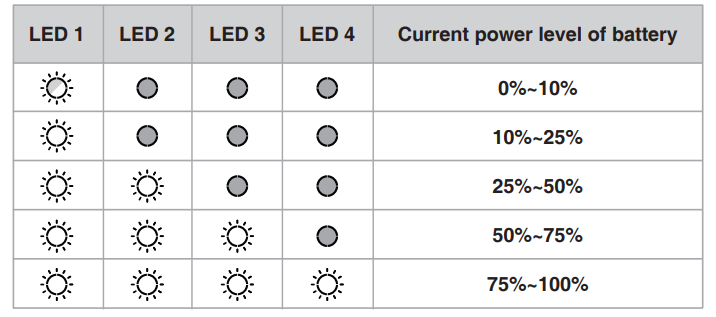
Status Indication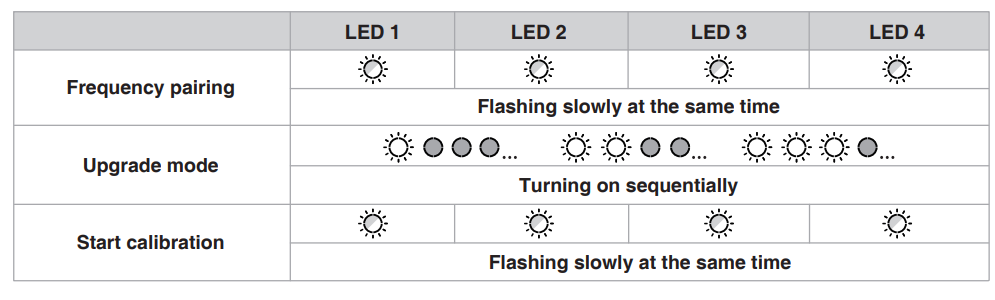 Remote Controller Function
The Atom SE drone and the remote controller can be used immediately after startup since they have passed frequency pairing before delivery. If a new remote controller or drone is used for the first time, the user must conduct frequency pairing for them as follbeforer to use:
- Power on the remote controller and connect it with the mobile phone, launch the Potensic Pro App, tap Settings,, and select “Re-pair the drone” to enter the frequency pairing interface.
- After powering on the dronelong-pressss the“Power ”button until the drone indicator flashes quickly in green; now the drone is ready for frequency pairing.
- Wait for about 7s, the remote controller beeps once to indicate frequency pairing is successful,ful and the flight interface of the App will start video transmission.
Antenna Angle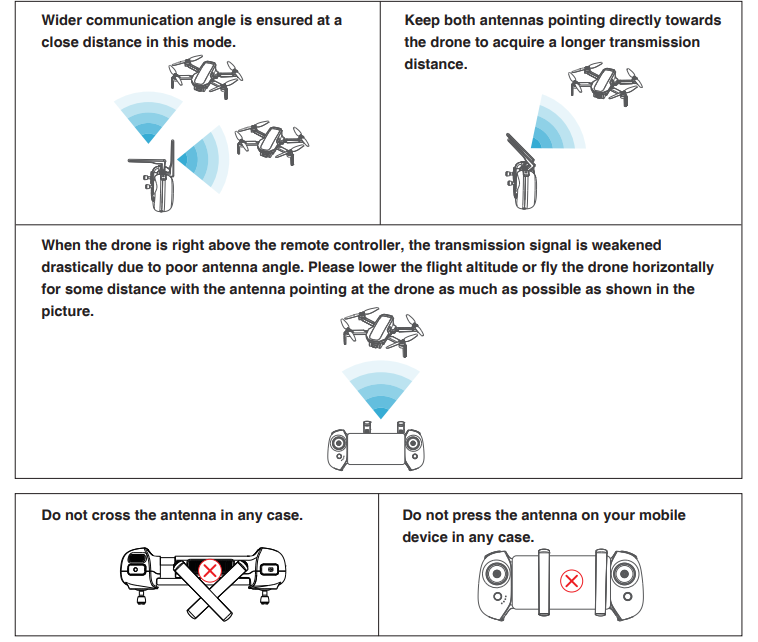
Adjust the antenna angle along with the changes of drone height and distance, to ensure the best communication status of the remote controller.
Remote Controller Calibration
When to perform remote controller calibration
- When the drone drifts automatically in one direction without any toggling of the control sticks.
- When the drone automatically and continuously rotates in one direction.
- When the control sticks are oversensitive or lack sensitivity.
Calibration Procedure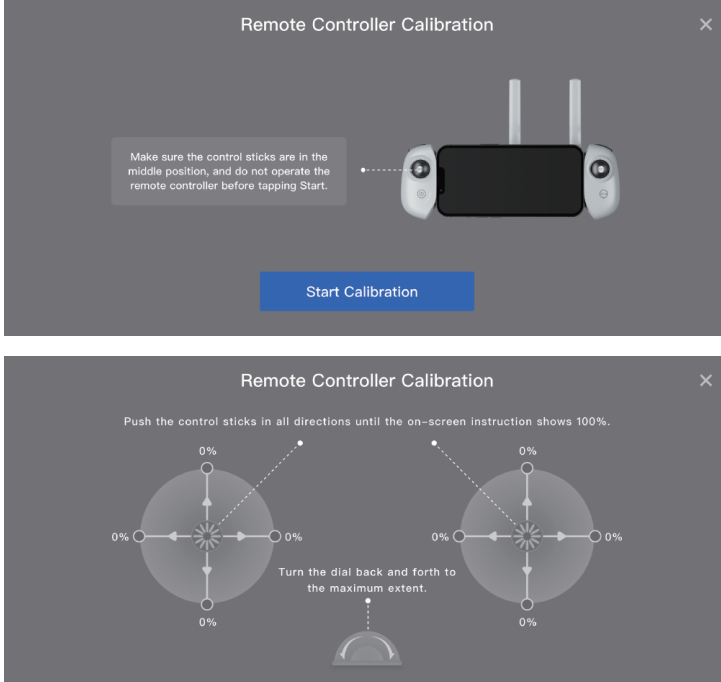
- Turn on the remote controllerd connect the mobile device, tap Settings in the App, and select“Remote Controller Calibration.” Make sure the control sticks are in the middle position and do not operate them before tapping to start the calibration.
- Tap “Start Calibration”, then follow the on-screen instructions and toggle the sticks in all directions until 100% is displayed. Then, apply the pressure and toggle the thumbwheel back and forth.
- When the app prompts “Calibration Succeeded”, the remote controller calibration is completed
Potensic Pro App
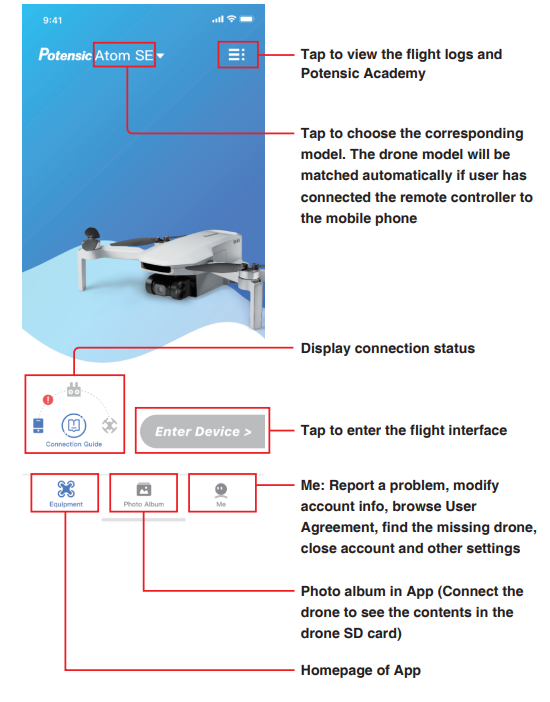
App Homepage Flight Interface
- Navigation prompt bar: Tap to return to the homepage. Display drone status and flight mode
- Flight mode: Video Normal Sport
- Positioning mode: GPS positioning, Vision positioning, Attitude mode, no positioning
- Power level of the smart battery: Estimated Remaining Flight Time
- Power level of the smart battery
- Shooting Information Display/Settings
- Shooting Information Display/Settings: D to switch from shooting to video recording, and to switch from video recording to shooting.
- Shoot/Record button: Video recording mode, tap to start video recording.
- Video recording in progress, tap to cancel Shooting mode, tap to shoot a picture
- Album: ( Preview or download shortcuts or pictures to the SD card.
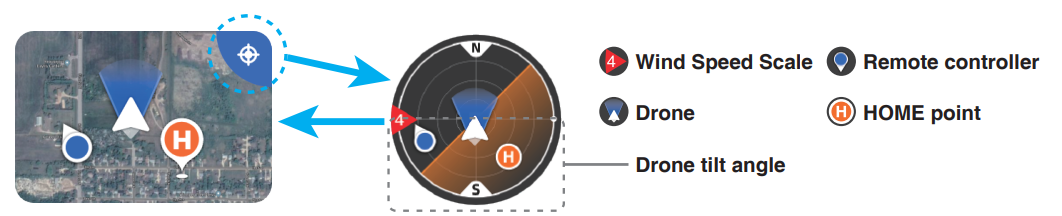
- Attitude Indicator/Thumbnail map Tap the upper right corner to switch to Attitude Indicator Mode Tap thumbnail map to switch to full-screen map
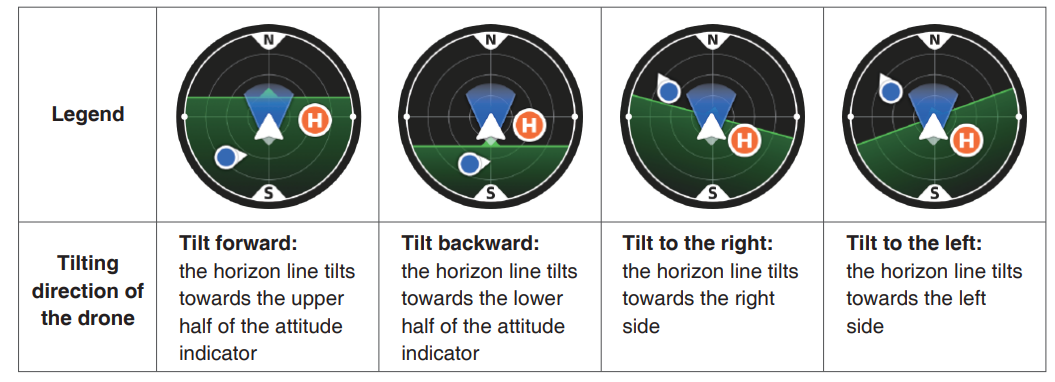
- The attitude indicator displays information on drone direction, tilt angle, remote controller direction, HOME point, and more. The attitude indicator can show the angle and direction of the drone in real time as follows:

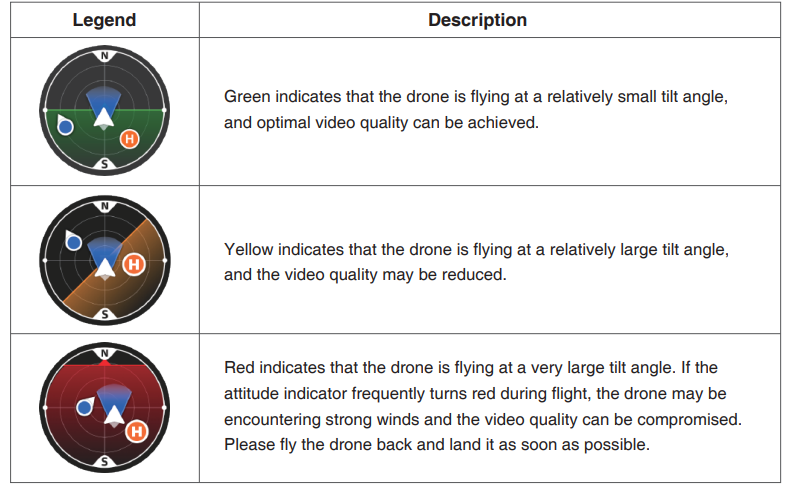
Different Colours of the Attitude Indicator
Intelligent Flight Modes
- Intelligent Flight Modes include Circle Flight, Waypoint Flight,t and Follow-Me Flight.
- One-key takeoff, landing/retrieval.rn The App will display different buttons based on drone status.
- Tap to initiate one-key takeoff, landing, or return.
- Tap to unlock, take off, nd hover at a height of 1.2m. Tap to land or auto return.
- Display important information or the status of the drone.

Flight
This chapter introduces safe flight practices and requirements.
Requirements of Flight Environment
- Do not use the product in severe weather, such as snow, wind,w and fog. Only fly in open areas. Tall structures and large metal structures may affect the accuracy of the onboard compass and GPS and result in positioning failure.
- It is recommended to keep the drone at least 5m away from structures. Control the product within your sight and keep away from the obstacles and crowds.
- Do not use the product in places with high-voltage power lines, telecommunication base station or ltowerssing tower, to avoid interfwithwithce of the remote controller.
- Please use the product with caution when the altitude is over 3,0,00m, as that performance can be affected when the performance of the drone battery and power system is weakened due to environenvironmental factorsutions of Flight.
- Check if the remote controller, intelligent flight battery, and mobile device are fully recharged. Check if the drone is intact andthe propellers are installed correctly. Check if the camera is working normally after powering on. the appck if App is running normally. Check if the SD card is inserted and make sure the camera is clean.
- Make sure the drone takes off on a flat and hard surface, instead of sandstone or bush; the drone may fail to unlock if it has major vibration. Please be careful when the object takes off on the surface of moving objects, such as runnivehicles shipsships.
- GPS positioning and waypoint flight will be disabled in the south and north polar regions. Do not use the product in extreme cold or hot places to avoid hazards.
Connection
Please follow the steps below:
- Please finish the steps in “3.5 Preparing the Remote Controller” and turn on the remote control.
- Please finish the steps in “3.4 Preparing the drone” and turn on the remote control.
- Launchthe appp to view the connection status. Connection is finished when it shows (A)
- Tap Enter Device to enter the flight interface. O- It is advised to tap ® and follow the animated guide to operate for first-time users.
Flight Mode
Atom SE has three flight modes-Video/Normal/Sport, which can be switched via the App.
Video Mode
Ascent speed: 2m/s, descent speed: 1.5m/s, flight speed: 6m/s.. The system will enter beginner mode by default when using the drone for the first time, and the flight mode will be limitto at beginner mode.
Normal Mode
Ascent speed: 4m/s, descent speed: 3m/s, flight speed: 10m/s The beginner mode can be quit after the flight operation is mastered, and the normal mode will be entered by default. This is the common mode.
Sport Mode
Ascent speed: 5m/s, descent speed: 4m/s, flight speed: 16m/s Video mode is recommended in aerial photography. Sport mode is recommended if you would like to get a speedy flight experience. Please pay more attention to Sport Mode flights as the responsiveness of the drones significantly increases in Sport modes.
Compass Calibration
Scenarios Requiring Compass Calibration
- Compass calibration is required for the first time using it.
- Flying at a location further than 31 miles (50 km) away from the location where the drone was last flown.
Calibration Procedure
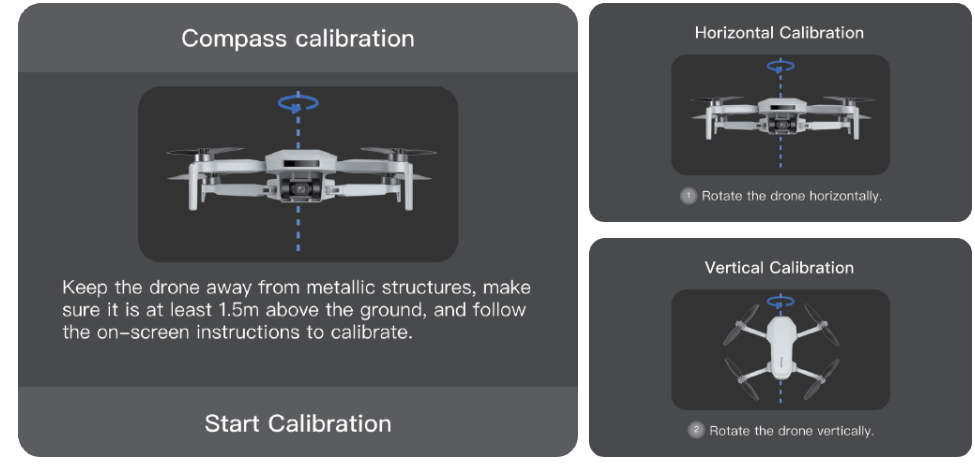
Choose an open area to carry out the following procedure.
- When calibration is required, the App will pop up the calibration interface automatically, just tap “Start calibration”, and the tail indicator will alternatively flash in red and green.
- Hold the drone horizontally and rotate it 360° till the app shows vertical calibration, and the tail indicator will alternatively flash blue and green.
- Hold the drone vertically and rotate it 360° around a vertical axis till tthatApp prompts the calibratis completeeted. You can also trigger compass calibration manually in the App: Settings-Calibration-Compass Calibration
Beginner Mode
The drone is automatically set to Beginner Mode for first-time use. In beginner mode:
- The flight distance and height will be restrictedtot 0~30m
- The speed level will be restricted in Video mode
- The beginners are suggested to learn and master the drone in beginner mode
Manual Takeoff/Landing
Takeoff
Step 1: Start the motors. Use a combination stick command to start the motors. Push both sticks to the bottom inner or outer corn, er depending on your control stick mode, to start the motors. Release both sticks simultaneously once the motors are spinning.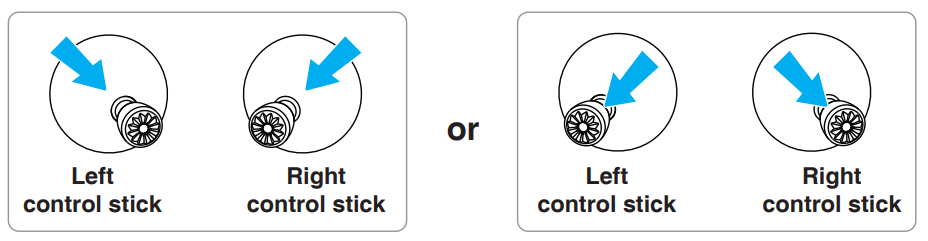
Step 2: Push the throttle control stick to take .off Push the throttle control stick upwards gently as shown in the picture, release the control stick when he droneleaves ground, and it, will keep hovering.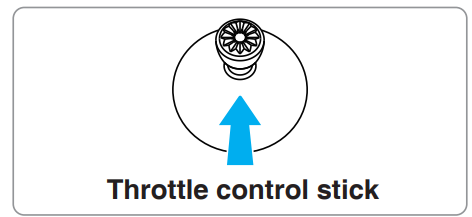
Landing
Pull the throttle control stick until the drone lands on the ground. Release the throttle control stick when the motors are no longer spinning.
One-key Takeoff / Landing
Tap the one-key take the app button in App, then swipe right in the pop-up window to start the drone automatically,lly then ascenda the height of 1.2m and maintain hovering.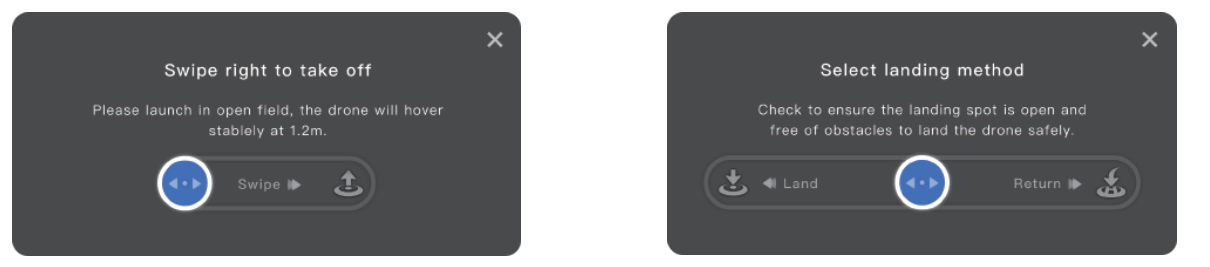
Tap the one-key landing button in the app, then swipe left in the pop-up window to land the drone, or swipe right to start r.eturning
Smart Flight
Circle Flight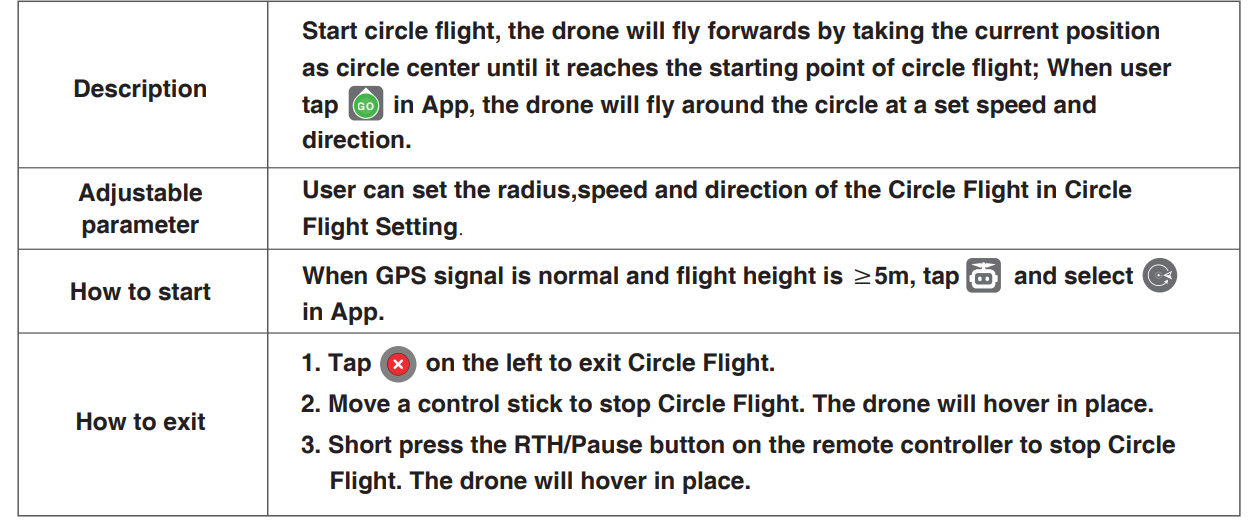 Follow Me Flight
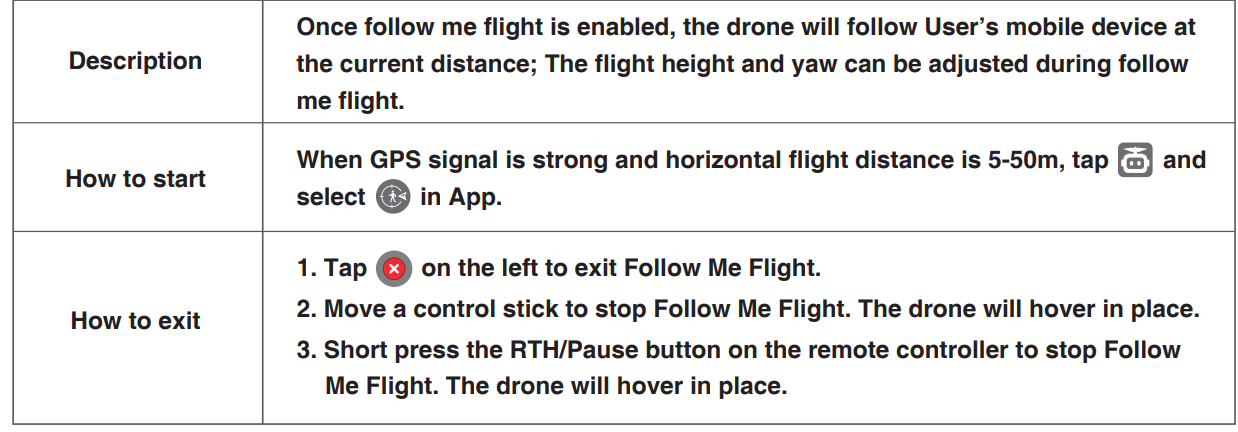
Waypoint Flight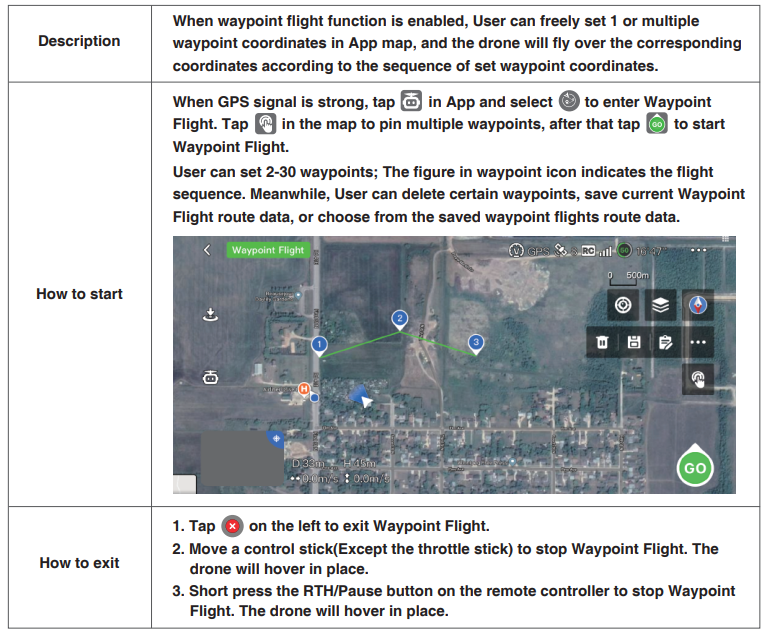 Return (RTH)
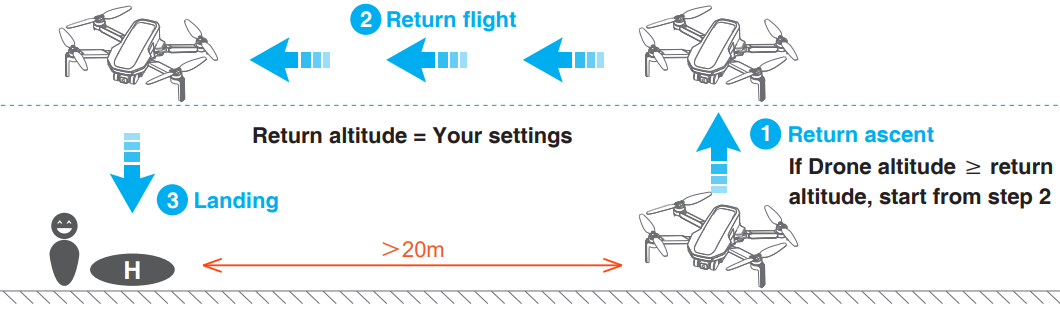
The return consists of three steps, as follows:
- Ascent: The drone ascends to the set return altitude (this step is skipped if the drone’s altitude is already higher than the return altitude).
- Level flight: The drone maintains a straight flight at the set altitude towards the home point.
- Landing: Once it reaches the home point, the drone will automatically land and stop its propellers. Return to Home (RTH) The drone must be in GPS mode
How to RTH
One key RTH: Press and hold the RTH button & on the remote controller for 1s or tap in the App to pop up the menu, then swipe right to start the return (see 7.7.2).
How to exit the RTH
Method 1: Tap © on the left of the App to exit RTH. Method 2: Briefly press the return button on the remote controller to exit RTH.
RTH Requirements
The drone must take off in GPS mode and successfully record the HOME point. If the drone takes off in OPTI mode and switches to GPS mode mid-flight, it will not be able to return to the takeoff point. Please pay attention to the location of the HOME point on the map and the prompts in the Potensic Pro App.
Specifications
- Model: DSDR04B
- Takeoff Weight: < 249g (the takeoff weight includes battery and propeller blades)
- Folded Size: 88x143x58mm
- Unfolded Size (propeller blades included): 300x242x58mm
- Unfolded Size (propeller blades excluded): 210x152x58mm Diagonal Distance: 219mm
- Max Speed (Sport Mode): Ascent speed: 5m/s; Descent speed: 4m/s; Flight speed: 16m/s
- Max Wind Speed Resistance: 38km/h (Level 5)
- Operating Temperature: 0°C~40°C
- GNSS: GPS+GLONASS+Galileo+BeiDou
- Operating Frequency: 2.400~2.4835GHz
- Transmission Power: 2.4GHz: < 24dBm
- Hovering Accuracy Range:
- Vertical: +0.1m (with Vision Positioning), +0.5m (with GPS Positioning)
- Horizontal Flight: +0.3m (with Vision Positioning), 1.5m (with GPS Positioning)
- Extra Payload: Not supported.d Max hovering time: 28 mins (indoor hovering)
Downward Vision System
Hovering range: 0.3~5m(ideal environment); Available at 0.3~10m. Unavailable scenarios of vision positioning:
- Pure-color surface
- Surface with strong reflection, such as a smooth metal surface
- Transparent object surface, such as water surface and glass surfaces
- Moving texture, such as running pets
- Scenarios with drastic change of light; for example, the drone flies toan outdoor space with strong light from an indoor space
- The places with weak or strong light
- The surface with repeating identical patterns or textures, such as floor tile with the same texture and size
- The surface with the highly consistent strip pattern
Drone FCC ID: 2AYUO-DSDR04B
Remote controller FCC ID: 2AYUO-DSRC02A Changes or modifications not expressly approved by the party responsible for compliance could void the user’s authority to operate the equipment. This device complies with Part 15 of the FCC Rules. Operation is subject to the following two conditions:
- This device may not cause harmful interference, and
- This device must accept any interference received, including interference that may cause undesireoperationon.
Disclaimer
Drones are products that are potentially dangerous and relatively complex to operate. Please be sure to read the full User Manual to ensure that you understand the basic knowledge of the drone and are familiar with the basic functions before using the product. Please follow the Manual’s operation instructions and precautions strictly, in order to use the product safely and correctly. Users aged under 16 must be accompanied by an adult while using the product.
Please keep the product out of children’s reach. For any direct or indirect loss (including but not limited to property loss and personal injury) due to the user’s failure to follow the Manual’s safety operation, the Company does not bear any liability or offer warranty services. Do not dismantle any part except for propeller blades, or refit the product and attach other items to it; otherwise, the user should undertake the consequences arising therefrom. For any issues with use, handling, a,noraintenance, pleasedoo not hesitateo contact our local dealer or the Company. Potensic reserves the right to interpret this document and related product documents, and reserves the right to change them without notice.
Customer Service
- Ph: +1 833 549 7772
- Website: https://www.potensic.com