
POWERTEC MB3914 8AMP Battery Charger

Safety Instructions
- Before using the battery charger, ensure the instructions have been read and understood.
- The battery charger is not intended for use by young children. Please keep away from pets.
- Always wear the appropriate Personal Protective Equipment (PPE) when working near batteries.
- This includes gloves and eye protection.
- Always ensure that there is no damage to the power source 230V power outlet).
- This includes cracks or exposed wires.
- When working with automotive batteries, remove all jewellery, including watches and rings.
- Never charge a battery in a closed-off space or in an area without ventilation.
- This battery charger is designed for indoor use only and is not water-resistant or waterproof.
- Do not expose the battery charger to water or liquids.
- Do not attempt to use the battery charger if the cables or plugs are damaged.
- This unit does not contain serviceable parts.
- To avoid a hazard, ensure that any damage to the unit, cable, or plug is replaced by the manufacturer or a service agent/ qualified technician.
Box Content
 1x Battery Charger
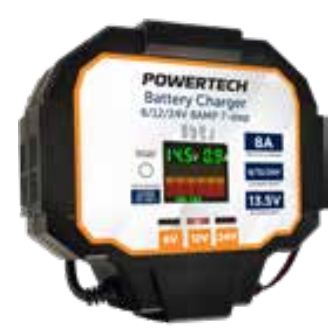
Product Diagram
Before First Use
Prior to using your product, please read all the safety and operating instructions thoroughly. Please ensure you follow the steps below before using the product. We recommend you keep the original packaging for storing the product when not in use.
Please pay close attention to the section entitled Important Warning and Safety Instructions. Find a safe and convenient place to keep this instruction manual for future reference. Unpack the product, but keep all packaging materials until you have made sure your new product is undamaged and in good working order. Ensure you have all accessories listed in this manual.
Features
- Button-less automatic battery voltage selection. This charger is suitable for 6-Volt, 12-Volt, and 24 Volt DC automotive batteries.
- When the charger is connected to a battery and switched on, the unit will take approximately 1 minute to test and initialise the correct voltage program.
- This occurs automatically with no user input required.
- Button-less automatic battery chemistry selection, suitable for GEL, LEAD ACID, AGM, and Maintenance Free, Calcium types of automotive batteries.
- To charge 12V lithium batteries, please hold the mode button for 3 seconds to switch to 12V Lithium charging. This will display on the LED screen.
- Lar, the easy-to-read LED display shows the charging stage status, volts, and amps output, and battery capacity. Inbuilt protection systems for safe operation.
- Zero-volt start-up, enabling recovery and charging of a completely deep-discharged battery. But any load must be removed from the rechargeable battery.
- 13.5V DC power supply for 8A, 12A and 16A output currents with overload and short circuit protection.
- Internal or external short circuit, reverse connection (Yellow LED), over temperature, overload, and overvoltage protection.
- For these products, the charger can be hung with a hook, and the power cable can be wound on the back.
Operating Instructions
Analysis / Desulphation (Charging stage 1 illuminated)
- A small voltage pulse is applied to the battery to ensure it can effectively and safely accept a charge.
- Desulphation uses pulse reconditioning to gently remove any sulphation build-up on the battery plates and prevents oxidation.
- Stabilises electrolyte consistency and minimises the battery temperature rise by charging, recovers battery capacity, and can help extend battery life.
Soft Start (Charging stage 2 illuminated)
- The soft start function improves the battery’s charging capability, reduces gas and heat build-up, and can improve electrolyte consistency, which can become uneven in the battery cells from day-to-day use.
- A steadily increasing current is applied over a set time so as not to initially overload the battery. This stage prepares the battery for the more intense charging stages to follow.
Analysis (Charging stage 5 illuminated)
- The charger shuts off power and measures the voltage drop over a set time. If unacceptable readings are measured, this may indicate an internal short or other issue inside the battery.
- If the battery has a fault, the charger will illuminate the Battery Error LED indicator(Red LED). The charger will cut output and not continue to charge until it is either switched off or the battery is removed.
Boost / Equalisation charge (Charging stage 6 illuminated)
- Once the battery is fully charged, the charger will equalise all the battery cells by providing a steady set voltage over a programmed period, at low current.
Temperature Compensation
This charger has a temperature compensation feature that will reduce the output current of the charger if the charger’s internal temperature exceeds its set limit.
There is no indicator to show temperature compensation. There are no buttons to decipher – the specially designed microprocessor charging system automatically selects the correct voltage and current setting and output levels for the size and type of the battery, greatly assisting prolonged battery life and user safety. Please adhere to all safety directions in this manual and retain n for later use.
Battery Charger
This charger has been designed to be as simple to use as possible. As a result, there is only one input button for Lithium charging mode. The charger has an advanced onboard microprocessor that will take care of every setting required.
Charging
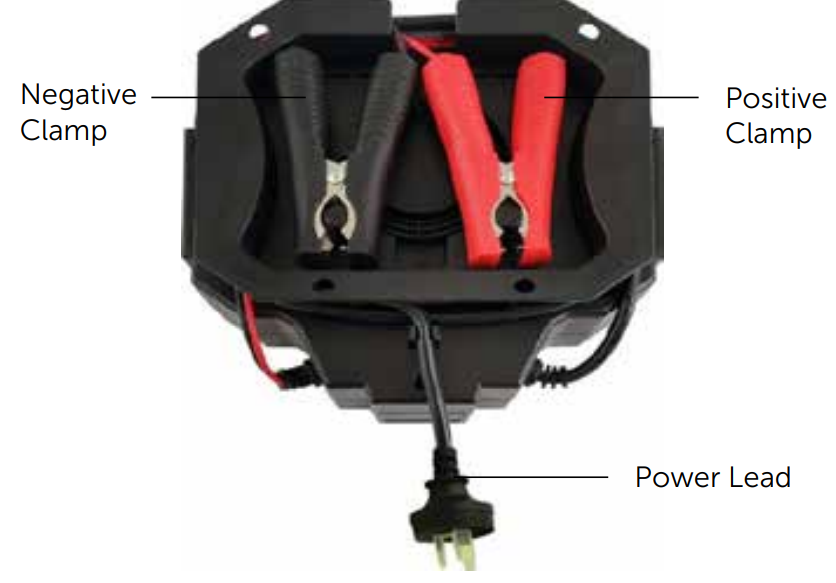
- Unwind both 230V and 12V power leads from the rear of the charger.
- Connect the Red POSITIVE (+) clamp to the battery Red POSITIVE (+) terminal
- Connect the Black NEGATIVE (-) clamp to the Black NEGATIVE (-) terminal
- Plug in the 230V mains power cord, and switch on the power.
- Once complete, the correct LED will illuminate for 6, 12, or 24V operation.
- Charging will now commence automatically.
To Disconnect
- Disconnect the Black NEGATIVE (-) clamp from the Black NEGATIVE (-) terminal.
- Disconnect the Red POSITIVE (+) clamp from the battery Red POSITIVE (+) terminal**
- Re-attach battery terminal protective covers if previously removed.
- Rewind both 230V and 12V power cables into the rear of the charger for storage.
Maintenance, Cleaning, Care & Storage
- Disconnect from any mains power before commencing any cleaning or maintenance.
- Never immerse the charger in water, as submerging the charger will damage it.
- Clean only with a dry, lint-free cloth. Should the charger become heavily soiled, clean with a lightly dampened cloth only and allow to completely dry before use.
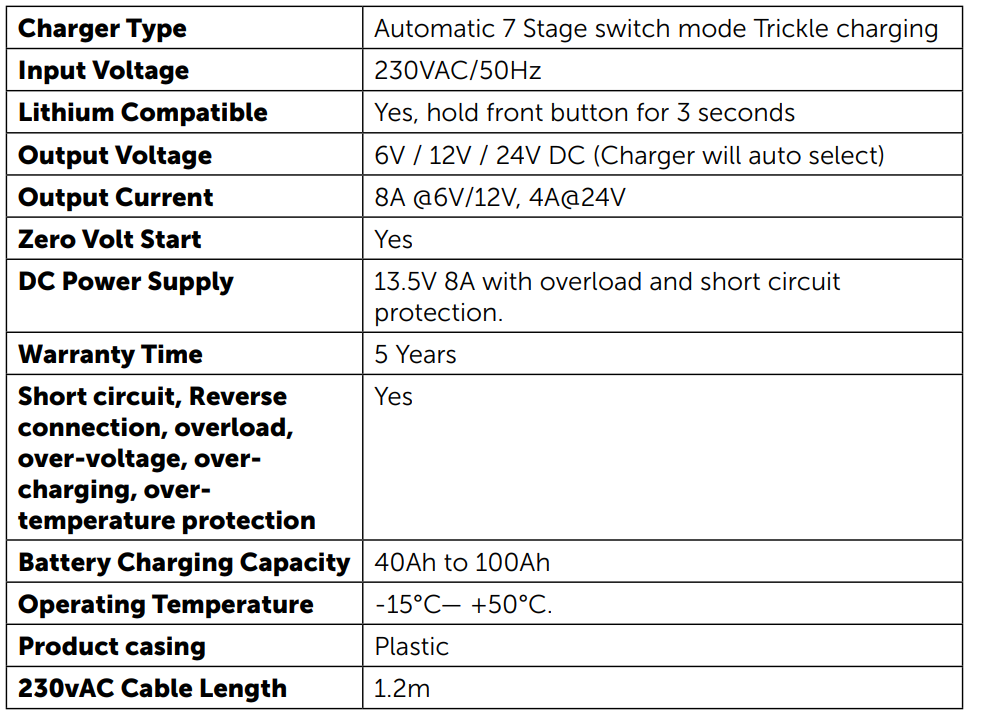
Specifications
Limited Warranty
If your product becomes defective during this period, Electus Distribution will repair, replace, or refund it if the product is faulty or not fit for the intended purpose. ]
This warranty POWERTEC MB3914 8AMP Battery Charger will not cover a modified product; misuse or abuse of the product contrary to user instructions or packaging label; change of mind; or normal wear and tear.
You will need to show a receipt or other proof of purchase. The benefits to the customer given by this warranty are in addition to other rights and remedies of the Australian Consumer Law in relation to the goods or services to which this warranty relates.
Customer Service
- Distributed by: Electus Distribution Pty Ltd 46 Eastern Creek Dr, Eastern Creek NSW 2766 Australia
- Ph: 1300 738 555
- Website: www.electusdistribution.com.au
FAQs
Q: What is the charging current of this charger?
With a maximum charging current of 8 amps, the charger is appropriate for deep-cycle or medium-capacity automobile batteries.
Q: Can I leave the charger connected overnight?
Yes, but only if the charger has a float or automated mode to avoid overcharging. To avoid damage, don’t leave batteries on a continuous manual charge.
Q: Does the charger have reverse polarity protection?
Indeed. Reverse polarity protection is a feature of the MB3914.
Q: How long will it take to fully charge a battery?
The battery’s capacity and level of charge determine how long it takes to charge. A 50Ah battery running at 8A, for instance, might take six to eight hours. Always keep an eye on the charging process.
Q: Can I use the charger in wet or outdoor conditions?
The battery’s capacity and level of charge determine how long it takes to charge. A 50Ah battery running at 8A, for instance, might take six to eight hours. Always keep an eye on the charging process.