
POWERTEC MS-6108 Mains Power Meter
PACKAGE CONTENTS
Thank you for purchasing this product. To ensure you get the most from your purchased device,
Please read the following instructions carefully
TECHNICAL SPECIFICATIONS
Input Voltage: Max. Load: Measurable Voltage: Measurable Current: Measurable Power: Measurable Power Cost: Measurable Frequency Range: Measurable Power Accuracy: Battery: Power Meter Power Consumption: Clock Display: Cable Length: Dimensions: Screen: Power Plug: Weight: 240VAC, 50Hz 10A, 2400W 200~276VAC 0.005~10A 0.1~2760W 0.00~9,999 45~65Hz ±1.5% 3.6V Ni-MH Rechargeable 0.3W max ± 1 minute per month 1.5m 80(H) x 70(W) x 21 (D)mm 117(H) x 60(W) x 48(0) (Excluding mains plugs) 227g
START
First, remove the product from the packaging, and discard the packaging material. Then plug the energy cost meter into a properly installed earthed socket. The device should now be ready for operation. Detailed information regarding the operation and setting options can be found in the following sections in this manual.
DISPLAYS & CONTROLS

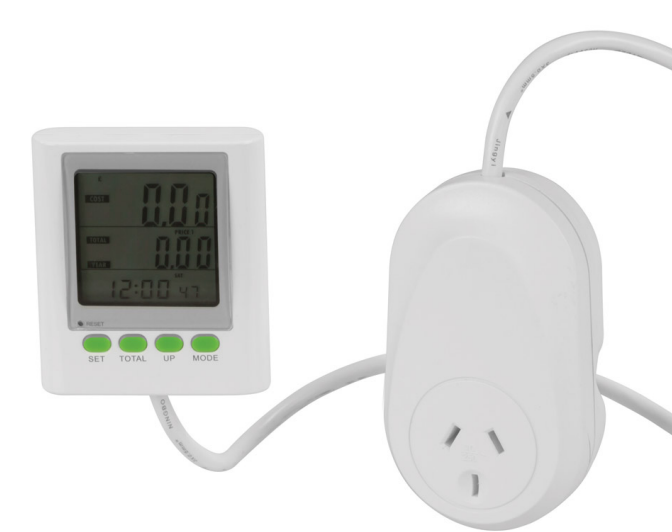
DISPLAY
Consumption Indicator: The display shows information on consumption, the total cost since the
start of measurement, to the mains voltage, to the current consumption of the load, and to the C02 values of the current day.
Cost Display: This represents the approximate weekly, monthly, or yearly Costs and C02 values, these are configured.
Time Display: The Display shows the current time.
KEY FUNCTIONS Mode: With this button, you can switch between the different modes. Up: During normal operation, this key allows you to switch between the 12 and 24-hour displays. In the settings menu, you may increase the time value by pressing this button. To increase the value faster, hold the button a little longer. Total: Display consumption costs between week, month, hour, and year. In the settings menu, the value can be lowered with this key. Press and hold the button a little longer to speed it up. Set: A short press to enter the date settings. You confirm the inputs by briefly pressing the SET button. A long press to get into the tariff and CO2 settings. You confirm the entries by briefly pressing the SET button. RESET: Press and hold the RESET button with a pointed object to clear all settings and restart the device. Date /Time Settings: Note: We recommend the device for about 2-3 hours before startup into a properly plugged power outlet to the internal Charge the battery. Briefly press the “SET” button to enter the setting mode. If the value to be set starts to flash. To adjust the respective value, press the “UP” key or the “TOTAL’.’ key until the desired value is shown in the display. By a short press on the “SET” key, confirm your entry and move on to the next position. The adjustment order is as follows: Year-> Format of the date (month/ day or day/ month) > Month > Day > Hour > Minute. Note: If no action is taken within 30 seconds, he device automatically switches off the setting mode. Cost settings: You have the option of two different electricity cost tariffs for different time periods. If price 1 and price 2 are set to “O.oo·; the cost function is switched off. Normally, it is sufficient to set only tariff 1 (price 1 ). Price 1 is the basic rate. If this is not set, entry for price 2 is not possible. Press and hold the “SET” button for about 2 seconds to enter the setting mode to start the cost. The currency unit will now flash in the display. Use the “UP” or “TOTAL’.’ buttons to set the desired currency. Confirm your entry with the “SET” key. After the display “Price 1” flashes. Press the “SET” button again. The Days of the week start to flash. Use the buttons “UP” and “TOTAL’. To’ the desired period for which the first tariff (price 1) should apply. After you have set the days of the week, confirm with the “SET” button. You can then change the hour display for the beginning of the set billing period. Confirm the entry with the “SET” button and repeat the process with the minute display. To confirm again, with “SET: After that, set the costs. The first digit of the cost display begins to flash. Set these with the buttons “UP” and “TOTAL’.’ and confirm with “SET’:Then repeat this with the second and third digits. Confirm each setting with the “SET” button. The decimal point then flashes. If you want to adjust this, press the “UP” or “TOTAL:’ button. If the point stays that way, press the “SET” button to confirm the setting. To set price 2, you need “Price 2” instead of “Price 1” at the beginning, select and set. Make sure that there are no time overlaps between the two rates. The time settings should not be identical! Example: For a kWh price of 0.24 $ / kwh you have to enter 0.24. If you only want to set a tariff, set the period to all 7 days of the week and the beginning at 0.00 o’clock. CO2 Settings: After you have set the prices and confirmed them, you will get into the CO2 settings (CO2 equivalent). At best, you can get that value from your energy suppliers. The display will show “SET CO2’~ Use the “UP” and “TOTAL:’ buttons to set the Unit of measurement (kg/ kWh or lb/ kWh). Then press the “SET” button to confirm the setting. Subsequently, the first digit of the CO2 setting flashes. Put these with the Press “UP” and “TOTAL:’ and repeat this procedure with the second one and third place. Confirm the setting with the “SET” button. Then press the “SET” button again to return to the normal display to return.
DISPLAY & MODES
In the normal display mode, you can use the “MODE” key between the following: Change modes in the first line: Display of the costs since the beginning of the measurement; Power display; Voltage display, current consumption of the load, and CO2 mode. The second line shows the accumulated data for costs, consumption, or CO2 emissions. This data can be accessed by pressing the “TOTAL:’ key between weekly, monthly, and yearly totals.
RESET THE DEVICE
Press the “RESET” button on the front of the unit with a pointed tip to clear all settings and restart the device. Attention! Make sure you do not hurt yourself with the item! To reset only the accumulated data, press and hold the Buttons “TOTAL:’ and “UP” simultaneously for 2 seconds. The following are the accumulated data reset to zero.
ATTENTION
- Do not plug in a row!
- Voltage-free only with a pulled plug!
- For indoor use only!
- No maintenance required!
- Do not connect a device that has a load of 10A or more.
- Always make sure that the plug is completely closed and inserted correctly.
- Only clean the device with one dry cloth.
- Do not immerse the device in water\
SYMBOL
Ground terminal block. Alternating Current. For indoor use only. Over-voltage category 11
SAFETY INSTRUCTIONS AND DISCLAIMER
- Never attempt to open the device for repairs or conversions.
- Avoid contact with the mains voltages. Close that Product, not short. The device is not waterproof, please use it only in dry conditions. Protect it from high humidity, water, and snow. Hol.d Keep the device away from high temperatures.
- Do not subject the device to sudden temperature changes or strong vibrations because it could
damage the electronics. - Before use, check the device for damage. The device should not be used if it has received a shock
or has been damaged in any other way. Please observe the national regulations and restrictions. - Do not use the device for purposes other than those described in the manual.
- This product is not a toy. Keep it out of the reach of Children.
- Any repair or modification to the device not from the original supplier is carried out, will void the
warranty. - The device should only be used by persons who use it have read and understood the instructions. The device specifications may vary or change without prior notice.
DISPOSAL
Dispose of electrical components and batteries in accordance with your local state laws.
Distributed by:
Reduction Revolution Pty Ltd www.reductionrevolution.com.au
FAQs
What is the POWERTEC MS-6108 Mains Power Meter used for?
A plug-in electricity usage monitor, the POWERTEC MS-6108 measures the power consumption, voltage, current, frequency, and cost of operating office or home appliances. It assists users in efficiently monitoring and controlling their energy consumption.
What is the voltage and current range it supports?
The POWERTEC MS-6108 can handle loads up to 10A (about 2300W) and is intended for an AC 230V, 50Hz mains supply.
Can I use it with high-power appliances?
Yes, but make sure the linked item doesn’t need more than 2300 watts or 10 amps. For other POWERTEC monitoring devices, see the POWERTEC QP2322 Multi-function Battery Meter for battery-powered energy monitoring solutions. Steer clear of using it with air conditioners, heaters, or big power tools that use a lot of current.
What is the accuracy of the MS-6108 readings?
Under typical operating conditions, the POWERTEC MS-6108 provides voltage and power readings with an accuracy of ±1%.
Does the meter retain data after being unplugged?
Indeed. An internal battery powers the MS-6108’s built-in memory backup, which keeps cost settings and cumulative energy statistics even when the device is unplugged.
Can I use the power meter outdoors?
No, the MS-6108 is only intended for use indoors in dry conditions. The device may be harmed by exposure to moisture or extremely high or low temperatures.
What is the power factor (PF) reading for?
The appliance’s power factor shows how effectively it uses electricity. A number near 1.00 indicates effective power utilisation, but lower values show energy wasted by reactive loads (such as transformers or motors).
Why is the display showing zero power when my device is on?
This could happen if the connected appliance uses very little power (less than 1 watt), as while it’s in standby mode. The MS-6108 may round extremely small values to zero and has a limited detection threshold.