
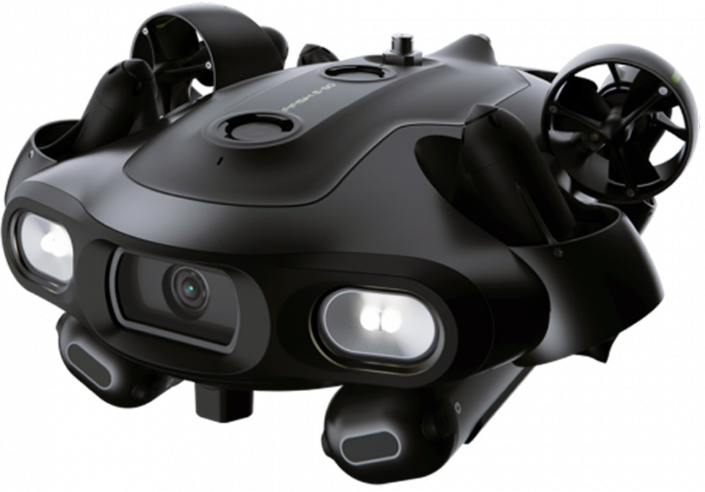
QYSEA FIFISH E-GO Black Underwater Drone
Operation
- Before connecting the ROV, please check the O-ring at the tether port, the Qinterfaces, and inside the SD card slot to ensure they are intact anddry.
- Before putting the ROV in water, please check the connection status of theROV’stether port to ensure a secure connection between the ROV and the tether spool.
- Before putting the ROV in water, please check the protective caps of both the Qinterfaces and the SD\ card slot to ensure they are securely tightened.
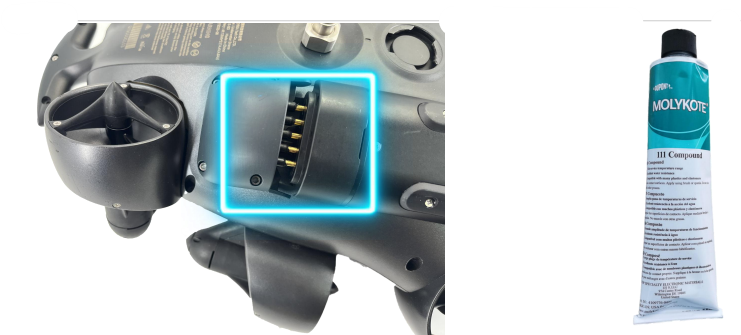
- Before putting the ROV in the water, please check the ROV’s battery connection to ensure the correct connection. Please scan the QR code to check the video: (MOLYKOTE 111 grease recommended for battery connectors and O-ring.)
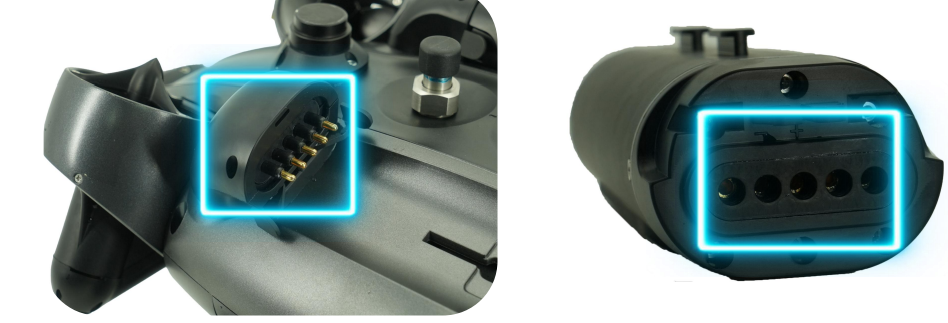
- Before use, please ensure that the male and female connectors of the battery are dry and clean.
- After use, wipe off any water stains on the male and female connectors of the battery.
- Regarding motor maintenance, please refer to page 65 or scan the QR code to check the relevant manuals.

Backgrounds
- Do NOT touch the running propeller. Avoid overheating of motors.
- Do not run the thrusters in the air for over 30 seconds.
- Do NOT throwtheROVwhen deployingintothewater
- Do NOT look directly at the LEDs, and do NOT touch the LEDs when they are ON
- Beware of the environment while operating the ROV (tide, water level, water traffic, etc.)
- Be part of marine protection and conservation for the local coral and marine life.e
- Maintain after dive, check the Maintenance GUI.
- Avoid the reefs, rocks, seaweeds, fishlineor other objects that maycause damagetoor entanglement of theROVor tet. her
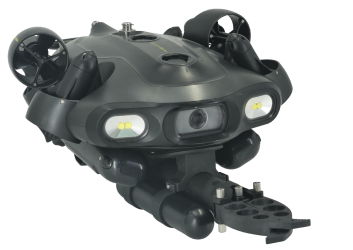
Parts List
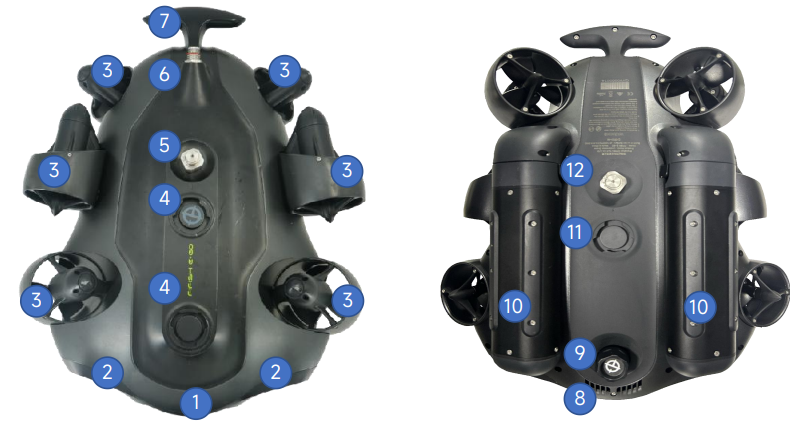

- 4K UHD Underwater Camera
- 5,000 lumens LED * 2
- Thrusters (Aluminum alloy propeller) * 6
- Upper Mounting Port
- Upper Q-interface (accessory port)
- ROV Tether Port
- Rear Fin[1]
- Drain Holes
- microSD Hot Shoes
- Swappable Battery * 2
- Lower Mounting Port
- Lower Q-lnterface(accessory port)
RC (Remote Controller)
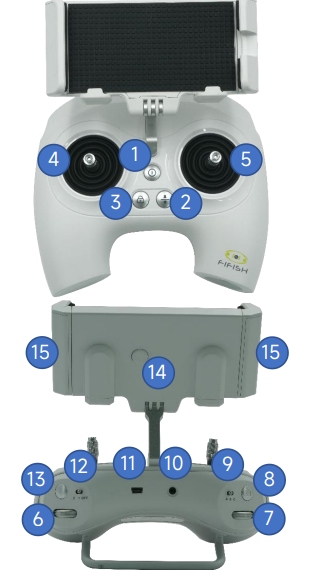
- ON/OFF
- Depth Holding (ON/OFF)
- Thrusters LOCK/UNLOCK
- Left Control Stick
- Right Control Stick
- Right Wheel
- Left Wheel
- Video (Record/Stop)”
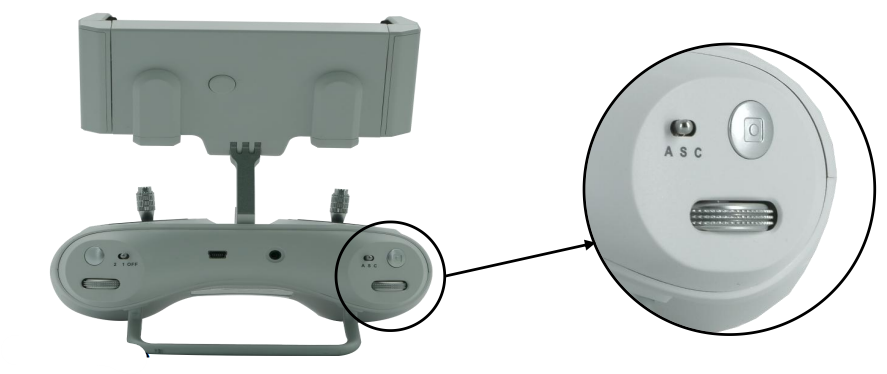
- Control Mode (Attitude / Sport / Combine)
- Tether Port
- Ethernet Port (mini USB)
- LED Brightness (OFF, 1,2)
- Photo (Snap) 2)
- Clamp Release Button
- Clamp for Smart Device
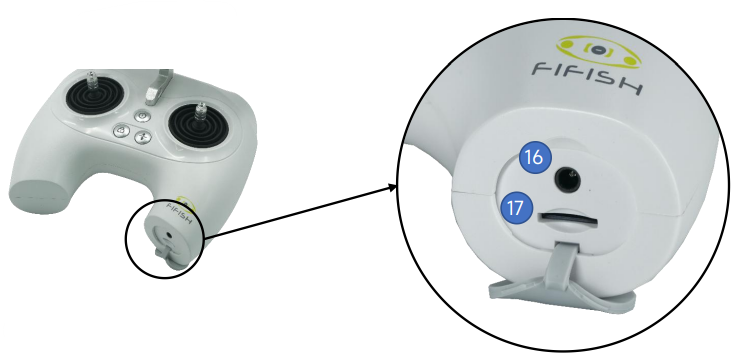
- Charging Port
- microSD Card Slot
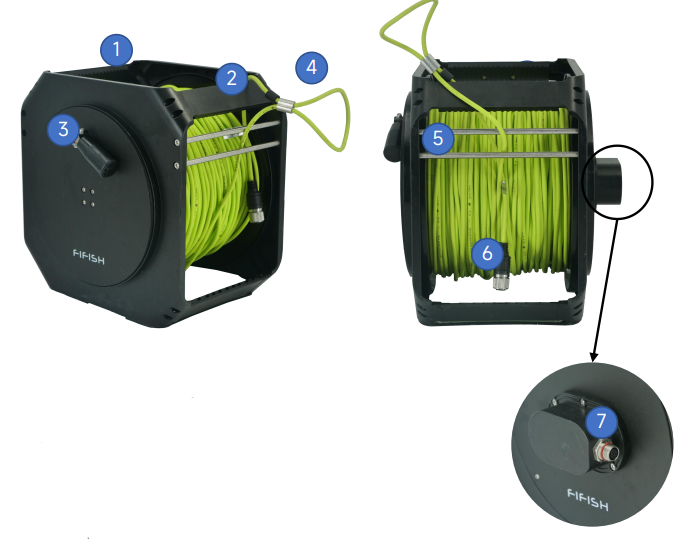
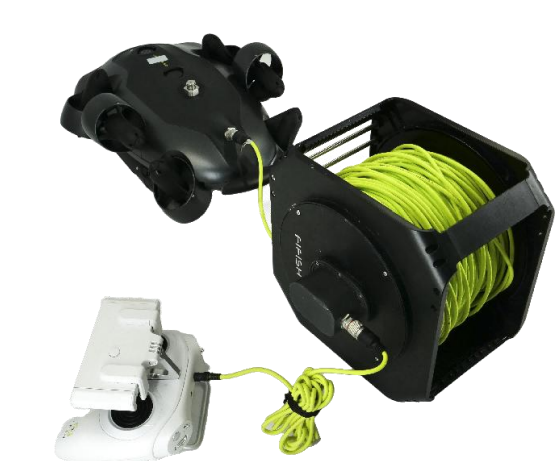
Tether on Spool
- Spool Handle
- pool Frame[1]
- Foldable Handle[2][3]
- Secure Loop
- Tether Regulator
- ROV Plug 6-Pin Female Socket
- RC Plug (3.5mm head port)
Pre-Dive
Checking List
- Gears checking
- Battery is full (ROV, RC, cell/tablet)
- ROV sensor calibration 1
- Smart device compatibility 2
- Enough memory for recording/picture
- Team role setting (pilot, tether man, guide)
- Entanglement threats, such as the boat engine, underwater structures, andcorals etc
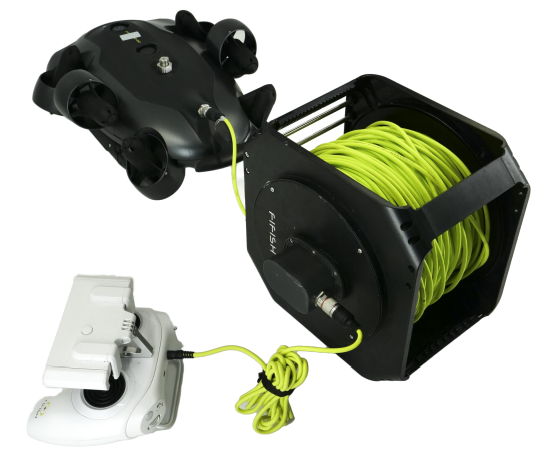
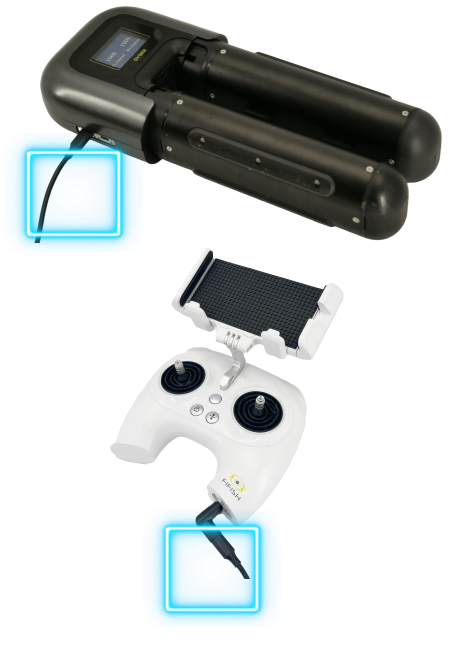
Hardware Connection
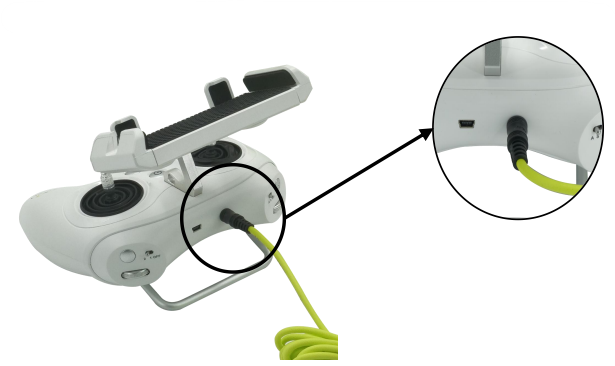
- Plug the tether (3.5 mm head) into the remote controller
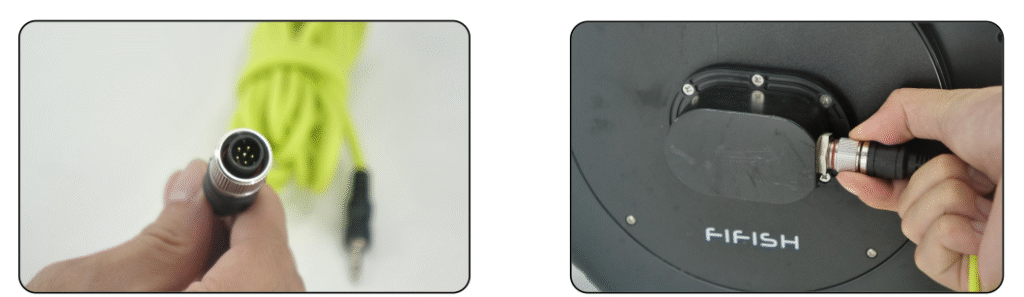
- Plug the 6-pin male plug into the socket of the spoo
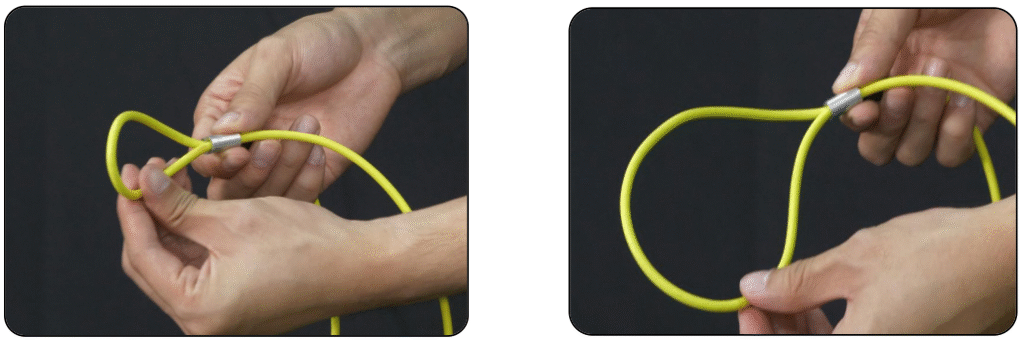
- Pull the cable to release the secure loop
- Put the secure loop around the rear fin and fasten it
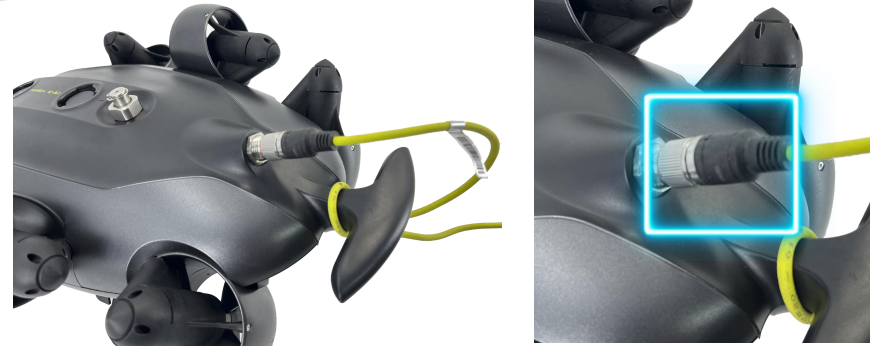
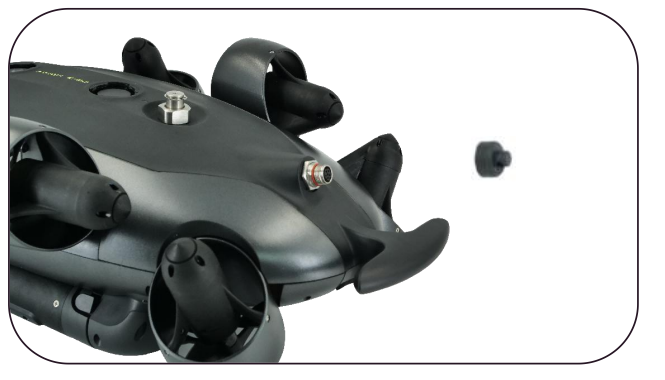
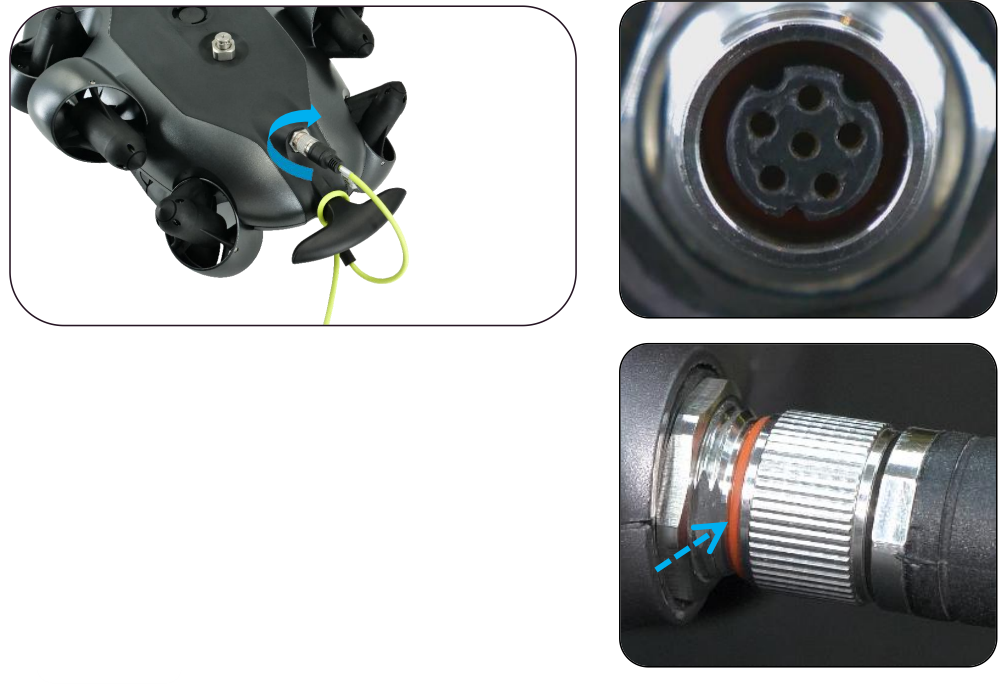
- Unscrew the protective cap (please keep it properly). [1]
- Align the tether port with the cable port at the ROV, connect it andtightenthebolt [2][3]
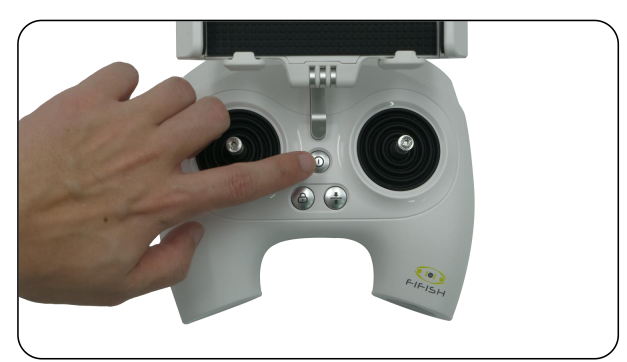
- Turn ON the RC. Press and hold the ON/OFF button (3 seconds)
- RC will play 7 chimes from low to high (Do, Re, Mi, Fa, Sol, La, Ti)
- ROV will turn on automatically, and play 5 chimes (Do, Re, Mi, Do, Mi)

System Connecting
The “ON/OFF”, “Depth Holding”, and “LOCK/UNLOCK” willflash and rotate clockwise, which indicates “Ready to be connected“. In about 30 seconds, the “ON/OFF” and “LOCK/UNLOCK” buttonswill stay solid, which indicates the hardware connection successfully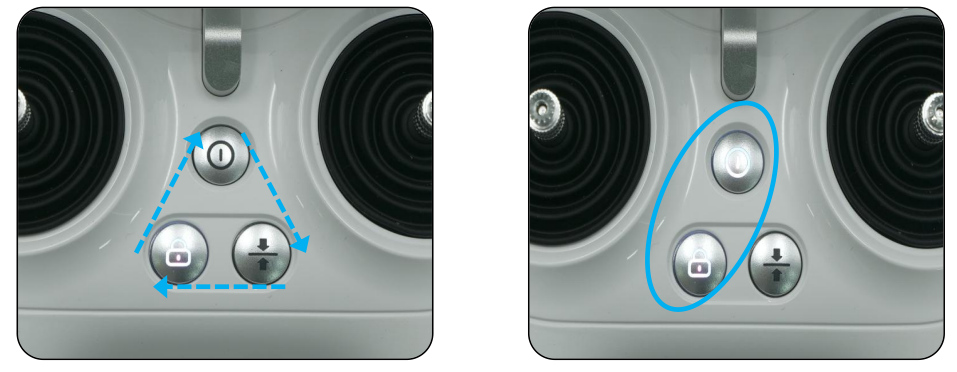
Software Connection
Smart device connects with the RC’s Wi-Fi (5 GHz) • Go to “Settings”, then “WL.AN”
- Find the Wi-Fi network name “FIFISHRC_x.xxx.”
- Enter the password to connect; the default password is “1234567890.”
System Settings
Select RC’s Wi-Fi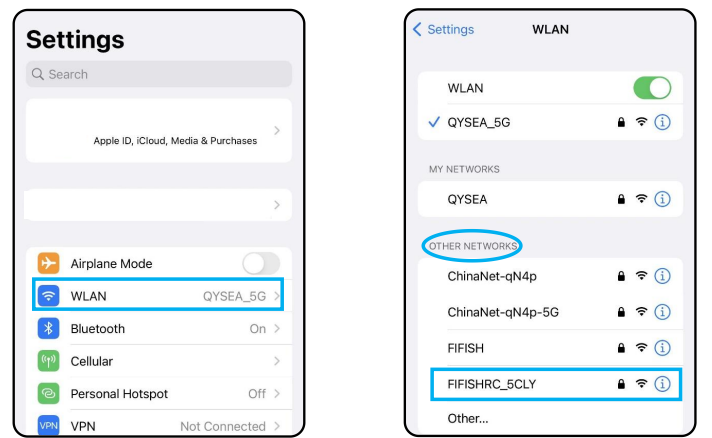
Enter Password
Connected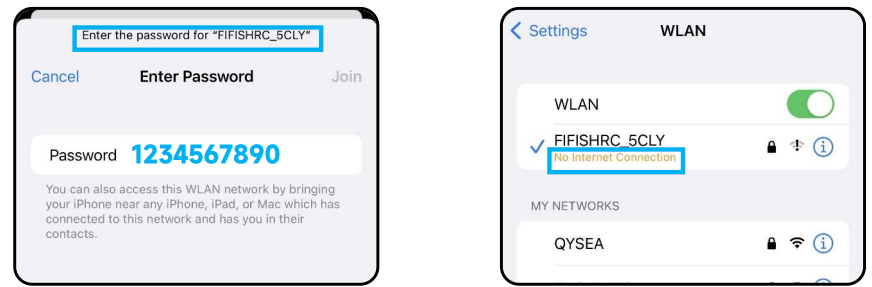
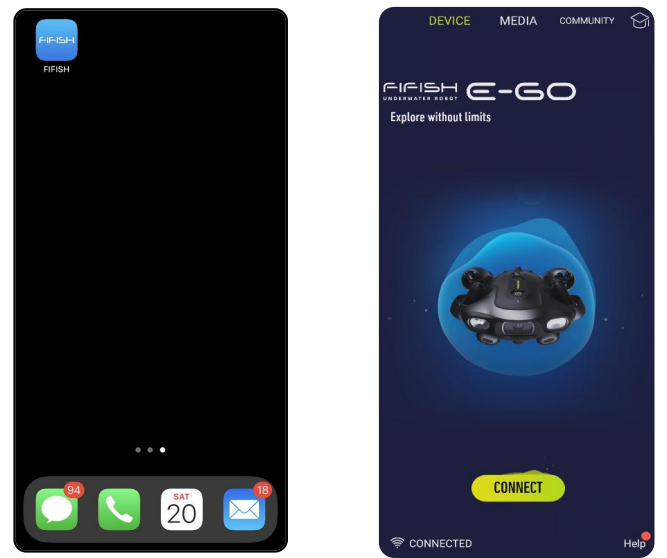
Open the FIFISH App, then press “Connect.”
- Allow access to photo albums, location, and notifications
- If the network did not connect to the internet, select the “KeepTryingWLAN” for iOS users, “Stay Connected” for Android users.
Open FIFISH App ConnectedSensor Calibration & Deployment
 Sensor Calibration & Deployment
Sensor Calibration
- Go to GenerSettings
- Select the Sensor Icon
- Follow the hit on the FIFISH App step by step, first Gyro-Acce, then Mag
- Reboot ROV in FIFISH App, and Power ON/OFF RC if necessary
Deploy the ROV
- ONLY pulling on the tether to deploy the ROV into the water.
- Unlock the thrust, rs then start to dive.
Retrieve
LOCK the thrust. s. STOP RECORDING the video before closing the FIFISHApp. ONLY PULLING on the tether to retrieve the ROV
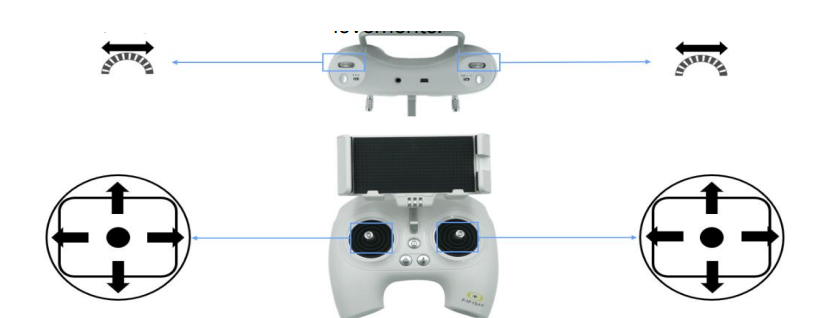
Controlling
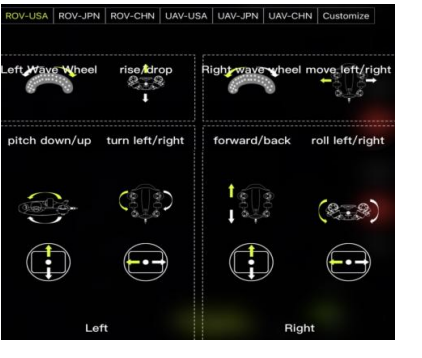
Definition of Controlling
The FIFISH E-GO PLUS uses the patented Smart Thruster Array™ to ensure the ultimate maneuverability and delivers the 6 DOF (degrees of freedom). • E-GO can move inclined & ascend, left and right, forward and backward. • E-GO can rotate in 360 yaw (z-axis), 360 pitch (y-axis), 360 roll (x-axis). We have simplified the Left Control Stick, Right Control Stick, Left Wheel andRightWheel into the following symbol. The arrows on RC indicate the commandandthearrows on ROV indicate the actual movements.
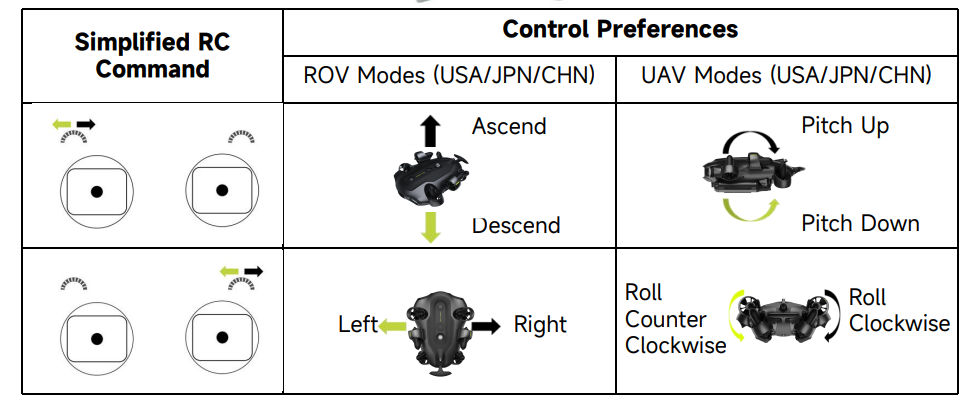
Controlling Modes
FIFISH E-GO supports 3 modes for control: A, S, and C. A is Attitude mode, S is Sport mode, and C is the Combination mode.
Attitude Mode
Attitude mode is designed for beginners. The ROV will not roll in Attitude mode. The ROV will stay in the same depth,,h moving when depth holding is ON. Evenwithpitchangle, the depth will be the same. Sport Mode
Sport Mode
is designed for skillful pilots. Sport mode will enable the rolling freedom, so you will access all degrees of freedom of the ROV. Controlling and moving based on the First Person View, do not operate in the third-person view. The ROV will only stay at the same depth with no command input when depth holding is ON.
Combination Mode
User puts the mobile phone into VR glasses after turning on the ONV R mode in the FIFISHAPP toolbox, and turns the controller to C mode.
Accessories Attached
The right wheel will ONLY be working in Attitude mode or Combinationmodeformotor driven accessories. For example, a robotic arm, a water sampler, roboticfishclamp, a compass ruler, and a mud sampler, etc
Video/Photo Download
Connect with RC and ROV with the tether. Insert a microSD card in the RC Software connecting.
Video/Photo Download
Please keep the remote control connected to the ROV whenit isturnedo n. Turn ON the Depth Holding
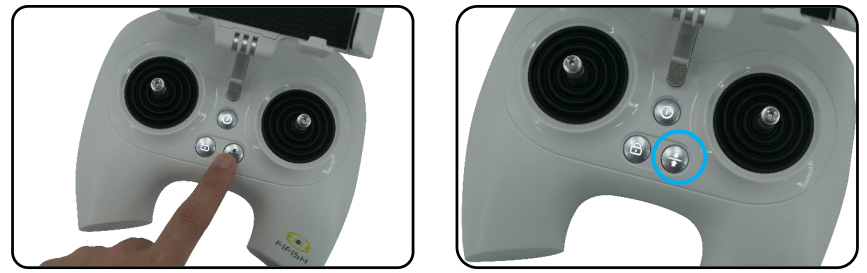
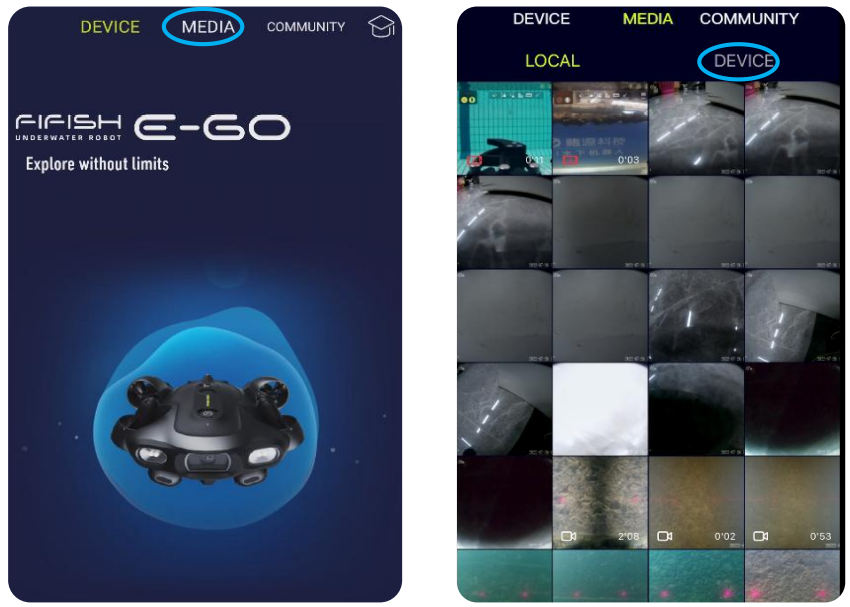
Press MEDIA, then Press DEVICE
Select the Camera, SDCard 1 is the main camera, SDCard 2 is thesecondarycamera (Note: SDCard 2 only be displayed if equipped with Q-Camera)
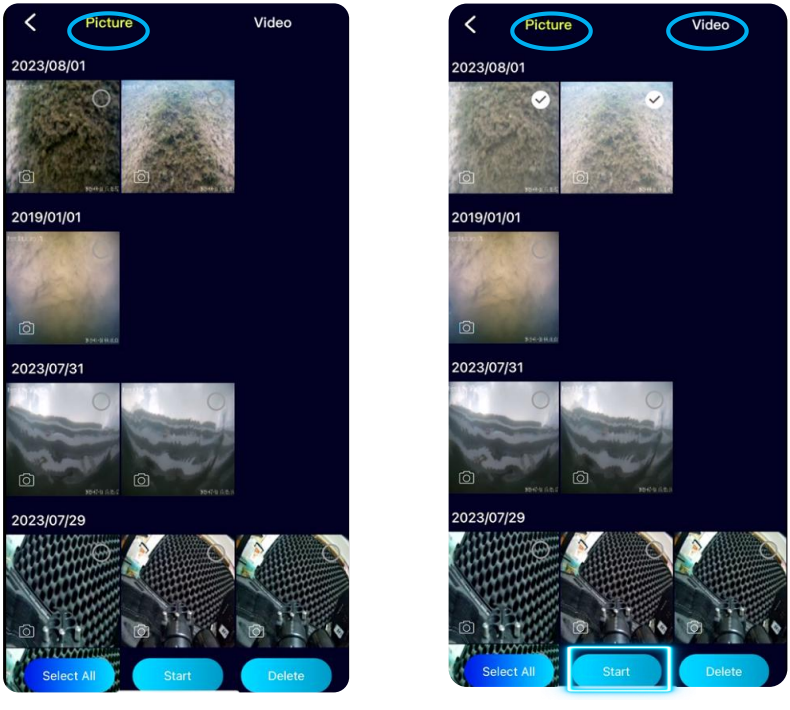
The default is Picture, select Video if you only want to copy out thevideos5.1.8. Press and hold on the desired clip for over 1 second, then you can select theclip(s)you would like to copy. After you are satisfied,d then press the Star.t
 Select the place to c.opy Do NOT minimize the FIFISH App while downloading.

Battery Installation & ROV Charging
Battery Installation
Press the side buttons to unlock with one hand while pulling thebatterywith the other. er
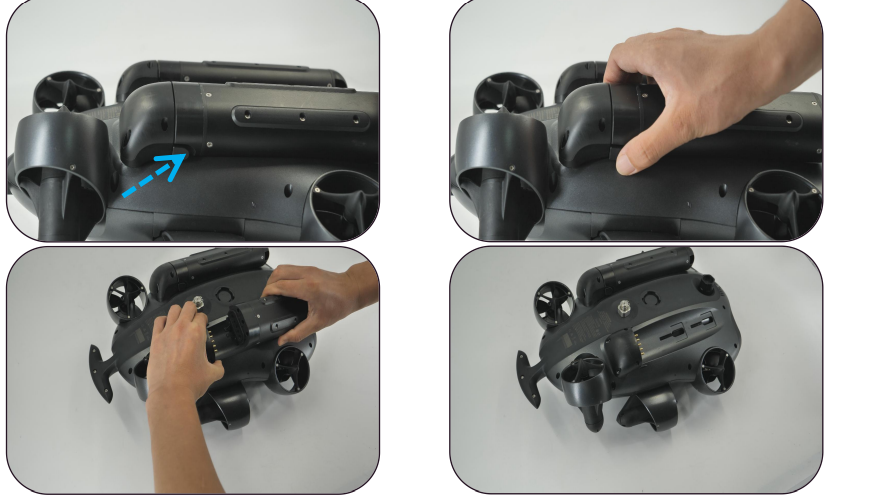
Align two tabs on the battery to the slots before pushing it to lock in place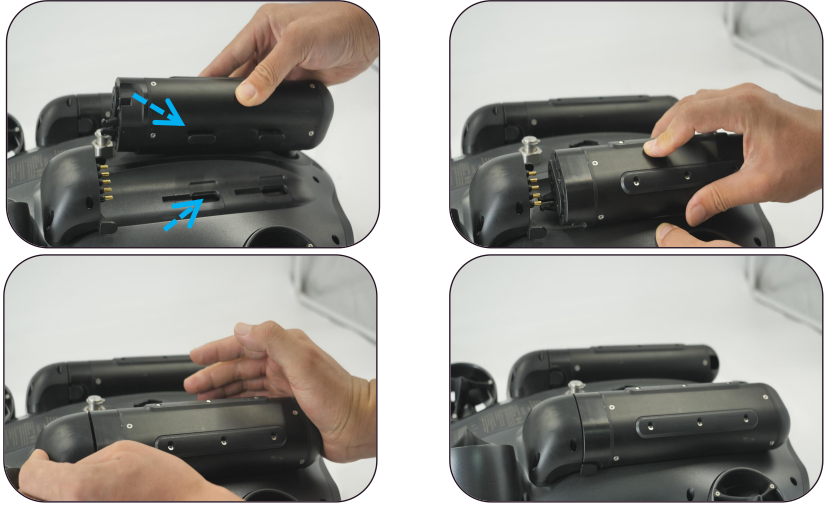
ROV Charging
. Unscrew the protective cap and connect the power adapter connectortothe main cable connector and turn on the power.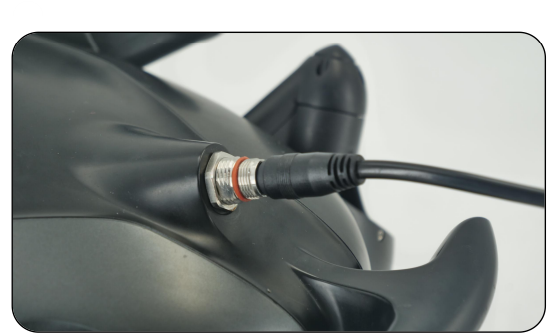
The indicator light of the power adapter will turn red until it is fullychargedand then turn green.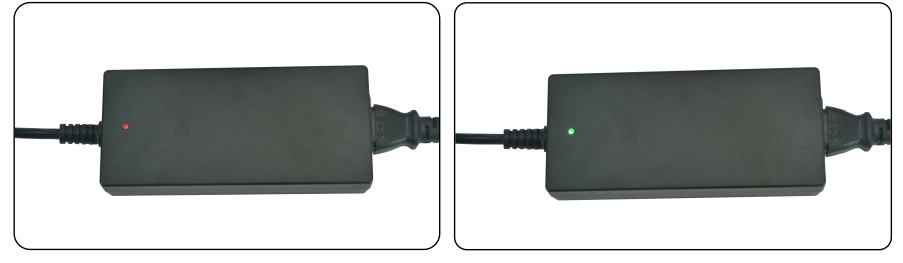
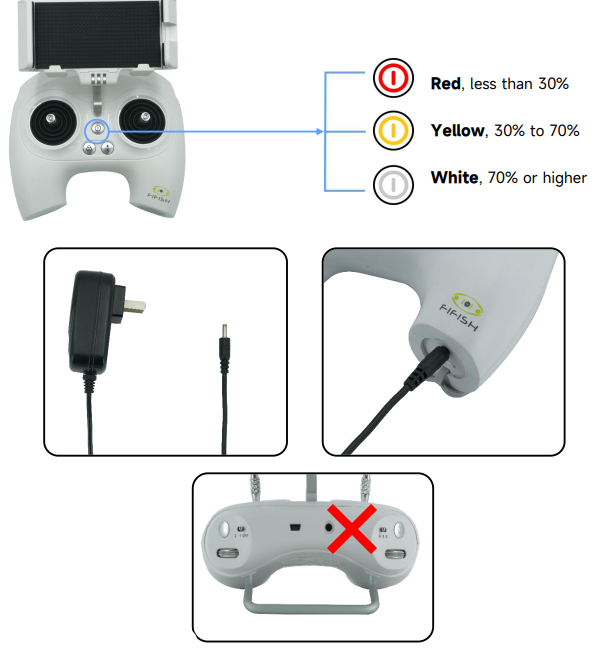
RC Charging
Flashing ON/OFF button means RC is charging. A steady ON/OFF button means RC is fully charged.
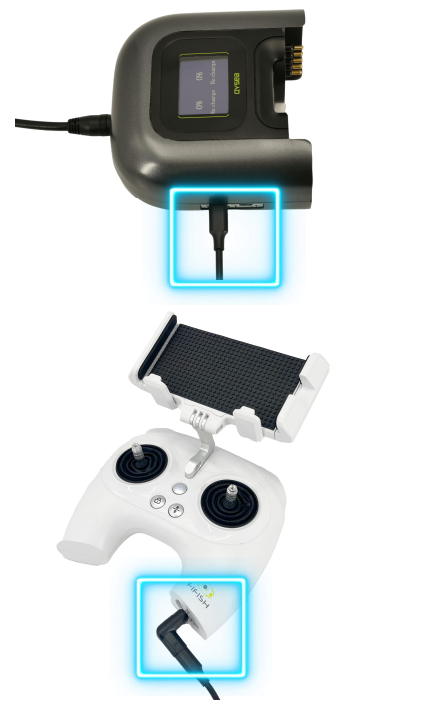
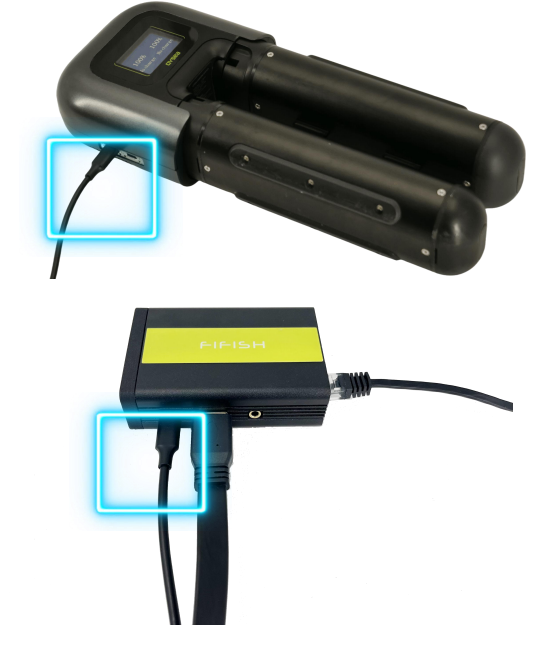
Q-Energy Station (Optional)
The Q-energy station comes with other accessories.s.. The energy station comes with 1 type C cable and 1 type Cto 3.5mmconversionconnec.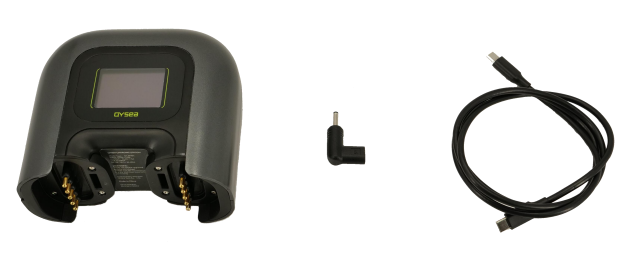
The main function of the Q-energy station
- An energy station can be used to charge the underwater ROV’s battery
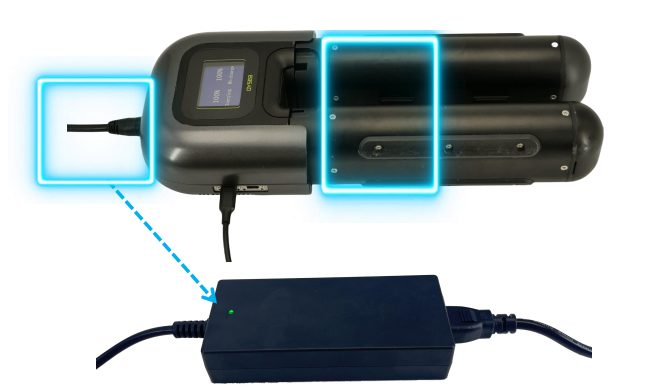
- The energy station can be used to charge the underwater ROV’s battery.
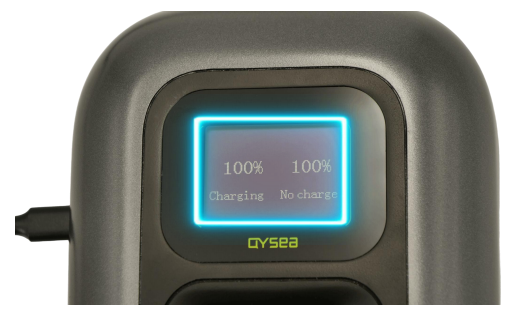
- The energy station can be used to charge the underwater ROV’s batterywhileproviding power to the HDMI bo.
- An energy station can be used to charge the underwater ROV’s batteryand remote controller simultaneously.
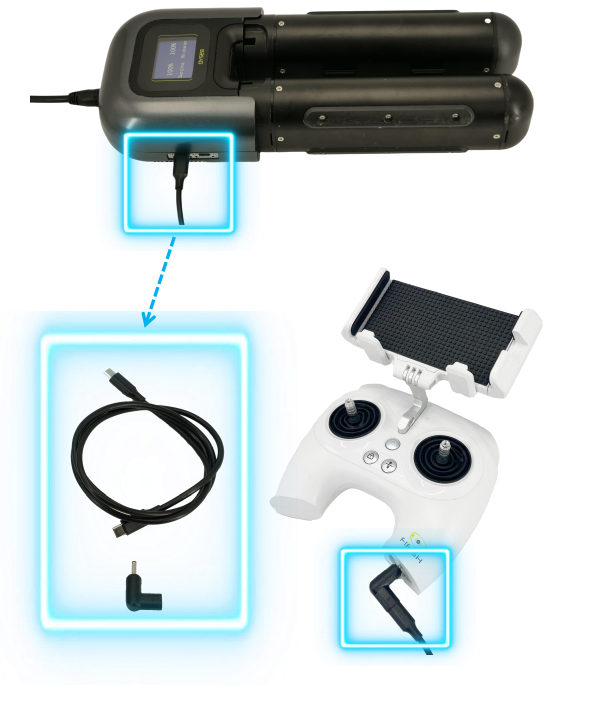
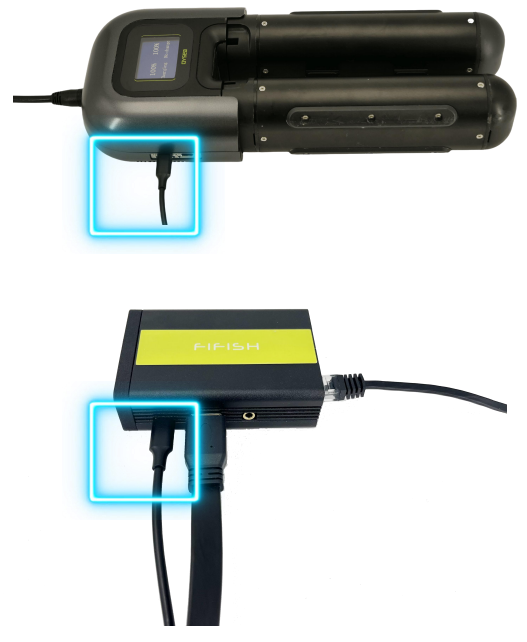
- The Q-energy station can be used to supply power to otheraccessories The energy station can be used to power the HDMI b.ox
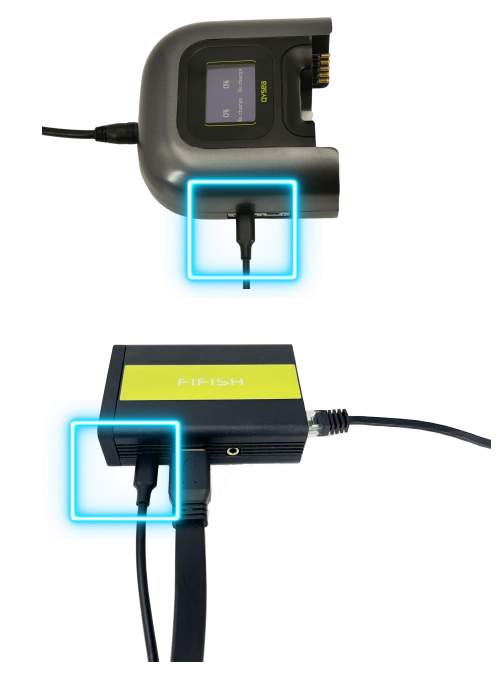
- The energy station can be used to charge the remote controller.
- The underwater ROV’s battery can be used as an external power source for the Q-energy station.
- The underwater ROV’s battery can be used as an external power supplyforthe energy station to charge the remote controller when the charger is not around.
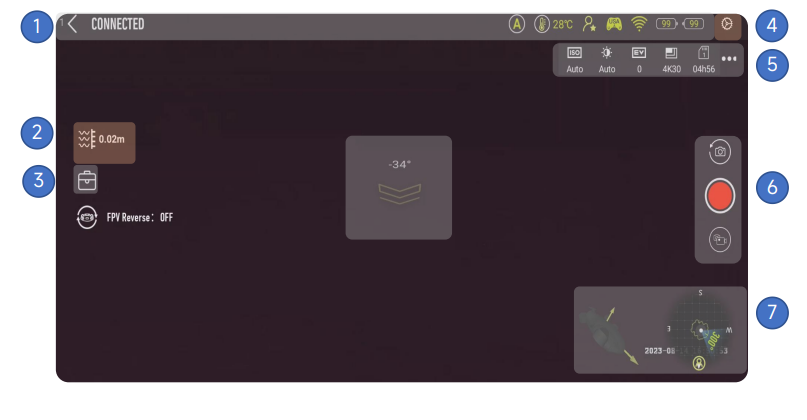
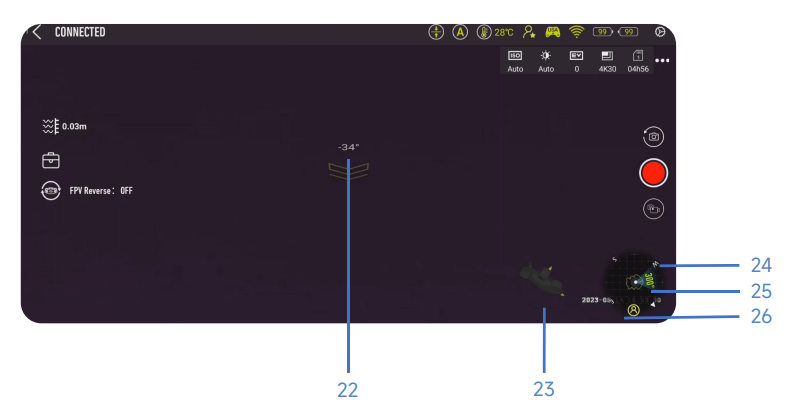
FPV Interface in FIFISH App
- Status
- Navigation Information
- Toolbox
- General Settings
- Image/Video Setting Shortcut
- Image/Video Button
- Navigation Chart
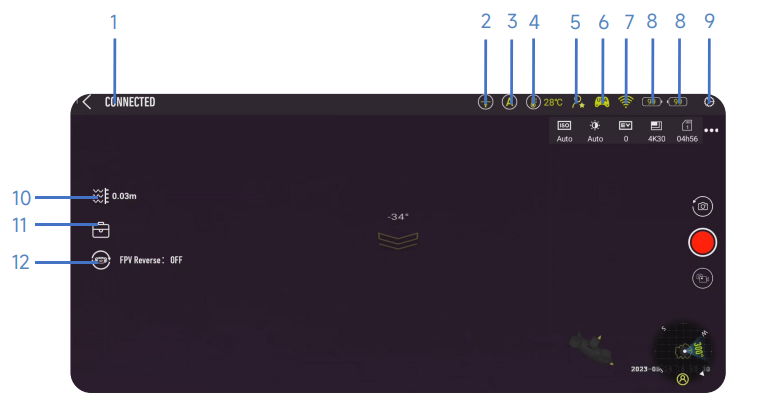
FIFISH App
User Interface
- System Status: Connected and Offline status
- Depth Holding: ON/OFF
- Control Mode: Displays the current flight mode
- Water Temperature: Displays the current water temperatureinC/F5.
- Controlling Preference: Displays the current controlling preference.
- RC’s Wi-Fi Signal: Displays the remoter controller Wistatusstatu. ROV’s
- Battery: Displays the current battery level
- General Setting: General settings provide information about system settings,
- Controlling Preferences, Sensor Calibration, ion, and Main CameraInternalStorage.
- Depth: The distancefrom them water surface to the depth gauge
- Toolbox: Contains Special Features and Attachment Features
- PV Reverse: The ROV and the lens will both turn over simultaneously.
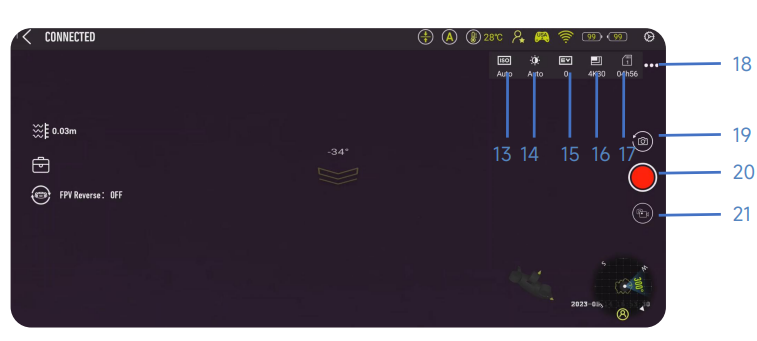
- ISO: Setting the ISO between 100 and 6400
- White Balance: Setting the parameter of WB
- Exposure Value: Setting the exposure value
- Resolution Frames Rate: Setting the number of pixels
- displayedonascreen
- Remaining Time / Pics:
- Displays the remaining number of photosorvideorecoding time on the current micro SD card
- Camera Setting: Provides more camera settings
- Video / Photo Mode Switch: Tap to switch the Video and Photomode20.Record / Stop / Snap
- Pitch Angle: Displays the current pitch angle, Heading downis inaminusdigit degree with a downward arrow; Heading up is in a positive digit degreeswith upward arrow
- Posture in 3D Model: Displays the current ROV posture
- Compass: Match with the smart device, shows the cardinal directionsusedfor geographic orientation
- Heading in Degrees: 0° is North, 90° is East, 180° is South, 270° isWest.For Example, 300° is facing
- Pilot’s Facing Direction: The icon showing on the compass. For Example, the pilot isin the North East
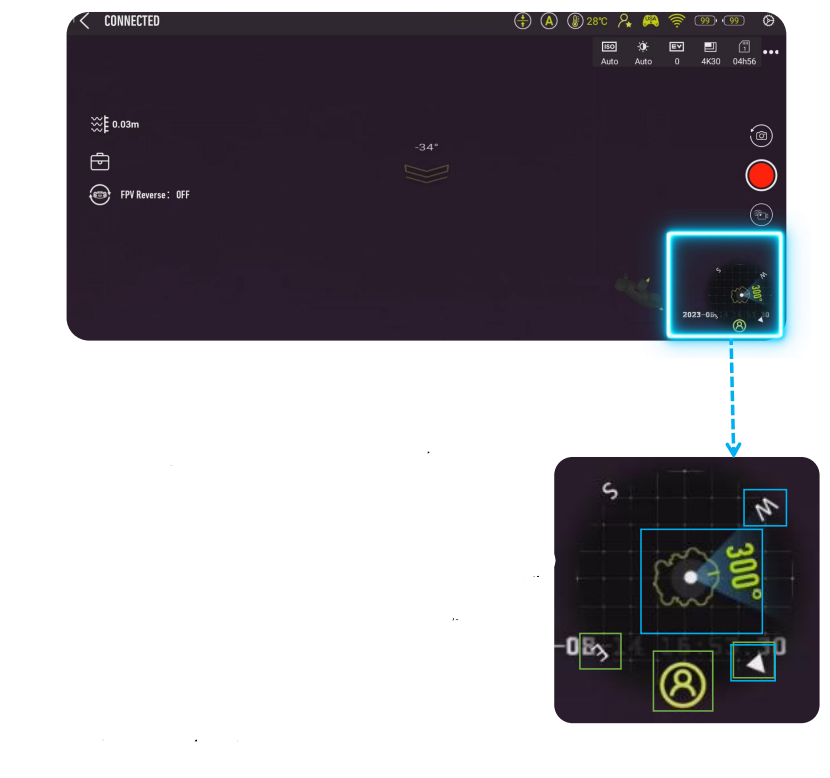
Pilot’s Facing Direction & ROV’s Heading
- As shown in green, the pilot icon is located between North and East, so the pilot’s orientation is East of North. 2. As shown in blue, the heading degree of the ROV is 300°, which lies between the North andthe West, so the ROV faces 30° West of the North.
General Settings, Select System Setting Icon in 1
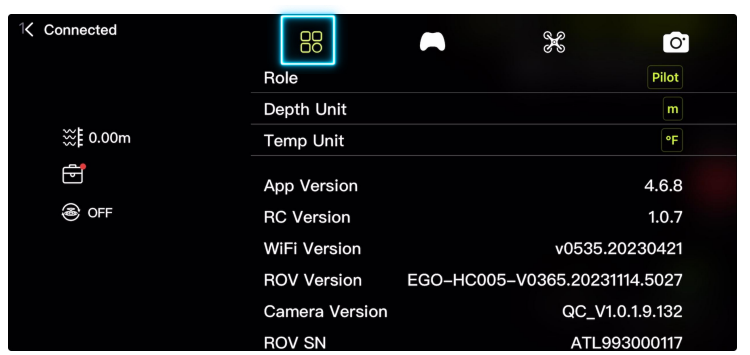
- If you have 2 devices connected to the RC, role are includingPilotandSpectator
- ONLY the “Pilot” can manipulate the settings, such as control preferences, camera settings, etc. • The
- atermark” ON will record to video or write on photo, “Watermark ”O, FF then no trace on video or photo
- Watermark in Time, FIFISH Logo, ROV
System Setting
Scroll down thesystem settingsg, the system version information wshow u.powup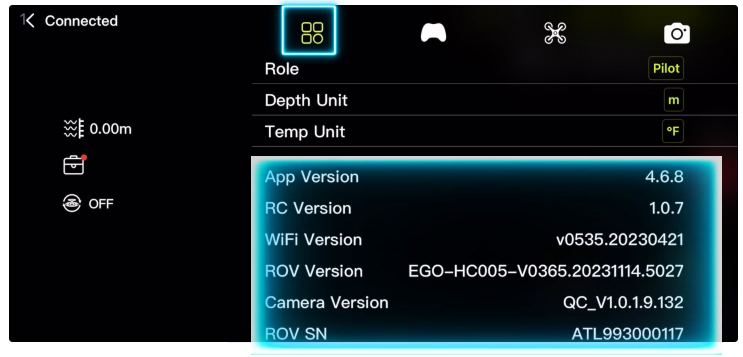
- The App Version is the FIFISH App veonion in your cell or tablet
- The RC Version is the RC’s motherboard version
- WiFi Version is the RC’s Wi-Fi module version
- ROV Version is the ROV’s current software version
- Camera Version is the camera module software version
- ROV SN is the identical SN for this ROV
Controlling Preferences
General Settings, Select Controlling Preferences Icon in 2nd column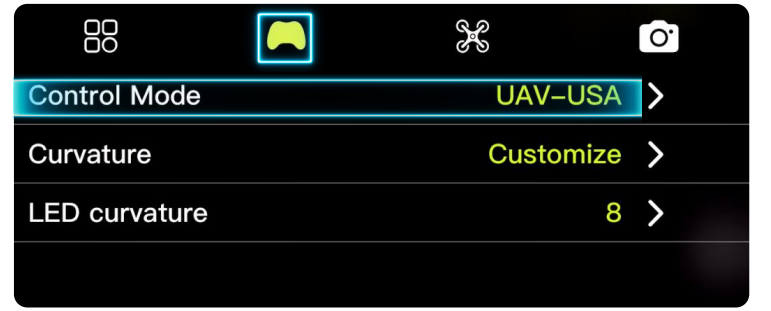
- Click “Control Mode”, the default is ROV-USA Control Mode, youcanselectyour preferences if you like
- Click “Confirm” after setting.
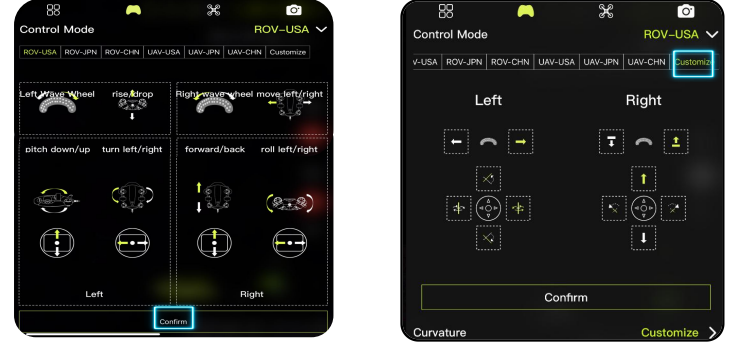
As for advance level pilot, Seekarcustomized the setting demo. PleasecheckFIFISHauthorized local Dealer or Service Center for more details and trainingprograms.
Control Curvature
For the advanced level pilot, the curvature setting can provide more AccurateandSmooth operating experiences.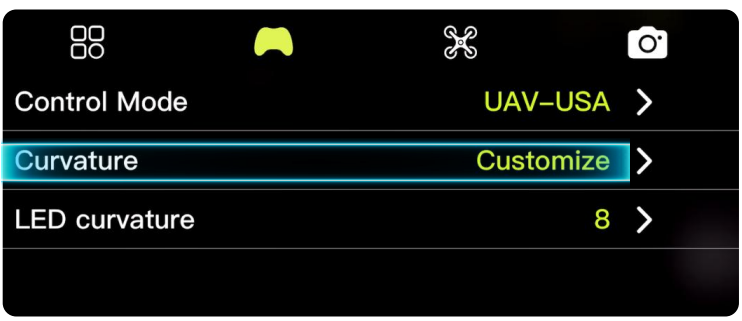
Set the Move & Rotate
- Adjusting the curvature (set the center sector output sensitivity) • Adjusting the attenuation (set the maximum output)
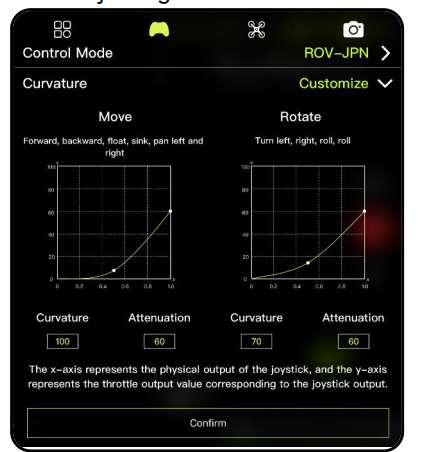
**As for advanced level pilo,t seektor explore curvature setting tips. PleasecheckFIFISH authorized local Dealer or Service Center for more details andtrainingprograms.
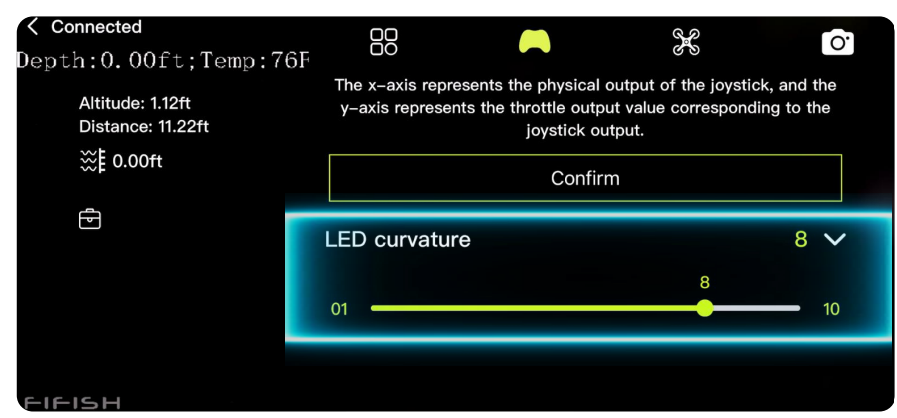
LED Curvature
For LED curvature, more brightness level adjustment can be made by dragging.
Sensor Calibration
Select the Sensor Icon in the 3rd column.
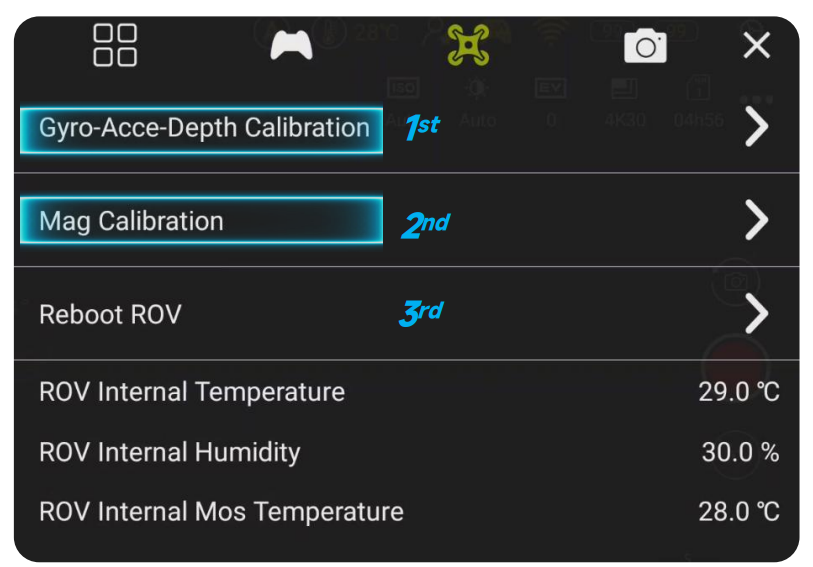
- Follow the hit onthe FIFISH App step by step, first Gyro-AccethenMag
- Reboot ROV in FIFISH App, and Power ON/OFF RC if necessary
- ROV internal status monitoring
The Main Camera Internal Storage is ROV’s main camera internal memorystatus.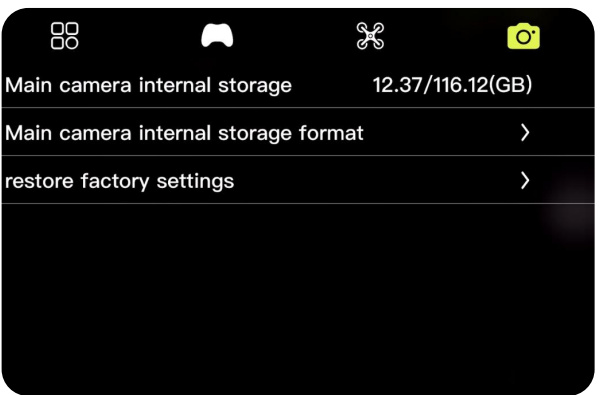
- Clicking “Main camera internal storage format” will erase theinternal memory of the main camera.
- Clicking“restore factory settings” will reset to the default camera settings.
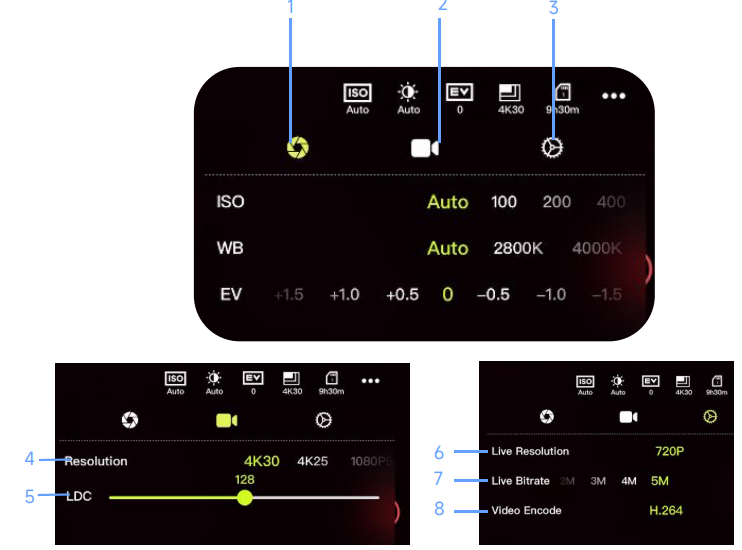
mage Settings
- Exposure and WB
- Video Setting
- Camera General Setting
- Resolution
- LDC
- 6. Live Resolution on FPV
- Live Bitrate on FPV
- Video Encode
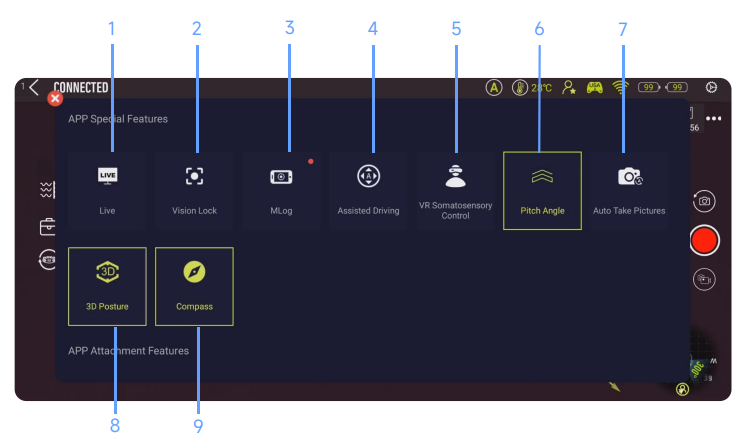
Special Features:
- Live Steaming
- Vision Lock
- Mission Log (M-Log)
- Assisted Driving
- VR Control
- Pitch Angle ON/OFF
- Auto Take Pictures
- 3D Posture Model
- Compass
Vision Lock
Lock the positions of objects at focus
Click the icon to activate vision lock
- Click the position on the screen, and the ROV will move and adjust theclicked area to the centre of the field of vision.
- Touch the screen for seconds with your finger and drag it in the(up/down/left/right) direction, which can realize the dragging of thevisual fieldin the
Vision Lock
Lock the positions of objects at foc.us. Click the icon to activate vision lock.
Two fingers press the screen for seconds, and when you open/clampyourfingers to make a zoom-in/zoom-outgesture, you can zoomin/out thecurrentpicture of the camera’s field of vision
Toolbox, Vision Lock
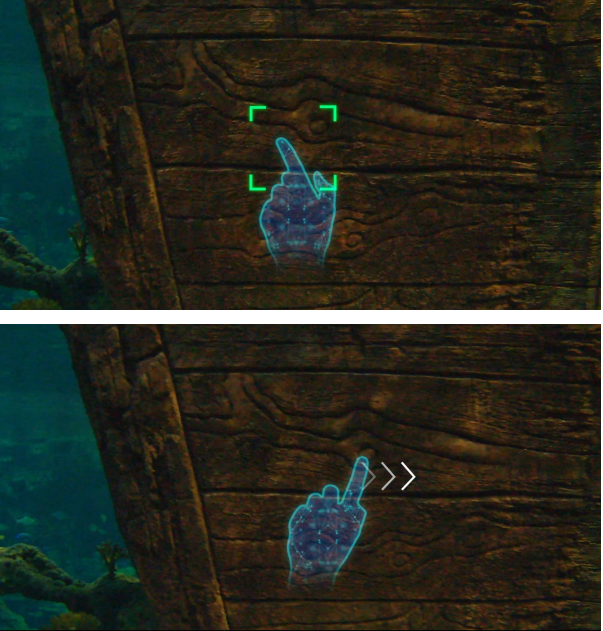
Vision Lock
Lock the positions of objects at focus. Click the icon to activate vision loc.k
Touch the target area for seconds to lock the area/static object inafixedposition on the screen, so that the field of vision can be fixed at thecurrentposition without refocusing on other moving objects.
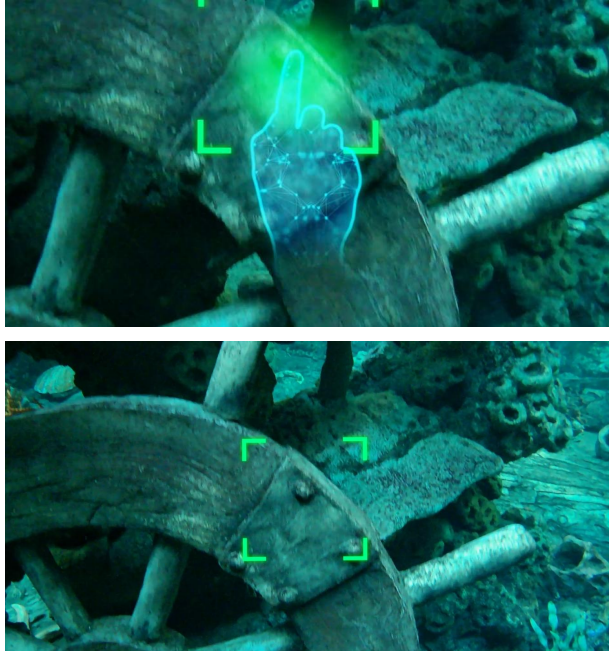
Vision Lock
Lock the positions of objects at focus. Click the icon to activate vision lock.
Dynamic Lock
When controlling the ROV moves (forward/backwards, left/right lateral, ascend/descend), the algorithm will recognize the object again andrefocusit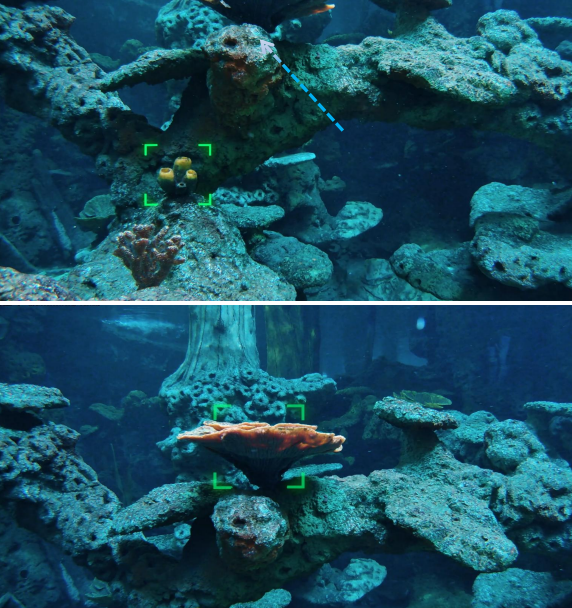
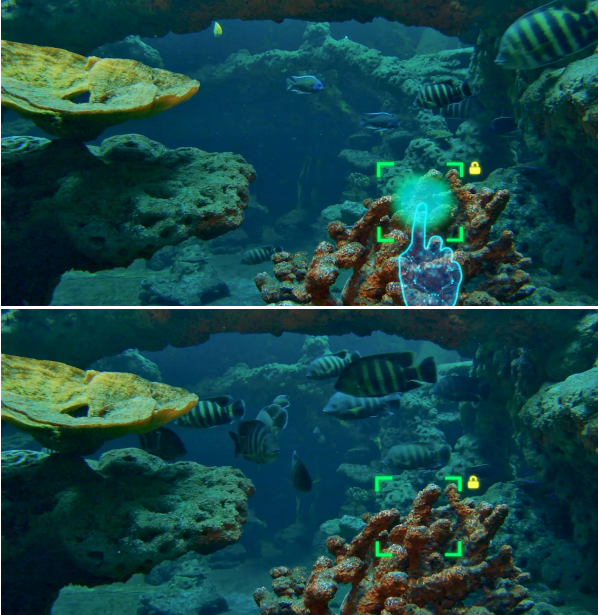
Vision Lock
Lock the positions of objects at focus. Click the icon to activate vision .lock
Surround Shooting
Move the certain stick to perform turning left/right or pitching up/down. Taking the ROV-USA mode, for example, push the Left stick on RCinasingledirection. (Note: Keep the focused object on the screen)
The reason fail to perform:
- The target is moved out of the view of the ROV
- Move the driving sticktod the perform moving forward/ backward/ left/right/ rising/ dropping, wallowingthe ROV to unlock the object.
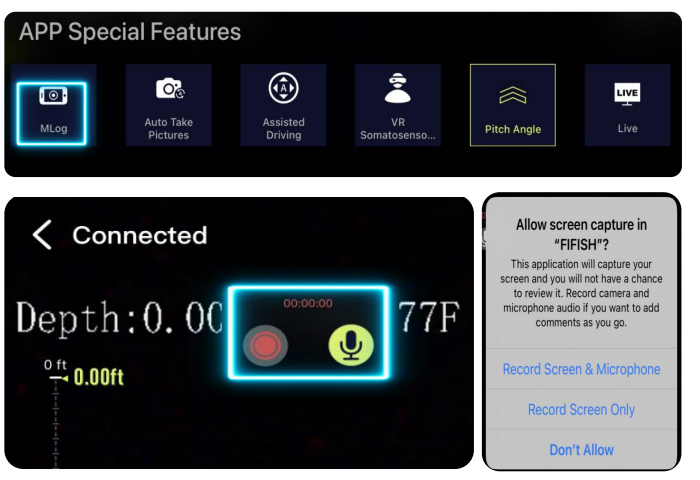
Mission Log(M-Log)
Record the screen and voice
- Click the icon to open M-Log
- The M-Log screen recording button and voice recording buttonwill bedisplayed
- Click “Record Screen & Microphone” to allow screen capture
- Press the video recording button to start
- Optional recorded quality: High/Medium/Low
Auto Take Pictures
Take a preset number of photos with a preset time interval
- Click the auto take pictures icon
- Click the time interval icon or photo number to open settinginterface
- The number of photos that can be stored in the memory cardis displayedbelow.
- After setting the parameters, click the Auto Photo icon torunthefunction.

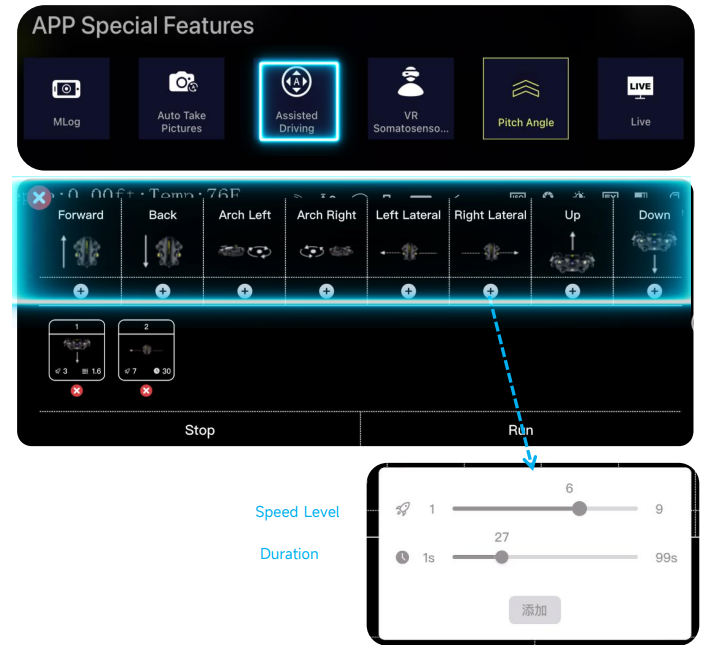
Assisted Driving
- Drive automatically with preset performance, speed, a nd runningtime1. Press the Icon
- Select moving behavior
- Set speed/time
- Click “Run” to activate Assisted Driving
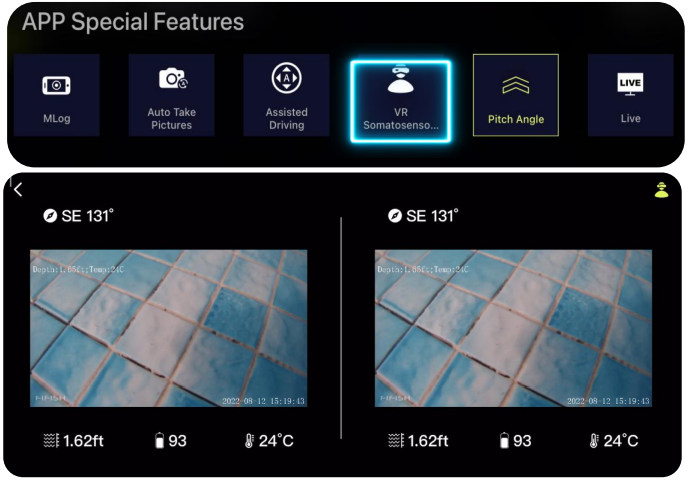
VR Control
Somatosensory control through VR goggle
- Click the VR icon in the toolbox
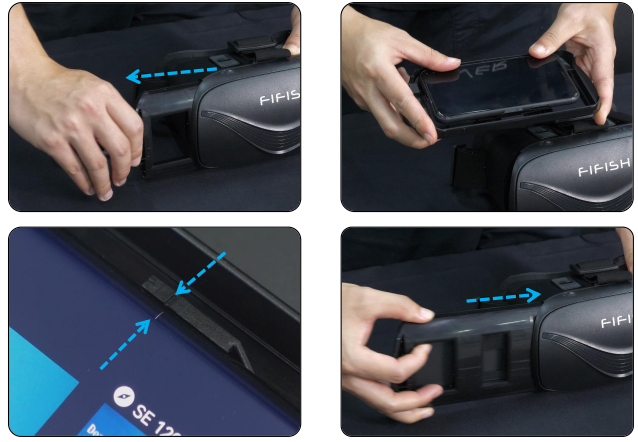
- Install the dinice to the VR bracket
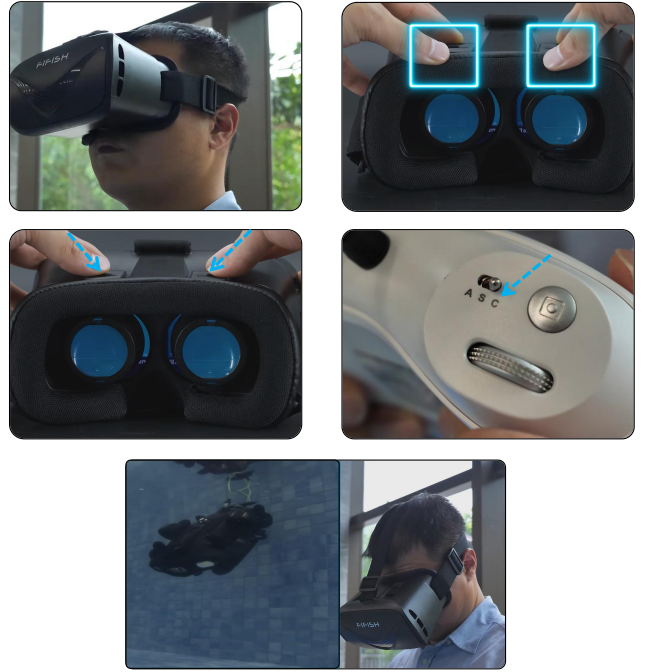
- Wear the VR goggle
- Adjust the view by moving the sliders
- Turn the remote control to mode C
VR control
Somatosensory control through VR goggle[1]
- Click the VR icon in the toolbox
- Install the device in the VR bracket
- Wear the VR goggle
- Adjust the view by moving the sliders
- Turn the remote control to mode C
VR control
Somatosensory control through VR goggle
- Click the VR icon in the toolbox
- Install the device in the VR bracket
- Wear the VR goggle
- Adjust the view by moving the sliders
- Turn the remote control to mode C
Toolbox, LIVE Streaming
LIVE Streaming
Board casting directly on YouTube, Facebook, or other social media networks.1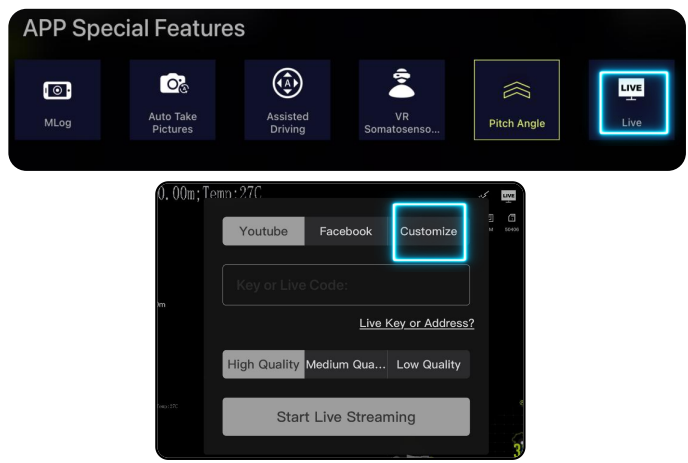
- Generate a Stream Key and Stream URL on YouTube or Facebook. Click the LIVE ico.n
- Paste the Stream URL and Stream Key in the column
- Select the LIVE quality (High, Medium, and Low) 2, 3
- Click “Start Live Streaming
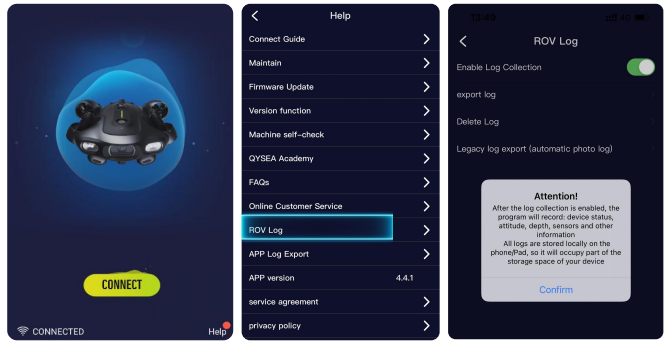
ROV Log
The navigation information can be recorded and output as a document
- Return to the main homepage and click Help in the lower right corner
- Select ROV Log
- Turn ON the Log Collection
- Click ’Connect’ and control the ROV to collect data
- Export log
OV Log
The navigation information can be recorded and output as a document
- Return to the homepage and click Help in the lower right corner
- Select ROV Log
- Turn ON the Log Collection
- Click ’Connect’ and control the ROV to collect data
- xport log
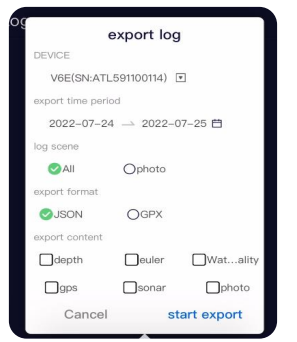
- Log scene: ‘All’ – Output all data collected twice per second ‘photo’ – Output the related data to photos which took present
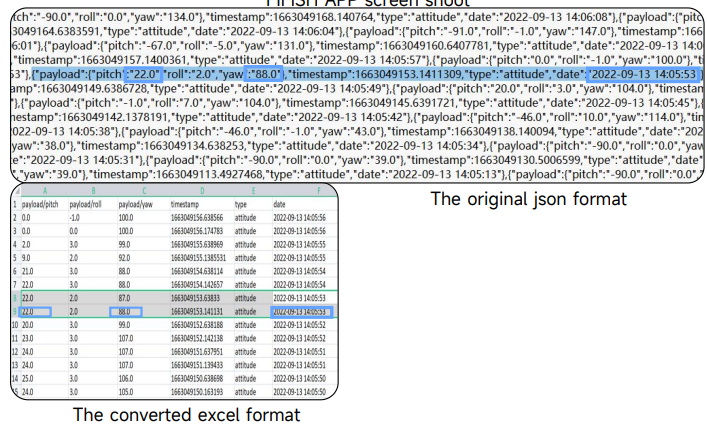
- Export format: ‘JSON’ – A standard text-based format for representing structureddatabasedon JavaScript object syntax. which can be converted to Excel format. ‘GPX’ – An XML file format for storing coordinate data. (requiredtoequipU-QPS to collect)
- Export content: ‘depth’ – The corresponding dive depth ‘euler’ – Posture data including pitch angle, roll angle and yawangle‘water quality’ – Water quality data including dissolved oxygen, turbidity, salinity and pH (required to equip related sensor to collect) ‘gps’ – Coordinate data including longitude and latitude(requiredtoequipU-QPS to collect) ‘sonar’ – Frontal sonar and Downward sonar data (required to equipAltimeterand Distance meter module to collect)
ROV Log
The navigation information can be recorded and output as a document
- Return to the homepage and click Help in the lower right corner
- Select ROV Log
- Turn ON the Log Collection
- Click ’Connect’ and control the ROV to collect data
- Export log

SD Card Removal
Remove the snap-fit protective cover for the protective cap of theSDcardslot cap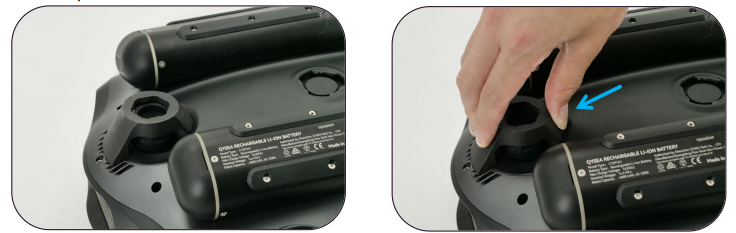
Remove the protective cover and use it to turn the SDcardslot capcounterclockwise to remove it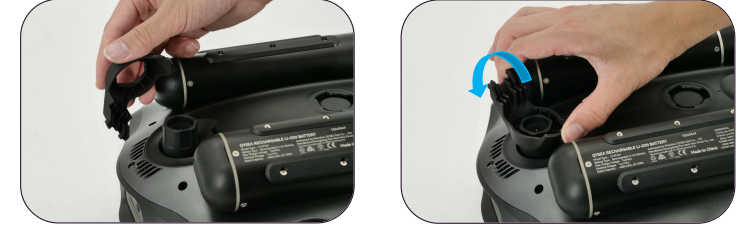
.Hardware connection-manipulator installation [1]
Remove the protective cap of the lower Q-interface and keepit properly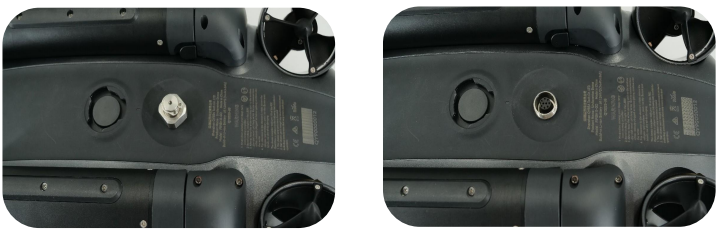
Insert the front hook of the bracket into the venting hole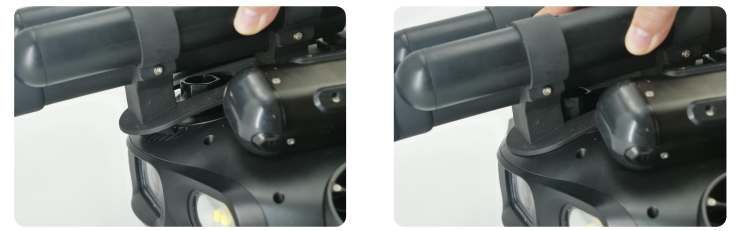
Lock the bracket to the mounting port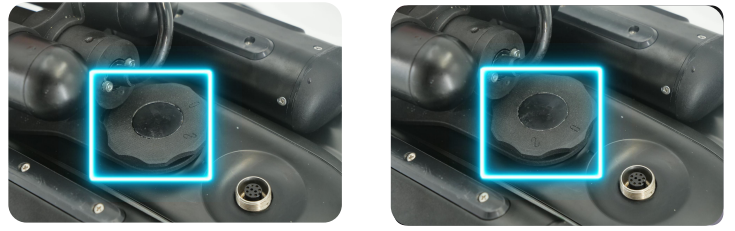
Connect the cable to the lower Q-interface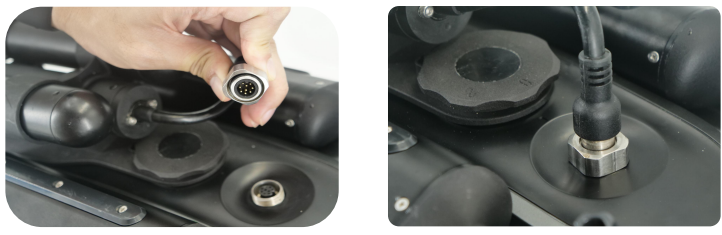
Maintenance
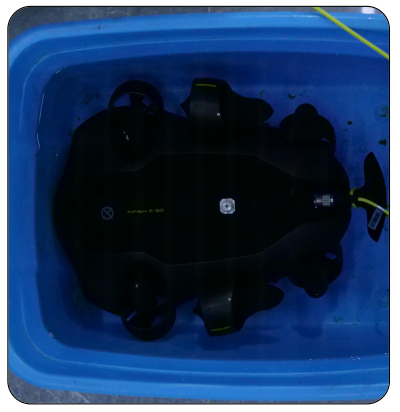
Motor Maintenance (After Every Dive)
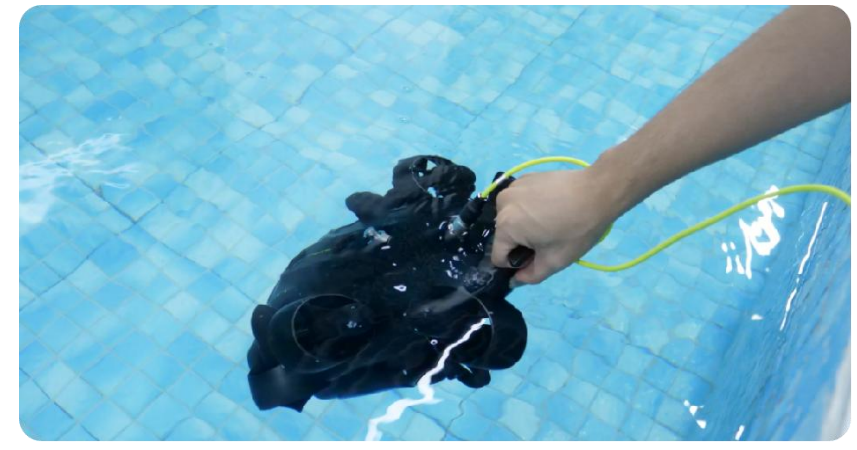
- Connect the RC to E-GO and open the FIFISH App (see HardwareConnectionsection, in Quick Start Guide). Make sure every motor is immersedine fresh water, see the picture(verticalsoaking in a bucket will have the same results)
- Open the FIFISH App, homepage, click “Help” in the bottom-right corner. Click”Maintain/Thrusters”, then press “Start”. All motors will rotate slowly. (4) In about 10 mins this cleaning program will stop. Air dry E-GO inae cool place and avoid direct sunlight.
- Keep 50% to 60% battery level before long-term storage.
- Charge to full once every 90 days.
- If you haven’t used FIFISH E-GO for more than 30 days, you needto use a charger to activate it.
FIFISH App download and Installations
- Option 1. Scan the above QR code to download the IFISH App.
- Option 2. Search the FIFISH on App Store (iOS) or Google Play (Android).
- Option 3. Go to QYSEA’s website at https://www.qysea.com/support/app-download/
Specifications
|
|
| Battery capacity | 69.12Wh |
| Number of Batteries | 2 pcs |
Disclaimer
We provide customers with after-sales services, excluding the following circumstances-
- Damage caused by unauthorized modification, disassembly, or shell opening not in accordance with
official instructions or manuals. - Damage caused by improper installation, incorrect use, or operation not in accordance with official instructions or manuals.
- Damage caused by a non-authorized service provider.
- Damage caused by unauthorized modification of circuits, mismatch, or misuse of the battery and
charger. - Damis’ age is caused by those who do not follow instructions and manual recommendations.
- Damage caused by operation in bad water conditions (i.e, strong currents, huge waves, etc.)
- Damage caused by operating the product in an environment with electromagnetic interference (i.,e. in mining areas or close to radio transmission towers, caves, mudconditionsiradiationions, tunnels, etc.).
- Damage caused by operating the unit with a low-charged or defective battery.
- Uninterrupted or error-free operation of a product.
- Loss of, or damage to, your data by a product.
- Damage caused by operating the ROV in the sensitive zone (military, natural resource protection zoning, marine conservation, ocean conservation, etc.)
- Damage caused by unpredictable factors (current, cave collapse, swallow ban by an animal, etc.)
- Products or parts with an altered identification label or from which the identification label has been removed.
Customer Service
- Website: https://www.qysea.com/
- Ph: +86-755-2266-2313