
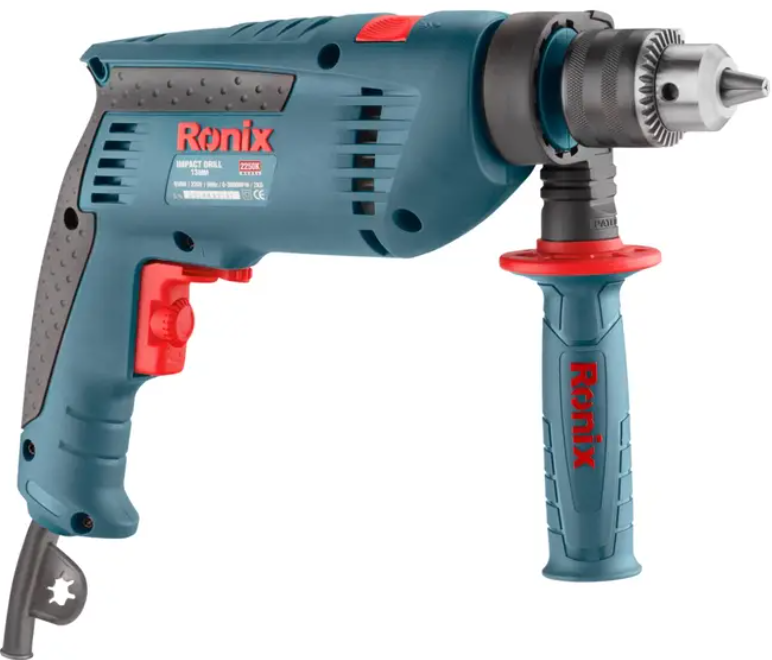
Ronix 2250K 13mm Electric Impact Drill
Safety Instructions
- Save all warnings and instructions for future reference.
- Keep the ork area clean and well-lit. Cluttered or dark areas invite accidents.
- Power tools create sparks, which may ignite the dust or fumes.
- Keep children and bystanders away while operating a power tool.
- Power tool plugs must match the outlet. Never modify the plug in any way.
- Do not use any adapter plugs with earthed (grounded) power tools.
- Unmodified plugs and matching outlets will reduce the risk of electric shock.
- There is an increased risk of electric shock if your body is earthed or grounded.
- Do not expose power tools to rain or wet conditions.
- Water entering a power tool will increase the risk of electric shock.
- Do not abuse the cord. Never use the cord for carrying, pulling, or unplugging the power tool.
- Keep the cord away from heat, oil, sharp edges, or moving parts.
- When operating a power tool outdoors, use an extension cord suitable for outdoor use.
- Use of a cord suitable for outdoor use reduces the risk of electric shock.
- If operating a power tool in a damp location is unavoidable, use a ground fault circuit.
- Interrupter (GFCI) protected supply. Use of a GFCI reduces the risk of electric shock.
- Stay alert, watch what you are doing, and use common sense when operating a power tool.
- Do not use a power tool while you are tired or under the influence of drugs, alcohol, or medication.
- A moment of inattention while operating power tools may result in serious personal injury.
- Use personal protective equipment. Always wear eye protection.
Use & Care
- Recharge only with the charger specified by the manufacturer. A charger that is suitable for one type of battery pack may create a risk of fire when used with another battery pack.
- Use power tools only with specifically designated battery packs. Use of any other battery packs may create a risk of injury and fire.
- When the battery pack is not in use, keep it away from other metal objects, like paper clips, coins, keys, nails, screws, or other small metal objects that can make a connection from one terminal to another. Shorting the battery terminals together may cause burns or a fire.
- Under abusive conditions, liquid may be ejected from the battery; avoid contact. If contact accidentally occurs, flush with water.
- If liquid contacts the eyes, additionally seek medical help. Liquid ejected from the battery may cause irritation or burns.
Service
- Have your power tool serviced by a qualified repair person using only identical replacement parts.
- This will ensure that the safety of the power tool is maintained.
- Follow the instructions for lubricating and changing accessories.
- Keep handles dry, clean, and free from oil and grease.
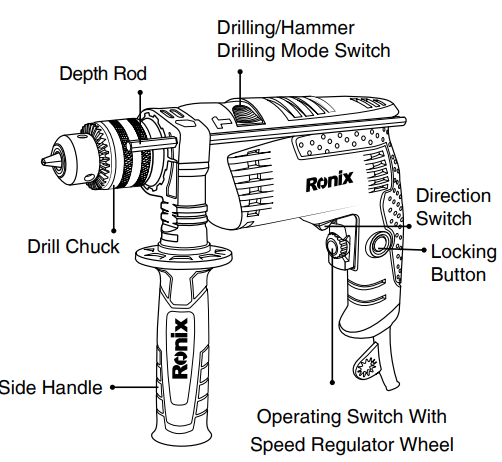
Part List
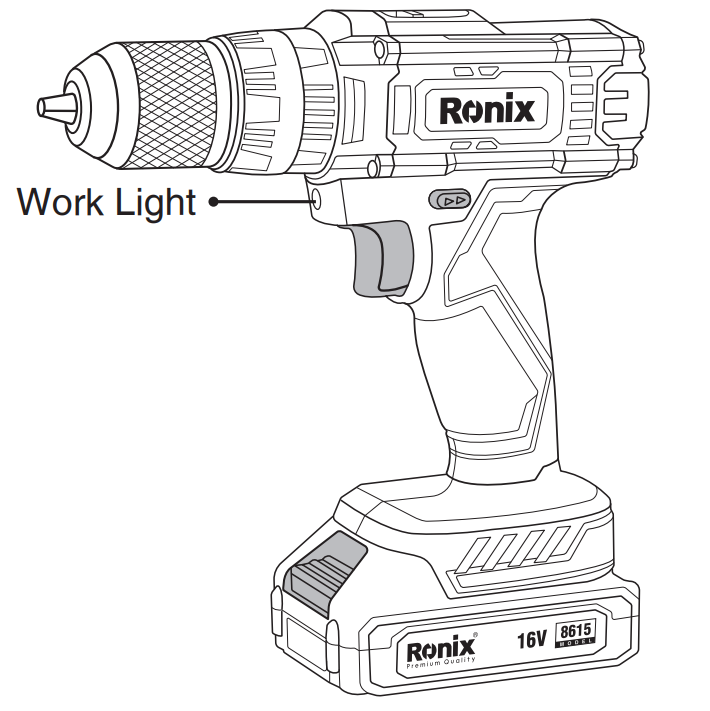
Cordless Drill/Screw Driver
- Hold the power tool by its insulated gripping surfaces when performing an operation where the fastener may contact hidden wiring or its own cord.
- Fasteners contacting a «live» wire may make exposed metal parts of the power tool live and could give the operator an electric shock.
- Always be sure you have a firm footing. Be sure no one is below when using the tool in high locations.
- Hold the tool firmly.
- Keep your hands away from rotating parts.
- Do not leave the tool running. Operate the tool only when hand-held.
- Do not touch the drill bit or the workpiece immediately after operation; they may be extremely hot and could burn your skin.
- Some material contains chemicals that may be toxic.
- Take caution to prevent dust inhalation and skin contact. Follow the material supplier’s safety data.
Lighting Up
Do not look in the light or see the source of light directly. Pull the switch trigger to light up the lamp. The lamp keeps on lighting while the switch trigger is being pulled.
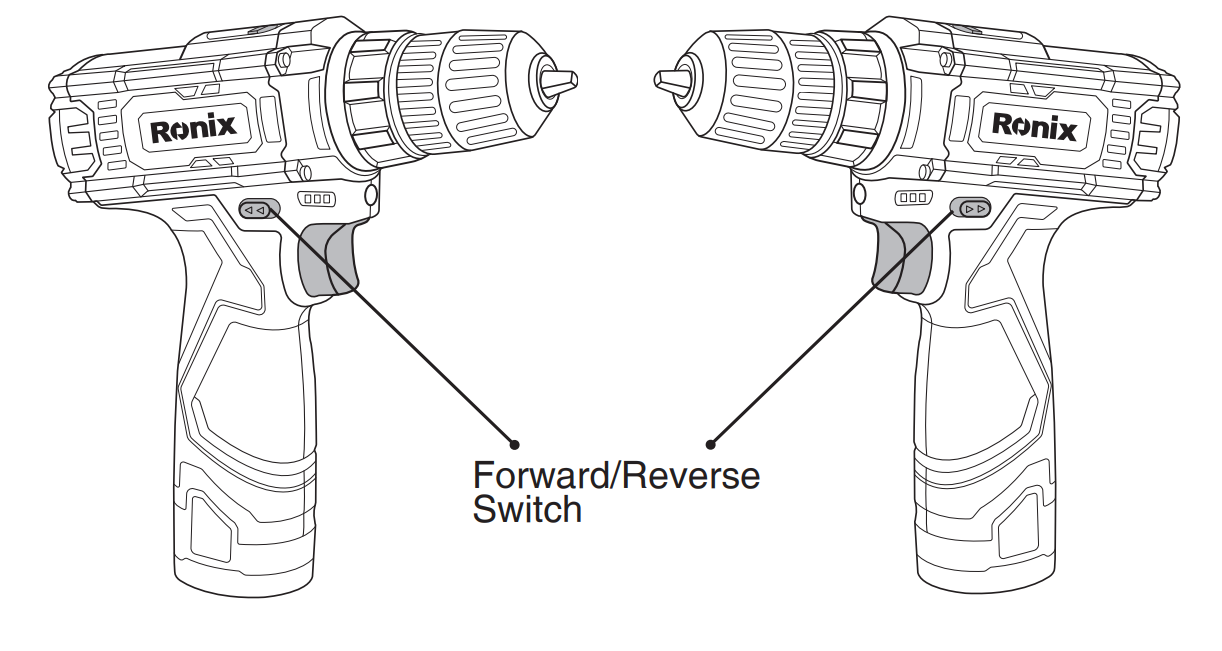
Reversing Switch Action
This tool has a reversing switch to change the direction of rotation. Depress the reversing switch lever from the A side for clockwise rotation or from the B side for counterclockwise rotation. When the reversing switch lever is in the neutral position, the switch trigger cannot be pulled.
Functional Description
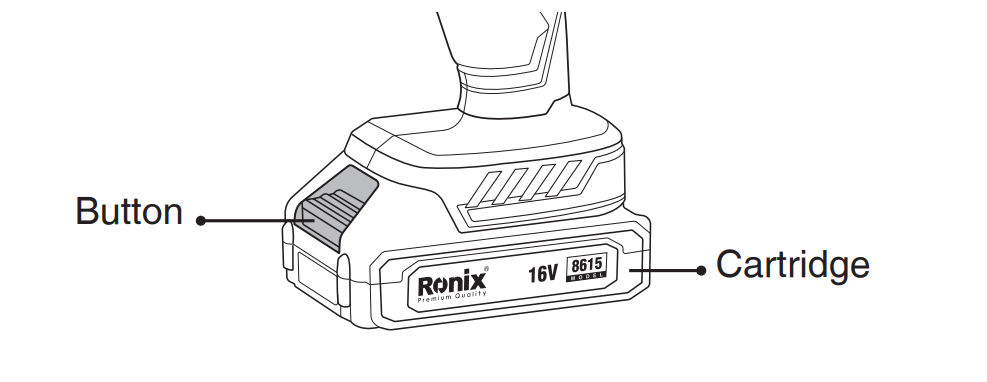
Installing or Removing a Battery
- To remove the battery cartridge, withdraw it from the tool while sliding the button on the front of the cartridge.
- To insert the battery cartridge, align the tongue on the battery cartridge with the groove in the housing and slip it into place. Always insert it all the way until it locks in place with a little click.
- Do not use force when inserting the battery cartridge. If the cartridge does not slide in easily, it is not being inserted correctly.
Switch Action
- Before inserting the battery cartridge into the tool, always check to see that the switch trigger actuates properly and returns to the «OFF» position when released.
- Always check the direction of rotation before the operation.
- Use the reversing switch only after the tool comes to a complete stop. Changing the direction of rotation before the tool stops may damage the tool.
- When not operating the tool, always set the reversing switch lever to the neutral position.

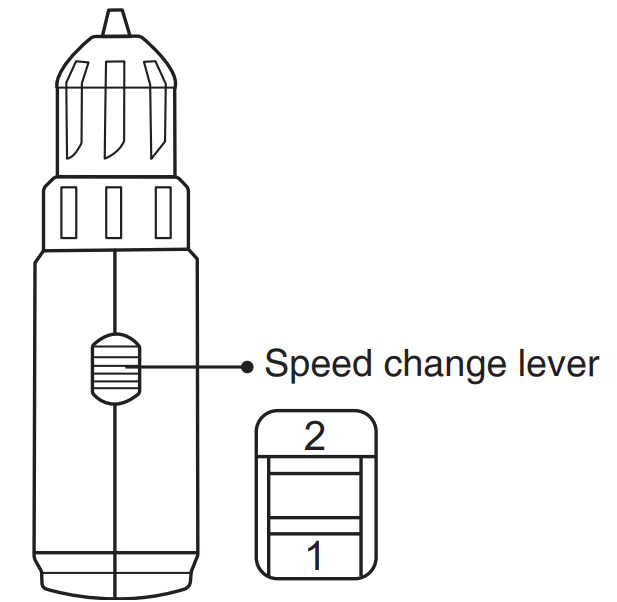
Speed Change
To change the speed, first switch off the tool and then slide the speed change lever to the «2» side for high speed or the «1» side for low speed. Be sure that the speed change lever is set to the correct position before operation. Use the right speed for your job.
- Always set the speed change lever fully to the correct position. If you operate the tool with the speed change lever positioned halfway between the «1» side and the «2» side, the tool may be damaged.
- Do not use the speed change lever while the tool is running. The tool may be damaged.
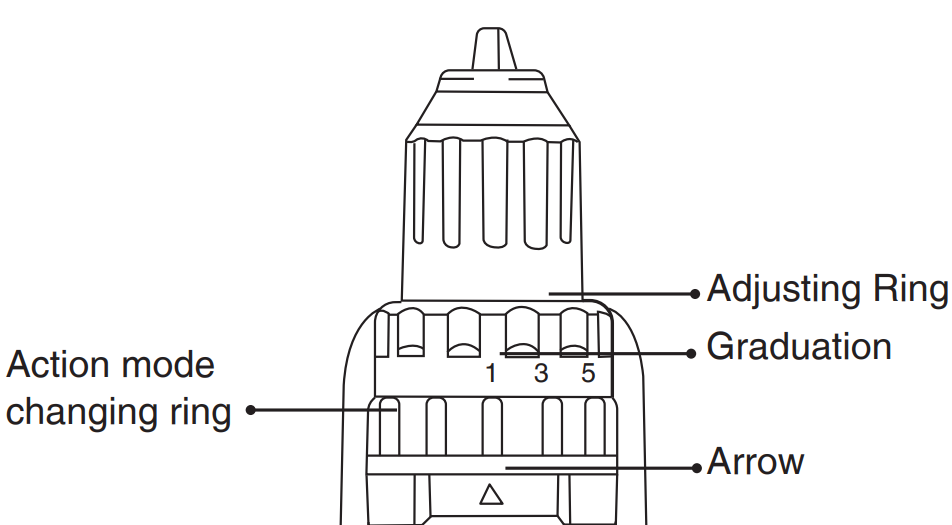
Selecting Action Mode
Always set the ring correctly to your desired mode mark. If you operate the tool with the ring positioned halfway between the mode marks, the tool may be damaged.
- Action mode changing ring
- Adjusting ring
- Graduation
- Arrow
This tool has three action modes.
- Drilling mode (rotation only)
- Hammer drilling mode (rotation with hammering)
- Screwdriving mode (rotation with clutch). Select one mode suitable for your work.
- Turn the action mode changing ring and align the mark that you selected with the arrow on the tool body of your work.
- Turn the action mode changing ring and align the mark that you selected with the arrow on the tool body.
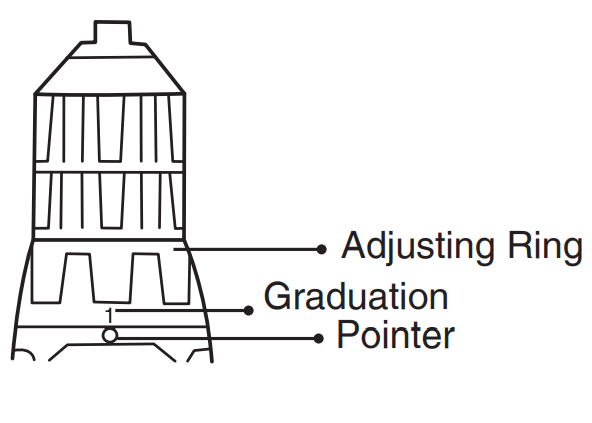
Adjusting the Torque
The fastening torque can be adjusted in 18 steps by turning the adjusting ring so that its graduations are aligned with the pointer on the tool body. The fastening torque is minimum when the number 1 is aligned with the pointer and maximum when the marking is aligned with the pointer.
Before actual operation, drive a trial screw into your material or a piece of duplicate material to determine which torque level is required for a particular application.
Assmebly
- Always be sure that the tool is switched off and the battery cartridge is removed before carrying out any work on the tool.
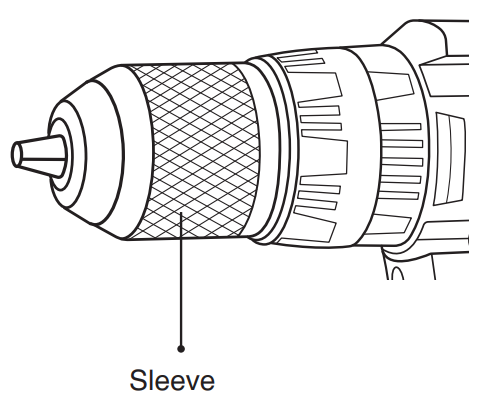
- Turn the sleeve counterclockwise to open the chuck jaws. Place the bit in the chuck as far as it will go. Turn the sleeve clockwise to tighten the chuck.
- To remove the bit, turn the sleeve counterclockwise.
Operationg
Drilling
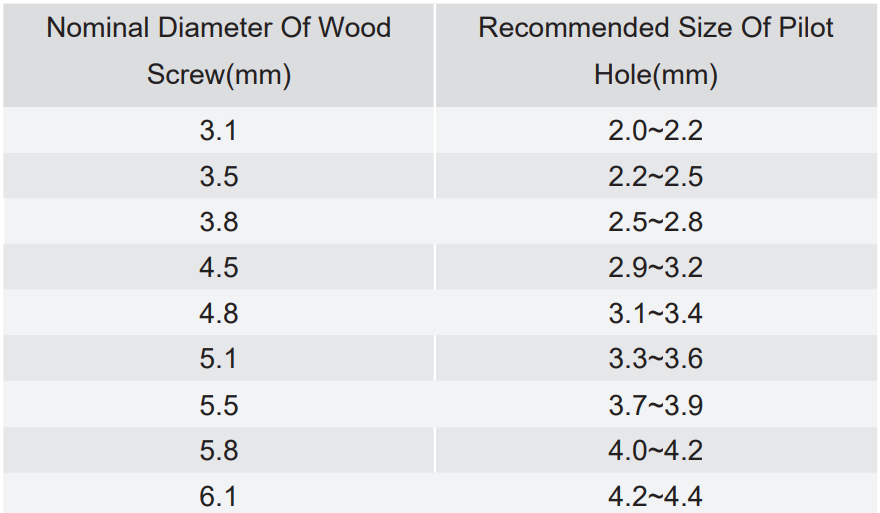
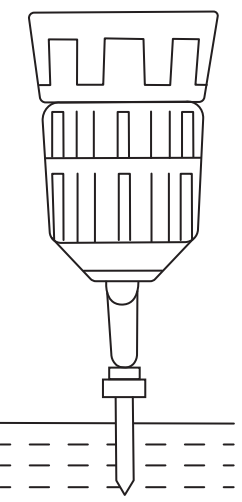
First, turn the adjusting ring so that the pointer points to the marking. Then proceed as follows. When drilling in wood, the best results are obtained with wood drills equipped with a guide screw. The guide screw makes drilling easier by pulling the bit into the workpiece.
To prevent the bit from slipping when starting a hole, make an indentation with a center punch and hammer at the point to be drilled. Place the point of the bit in the indentation and start drilling. Use a cutting lubricant when drilling metals. The exceptions are iron and brass, which should be drilled dry.
Screw Driving
Adjust the adjusting ring to the proper torque level for your work. Place the point of the driver bit in the screw head and apply pressure to the tool. Start the tool slowly and then increase the speed gradually. Release the switch trigger as soon as the clutch cuts in.
- Make sure that the driver bit is inserted straight in the screw head, or the screw and/or bit may be damaged.
- Always secure small work pieces in a vise or similar hold-down device.
- If the tool is operated continuously until the battery cartridge has discharged, allow the tool to rest for 15 minutes before proceeding with a fresh battery.
Maintainance
- Always be sure that the tool is switched off and the battery cartridge is removed before attempting to perform inspection or maintenance.
- Never use gasoline, benzene, thinner, alcohol, or the like. Discoloration, deformation, or cracks may result.
Specifications

Environmental Instructions
- Dispose of cardboard packaging and polyethylene (PE) bags in the appropriate containers for separate collection of municipal waste according to their description.
- If there are batteries in the device, remove them and separately return them to the collection and storage facility. Return the used device to a suitable collection and storage facility, as the hazardous substances in it may pose a threat to health and the environment.
- Waste electrical equipment is waste that contains substances harmful to humans, animals, and the environment.
- These substances can lead to contamination of the soil, water, or air, and through this they can get into the human body and lead to numerous health ailments, such a vision, hearing, and speech disorders; they can also lead to kidney, liver, and heart damage, and cause skin diseases.
- Harmful substances can also have adverse effects on the respiratory and reproductive systems and lead to cancerous changes. Consumption of plants growing on the contaminated soils, and products made from them, may risk the above-mentioned health effects.
- Do not dispose of the device in the municipal waste container!!! Service: If you wish to purchase spare parts or report any complaints, please contact directly with the seller who issued the receipt directly.
Customer Support
- Address: Lyoner Str. 36 60528 Frankfurt am Main
- Tel:+49 69 310 900 66
- Website: www.ronixtools.com
FAQs
Q: What is the main function of the Ronix 2250K Impact Drill?
For drilling and mild hammer drilling in materials like concrete, masonry, metal, and wood, the Ronix 2250K is a multipurpose electric impact drill. It blends impact force and speed for both professional and do-it-yourself applications.
Q: What is the chuck size of this drill?
You may utilise a variety of drill bits for different materials and purposes with this model’s 13mm keyed metal chuck.
Q: What is the motor power of the Ronix 2250K?
It has a 710W high-performance motor that provides the best power and torque for jobs involving drilling and screw driving.
Q: Does the Ronix 2250K have variable speed control?
Indeed. You can modify the drilling speed based on the material by using the variable speed trigger; for example, you can use a lower speed for metal and a higher speed for wood or masonry.
Q: Can this drill be used for screwdriving?
Yes, although it works best for sporadic screwdriver jobs. Set the tool to a modest speed and stay out of impact mode to avoid overdriving screws.
Q: Does this model support reverse rotation?
Indeed. A forward/reverse switch on the Ronix 2250K makes it simple to back out drill bits or remove screws from holes.
Q: What is the no-load speed of this impact drill?
With a maximum impact rate of 48,000 BPM and a no-load speed of 2,800 RPM, the Ronix 2250K ensures effective drilling performance on a variety of materials.
Q: How do I use the depth gauge?
Adjust the depth gauge rod to the desired depth by inserting it into the side handle bracket. This guarantees uniform hole depths, particularly when drilling several identically sized holes.
Looking for more drills? Alongside the Ronix 2250K 13mm Electric Impact Drill, you might also find the Ronix 2211P 600 W 13mm Impact Drill helpful for your projects.
1 Comment
Pingback: Ronix 2211P 600 W 13mm Impact Drill | Safety & User Guide