
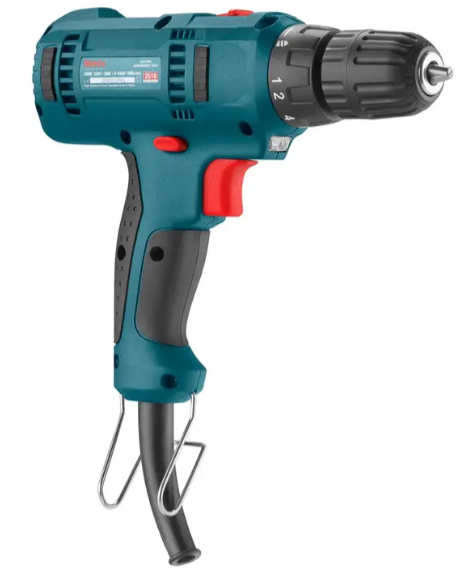
Ronix 2510 10mm Electric Screw Driver
Safety Instructions
- Keep your work area clean and well-lit. Cluttered benches and dark areas invite accidents when using the Ronix 2510 10mm Electric Screw Driver.
- Keep children and bystanders away while operating a power tool.
- Distractions can cause you to lose control.
- Power tool plugs must match the outlet. Never modify the plug in any way.
- Do not use any adapter plugs with earthed (grounded) power tools.
- Unmodified plugs and matching outlets will reduce the risk of electric shock.
- Avoid body contact with grounded surfaces such as pipes, radiators, ranges, and refrigerators.
- Don’t expose power tools to rain or wet conditions.
- Water entering a power tool will increase the risk of electric shock.
- Do not abuse the cord. Never use the cord for carrying, pulling, or unplugging the power tool.
- Keep the cord away from heat, oil, sharp edges, or moving parts.
- Damaged or entangled cords increase the risk of electric shock.
- When operating a power tool outdoors, use an outdoor extension cord marked “W-A” or “W”.
- The use of an RCD reduces the risk of electric shock.
- Stay alert, watch what you are doing, and use common sense when operating the Ronix 2510 10mm Electric Screw Driver.
- Do not use tools while tired or under the influence of drugs, alcohol, or medication.
- A moment of inattention while operating power tools may result in serious personal injury.
- Proper footing and balance enable better control of the tool in unexpected situations.
- Dress property. Do not wear loose clothing or jewelry.
- Keep your hair, clothing, and gloves away from moving parts.
- Do not force the power tool. Use the correct power tool for your application.
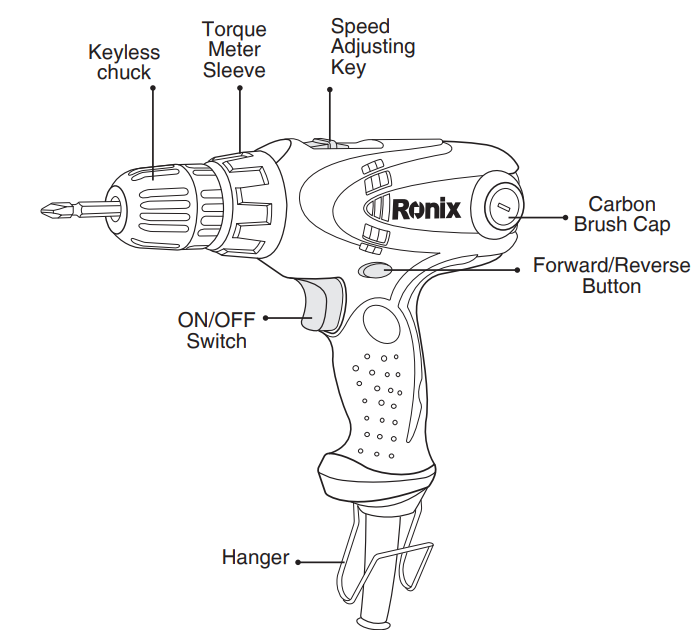
Part List
Service
Have your Ronix 2510 10mm Electric Screw Driver serviced by a qualified repair person using only identical replacement parts. Special Safety Warnings for Impact Drill:
- Wear ear protectors during impact drills. Noise exposure can cause hearing Loss.
- Use auxiliary handles supplied with the tools. Loss of control can cause personal injury.
- Hold the power tool by its insulated gripping surfaces while performing an operation where the cutting accessory may contact hidden wiring or its cord.
- Cutting accessory contacting a “live” wire may make exposed metal parts of the power tool “live” and could give the operator an electric shock.
Assembly
Charging the tool
- Before any work on the Ronix 2510 10mm Electric Screw Driver (e.g., maintenance tool change, etc.), as well as during transport and storage, set the rotational direction switch to the center position. An unintentional actuation of the on/off switch can lead to injuries.
- The drill spindle is locked when the ON/OFF switch 5 is not pressed. This makes the quick, convenient, and easy changing of the tool in the drill chuck possible.
- Open the keyless chuck by turning it in the opposite direction until the tool can be inserted. Insert the tool.
- Firmly tighten the collar of the keyless chuck by hand in the rotation direction.
Replacing the Chuck
Before any work on the power tool, such as maintenance or part replacement on the Ronix 2510 10mm Electric Screw Driver, as well as during transport and storage, set the rotational direction switch to the center position. Unintentional use of the ON/OFF switch can lead to injuries.
Removing the Screw
The keyless chuck is secured with a securing screw against unintentional loosening from the drill spindle. Completely open the keyless chuck and unscrew the securing screw in the rotation direction. Please note that the securing screw has a left-hand thread.
Removing the chuck
Clamp the short end of a hex key into the keyless chuck. Place the machine on a stable surface(e.g., workbench). Hold the machine firmly and loosen the keyless chuck by turning the hex key in the rotation direction. Loosen a tight-seated keyless chuck by giving the long end of the hex key a light blow. Remove the hex key from the keyless chuck
Mounting the Drill
The drill chuck must be tightened with a tightening torque of approximately. 20Nm. Screw the securing screw in the counterclockwise direction into the opened keyless chuck; Tightening torque approx. 4-5Nm. Always use a new securing screw, as the threads are covered with a thread-locking compound that loses its effect after multiple uses.
Dust/Chip Extractions
Dust from materials such as lead-containing coatings, some wood types, minerals, and metal can be harmful to one’s health. Touching or breathing in the dust can cause allergic reactions and/or lead to respiratory infections in the user or bystanders.
Operation
On/Off
This tool is started and stopped by pressing and releasing the trigger ON/OFF switch. The speed can be adjusted in the high gear or the low gear by controlling the trigger-pressing force. For continuity operation, press the lock button while pressing the trigger.
Reversing the Direction
The F/R lever is used to reverse the rotation of the machine. However, this is not possible with the ON/OFF switch. Right rotation: for drilling and deriving in screws, push the F/R lever left stop. Left rotation: for loosening and unscrewing screws and nuts, press the F/R lever through to the right stop.
Adjusting the Speed
The speed of the switched-on power tool can be variably adjusted according to how far the ON/OFF switch 5 is pressed. Fully automatic spindle locking (auto-lock). When the on/off switch 5 is not pressed, the drill spindle and thus the top holder are locked. This enables screws to be screwed in, and allows for the tool to be used as a screwdriver.
Working Instructions
- After a long period of working at low speed, allow the machine to cool down by running it for approximately 3 minutes at maximum speed with no load.
- For drilling in metal, use only perfectly sharpened HSS drill bits (HSS=high speed steel).
- Before screwing larger and longer screws into hard materials, it is advisable to predrill a pilot hole with the core diameter of the thread to approx.2/3 of the screw length.
- Light pressure on the ON/OFF switch results in a low rotational speed.
- Further pressure on the switch results in an increase in speed.
Specifications
- Model 2513T
- Power 280W
- Voltage 220-240V
- Frequency 50-60Hz
- Chuck Size 10mm
- Max Torque 36N.M
- No-load Speed 0-440RPM / 0-1650RPM
- Weight 1.3Kg
- Includes carbon brush 1pai
Environmental Instructions
- Dispose of cardboard packaging and polyethylene (PE) bags in the appropriate containers for separate collection of municipal waste according to their description.
- If there are batteries in the device, remove them and separately return them to the collection and storage facility. Return the used device to a suitable collection and storage facility, as the hazardous substances in it may pose a threat to health and the environment.
- Waste electrical equipment is waste that contains substances harmful to humans, animals, and the environment.
- These substances can lead to contamination of the soil, water, or air, and through this they can get into the human body and lead to numerous health ailments, such a vision, hearing, and speech disorders; they can also lead to kidney, liver, and heart damage, and cause skin diseases.
- Harmful substances can also have adverse effects on the respiratory and reproductive systems and lead to cancerous changes. Consumption of plants growing on the contaminated soils, and products made from them, may risk the above-mentioned health effects.
- Do not dispose of the device in the municipal waste container!!! Service: If you wish to purchase spare parts or report any complaints, please contact directly with the seller who issued the receipt directly.
Customer Support
- Address: Lyoner Str. 36 60528 Frankfurt am Main
- Tel:+49 69 310 900 66
- Website: www.ronixtools.com
FAQs
Q: What types of screws can the Ronix 2510 handle?
Standard screws with a diameter of up to 10mm can be used with the Ronix 2510. It is appropriate for do-it-yourself, home, and workshop applications since it works well with wood, metal, and plastic screws.
Q: Can I adjust the torque settings?
Yes, the torque control on the Ronix 2510 is adjustable. For brittle materials like plastic or softwood, use a lower setting; for harder materials like metal or hardwood, use a higher setting.
Q: Is the screwdriver cordless?
No, because the 2510 is a corded electric screwdriver, it has steady power without relying on a battery. Always connect to a power supply that is compatible.
Q: Can I use the screwdriver for small electronics?
Yes, but only on screws that need a moderate amount of torque and fit the bit size. To prevent damage to particularly delicate devices, use a set of precision screwdrivers.
Q: Can the Ronix 2510 be used for furniture assembly?
Yes, it is perfect for putting together minor fixtures, cupboards, and flat-pack furniture. For best results, use the right bit and torque.
Q: Is the screwdriver suitable for professional use?
It is appropriate for small workshops, do-it-yourself projects, and light to medium-duty jobs. Consider a professional cordless or high-torque type for heavy-duty industrial applications. If you need a more powerful tool for heavy-duty drilling or masonry work, you might also be interested in the Ronix 2732 1250 W Rotary Hammer, which complements the Ronix 2510 10mm Electric Screw Driver for tougher tasks.
Q: Does it come with a warranty?
Yes, a manufacturer’s warranty is usually included with Ronix items. To keep your warranty intact, keep your purchase receipt and adhere to usage and maintenance guidelines.
Q: Can I use accessories from other brands?
Yes, provided that the bit is firmly inserted into the 10mm chuck. Using incompatible or low-quality parts, however, could harm the instrument or decrease efficiency.
1 Comment
Pingback: Ronix 2732 1250 W Rotary Hammer | Specs, Safety & FAQs