
Ronix 5720 200mm Band Saw Wood Cutter

Safety Instructions
- Keep the work area clean and well-lit. Cluttered or dark areas invite accidents.
- Power tools create sparks, which may ignite the dust or fumes.
- Keep children and bystanders away while operating a power tool.
- Distractions can cause you to lose control.
- Power tool plugs must match the outlet. Never modify the plug in any way.
- Don’t use any adaptor plugs with earthed (grounded) power tools.
- Unmodified plugs and matching outlets will reduce the risk of electric shock.
- There is an increased risk of electric shock if your body is earthed or grounded.
- Don’t abuse the cord. Never use the cord for carrying, pulling, or unplugging the power tool.
- Keep the cord away from heat, oil, sharp edges, or moving parts.
- Damaged or entangled cords increased the risk of electric shock.
- When operating a power tool outdoors, use an extension cord suitable for outdoor use.
- Using a cord suitable for outdoor use will reduce the risk of electric shock.
- Use of an RCD reduces the risk of electric shock.
- Stay alert, watch what you are doing, and use common sense when operating a power tool.
- Don’t use a power tool while you are tired or under the influence of drugs, alcohol, or medication.
- A moment of inattention while operating power tools may result in serious personal injury.
- Use personal protective equipment. Always wear eye protection.
- Remove any adjusting key or wrench before turning the power tool on.
- A wrench or a key left attached to a rotating part of the power tool may result in personal injury.
- Don’t overreach. Keep proper footing and balance at all times.
- This enables better control of the power tool in unexpected situations.
- Loose clothes, jewelry, or long hair can be caught in moving parts.
- The use of dust collection can reduce dust-related hazards.
Use & Care
- Don’t force the power tool. Use the correct power tool for your application.
- The correct power tool will do the job better and safer at the rate for which it was designed.
- Don’t use the power tool if the switch doesn’t turn it on and off.
- Any power tool that cannot be controlled with the switch is dangerous and must be repaired.
- Such preventive safety measures reduce the risk of accidentally starting the power tool.
- Power tools are dangerous in the hands of untrained users.
- If damaged, have the power tool repaired before use.
- Many accidents are caused by poorly maintained power tools.
- Keep cutting tools sharp and clean.
- Use the power tool, accessories, and tool bits, etc.
- In accordance with the instructions, taking into account the working conditions and the work to be performed.
- Use of the power tool for operations different from those intended could result in a hazardous situation.
For additional workshop tasks, including grinding and surface preparation, you might also consider the Ronix 3250 180mm 2200 W Angle Grinder. This tool complements the Ronix 5720 Band Saw for versatile woodworking and metalworking projects.
Service
- Have your power tool serviced by a Ronix Services qualified repair person.
- Using only identical replacement parts. This will ensure that the safety of the power tool is maintained.
- Follow the instructions for lubricating and changing accessories.
- Keep handles dry, clean, and free from oil and grease.
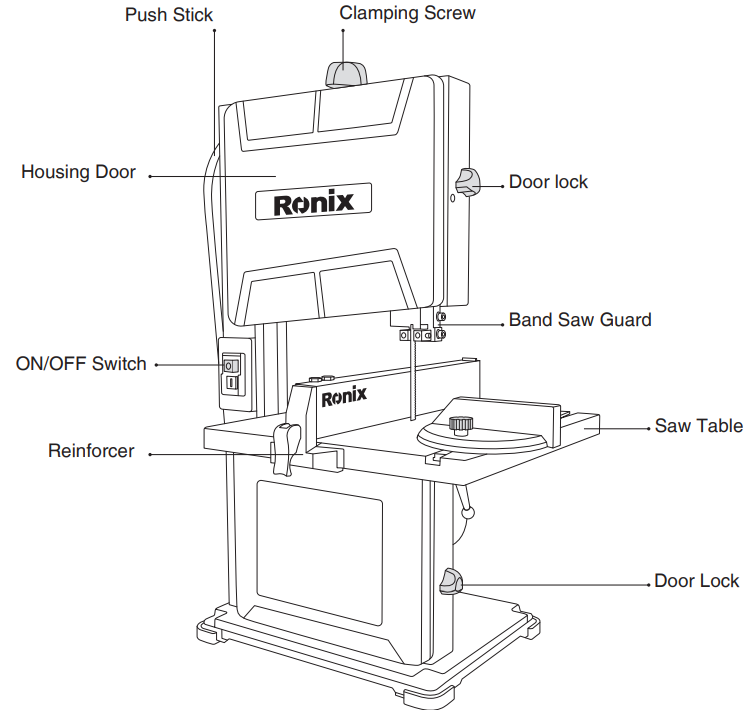
Part List
Content of Box
Specifications
- Model: 5720
- Motor Power: 350W
- Motor Type: Induction motor
- Voltage: 220-240V
- Frequency: 50-60Hz
- No-Load Speed: 1500RPM
- Total Length: 485mm
- Total Height: 675mm
- Work Table Size: 300×300mm
- Tilt Range: 0-45 degrees
- Blade Width: 6.35mm
- Blade Thickness: 0.35mm
- Blade Size: 1400mm
- Blade Material: 65mn
- Band Wheel: 200mm
- Cutting Depth: 80mm
- Cutting Size: 200mm
- Cutting Capacity: @45°: 50mm, @0° : 80mm
- Drive: motor shaft
- Saw Dust Diameter: φ40mm
- Table Material: Q235A steel
- Weight(N.W): 15.9Kg
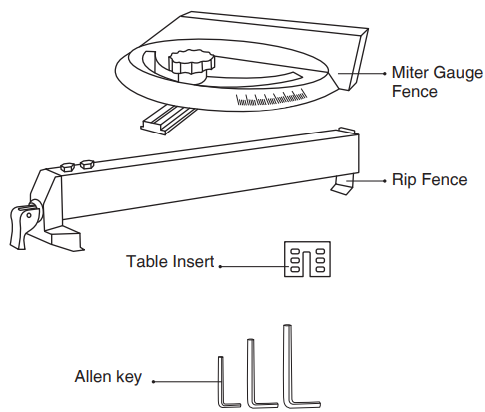
Includes
- 1pc Push Rod
- 1set Angle Ruler
- 3pcswrench (3mm,4mm,5mm)
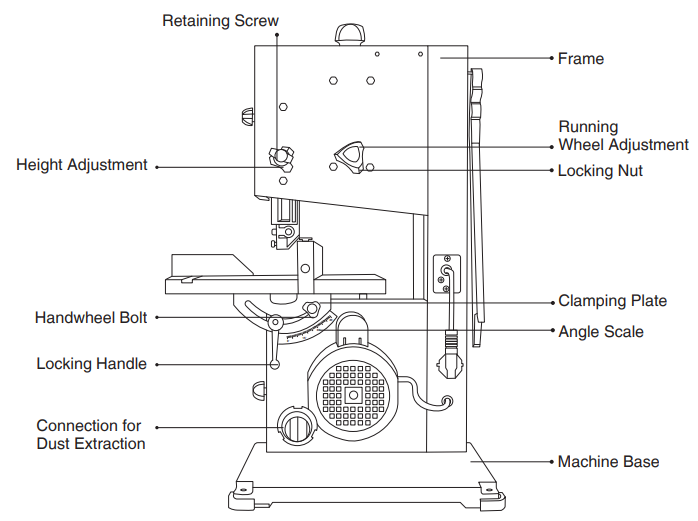
Controls & Functions
Before working with the machine or making adjustments, familiarize yourself with all the controls and how they function.
- Danger of cuts! Never move the band saw guard by hand. Loosen the locking screw of the saw blade guard.
- Raise or lower the band saw guard by turning the height adjustment (7).
- Direction of rotation as seen from behind
- Raising
- Lowering
- Tighten the retaining screw.

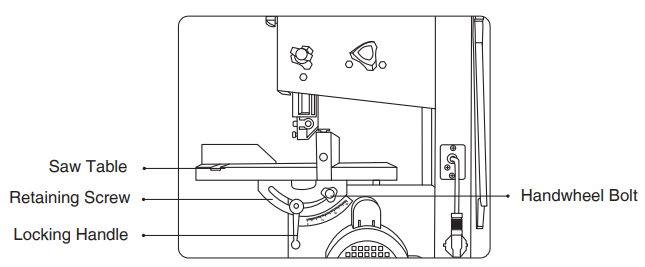
Tilting the Table
To adjust the Saw table tilt, first release the locking handle by turning it, then unscrew the Handwheel bolt. Tilt the saw table by using the angle scale to show the inclination. After that, tighten the locking handle and the handle screw.
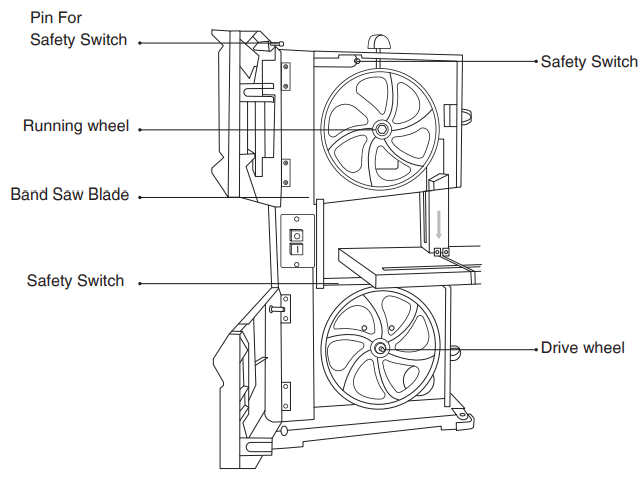
Opening the Door
Remove the mains plug from the socket before opening the housing door.
- TURN THE DOOR LOCK
After a maximum of 2 rotations, the housing door opens slightly. The safety switches interrupt the power circuit. - CLOSING THE HOUSING DOOR
To close the housing door, Press and hold the housing door against the frame, then turn the door lock.
Operation
- The following safe working practices are considered to contribute to safety, but may not be appropriate complete to every application, and they cannot cover every possible danger.
- When working in closed spaces, connect the machine to a dust extraction system.
- While the band saw is off, clean the bandsaw blade regularly.
- For your personal protection, wear safety goggles and hearing protection when working.
- Wears a hair net if you have long hair. Roll up loose sleeves to above the elbows.
- Before starting work, all protective and safety devices must be securely mounted on the machine. When working, always position the band saw guard as close as possible to the workpiece.
- Always hold the workpiece so that your fingertips point away from the bandsaw.
- Safely fold unused band saw blades and store them in a dry place.
- Check the saw blade before use. Do not use faulty band saw blades.
- Wear protective gloves when handling the band saw blade.
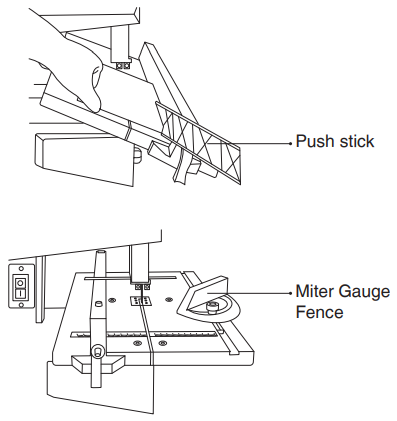
- Use the push stick to manually feed narrow workpieces.
- Using workpieces longer than the saw work table may cause tilting at the end of the cutting operation.
- Lower the band saw guard as close as possible to the workpiece for all cutting procedures.
- The workpiece must always be guided with both hands and heels flat on the saw table.
- When sawing, the workpiece must always be guided by its longest side.
Switching On & Sawing
Always inspected the machine for obvious defects, such as safety devices, loose screws, damaged parts and etc. have remedied the defects. Check the band saw blade for damage; if it has cracks, replace it. Insert the machine plug into a wall socket. Connect the connection for dust extraction to a vacuum cleaner. First, switch the vacuum cleaner on.
- STRAIGHT CUTS
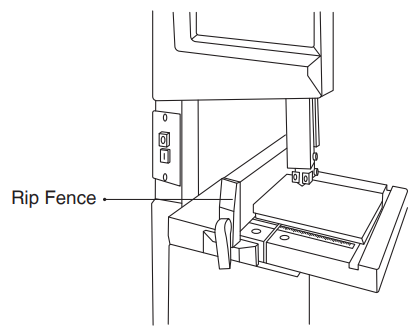
Always use the rip fence for straight cuts to prevent the workpiece from tilting or slipping.
- MOUNTING THE RIP FENCE
Open the quick-release lever of the rip fence. Push the rip fence from the side onto the saw table. Move the rip fence on the saw table. Make sure that both scales are set to the same value. Close the quick-release lever of the rip fence. - ANGULAR CUTS
There are two options for sawing diagonally:- Sawing with a tilted saw table
Set the miter gauge fence to the desired angle. Slide the rail of the miter gauge fence into the guide on the saw table. While the machine is switched off, check that the guide is completely inside the rail. If possible, attach the rip fence to the left side of the saw table. - Sawing with a tilted saw table
Set the saw table to the desired inclination. If possible, attach the rip fence to the right side of the saw table. This will prevent the workpiece from slipping.
- Sawing with a tilted saw table
- CURVED CUTS
Your fingers are particularly at risk when cutting curves! Take special care. Remove the rip fence and the miter gauge fence. Use an auxiliary template for executing repeat curved, irregular cuts. When making curved and irregular cuts in the workpiece, push the workpiece evenly forward using both hands, with your fingers closed. Keep your hands in the safe area when holding the workpiece.
Ending
Turn the machine off with the ON/OFF switch. Press the O button. Wait for the band saw blade to come to a complete standstill. Pull out the mains plug. Release the tension of the band saw blade. It helps to improve the band saw blade’s lifetime. Clean the machine.
Cleaning & Storage
- Electric shock! Remove the mains plug before carrying out any adjustments, maintenance, or repair work.
- Risk of burn injury! Allow the machine to cool off before any maintenance or cleaning is undertaken.
- Cutting injuries! Wear cut-resistant gloves when working with the band saw.
- Keep the ventilation slits and motor housing of the machine clean. Use a dry cloth or brush to do this.
- Clean the band saw guard with a brush or by blowing out with compressed air.
- Open both housing doors.
- Open the cover of the band saw blade on the band saw guard.
- Remove the sawdust with a brush or by blowing out with compressed air.
- Close both housing doors.
Adjusting the Positioning
- Pull out the mains plug.
- Use hand protection.\\\\\
- Adjusting the position of the band saw blade on the running wheel and drive wheel.
- Set point: The band saw blade runs as centrally as possible on the drive wheel and the running wheel.
- The band saw blade must not run outside the black tires.
- Loosen the locking nut of the running wheel adjustment.
- Turn the running wheel while adjusting.
- Direction of rotation as seen from behind
- Running wheel to the rear
- Running wheel to the front
- Check the position of the band saw blade on the drive wheel.
- If it is no longer running in the middle, then reduce the setting slightly.
- Turn the running wheel a few more revolutions, and observe the position of the band saw blade.
- At the end, secure the running wheel adjustment with the locking nut.
- Close the upper housing door.
Changing the Blade
If you have difficulty mounting the band saw blade, call a qualified person. Only use Ronix saw blades that, suitable for your band saw. Open both housing doors. Remove one screw of the reinforcer and loosen the second screw. Lower the band saw guard all the way down.
Open the cover of the band saw blade on the band saw guard. Use the safety gloves. Release the tension of the band saw blade, then remove the band saw blade. For installing a new saw blade, follow the steps above. Refer to adjusting the position of the band saw blade section. At the end, close both housing doors.
- Store the device and its accessories in a dark, dry,frost-proof place that is inaccessible to children.
- The optimum storage temperature is between 5˚and 30˚C.
- Store the electrical tool in its original packaging.
- Cover the electrical tool to protect it from dust and moisture.
- Store the operating manual with the electrical tool.
Troubleshooting
| Problem | Possible cause | Error Correction |
| Machine Doesn’t Start | No Main Power Supply | And Fuse And Have Them Repaired By a Qualified Electrician If Necessary |
| Is the (30) On/Off Switch Broken | Contact The Service Center | |
| Defective Motor | Contact The Service Center | |
| Machine Works With | Internal Loose Contact | Contact The Service Center |
| Interruptions | Is the (30) On/Off Switch Broken | Contact The Service Center |
| Poor Sawing Performance | Band Saw Blade Blunt | See Changing The Band Saw Blade |
| Pressure Of Workpieces Against Band Saw Blade Too High Or Too Low | Adjust Pressure | |
| Saw Blade Quickly Becomes Blunt | Band Saw Blade Unsuitable For The Workpieces To Be Worked On | Insert A Suitable Band Saw Blade |
| Too Much Pressure Applied | Reduce The Pressure | |
| Belt Stuck In Workpieces | Belt Too Loose | See Checking And Adjusting The Tension Of the Band Saw Blade |
Environmental Instructions
- Dispose of cardboard packaging and polyethylene (PE) bags in the appropriate containers for separate collection of municipal waste according to their description.
- If there are batteries in the device, remove them and separately return them to the collection and storage facility. Return the used device to a suitable collection and storage facility, as the hazardous substances in it may pose a threat to health and the environment.
- Waste electrical equipment is waste that contains substances harmful to humans, animals, and the environment.
- These substances can lead to contamination of the soil, water, or air, and through this they can get into the human body and lead to numerous health ailments, such a vision, hearing, and speech disorders; they can also lead to kidney, liver, and heart damage, and cause skin diseases.
- Harmful substances can also have adverse effects on the respiratory and reproductive systems and lead to cancerous changes. Consumption of plants growing on the contaminated soils, and products made from them, may risk the above-mentioned health effects.
- Do not dispose of the device in the municipal waste container!!! Service: If you wish to purchase spare parts or report any complaints, please contact directly with the seller who issued the receipt directly.
Customer Support
- Address: Lyoner Str. 36 60528 Frankfurt am Main
- Tel:+49 69 310 900 66
- Website: www.ronixtools.com
FAQs
Q: Can the Ronix 5720 cut curves?
Indeed. The band saw can cut complex forms and smooth curves in soft plastic and wood by employing thin blades (6–10 mm) and changing speed suitably.
Q: What is the warranty for the Ronix 5720?
A one-year limited warranty covering manufacturing faults is included with the saw. Misuse, overloading, and incorrect blade installation are not covered by the warranty.
Q: Can the band saw cut curves in thick wood?
Yes, but keep your feed moderate and steady and use a thinner blade (6–8 mm) for heavy timber. Specialised blades or extra support may be needed for tight turns.
Q: Can I use the saw for angled bevel cuts?
Indeed. Use a mitre gauge or fence to guide the workpiece after adjusting the table tilt angle and securing it in place.
Q: Can the saw handle long wooden boards?
Because the Ronix 5720 is a small band saw, very long boards might need additional support on both ends to avoid bending or binding while being cut.
Q: What should I do if the motor overheats?
As soon as possible, unplug and turn off the saw. Give the motor 15 to 20 minutes to cool. Look for potential causes such as blade friction or binding.
Q: How do I ensure safe operation when cutting small pieces?
To guide small workpieces, use push sticks or blocks. Keep your hands at least 100 millimetres away from the blade. Slowly and steadily feed the substance.
Q: What is the ideal blade speed for different materials?
Softwood: 1,200–1,600 RPM, 1,000–1,400 RPM for hardwood, 1,000–1,200 RPM for plastic
800–1,000 RPM for non-ferrous metal