
Ronix 8658 20V 8 Inch Brushless Chainsaw

Part List
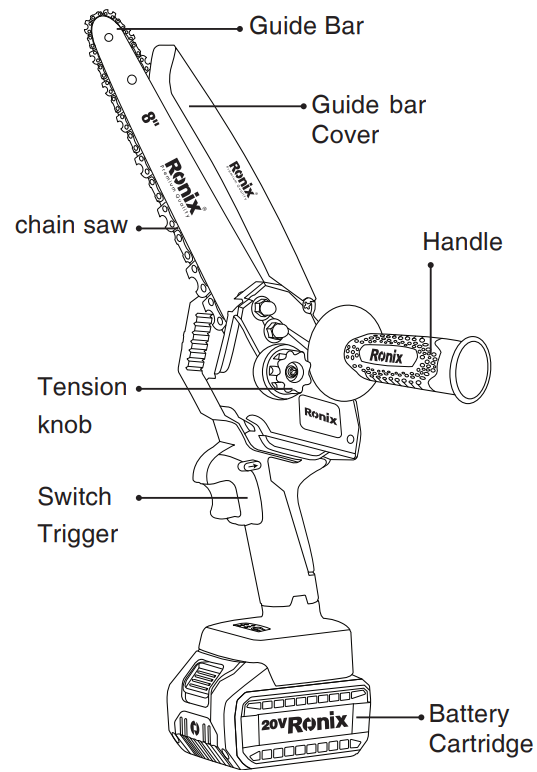
Functional Description
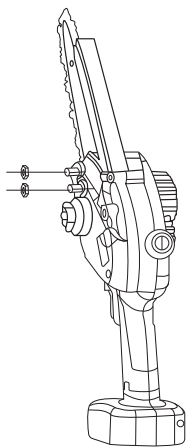
Loosen the nut counterclockwise and remove the side cover.

Operation
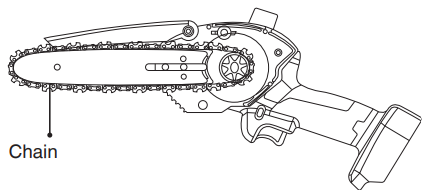
- How to remove the chain, loosen the compression button, and remove the side cover. After removing the side cover as picture, remove the guide directly.
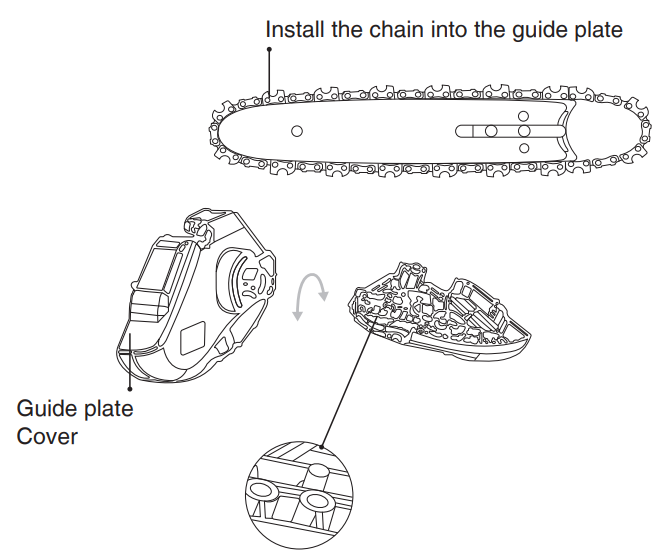
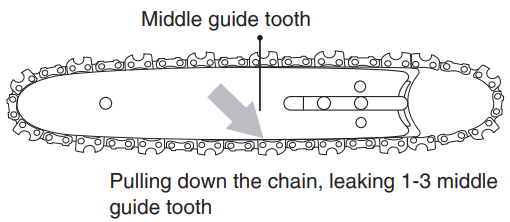
- How to install the chain guide plate: first, load the chain into the guide plate, and the middle guide tooth just sticks into the guide plate’s guide slot.
- When installing the guide plate, make sure that the adjusting block gets stuck into the positioning adjusting hole at the end of the guide plate!

- Install the guide plate cover by aligning the screw boss on the guide plate cover with the guide plate hole position.
- Manually Screw The M6 Nut Into The Machine.
- M6 outer hexagonal flange nut.
- Open the oil cover, pour the lubricating oil into the oil bottle, and tighten the oil cover.
- Open the oil cover, pour the lubricating oil into the oil bottle, and tighten the oil cover.


Assembly
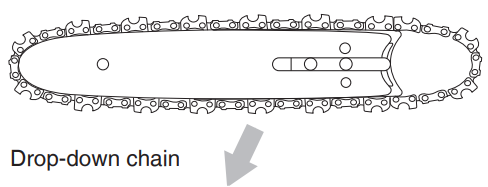
1-3 middle guide teeth are exposed in the pull-down chain.
- The new chain will be stretched in the early stage of use. Please check and adjust the appropriate tension frequently, because a loose chain is easy to derail, which may lead to rapid wear of the chain and guide plate.
- The chain must be stuck to the sprocket. After installation, please check it again.
- Drop down chain pull down the chain to expose the three middle guide teeth.
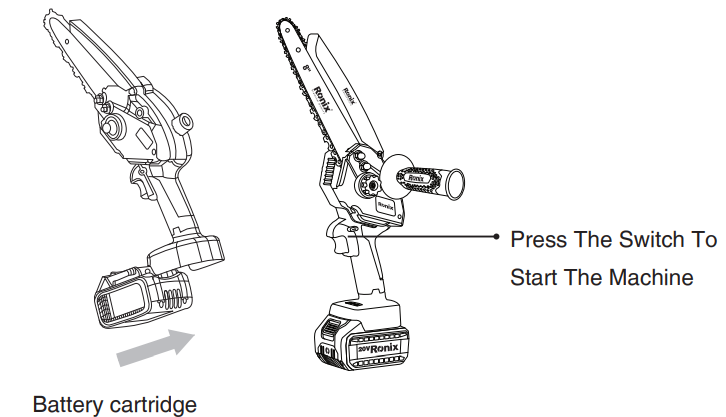
- Battery packing: Pay attention to aligning slots, inserts.
- Install the battery into the machine
Say carefully open the package, check the weather components are all: electric coarse branch.
- Electric coarse branch
- Battery
- Charger
Technical Specifications
- Model: 8658
- Voltage: 20V
- Battery Type: Lithium battery
- Battery Capacity: 2Ah
- Maximum Cutting Diameter: 140mm
- Chain Size: 290mm
- Chain Bar Length: 239mm
- No-Load Speed: 3800RPM
- Chain Speed: 5m/s
- Oil Tank Capacity: 25ml
- Run Time: 30min
- Cuts Per Battery Charge: (Cutting Diameter 110mm) 30Pcs
- Charging Time: 1hr
- Net Weight: 1.47Kg(machine with 1pc battery)
- Total Weight: 2.25Kg(machine with all accessories)
- BMC: 0.9Kg
- Supplied In: BMC
Include
- 2pcs battery
- 1pc charger
- 1pc handle
- 1pc wrench
- 1pc bar cover
Charging
Do not expose the battery to extreme conditions such as high temperature or shock. Otherwise, it will cause personal injury due to the leakage of the electrolytic solution. Before charging, check that the surface of the battery is clean and dry. Before delivery, the battery of this product is not fully charged.
- Put the charger in the room between 10 and 22M, and stops moisture from entering.
- Check that the switch is in the off position.
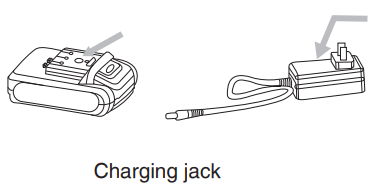
- Connect to charger to the corresponding connector for the battery pack.
- Make sure the power is consistent with the rated values on the charger and adapter.
- When the red light is on the charger, it indicates that the battery is charging, and the green light indicates that the charge is completed. The average charge time is 2 hours.
- The battery is used to ensure that it is recharged at least once every three months.
Condition of Work
Maintain charging temperature 0°C-45°C for the soap charger and battery pack discharge temperature -1 °C for the battery pack ~60°C.
OPERATIONS INSTRUCTIONS
Please wear suitable clothing and work gloves when using the parent. Before each use, make sure that the belt is running normally. For guidance on operating other Ronix cutting tools safely, you can also check the Ronix 4110 600 W Electric Jig Saw user manual. The start/off switch and safety switch must be available for normal use. When loosening the start switch, the power must be turned off. If the switch is damaged, stop using the device. Make sure the voltage of the power supply is consistent with the voltage on the nameplate.
The risk of injury can be reduced by wearing protective devices and ensuring that the devices are functioning properly. Confirm the frequency of the operation to ensure that the operation is in the best condition to save the use of electric batteries and ensure the best service life of pruning and shearing. Don’t allow this load to overload cut wet and dry branches over 60mm in diameter and 20mm.
Skills
- When the device is running, keep your other hand at least 15cm away from the cutting area of the blade, and your hand must not touch the knife edge.
- Don’t use this equipment to force the bigger branches; otherwise, it may deform the blade and damage the pruning stick.
- In cold or humid weather, to protect the battery pack, put it under waterproof clothing, and don’t use the equipment on rainy days.
- We recommend that after daily use, the connection between the pruning number and the battery and the battery pack must be cut, and the power switch must be closed and put together into the matching toolbox.
Maintainance & Cleaning
Repair of he function not mentioned herein shall be performed by the service center. To ensure the safety of use, only the original parts can be used. Clear the connection between the battery in the safe package. Wear hand care when touching safety blades. This can avoid sharp blade scratching the user. Follow-up cleaning and maintenance must be carried out regularly. This ensures long-term and reliable operation of the equipment.
Don’t spray the equipment with water or submerge it in water; otherwise, it may cause an electric shock. Keep the ventilator, motor room, and equipment handles clean. Use a damp cloth or brush cleaner. Don’t use a bay cleaner. Otherwise, it may cause permanent failure of the equipment. Please clean the blade carefully after each use. Use an oily cloth to wipe the blade and absorb the metal to protect the fog. After 8 hours of continuous operation, please remove debris such as dust from the front turbulent cover plate of the equipment.
Storage
- Dust and moisture from entering, check if the switch is off.
- Check if the switch is closed or not.
- The battery should be stored in a dry environment, -20°C ~ 60°C.
- Short-term term less than 1 month, storage temperature -010°C ~ 35°C.
- Short-term storage less than 6 months -10°C ~ 35°C.
- The distance between the battery and the combustible must be kept beyond 1.5 m.
To ensure the service life of the equipment and prevent its degradation, store it in a fully charged state. When not in use, charge and discharge the battery at least once a month.
Environmental Instructions
- Dispose of cardboard packaging and polyethylene (PE) bags in the appropriate containers for separate collection of municipal waste according to their description.
- If there are batteries in the device, remove them and separately return them to the collection and storage facility. Return the used device to a suitable collection and storage facility, as the hazardous substances in it may pose a threat to health and the environment.
- Waste electrical equipment is waste that contains substances harmful to humans, animals, and the environment.
- These substances can lead to contamination of the soil, water, or air, and through this they can get into the human body and lead to numerous health ailments, such a vision, hearing, and speech disorders; they can also lead to kidney, liver, and heart damage, and cause skin diseases.
- Harmful substances can also have adverse effects on the respiratory and reproductive systems and lead to cancerous changes. Consumption of plants growing on the contaminated soils, and products made from them, may risk the above-mentioned health effects.
- Do not dispose of the device in the municipal waste container!!! Service: If you wish to purchase spare parts or report any complaints, please contact directly with the seller who issued the receipt directly.
Customer Support
- Address: Lyoner Str. 36 60528 Frankfurt am Main
- Tel:+49 69 310 900 66
- Website: www.ronixtools.com