
 Seeed Studio XIAO ESP32S3 Series
Introduction
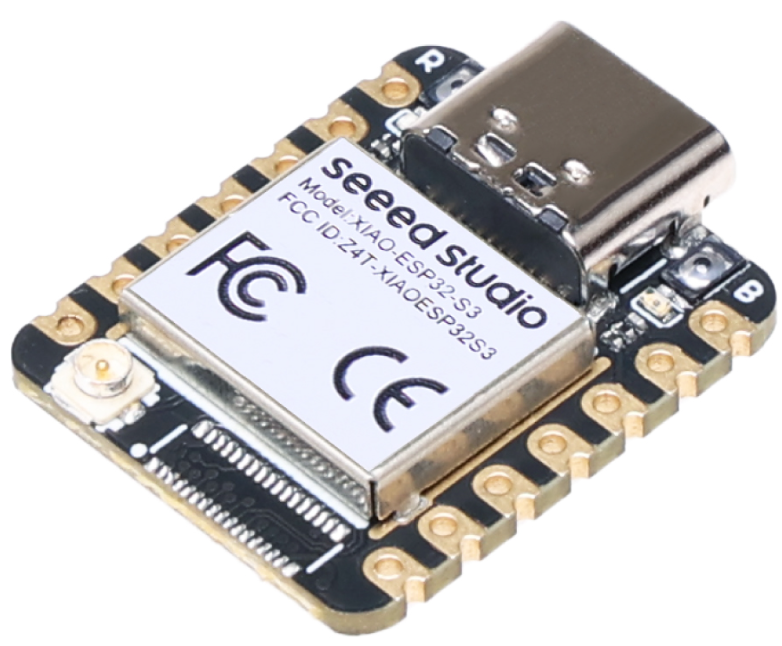
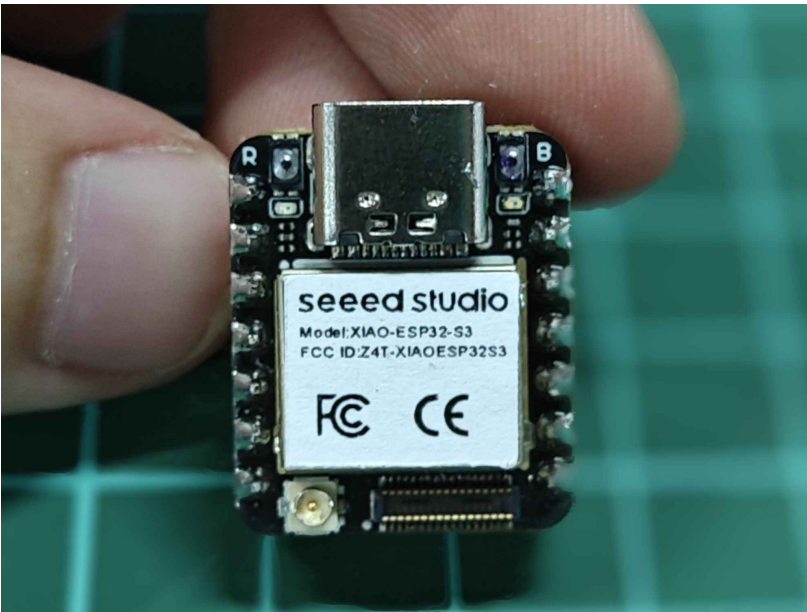
Seeed Studio XIAO ESP32S3 Series are diminutive development boards that share a similar hardware structure, with a size literally thumb-sized. The code name “XIAO” represents “Tiny” for its compact form, while “Puissant” reflects its powerful capabilities. The Seeed Studio XIAO ESP32S3 Sense integrates a camera sensor, digital microphone, and SD card support, combining embedded ML computing power with photography capabilities. This development board is an excellent tool to get started with intelligent voice and vision AI.
Specification
Explore the key features and technical details of the Seeed Studio XIAO ESP32S3 Series to understand its powerful capabilities and compact design.
Features
The Seeed Studio XIAO ESP32S3 Series offers a range of powerful and compact features ideal for IoT, wearable, and AI projects.
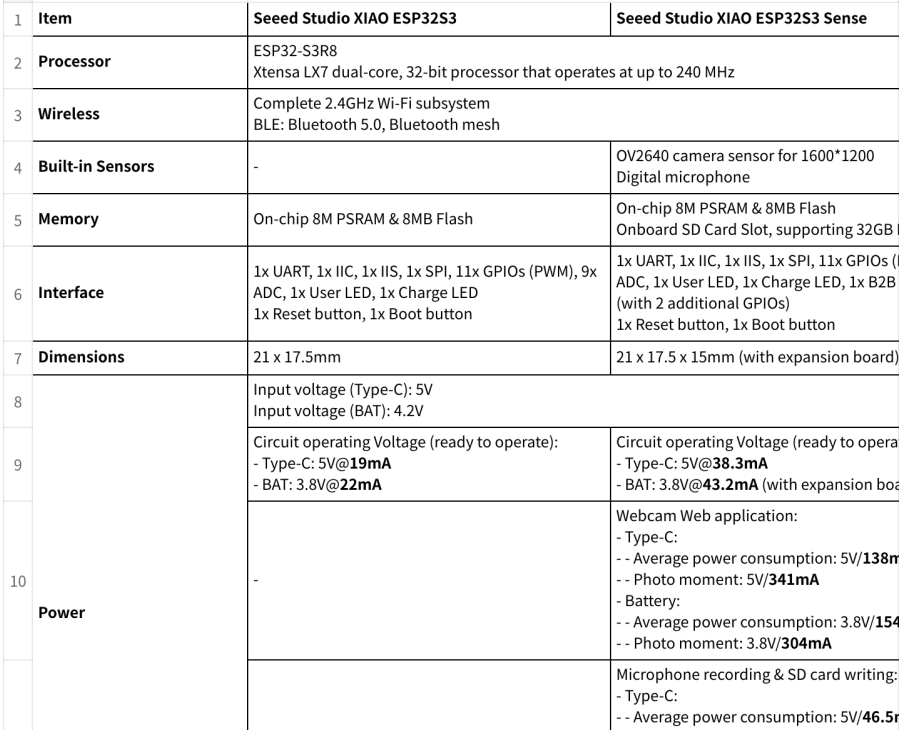
- Powerful MCU Board: Incorporates the ESP32S3 32-bit, dual-core, Xtensa processor chip operating up to 240 MHz, mounted multiple development ports, Arduino / MicroPython supported.
- Advanced Functionality (for Sense): Detachable OV2640 camera sensor for 1600*1200 resolution, compatible with OV5640 camera sensor, integrating an additional digital microphone
- Elaborate Power Design: Lithium battery charge management capability, offers 4 power consumptiomodelsel whiallowows for r deep sleep mode with power consumption as low as 14μA
- Great Memory for more Possibilities: Offer 8MB PSRAM and 8MB FLASH, supporting SD card slot for external 32GB FAT memory
- Outstanding RF performance: Supports 2.4GHz Wi-Fi and BLE dual wireless communicationsupports 100m+ remote communication when connected with a U.FL antenna
- Thumb-sized Compact Design: 21 x 17.5mm, adopting the classic form factor of XIAO, suitable for space-limited projects like wearable devices.
Hardware Overview
The Seeed Studio XIAO ESP32S3 Series comes with compact and versatile hardware features, providing all the essential pins and connections for your development projects.
- 5V – This is 5V out from the USB port. You can also use this as a voltage input, but you must have some sort of diode (Schottky, signal, or power) between your external power source and this pin, with anode to battery, cathode to 5V pin.
- 3V3 – This is the regulated output from the onboard regulator. You can draw 700mA
- GND – Power/data/signal ground
Getting Started
To enable you to get started with the XIAO-ESP32-S3 faster, please read the hardware and software preparation below to prepare the XIAO.
Hardware Preparation
Solder header
- XIAO-ESP32-S3 is shipped without pin headers by default; t, you need to prepare your own pin headers and solder them to the corresponding pins of XIAO so that you can connect to the expansion board or sensor.
- Due to the miniature size of XIAO-ESP32-S3, please be careful when soldering headers, do not stick different pins together, and do not stick solder to the shield or other components.
- Otherwise, it may cause XIAO to short-circuit or not work properly, and the consequences caused by this will be borne by the user.
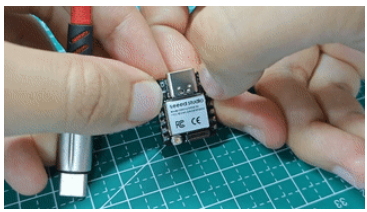
Installation of the antenna
- For optimal performance, the Seeed Studio XIAO ESP32S3 Series requires proper installation of its WiFi/BT antenna. On the bottom left of the front of XIAO-ESP32-S3, there is a separate “WiFi/BT Antenna Connector”. In order to get a better WiFi/Bluetooth signal, you need to take out the antenna inside the package and install it on the connector.
- There is a little trick to the installation of the antenna. If you press down hard on it directly, you will find it very difficult to press, and your fingers will hurt! The correct way to install the antenna is to put one side of the antenna connector into the connector block first, then press down a little on the other side, and the antenna will be installed.
- Removing the antenna is also the case; do not use brute force to pull the antenna directly. One side of the force to lift, and the antenna is easy to take off.

Installation of expansion boards
- For seamless functionality, the Seeed Studio XIAO ESP32S3 Series works perfectly with compatible expansion boards. If you are shopping for the XIAO-ESP32-S3-Sense, then you should also include an expansion board. This expansion board has a 1600*1200 OV2640 camera sensor, an onboard SD card, and a digital microphone.
Additionally, you can explore other Seeed Studio modules, such as the MR60 FDA1 Fall Detection Pro Module, which can be integrated with your XIAO-ESP32-S3 projects for enhanced functionality.
- By installing the expansion board with XIAO-ESP32-S3-Sense, you can use the functions on the expansion board.
- Installing the expansion board is very simple; you just need to align the connector on the expansion board with the B2B connector on the XIAO-ESP32-S3, press it hr d, and hear a “click; the installation is complete.

Software Preparation
The recommended programming tool for the XIAO-ESP32-S3 is the Arduino IDE, so as part of the software preparation, you will need to complete the Arduino installation.
TIP
If this is your first time using Arduino, we highly recommend that you refer to Getting Started with Arduino.
- Step 1
Download and install the stable version of Arduino IDE according to your operating system.
- Step 2
Launch the Arduino application.
- Step 3
Add the ESP32 board package to your Arduino IDE.
- Navigate to File > Preferences, and fill in “Additional Boards Manager URLs” with the URL below:
https://raw.githubusercontent.com/espressif/arduino-esp32/ghpages/package_esp32_dev_index.json
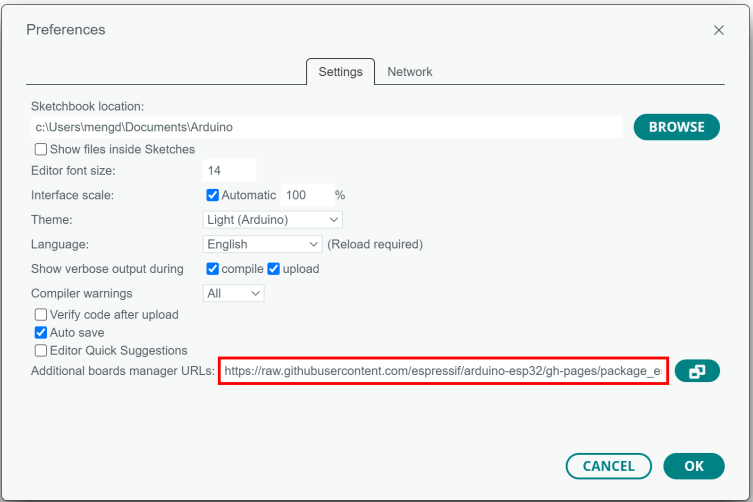
- Navigate to Tools > Board > Boards Manager…, type the keyword esp32 in the search box, select the latest version of esp32, and install it.

TIP
- We have now submitted a merge request to ESP32 and will be able to search and use XIAOESP32-S3 in the Arduino IDE when ESP32 releases the next version of the on-board package update.
- Until then, you can manually add the XIAO-ESP32-S3 on-board package to the Arduino directory to use it.
- After you have downloaded the above zip, please unzip it, and you will see two files. One is the XIAO_ESP32S3 folder, and the other is boards.txt.
- Under Windows PC
- The default onboard package storage path for ESP32 in Windows is:
- C:\Users\${UserName}\AppData\Local\Arduino15\packages\esp32\hardware \esp32\2.0.7
- We need to copy the download boards.txt file to the above path, overwriting the original boards.txt file in this path.
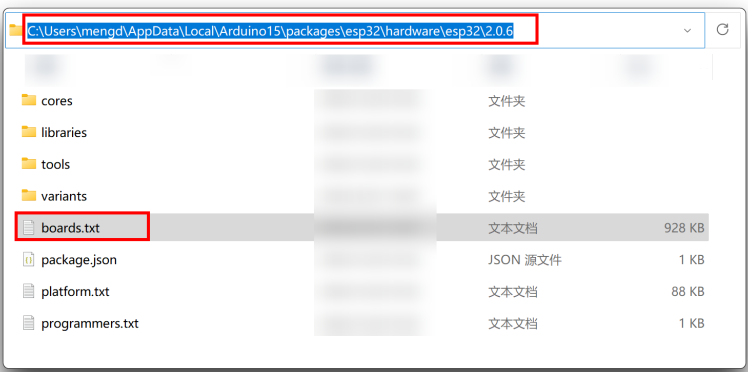
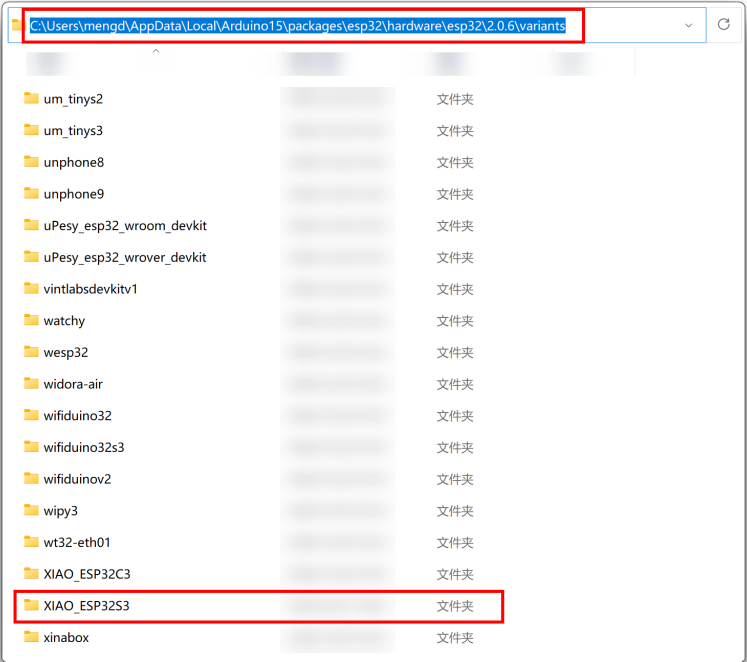
- C:\Users\${UserName}\AppData\Local\Arduino15\packages\esp32\hardware \esp32\2.0.7\variants • Then go to the variants folder and copy the XIAO_ESP32S3 folder to it.
- Under MacOS PC
- ~/Library/Arduino15/packages/esp32/hardware/esp32/2.0.7
- We need to copy the download boards.txt file to the above path, overwriting the original boards.txt file in this path.
- ~/Library/Arduino15/packages/esp32/hardware/esp32/2.0.7/variants
- Then go to the variants folder and copy the XIAO_ESP32S3 folder to it.
- Step 4. Close the Arduino IDE and reopen it.
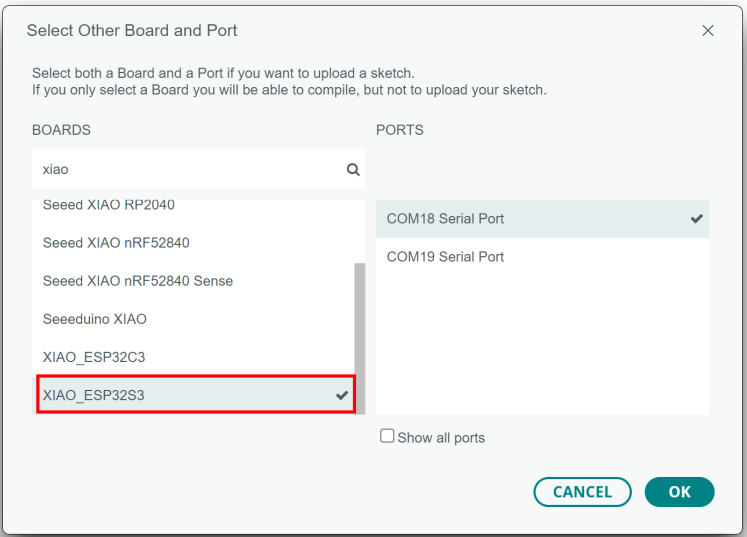
- Step 5. Select your board and port
- On top of the Arduino IDE, you can select the port directly. This is likely to be COM3 or higher (COM1 and COM2 are usually reserved for hardware serial ports).
- Also, search for Xiao in the development board on the left. select XIAO_ESP32S3.
With this preparation, you can start writing programs for XIAO-ESP32-S3 to compile and upload.
BootLoader Mode
Sometimes, using the wrong program can cause the Seeed Studio XIAO ESP32S3 Series to lose ports or not work properly. The specific issues include:
- Connected to the computer, but no port number found for XIAO.
- The computer is connected, and the port number appears, but the upload program fails. When you encounter the above situations, you can put the Seeed Studio XIAO ESP32S3 Series into BootLoader mode, which solves most problems of unrecognized devices and failed uploads. The specific method is:
- Step 1
Press and hold the BOOT button on the XIAO-ESP32-S3 without releasing it.
- Step 2
Keep the BOOT button pressed and then connect to the computer via the data cable. Release the BOOT button after connecting to the computer.
- Step 3
Upload the Blink program to check the operation of the XIAO-ESP32-S3.
Reset
- When the program runs abnormally, you can press Reset once during power-up to let XIAO reexecute the uploaded program.
- When you press and hold the BOOT key while powering up and then press the Reset key once, you can also enter BootLoader mode.
Run your first Blink program..
- Step 1
Launch the Arduino application.
- Step 2
Navigate to File > Examples > 01. Basics > Blink, open the program.
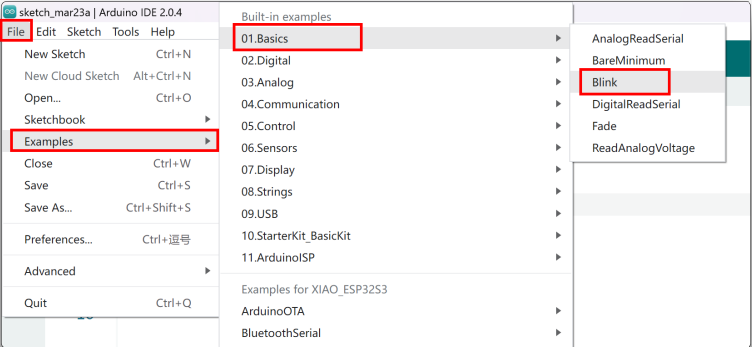
- Step 3
Select the board model to XIAO-ESP32-S3, and select the correct port number to upload the program.
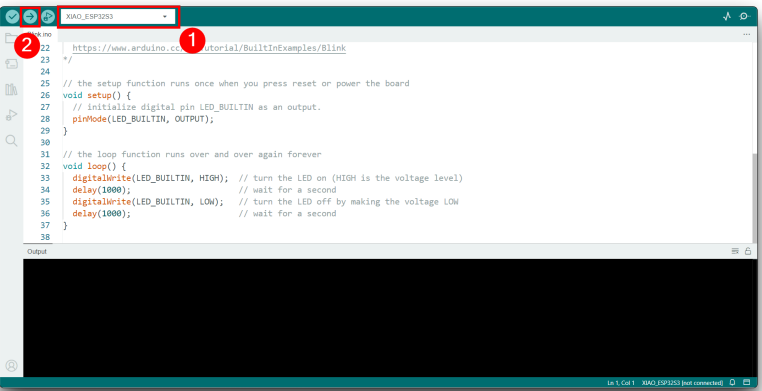
Once the program is successfully uploaded, you will see the following output message, and you can observe that the orange LED on the right side of the XIAO-ESP32-S3 is blinking. Congratulations, you’ve learned how to write and upload programs for the XIAO-ESP32-S3!
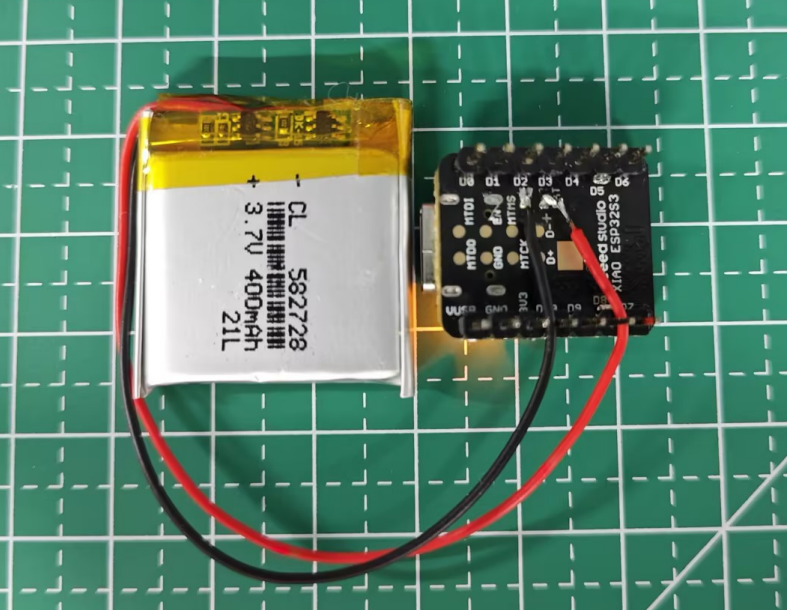
Battery Usage
- The XIAO-ESP32-S3 series has a built-in power management chip that allows the XIAO-ESP32-S3
to be powered independently by using a battery or to charge the battery through the XIAOESP32-S3’s USB port. - If you want to connect the battery for XIAO, we recommend nd you purchase a qualified rechargeable 3.7V lithium battery.
- When soldering the battery, please be careful to distinguish between the positive and negative terminals.
- The negative terminal of the power supply should be the side closest to the USB port, and the positive terminal of the power supply is the side away from the USB port.
FCC Rules
- This equipment generates, uses, and can radiate radio frequency energy, and if not installed and used in accordance with the instructions, may cause harmful interference to radio communications. However, there is no guarantee that interference will not occur in a particular installation.
- Reorient or relocate the receiving antenna.
- Increase the separation between the equipment and receiver.
- Consult the dealer or an experienced radio/TV technician for help.
- This device complies with FCC radiation exposure limits set forth for an uncontrolled environment.
The OEM integrator is responsible for ensuring that the end-user has no manual instructions to remove or install the module.
- This exterior label can use wording such as the following: “Contains Transmitter Module FCC ID: Z4T-XIAOESP32S3 Contains FCC ID: Z4TXIAOESP32S3
Customer Support
- Website: www.seeedstudio.com
- Ph: +86-0755-86095676
2008-2025 Seeed Technology Co., Ltd. All rights reserved.
FAQs
Q: What is the Seeed Studio XIAO ESP32S3?
Seeed Studio produces the small, powerful XIAO ESP32S3 microcontroller board. Because of its small size, it is perfect for rapid prototyping, robotics, and wearable technology.
Q: Can I use shields or Grove modules with this board?
Yes, but bear in mind its small size. It works with Grove modules that use I2C or UART, but because it lacks the typical Arduino Uno footprint, you might need wires or adapters.
Q: Is it compatible with wireless protocols beyond Wi-Fi and Bluetooth?
The XIAO ESP32S3 currently has native support for Bluetooth LE 5.0 and Wi-Fi 2.4 GHz. You can use SPI or UART to add external modules for other protocols, such as sub-GHz, Zigbee, or LoRa.
Q: Is the XIAO ESP32S3 suitable for battery-powered IoT projects?
Yes, because of its low-power modes. Advice for extending battery life: When the board is not in use, use deep sleep. For periodic data, use Bluetooth LE or shorten Wi-Fi transmission intervals. Make use of a Li-Ion or Li-Po battery with the appropriate charging circuit.
Q: Can I connect external memory or storage?
Indeed! The board uses an SPI interface to support SPI Flash and SD cards. I2C or SPI access to external RAM or EEPROM is beneficial for larger AI models, file storage, and data logging
1 Comment
Pingback: Seeed Studio RTU RS485 Light Intensity Sensor | Setup Guide