
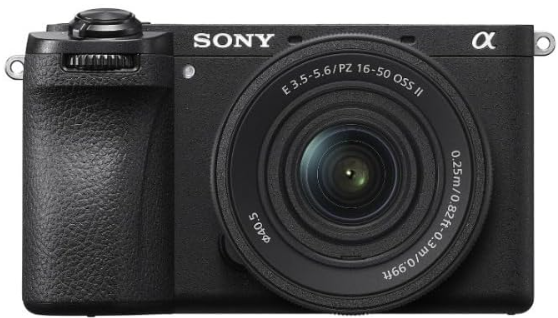
Sony ILCE-6700 Interchangeable Lens Digital Camera
Safety Instructions
- Do not leave the lens or the viewfinder exposed to a strong light source such as sunlight.
- Attach the lens cap when storing the camera. When shooting with backlighting,
- Keep the sun sufficiently far away from the angle of view.
- Even if it is slightly away from the angle of view, smoke or fire may still occur.
- Do not look at sunlight or a strong light source through the lens when it is detached.
- This may result in unrecoverable damage to the eyes or cause a malfunction.
- Do not place this camera close to persons who use such medical devices.
- Consult your doctor before using this camera if you use any such medical device.
- Increase the volume gradually. Sudden loud noises can damage your ears.
- Be especially careful when listening to headphones.
- Do not leave the camera, the supplied accessories, or memory cards within the reach of infants.
- They may be accidentally swallowed. If this occurs, consult a doctor immediately.
- If the monitor or electronic viewfinder is damaged, stop using the camera immediately.
- The damaged parts may harm your hands, face, etc.
- When someone with poor circulation or impaired skin sensation uses the camera
- When using the camera with [Auto Power OFF Temp.] set to [High]
Identifying the Parts

- Zoom/Focus ring
- Zoom lever
- Mounting index
- Lens contacts*
Do not touch the lens contacts.
Included items
(The number in parentheses indicates the number of pieces.)
- Lens (1)
- Front lens cap (1)
- Rear lens cap (1)
- Set of printed documentation
Preparations
Checking the supplied items
The number in parentheses indicates the number of pieces.
- Camera (1) • Shoe cap (1) (attached to the
- Rechargeable battery pack camera) NP-FZ100 (1) • Startup Guide (this manual) (1)
- Shoulder strap (1) • Reference Guide (1)
- Eyepiece cup (1)
- Body cap (1)*
- Only for the ILCE-6700/ILCE-6700M
Inserting the Battery
Open the battery cover and the memory card cover, insert the battery/ memory card, and close the covers.
This camera is compatible with SD memory cards. When you use a memory card with this camera for the first time, format the card using the camera in order to stabilize the performance of the memory card.
Charging the Battery Pack
- Turn the power off.
- If the camera is turned on, the battery pack will not be charged.
- The charge lamp will light up when charging starts.
- When the charge lamp turns off, charging is completed.
- Connect the USB Type-C® terminal of the camera to the USB Type-C terminal of a device compatible with USB PD (USB Power Delivery) using a commercially available USB Type-C cable (USB-C® – USB C).
- Use a USB-PD-compatible device with an output of 18 W (9 V/2 A) or more and a USB Type-C cable (USB-C – USB-C) that supports 3 A or more.
Initial Setup
By establishing a Bluetooth connection (pairing) between the camera and a smartphone, you can perform initial camera setup, such as date and time settings, gs, from the smartphone. Install the dedicated application on your smartphone in advance, and then follow the steps under “Procedures for initial camera setup.”
Attaching and Detaching the Lens
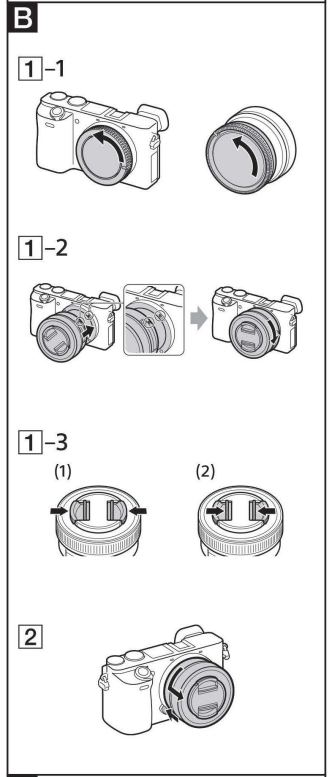
Attach the lens
- Remove the rear lens cap and the camera body cap.
- Align the white index on the lens barrel with the white index on the camera (mounting index), then insert the lens into the camera mount and rotate it clockwise until it locks.
- Do not press the lens release button on the camera when mounting the lens.
- Do not mount the lens at an angle. Remove the front lens cap.
- You can attach/detach the front lens cap in two ways: (1) and (2).
Remove the lens
- Attach the front lens cap.
- While holding down the lens release button on the camera, rotate the lens counterclockwise until it stops, then detach the lens. (See illustration l; J -[2].)
Installing
Install the application from the following website. Also, update to the latest version of the dedicated application. The specifications of the dedicated application may change without notice.
Procedures
- Set the ON/OFF (Power) switch to “ON” to turn on the camera.
- Select the desired language and then press the center of the control wheel.
- The privacy notice screen will appear. Press the center of the control wheel.
- Read the privacy notice regarding biometrics by opening the link using your smartphone, etc.
- You can also configure or change the initial settings later from the MENU of the camera.
- Follow the instructions on the camera screen to connect the camera with your smartphone and perform the initial setup.
Connecting the camera
- Turn and set the Still/Movie/S&Q dial to (Still).
- Select the desired shooting mode by turning the mode dial.
- Press the shutter button halfway down to focus.
- Press the shutter button all the way down.
Zooming
Zooming with the zoom lever

Slide the zoom lever to the desired focal length (zoom position).
- Move the zoom lever with your finger lightly on the lever to prevent wrong operation.
- Whether the camera is set to AF (auto focus ) or MF (manual focus), the zoom lever adjusts the zoom.
Zoom/focus ring
- Rotate the zoom/focus ring to the desired focal length (zoom position).
- We recommend using the zoom lever for muting the operation noise of the zoom/focus ring while recording movies.
- When the camera is set to MF (manual focus), the zoom/focus ring adjusts the focus.
For details on focus mode settings, refer to the instruction manual supplied with the camera.
Focusing
There are three ways to focus.

Autofocus
- Press the shutter button halfway down to focus automatically.
DMF (Direct manual focus)
- After focusing with auto focus, rotate the zoom/ focus ring to fine-tune the focus.
Manual focus
- Rotate the zoom/focus ring to focus manually. For details on mode settings, refer to the instruction manual supplied with the camera.
Specifications

- This is the equivalent focal length in 35mm format when mounted on an Interchangeable Lens Digital Camera equipped with an APS-C-sized image sensor.
- Angle of view is the value for Interchangeable Lens Digital Cameras equipped with an APS-C-sized image sensor.
- Minimum focus is the distance from the image sensor to the subject.
- Depending on the lens mechanism, the focal length may change with any change in shooting distance. The focal lengths given above assume the lens is focused at infinity.
Camera Type
- Interchangeable Lens Digital Camera
- Lens: Sony E-mount lens
Image sensor
- Image format: APS-C size, CMOS image sensor
- Effective pixel number of camera: Power consumption (Off mode): Approx. 26 000 000 pixels
- Total pixel number of camera: Power consumption (Standby mode/ Approx. 27 000 000 pixels
General
- Rated input: 7.2 V, 3.6 W
- Operating temperature: 0 to 40 °C (32 to 104 °F)
- Storage temperature: –20 to 55 °C (–4 to 131 °F)
- Dimensions (W/H/D) (Approx.): 122.0 × 69.0 × 75.1 mm
- 122.0 × 69.0 × 63.6 mm
- 4 7/8 × 2 3/4 × 3 in. NP-FZ100
- 4 7/8 × 2 3/4 × 2 5/8 in
- Mass (Approx.): 493 g (1 lb 1.4 oz) (including battery pack, SD Card)
Wireless LAN
- WW542541 (see name plate on the bottom of the camera)
- Supported format: IEEE 802.11 a/b/g/n/ac
- Frequency band: 2.4 GHz/5 GHz
- Supported format: IEEE 802.11 b/g/n
- Frequency band: 2.4 GHz
Eco and Energy Saving
- Power consumption (Off mode): Not available
- Power consumption (Standby mode/ Low power mode): 0.5 W
- Low power mode activated: Within 20 minutes (default)
- Networked standby mode activated: Within 20 minutes (default)
- Power consumption (Networked standby mode): 2.0 W (Bluetooth) / 2.0 W (all terminals and networks connected)
Rechargeable Battery Pack
NP-FZ100
- Rated voltage: 7.2 V
AC adaptor
- Output: 9 V / 2 A or more
Supplier’s Declaration of Conformity
- Trade Name: SONY
- Model: WW542541
- Responsible Party Sony Electronics Inc.
- Address:16535 Via Esprillo, San Diego, CA 92127 U.S.A.
- Telephone Number 858-942-2230
5 GHz wireless LAN
Compliance with FCC requirement 15.407(c)
Data transmission is always initiated by software, which is transmitted down through the MAC, through the digital and analog baseband, and finally to the RF chip. Several special packets are initiated by the MAC. These are the only ways the digital baseband portion will turn on the RF transmitter, which it then turns off at the end of the packet. Therefore, the transmitter will be on only while one of the aforementioned packets is being transmitted. In other words, this device automatically discontinues transmission in case of either the absence of information to transmit or operational failure.
- Frequency Tolerance: ±20 ppm
Sony lenses/accessories
- Using this unit with products from other manufacturers may affect its performance, leading to accidents or malfunctions.
5 GHz band for wireless LAN
- When using the wireless LAN function outdoors, set the band to 2.4 GHz by following the procedure below. (WW542541 only)
- MENU (Network) [Wi-Fi] [Wi-Fi Frequency Band]
- How to turn off wireless network functions (Wi-Fi, etc.) temporarily
- How to turn on or off the i-Fi function
- Select MENU (Network) [Wi-Fi] [Wi-Fi Connect] [On] or [Off].
Bluetooth Function
- Select MENU (Network) [Bluetooth] [Bluetooth Function] [On] or [Off].
Disposal
For the Customers in Europe
The recycling of materials will help to conserve natural resources. For more detailed information about the recycling of this product, please contact your local Civic Office, your household waste disposal service, or the shop where you purchased the product.
Notice for the customers in the countries applying EU Directives > Manufacturer: Sony Corporation, 1-7-1 Konan Minato-ku, Tokyo, 108-0075 Japan. For EU product compliance: Sony Belgium, bijkantoor van Sony Europe Limited, Da Vincilaan 7-D1, 1935
For the Customers ithe n the Republic of India
Reduction in the Use of Hazardous Substances in Electrical & Electronic Equipment. This product and its components, consumables, parts, or spares comply with the hazardous substances restriction of India’s E-Waste (Management) Rules. The maximum allowable concentrations of the restricted substances are 0.1% by weight in homogenous materials for Lead, Mercury, Hexavalent Chromium, Polybrominated Biphenyls (PBB) and Polybrominated Diphenyl Ethers (PBDE), and 0.01% by weight in homogenous materials for Cadmium, except for the exemptions specified in Schedule II of the aforesaid Rules.
Customer Service
- Website: https://www.sony.com/
- Ph: 800-326-9551
1 Comment
Can you be more specific about the content of your article? After reading it, I still have some doubts. Hope you can help me.