
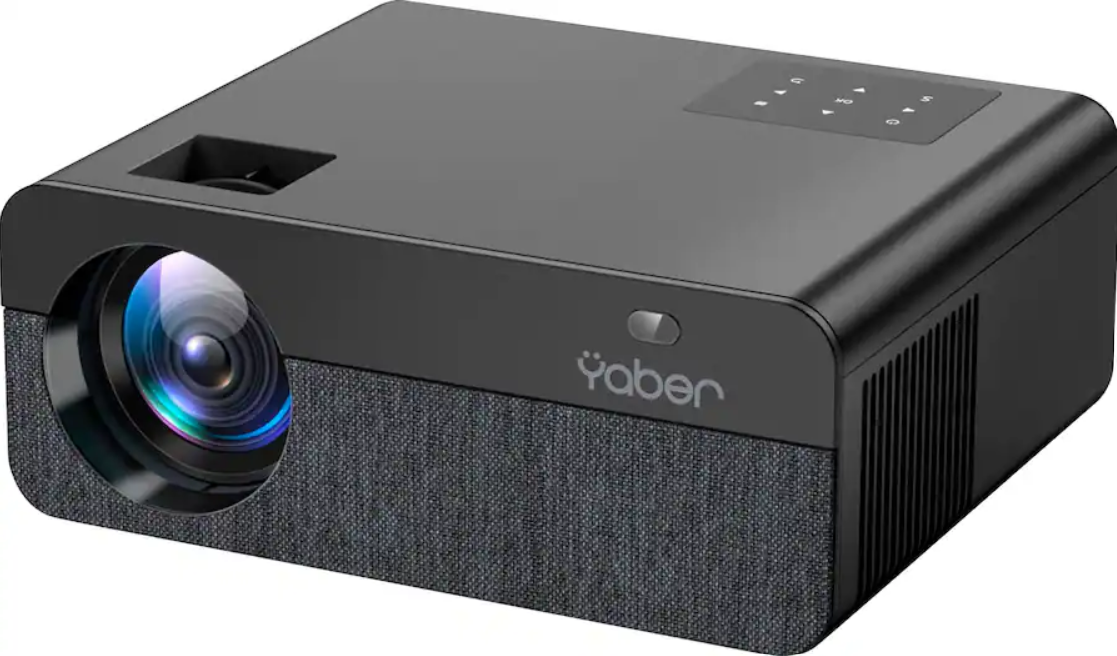
 Yaber Pro U9 Native 1080P Outdoor Projector
Safety Instructions
- Do not look directly into the lens, as the intense projector light can cause serious eye injury.
- Ensure that the air inlet and outlet are not blocked.
- Proper airflow is essential for heat dissipation and preventing damage to internal electronics.
- Clean the lens using only clean air (e.g., compressed air).
- Do not use paper, cloth, or other cleaning tools to avoid scratching or damaging the lens surface.
- Keep all parts and accessories out of reach of children to prevent accidental ingestion or injury.
- Operate the device in a dry and ventilated area to prevent moisture and ensure optimal performance.
- Store and use the device within a temperature range of 0°C to 40°C.
- Extreme temperatures can shorten the lifespan of electronic components.
- Never place the device in equipment like dryers or microwave ovens, as this can cause severe damage.
- Avoid squeezing the device or placing heavy objects on it, as this can lead to structural damage.
- Do not attempt to disassemble or reassemble the device yourself.
PACKAGE LIST
- YABER Pro U9 Projector*1
- HDMI Cable*1
- Cleaning Cloth*1
- Projector Screen*1
- Remote Control*1
- 3-in-1 AV Cable
- User Manual*1
- Power Cord*1
- Lens Cover*1
- Cleaning Kit*1
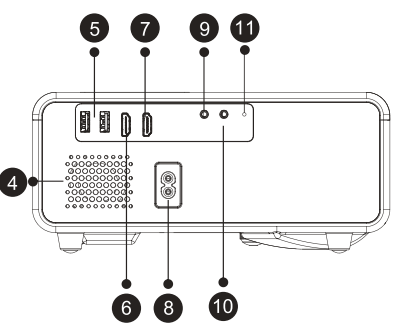
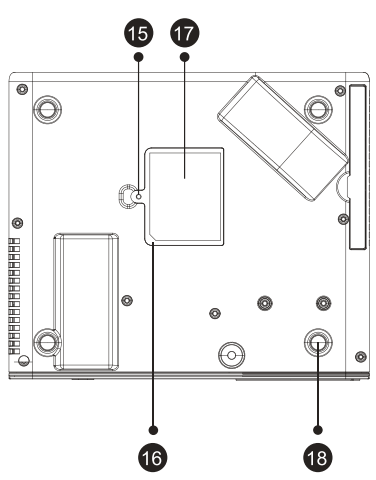
Overview

- 1 Foot pad: Increase the height of the projector
- 2 Projector lens: Optically coated glass lens
- 3/11 IR Window: Infrared signal receiver
- 4 Speakers: Speakers stereo 5w
- 5 USB Ports: U1 input / U2 input
- 6/7 HDMI Ports: HDMI 1 input / HDMI 2 input
- 8 Power Cord Port: Power Cord Port
- 9 AV Port: AV Signal Input
- 10 Headphone Jack: 3.5mm Headphone Output
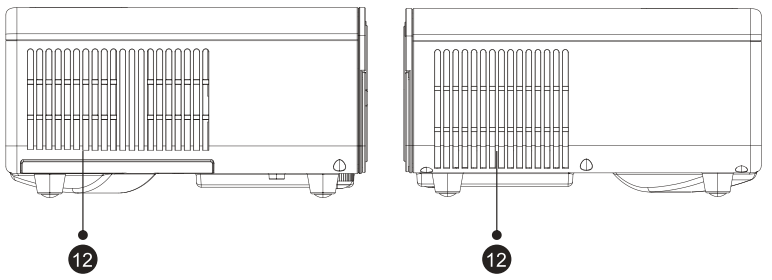
- 12 Vents: Prevent the projector from overheating
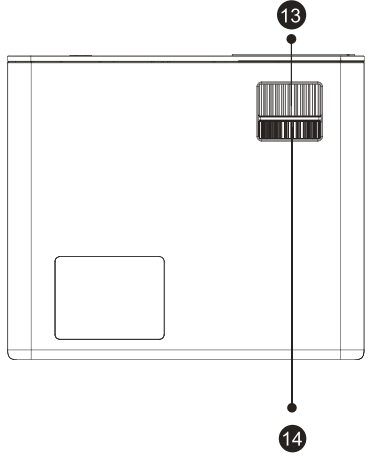
- 13 Focus Ring: Adjust the focus ring to get the clearest image
- 14 Keystone Ring: Adjust the keystone ring to get a rectangular shape
- 15 Detachable Dust Cover Switch: Use the attached screwdriver to remove the switch.
- 16 Detachable Dust Cover: Clean the dust (if the screen has a black spot)
- 17 Bottom label: Nameplate on the bottom of the projector
- 18 Rubber Pads: Protective pads/remove to install ceiling mount
Buttons
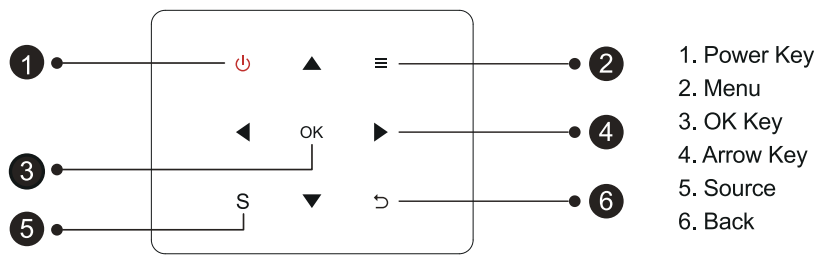
- Power: Turn on/off the power
- Menu Key: Operate in AV or HDMI mode
- OK: Confirm the option
- Arrow Keys: Used to adjust the parameter of the projector in the menu mode
- Source: Select the input signal source
- Back: Return to the previous menu
Remote Control
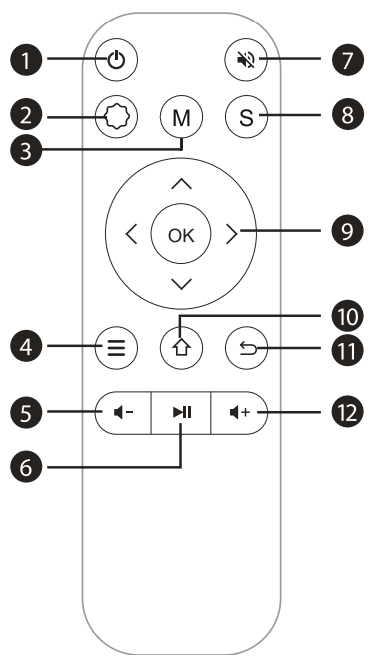

- Turn on/off the power.
- Make system settings
- Can make some basic adjustments to the screen after clicking during video playback
- Operate in AV or HDMI mode
- Volume down
- Play or pause the video in USB mode
- Close the sound
- Select the input signal source
- Used to adjust the parameter of the projector in the menu mode
- Back to the main menu
- Return to the previous menu
- Volume up
How to Use
- Install 2 AAA batteries into the remote controller before using it. Do not combine new batteries with old ones in the remote controller, which can cause operation failure due to insufficient power supply.
- When using the remote controller, please make sure that the signal transmitter of the remote controller aims at the infrared signal receiver of the projector.
- If you are not using the remote controller for an extended period, please take out the batteries to prevent battery leakage.
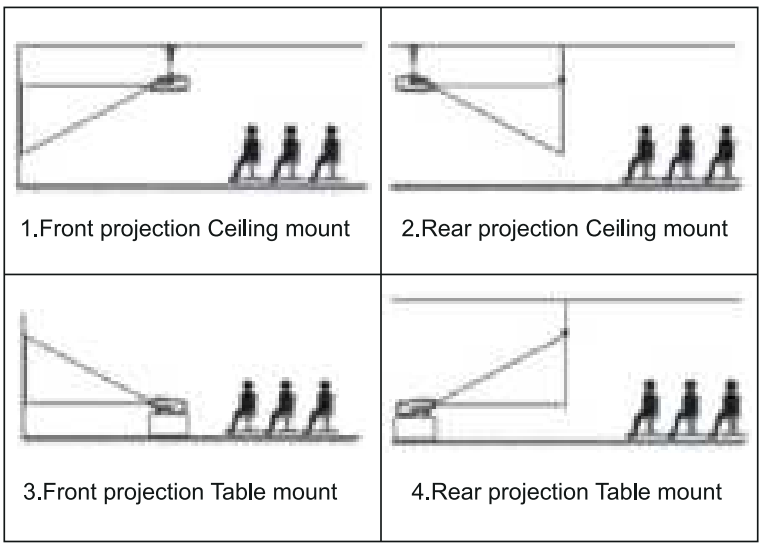
Installation Method
The projector can be hung on the ceiling with a special hanger frame and placed on a stable desk to project the image according to the operating environment and requirements. In addition, the projector can be installed using the following methods:
Front projection Ceiling mount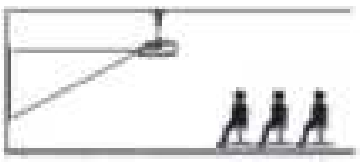
Rear projection Ceiling mount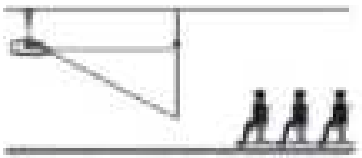
Front projection Table mount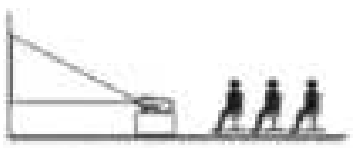
Rear projection Table mount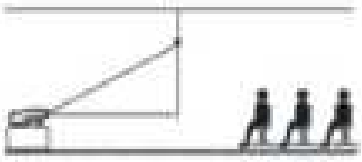
Keep the projector at a height where its lens is axially symmetric to the screen. If this is not possible, use the keystone correction function to adjust the projection image.
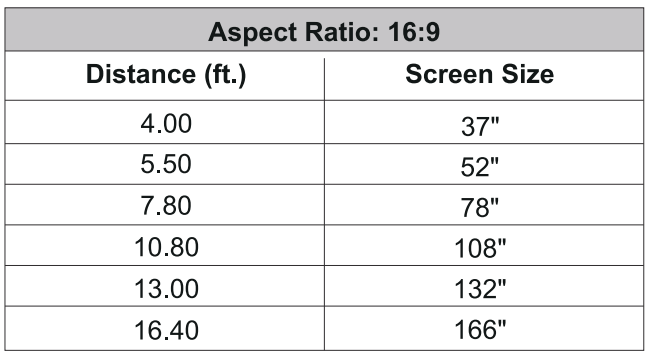
The recommended projection distance is about 10.8ft; the shortest projection distance is 4.0ft. The image size depends on the distance between the projector and the screen, where there may be 3% deviation among above listed data. Different settings cause various distances.
Install on the Ceiling
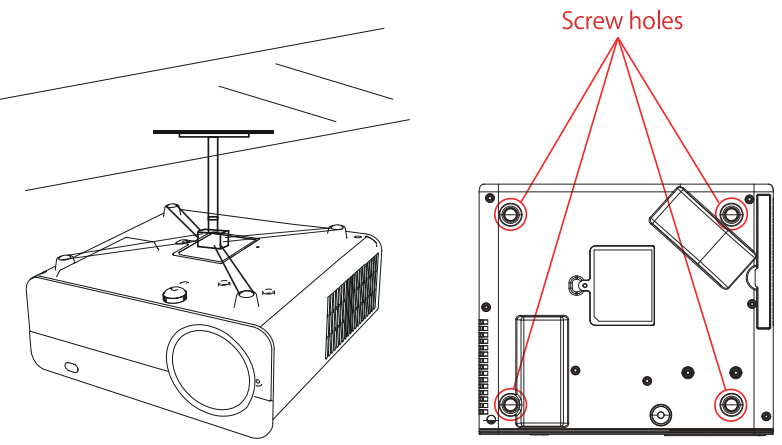
- Please purchase auniversal projector ceiling mount.
- Remove the four rubber pads on the bottom of the projector.
- You will see the screw holes, and use the M4*10mm screws for installing the ceiling, and then install it.
Starting Projector
- Press the power key on the remote or projector, and the indicator light will turn blue.
- Adjust the focus ring of the projector to get the best image performance; (If it is still blurry, please try to adjust the projection distance.)
- Use the 4D keystone function of the projector to get a rectangular projection screen,
- Connect the external device (smartphone, iPad, Fire TV stick, TV box, DVD player, Computer, etc.) to the corresponding interfaces of the projector. Pleasebe sure to select the corresponding source. If you do not select the correct source, the projector will not be able to detect the signal.
- Select the ” [” menu, enter the [Setting], then you can select the option [ Language Setting ] to set your preferred language.
- PS: Enter the [Setting] menu- then you can select the option [Language] to set the preferred language.
Image Adjustment
When using the projector for the first time, it normally displays an unclear image. This is due to the lens being out of focus or the incorrect trapezoid setting. Please follow the steps below to correct:
Focus Adjustment
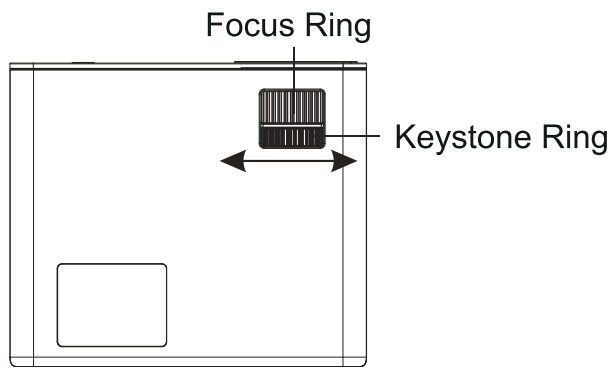
Image adjustment
Adjust the image size to get the best image size by moving the projector back and forth, then rotate the lens to get the best focus. Use the keystone ring or 4D&4P keystone function (4 Corner keystone& 4 Side) keystone of the projector to get a rectangular projection screen.
Select the Signal Source
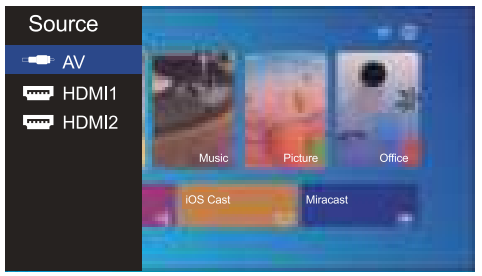
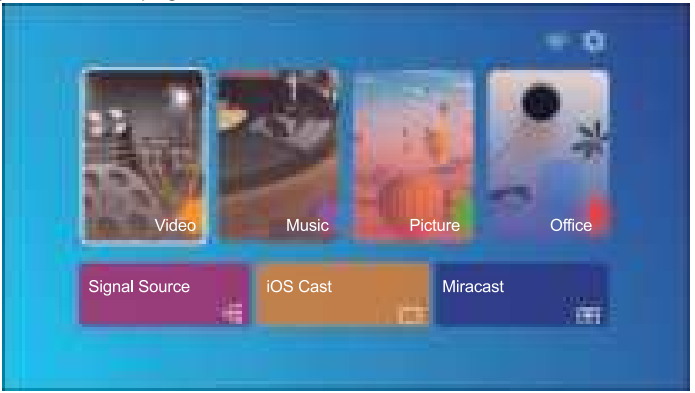
Press the “S” button on the remote control or the projector and choose between: “AV”, “HDMI1”, “HDMI2” Connect the external device (Smart phone, iPad, Fire TV stick, TV box, DVD player, Computer, etc.) in the correspond- ing interfaces of the projector, please be sure to select the corresponding source. If you do not select the correct source, the projector will not be able to detect the signal. And you can see the homepage “Video” “Music” “Picture” “Signal Source” ¡OS Cast”‘Miracast”.
Setting
The projector’s home page is as follows.
Select The Input Signal Source
- Select the desired input signal source (HDMI1/HDMI2/AV) on thehomepagee.
USB Disk Input Mode
Play Video/Music/Picture/Office in the USB Disk Input Mode
- Insert the USB Disk, select the option [ Video/Music/Picture/Office ];
- Select the desired file (or folder to enter the subfolder) in the USB disk, then press the [ OK] button to play it.
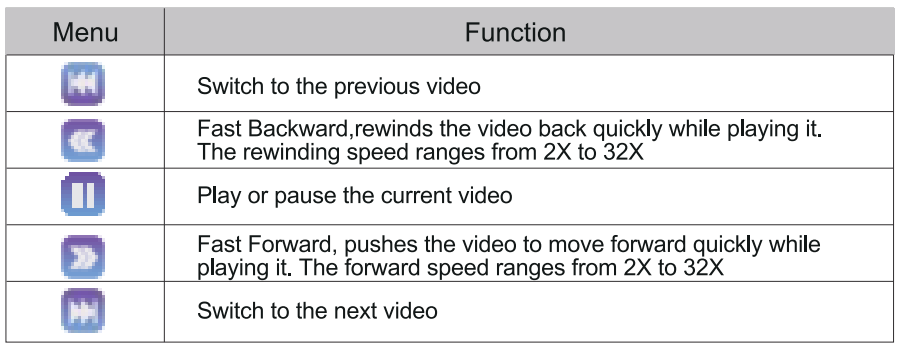
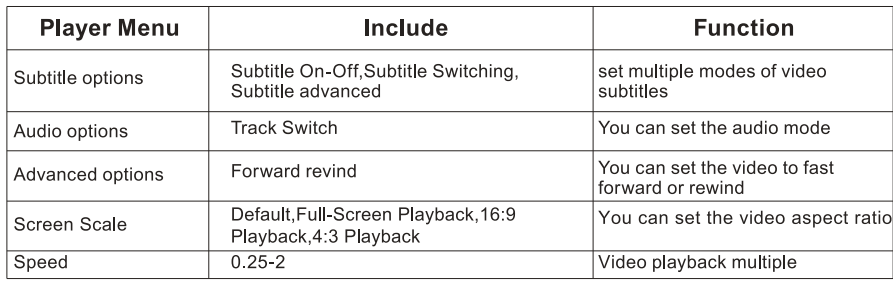
Video Interface

Music Play Interface

- Press the “=” button on the remote control. You can directly open the music list and play it.
- Press the “X” button on the remote control. You can set the music play mode, single loop/random play, etc.
Office Play Interface
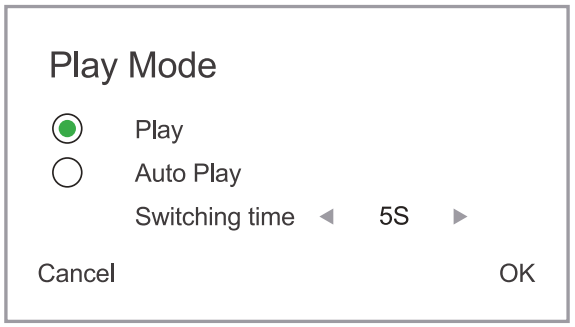
Choose the file you want to open, and press the “OK” button on the remote controller or projector. When you open a PPT file, you can select two play modes: play auto-play.
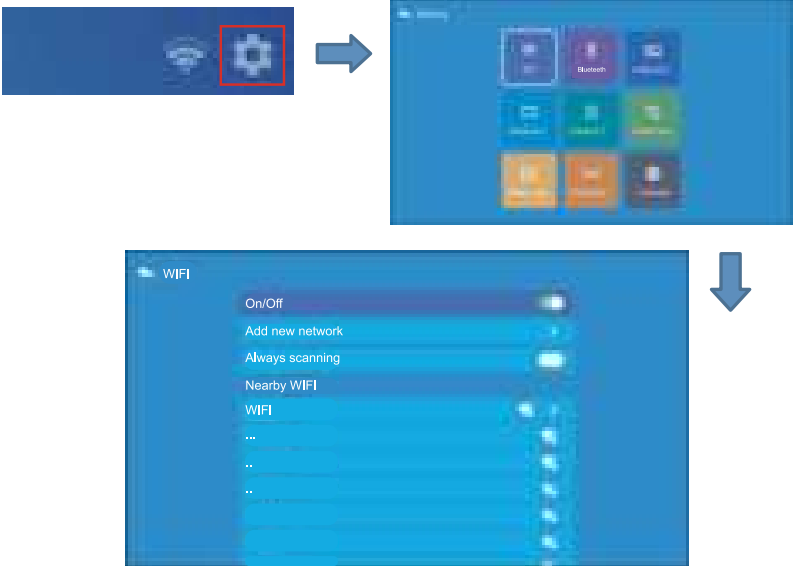
WiFi Setting
Wireless Connection
- The fluency of screen mirroring with wireless connection will be affected by the network environment.
- A bandwidth of 100 Mbps or more is recommended when using screen mirroring.
- Make sure your mobile device is close to the projector when using a wireless connection.
- A distance of within 1 meter is recommended.
- Some mobile devices may not support screen mirroring due to the compati- bility.
IOS Cast (for iOS Devices)
- Go to the home page – Select the [• ] menu — Select the [WiFi ] menu
- Open the WiFi function – Select your home WiFi from the list – Connect the U9 projector to your home WiFi.
- Open the WiFi function – Select your home WiFi from the list – Connect the U9 projector to your home WiFi.
- Back to home page – Select [iOS Cast] menu – Press the OK button to enter the [iOS Cast ] menu.
- Select the [ Settings ] menu on your iOS device – Turn on the [ Wi-Fi ] function — Connect your iOS device to the same home network as the projector.
- Open the [ Control Center ] on your iOS device – Select the [ Screen Mirroring ] function – Select and connect the iOS Cast receiver named [BJ_XXXXX] — your iOS device screen will be displayed on the projection screen after 3 seconds.
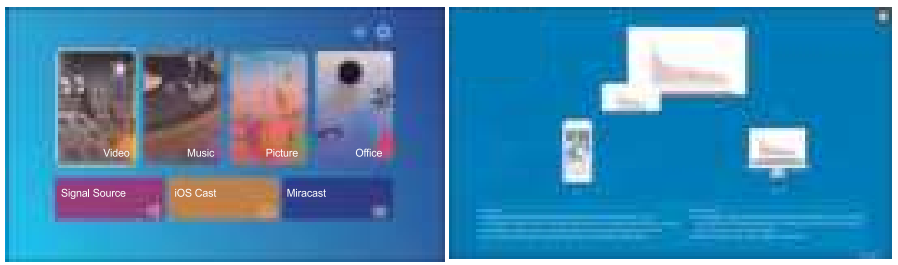
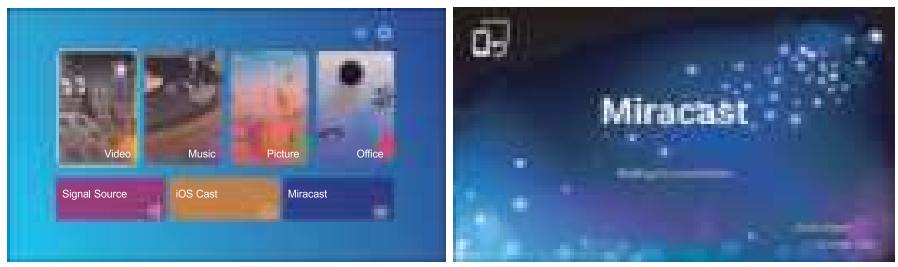
Miracast (for Android Devices)
- Go to the home page — Select the [ Miracast ] menu – Press the OK button to enter the [ Miracast ] interface.
- Select the [ Settings ] menu on your Android device — Select the [Screen mirroring] function–Select your Miracast receiver named [Android_XXX]. Your Android device screen will be displayed on the projection screen after 3 seconds.
- On your Android device, tap [ Settings 1 -[ WLAN Display ] -Turn [Wi-Fi ] ON, Connect to your home WiFi.

Blueteeth Setting
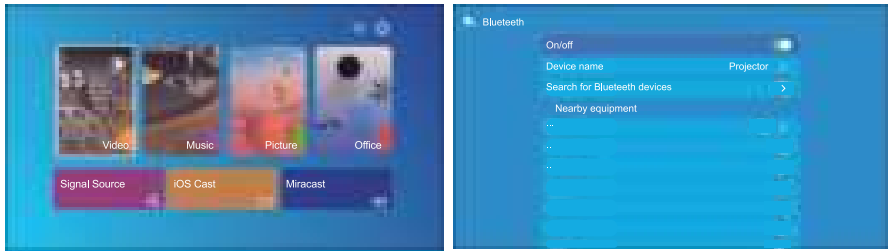
- Go to home page – Select the ] – Select the [ Blueteeth J.
- Open the Bluetooth function on your Bluetooth device.
- Click “Search for the Blueteeth devices.”
- Choose the Blueteeth device desired and press OK, wait a few seconds for a successful Blueteeth connection.
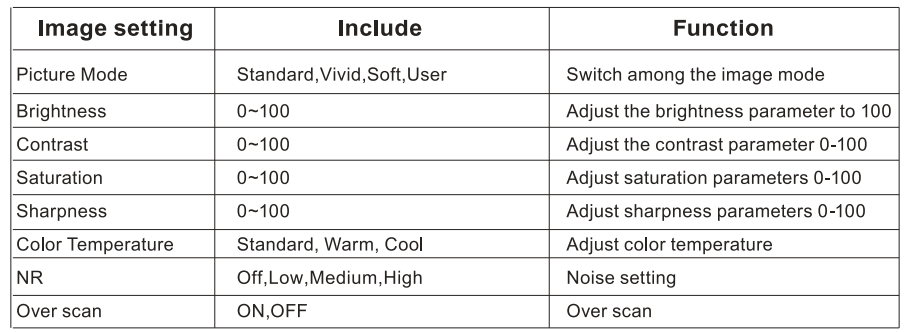
Image Setting
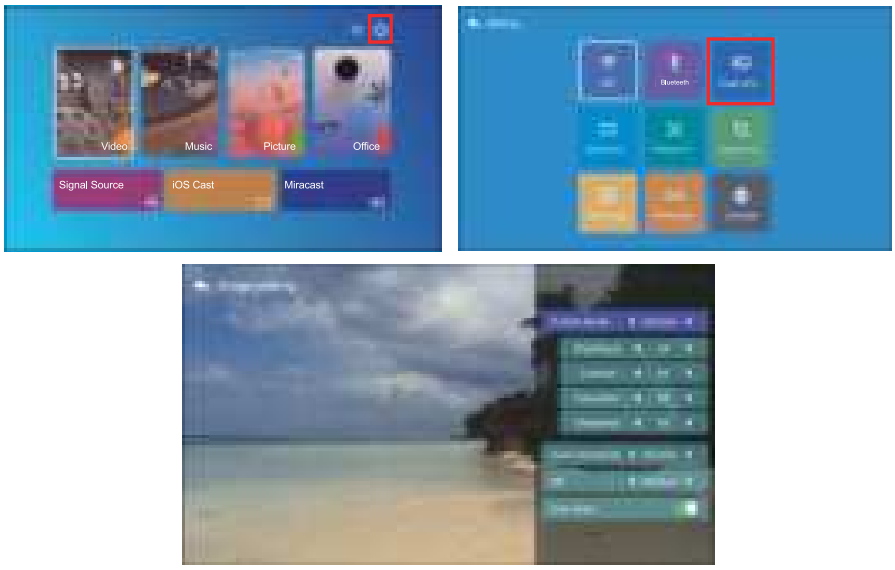
Selectthe “®” menu on the projector’s home page.
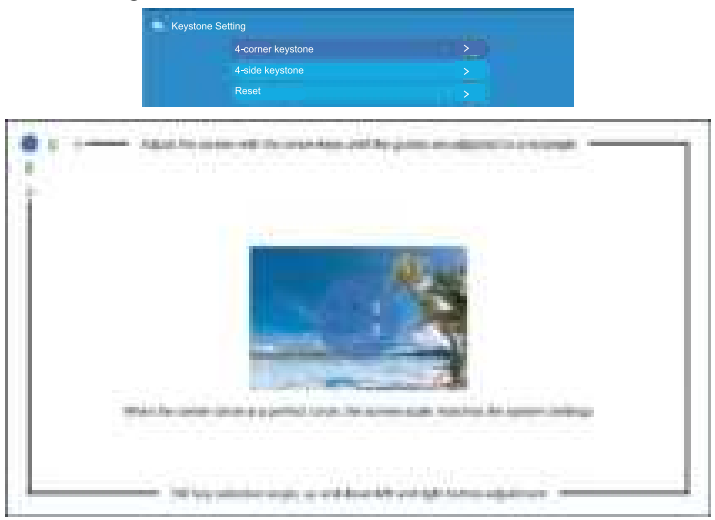
Keystone Setting
Corner Keystone: 0~50
When the projection screen is not rectangular, it can be adjusted by 4the point.
Keystone correction.
- Step 1: Press the button to select the [4-corner Keystone] menu, then press the [ OK ] button to enter the submenu.
- Step 2: Press the OK button on the remote controller or projector to select the point.
- Step 3: Press the arrow keys on the remote controller or projector to adjust the horizontal or vertical parameters until the projection screen becomes the desired rectangle.
4-side Keystone: -40~40
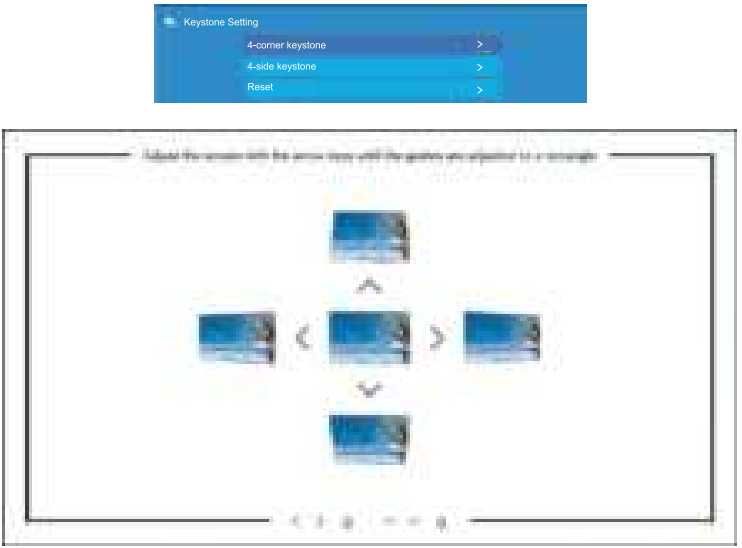
- Step 1: Press the button to select the [4-side Keystone] menu, then press the [ OK ] button to enter the submenu.
- Step 2: If the projection image shows as (1), press the button on the remote controller or projector to increase the vertical parameter (-40-0) until you achieve the projection image (2).
- Step 3: If the projection image shows as (3), then press the button on the remote controller or projector, and decrease the vertical parameter (0~40), until you achieve the projection image (4).

Reset
Click the “reset”, and the parameters will be restored to default values.
Projector Position

You can set 4 projection modes here:
- Front-Celling
- Front projection Ceiling mount
- Rear-Celling
- Rear projection Ceiling mount
- Front
- Front projection Table mount
- Rear
- Rear projection Table mount
Custom zoom
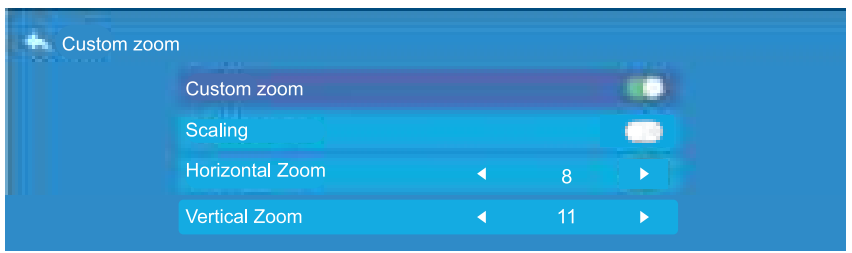
- Step 1: Press the button to select the [Customer zoom] menu, then press the [OK] button to enter the submenu.
- Step 2: Turn on”Custom zoom”, click the “Scaling “, turn on the Scaling function, you can reduce the height and width of the projection size up to 50% in the same proportion.
- Step 3:Click the “Scaling”, turn off the Scaling, you can reduce the horizontal ZOOM and Vertical zoom of the projection up to 50% apartly.
System update

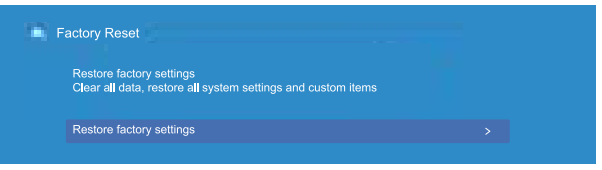
Factory Reset
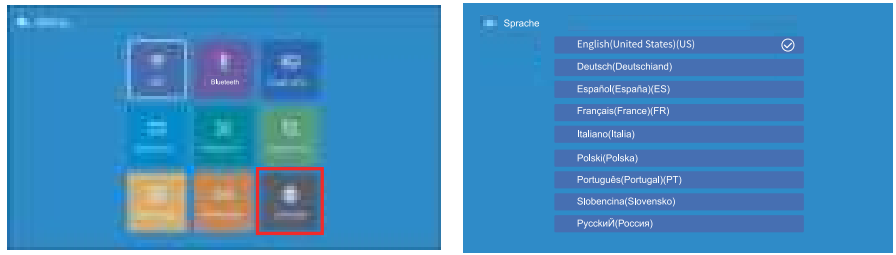
Lanuage
Signal Lines Connection
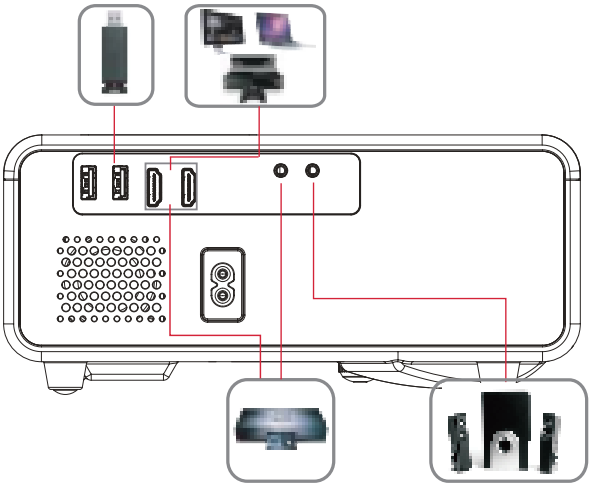
YABER Pro U9 projector has 6 interfaces, HDMI ports*2/USB ports*2/AV in /Audio output. Please select the correct connecting port to connect your device (PC, Phone, DVD Player, Sound bar, USB, PS4, etc.)
Connect USB Disk
- Insert the USB Disk, select the option [ Video/Music/Picture/Office ];
- Select the desired file (or folder to enter the subfolder) in the USB disk, then press the [OK ] button to play it.
HDMI ports
- Connect your TV stick or laptop to any HDMI port of the projector.
- Enter the home page to select the corresponding HDMI as the signal source.
DVD Player
- Turn on your DVD player and the projector.
- Connect the colorful female connectors to your DVD player’s RCA cable with the 3-in-1 AV cable in the package;
- Connect the black connector to the AV port of the projector, and enter the home page to select [AV ] as the signal source.

Or connect to the DVD Player with the HDMI cable in the package.

Connect to the Sound bar/S.aker..

If your speakhas ann s AUX port, please use your 3.5mm audio cable to connect the projector and your speaker as the picture .ows.
Safe Shutdown
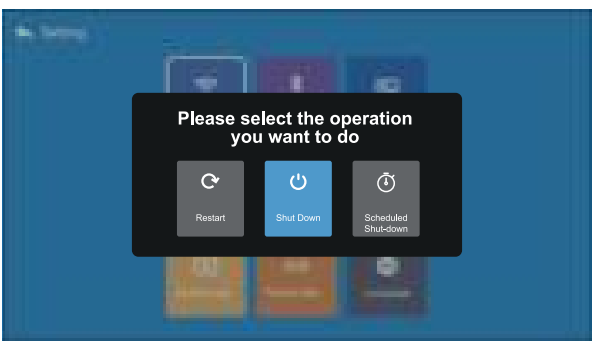
- Press the button”. “on the projector or remote controller.
- There will be three options: restart, shut down, and scheduled shutdown.
- You can choose different shutdown modes.
- Unplug the power cord of the projector.
- Cover the lens and store the projector in a cool and dry place.
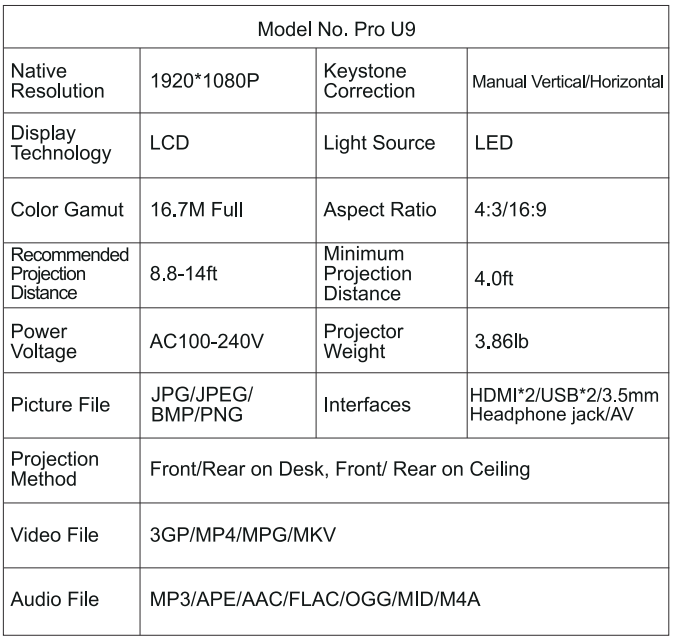
Specification
Troubleshooting
Problems listed below might occur during the operation of your projector. Please refer to the possible factors that might cause the issue to occur troubleshooting.
- When turning on the power switch, the indicator light does not work.
- The power might not be connected well.
- Check the over-heat protection system.
- The remote controller does not communicate with the projector.
- Is the power switch at the back of the projector turned on or off?
- Are the remote controller’s batteries depleted?
- Something is obstructing the signal between the remote and the IR
- Strong light on IR directly.
- No image on the screen.
- Is the channel set up correctly?
- Is there an input signal?
- Is the input cable plugged well?
- Under PC mode, is the refresh rate > 75KHz?
- Picture right, no sound.
- Input cables connected correctly?
- Volume at min or on Mute.
- Can’t play the movies.
- Is the format of the video right?
- Are files broken?
- Is the device broken?
- Auto-off after working for a while.
- The projector ventilation is blocked.
- The voltage is not stable.
- The overheat or temperature protection system.
YABER Lifetime Professional Support
Dear valued customer!
Thank you for choosing the Yaber projector. This manual will help you navigate through all the features. We understand that there may be many questions and concerns that arise during the use of the projector. We are also eager to hear your feedback. However, leaving a review on the product page does not get the fastest solution. Many common problems, such as inability to l. auto focus or keystone, sound issues, WiFi or Bluetooth connection issues, can usually be resolved with appropriate settings adjustments.
Rest assured, our service team will offer the solution to youwithinh 24 hours. Your satisfaction is our top priority. If you encounter any issues, we sincerely hope you will allow us to make things right. We also encourage you to thoroughly explore the contents of this manual first. We wish you an outstanding experience with the projector. Yaber Consumer Service Team
FCC Warning
This device complies with Part 15 of the FCC Rules. Operation is subject to the following two conditions: This device may not cause harmful interference, and (2) this device must accept any interference
received, including interference that may cause undesired operation.
- Reorient or relocate the receiving antenna.
- Increase the separation between the equipment and receiver.
- Connect the equipment to an outlet on a circuit different from that to which the receiver is connected.
- Consult the dealer or an experienced radio/TV technician for help.
IC Warning
This device complies with Industry Canada’s license-exempt RSSs. The operation is subject to the following two conditions: This device may not cause interference, and this device must accept any interference, including interference that may cause undesired operation of the device.”
Customer Service
- Website: https://www.yaber.com/
- Timings: 9:00 am to 7:00