
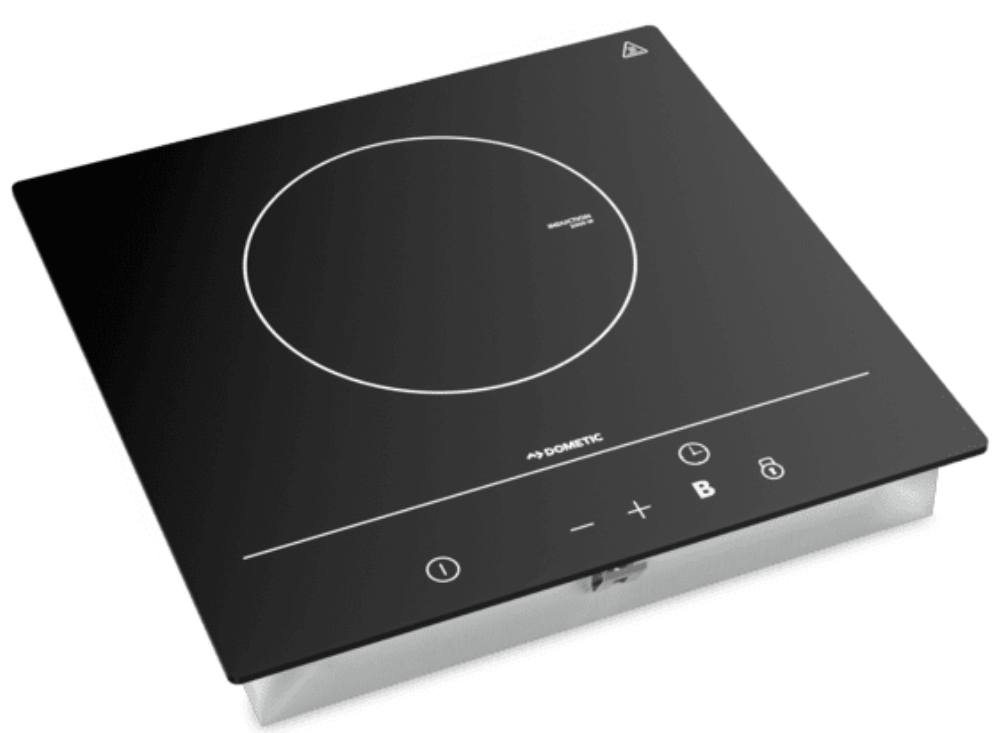
Dometic CVI1350 Induction Cooktop
Safety instructions
- Do not use the device when it is defective.
- Disconnect the device from the power supply if Here is a malfunction due to a technical defect.
- Do not modify this product.
- Do not remove or replace any components of this product.
- Do not store items on the cooking surfaces.
- Keep a fire extinguisher or other means suitable to extinguish a flame ready.
- Connect the device to a circuit that has a circuit breaker that ensures complete disconnection from the power supply.
- Do not cook unattended with fat or oil on the cooktop.
- Never try to extinguish a fire with water. Switch off the appliance.
- Cover the flame with a lid or a fire blanket.
- After use, switch off the cooktop and do not rely on the protection mechanism.
- The appliance and its accessible parts become hot during use.
- Keep your hands, face, and hair away from burners.
- Keep children and pets safely away.
- Monitor all activity around the device to avoid burns or other injuries.
- Let the device cool down to ambient temperature before you touch it with your bare hands.
- Do not use the device as a work or storage surface.
Explanation of Symbols
- Safety instruction: Indicates a hazardous situation that, if not avoided, could result in death or serious injury.
- Safety instruction: Indicates a hazardous situation that, if not avoided, could result in minor or moderate injury.
- Indicates a situation that, if not avoided, can result in property damage.
- Supplementary information for operating the product.
Scope of delivery
| Component | Quantity |
| Cooktop | 1 |
| Fixing kit | 1 |
| Installation and operating manual | 1 |
Target Group
The electrical installation and setup of the device must be performed by a qualified electrician who has demonstrated skill and knowledge related to the construction and operation of electrical equipment and installations, and who is familiar with the applicable regulations of the country in which the equipment is to be installed and/or used, and has received safety training to identify and avoid the hazards involved. All other actions are also intended for non-professional users.
Intended Use
- The cooktop is suitable for cooking and heating food. The cooktop is intended to be used in:
- Recreational vehicles
- Boat and marine usage: Installation in dayrooms. The cooktop is not suitable for:
- Using while driving
- Using it as a space heater
- Operating via an external timer or a separate remote control
- Boat and marine usage: Installation and operation on open decks
- Installation in ute canopies without meeting the IPx4 requirements
This product is only suitable for the intended purpose and application in accordance with these
Instructions. This manual provides information that is necessary for the proper installation and/or operation of the product.
Poor installation and/or improper operation or maintenance will result in unsatisfactory performance and a possible failure. The manufacturer accepts no liability for any injury or damage to the product resulting from:
- Incorrect installation, assembly, or connection, including excess voltage
- Incorrect maintenance or use of spare parts other than the original spare parts provided by the manufacturer
- Alterations to the product without express permission from the manufacturer
- Use for purposes other than those described in this manual
Technical description
- The food in the cookware is heated by an electromagnetic field, which heats the cookware.
- The cooktop is equipped with a lock to protect children from possible danger or injury.
- The cooktop has a timer, an over-temperature protection, an unsuitable object protection, and an automatic shut-down timer.
The cooktops are available in different versions
- CVI1350: Cooktop with one induction zone.
- CVI1525: Cooktop with two induction zones.
- The cooktop has 9 different temperature settings.
| CVI1350 | |||||||||
| Power level | 1 | 2 | 3 | 4 | 5 | 6 | 7 | 8 | 9 |
| Average power | 100 W | 200 W | 300 W | 400 W | 500 W | 1000 W | 1100 W | 1200 W | 1300 W |
| CVI1525 | |||||||||
| Power level | 1 | 2 | 3 | 4 | 5 | 6 | 7 | 8 | 9 |
| Average power (left zone) | W | W | W | W | W | W | W | W | W |
| Average power (right zone) | W | W | W | W | W | W | W | W | W |
Timer
The timer can be used to turn off the cooking zone automatically after the set time has elapsed. The timer can be set from 0 to 99 minutes.
Over-Temperature Protection
A temperature sensor monitors the temperature inside the cooktop. The cooktop switches off if the temperature sensor detects an overheat situation (≥ 190 °C (≥ 374°F)).
Unsuitable Object Protection
If cookware of an unsuitable size, a non-magnetic object, or a small object is left on the cooktop, or an the cookware is clearly off-center, the cooktop automatically switches to standby mode after 1 minute. The cooktop fan then cools the cooktop for 1 minute.
Automatic shutdown timer
The automatic shutdown timer is a safety protection function. The function shuts down the cooktop automatically after a certain period of time. The automatic shutdown times for various power levels are shown in the table below
| Power level | 1 | 2 | 3 | 4 | 5 | 6 | 7 | 8 | 9 |
| Shut down (h) | 8 | 8 | 8 | 4 | 4 | 4 | 2 | 2 | 2 |
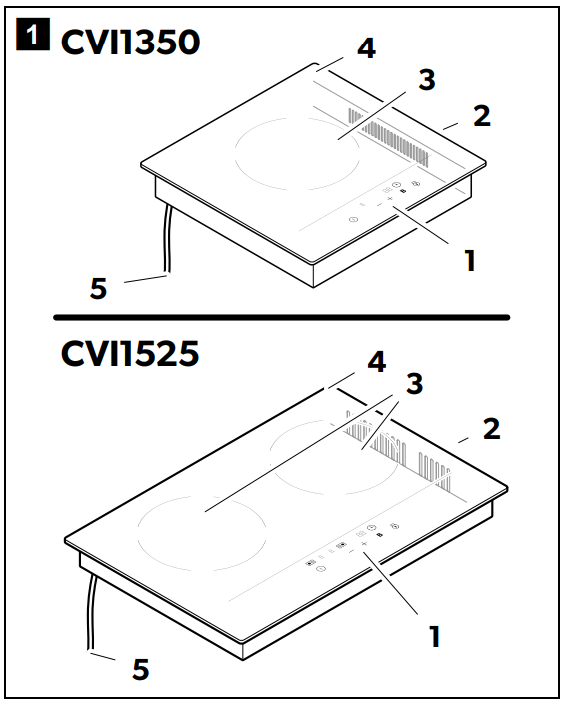
| No. | Description |
| 1 | Control panel |
| 2 | Ventilation |
| 3 | Cooking zone |
| 4 | Glass plate |
| 5 | Power cable |
A beep sounds when the touch buttons are pressed.
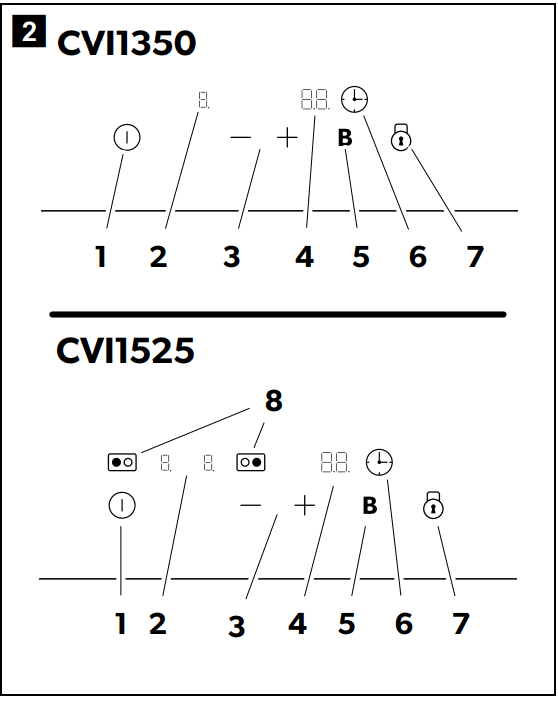
| No. | Description |
| 1 | ON/OFF button |
| 2 | Power level indicator |
| 3 | Heat level buttons |
| 4 | Time indicator |
| 5 | BOOST button |
| 6 | Timer symbol |
| 7 | Lock button |
| 8 | Cooking zone selection buttons |
Installation
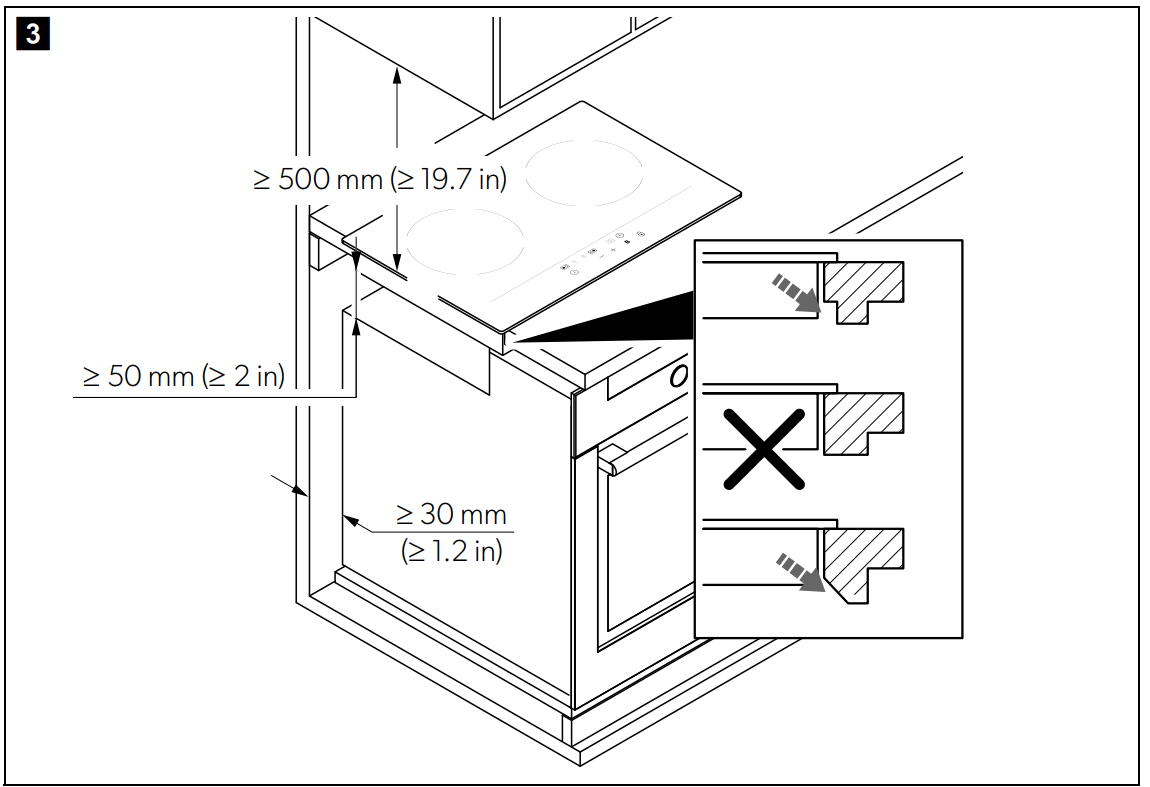
- Socket-outlets and switches shall not be installed in the prohibited location as shown (see page 3), on any wall, cupboard, or other surface within 150 mm of the edge of the cooking surface, in the area extending from the top of the cooking surface to a range Dometic CVI1350 Induction Cooktop hood, cupboard, or ceiling located directly above the cooking surface.
- Ensure the voltage corresponds to the value given in the data plate.
- Ensure the power supply cable sections can withstand the load specified on the rating plate.
- The power supply cable must not touch any hot Dometic CVI1350 Induction Cooktop parts and must be routed so that its temperature does not exceed 75 °C.
- The safety distance between the cooktop and the device above the cooktop must be at least 500 mm (fig.3, page 4).
- Ensure that the cooktop is well ventilated with a ventilation size of 1500 mm².
- Ensure that the air inlet and air outlet are not blocked (fig.3, page 4).

Mounting
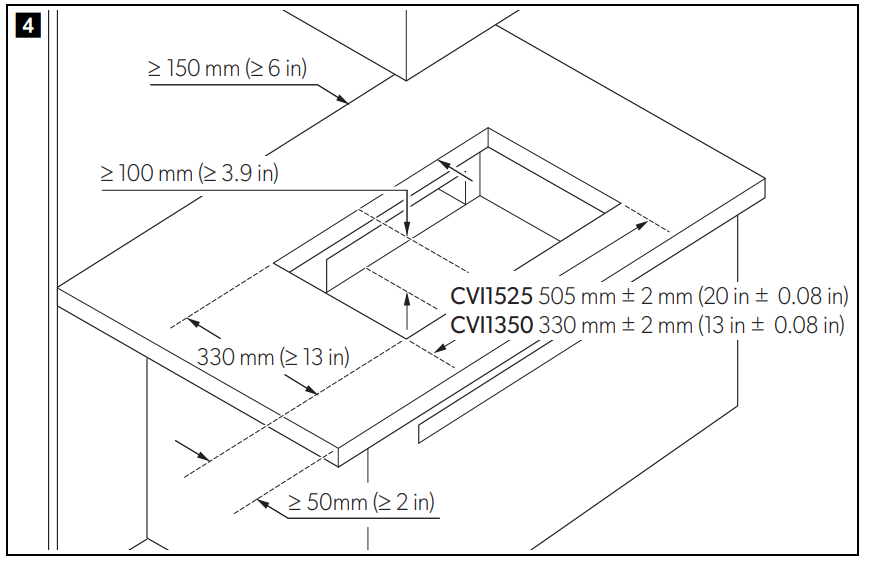
- Ensure that the distances are maintained as specified in fig.3, page 4.
- Cut out the working surface, see fig.4, page 5.
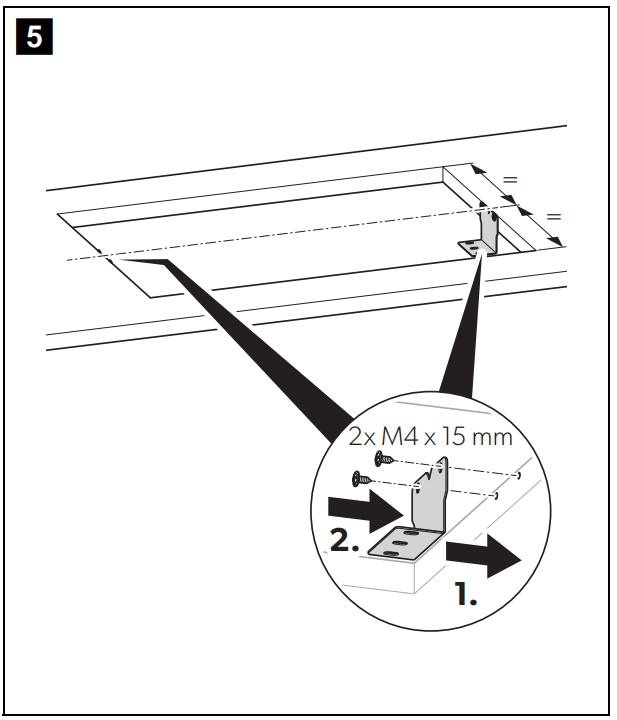
- Mount the brackets on the working surface, see fig.5, page 5.
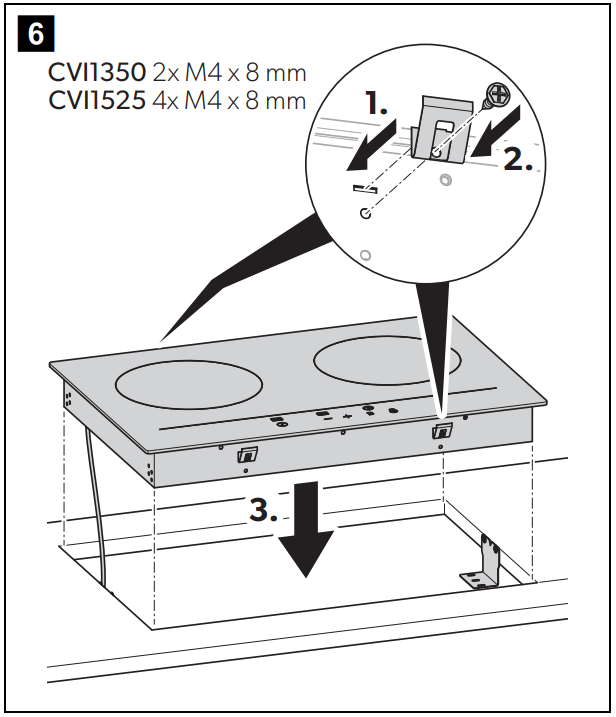
- Mount the spacer to the cooktop, see fig.6, page 5.
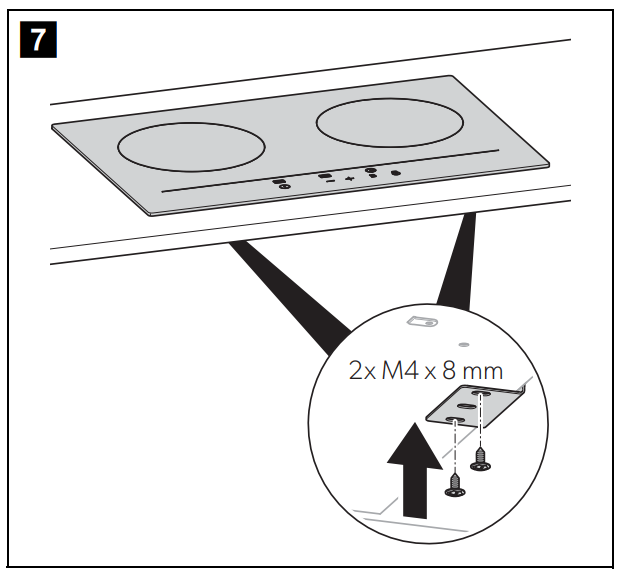
- Mount the cooktop to the brackets, see fig.7, page 6.
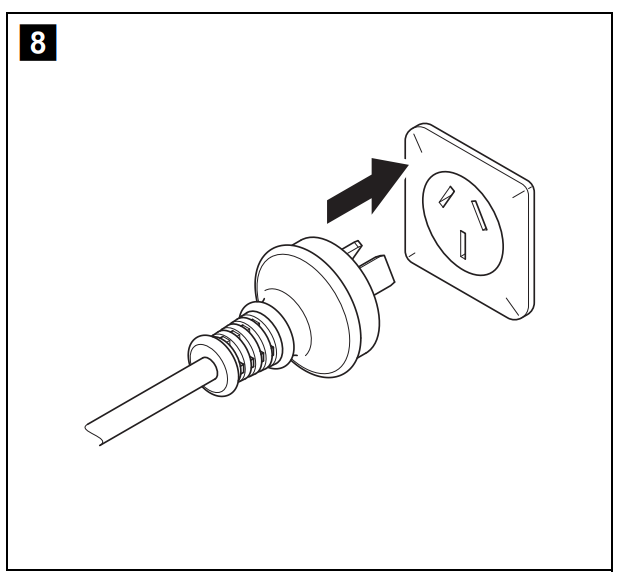
- Connect the power cable, see fig.8, page 6.
Operation
- Do not slide cookware over the cooktop.
- Lift the cookware when you want to remove it from the Dometic CVI1350 Induction Cooktop cooktop.
- With a battery management system that is capable of applying the necessary loads.
- The operation of multiple devices, e.g., air-conditioners, hot water systems, air fryers, microwaves, space heaters, or hair dryers at the same time, may overload the recreational vehicle’s input.
- In this case, reduce the load and reset the fault-current circuit breaker, if necessary.
- The buttons respond to touch. Do not use pressure to operate the buttons.
- Use the fingertip and not the fingernail to operate.
- Ensure the buttons are always clean and dry so that the operation is not affected.
Choosing the Right Cookware
NOTE
- Only use cookware with a base suitable for induction cooking.
- Do not use cookware made of pure stainless steel, aluminum, or copper without a magnetic base, glass, wood, porcelain, ceramic, or earthenware.
- Perform a magnet test to check if your cookware is suitable for the operation of the cooktop by moving a magnet towards the base of the cookware.
- The cookware is suitable for the cooktop when the magnet is attracted to the cookware.
- Use cookware with a bottom diameter of min. 140 mm.
Heat Settings
The following settings are guidelines. The exact setting will depend on the cookware and the amount to be cooked.
| Heat level | Suitability |
| 1 – 2 | Warming for small amounts of food Melting foods that burn quickly CVI1350 only: Slow simmering Slow warming |
| 3 – 4 | CVI1350 only: Reheating Fast simmering Cooking rice CVI1525 only: Slow simmering |
| 5 – 6 | Cooking pancakes CVI1525 only: Slow warming Reheating |
| 7 – 8 | Sautéing Cooking pasta CVI1525 only: Fast simmering Cooking rice |
| 9 | Stir-frying Searing Boiling water |
Using the Cooktop CVI1350
- Touch the button.
- The standby mode is activated.
- Touch the button.
- The power level indicator displays.
- Set the cooking zone power level by using the and button.
CVI1525
- Touch the button.
- The indicators display or.
- The power level indicator displays.
- Set the cooking zone power level by using the and button.
Switch off the Cooktop
- Turn the cooking zone off by touching the button Dometic CVI1350 Induction Cooktop until the time indicator displays it.
- Touch the button to switch off the cooktop.
- Touch the button to switch off the cooktop.
Using the lock
- Touch the button to lock the display.
- The time indicator displays.
- Touch the button and hold for a few seconds to unlock the display.
Boost Function
- 5 minutes at a higher power level.
- Power level: the power level indicator flashes.
- Touch the or button.
- Touch the button.
- The power level indicator displays.
- The power level indicator returns to normal after 5 minutes.
Deactivate the BOOST function as follows
- The power level indicators flash alternately.
- Touch the button of the right cooking zone.
- The power level indicator of the selected button flashes.
- Touch the button.
- The power level indicator of the selected cooking zone displays.
- The power level indicator of the selected cooking zone returns to normal after 5 minutes.
- Touch the button.
Using the timer
- Touch the button.
- The timer indicator displays minutes.
- Set the time by using the and button.
- Touch the or button once to decrease or increase the time by 1 minute.
- Touch and hold the or button to decrease or increase the time by 10 minutes.
- If the set time exceeds 99 minutes, the timer Dometic CVI1350 Induction Cooktop automatically returns to 0 minutes.
- The time counts down.
- The time indicator displays the remaining time.
- The timer indicator flashes for 5 seconds.
- The power level indicator displays until the temperature of the cooking zone is below 60 °C.
- Set the timer to turn the cooking zone off.
Set the Time
- Touch the button.
- The time indicator displays minutes.
- Touch the or button once to decrease or increase the time by 1 minute.
- Touch and hold the or button to decrease or increase the time by 10 minutes.
- If the set time exceeds 99 minutes, the timer automatically returns to 0 minutes.
- The time counts down.
- The time indicator displays the remaining time.
- The timer indicator flashes for 5 seconds.
- The power level indicator displays until the temperature of the cooking zone is below 60 °C.
- Set the timer to turn the cooking zone off. Setting the time to turn more than one cooking zone off:
Saving energy
- Switch off the cooktop if it is not in use.
- Use cookware whose diameter is as large as the selected cooking zone to use energy efficiently (see chapter “Technical data” on page 19).
- Always use a lid when cooking to reduce heat loss and use less energy for cooking.
- Reduce the energy supply early to finish cooking food with the residual heat in the cookware.
Cleaning and maintenance
- Do not use any sharp or hard objects for cleaning since they may damage the cooktop.
- Remove spilled food with a safe glass scraper after the cooktop has cooled.
- Only use standard commercial cleaning agents that are suitable for glass surfaces.
- Do not use a high jet or a steam cleaner to clean the cooktop.
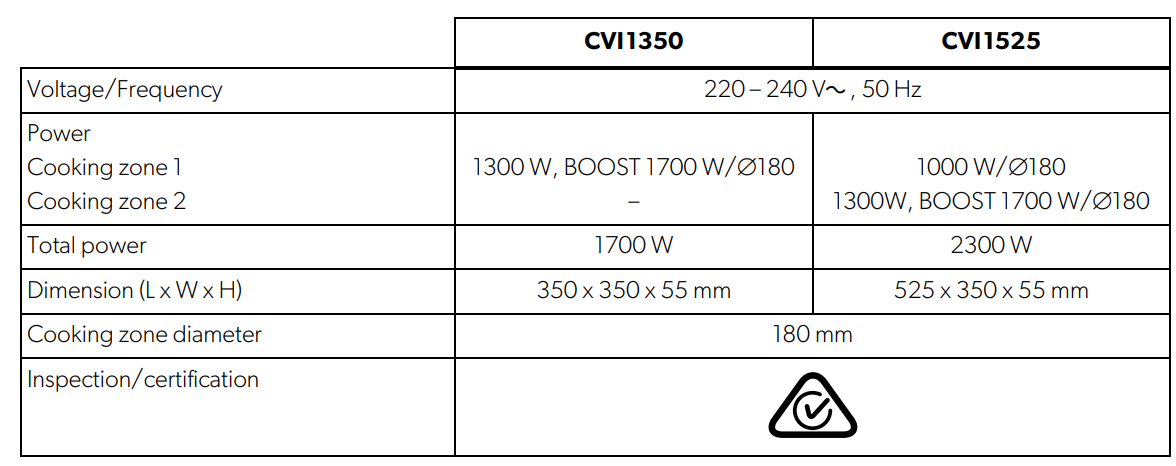
Technical Data
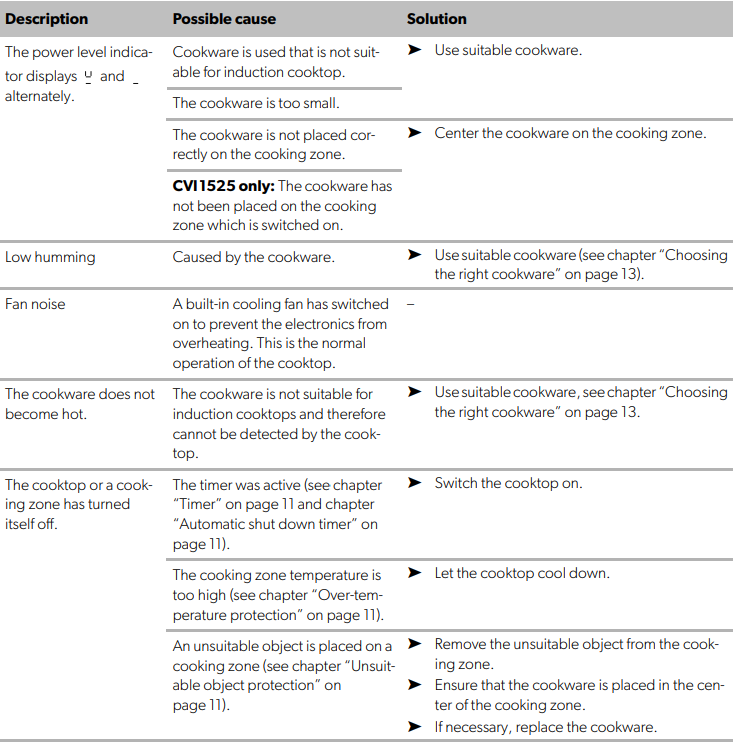
Troubleshooting
| Description | Possible cause | Solution | |
| The cooktop cannot be switched on. | No power. | ➤ | Ensure that the cooktop is connected to the power supply. |
| ➤ | Ensure that the cooktop is switched on. | ||
| ➤ | Check whether there is a power outage in your area. | ||
| ➤ | Contact the manufacturer support (see back page of this manual). | ||
| The touch buttons donoto respond. | The touch buttons are locked. | ➤ | Unlock the touch buttons, see chapter “Using the cooktop” on page 13. |
| The touch buttons do not react properly. | The operation is blocked by dirt or water. | ➤ | Ensure the touch buttons are clean and dry. |
| ➤ | Ensure that the touch buttons are operated with the fingertips and not with fingernails. | ||
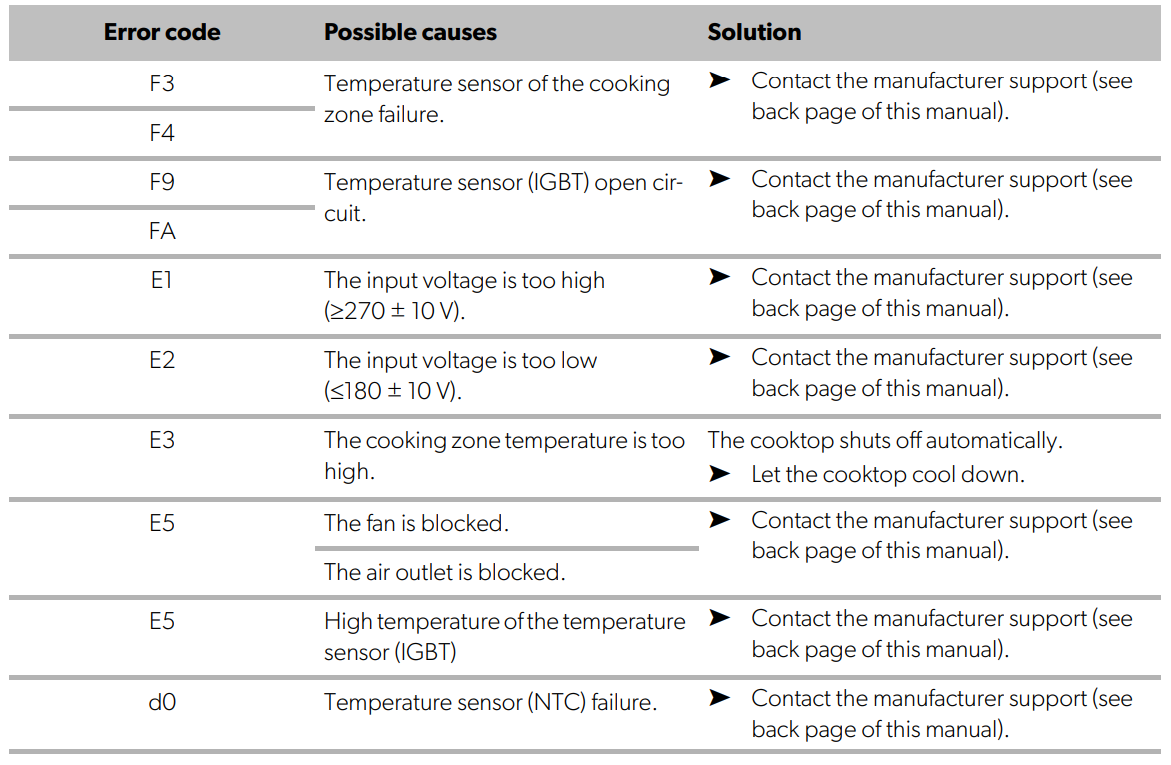
Error codes
Warranty
Refer to the sections below for information about warranty Dometic CVI1350 Induction Cooktop and warranty support in the US, Canada, and all other regions.
Disposal
Place the packaging material in the appropriate recycling waste bins, wherever possible. Consult a local recycling center or specialist dealer for details about how to DOMETIC SB27150 90 Degree Bezel Kit Installation dispose of the product in accordance with the applicable disposal regulations.
Customer Service
SPAIN
- Address: Dometic Spain S.L. Avda. Sierra del Guadarrama, 16 E-28691 Villanueva de la Cañada Madrid
- Call: 8 +34 900 100 245.
- Email: info@dometic.es
GERMANY
- Address: Dometic WAECO International GmbH Hollefeldstraße 63 • D-48282 Emsdetten
- Call: 9 +49 (0) 2572 879-195
- Email: info@dometic-waeco.de
FRANCE
- Address: Dometic SAS ZA du Pré de la Dame Jeanne B.P. 5 F-60128 Plailly
- Call: +33 344633518
- Email: vehiculesdeloisirs@dometic.fr
AUSTRALIA
- Address: Dometic Australia Pty. Ltd. 1 John Duncan Court • Varsity Lakes QLD 4227
- Call: 8 +61 7 55076001|
- Email: sales@dometic-waeco.com.au
FAQs
How does induction cooking work?
Unlike conventional electric or gas cooktops, induction cooking employs electromagnetic fields to directly heat compatible cookware, resulting in shorter heating times and greater energy economy.
What cookware is compatible with the CVI1350?
The induction hob is only compatible with ferromagnetic cookware, such as stainless steel or cast iron with magnetic bases. Glass and aluminium cookware are incompatible and will not heat up.
What power source does the CVI1350 require?
Depending on your location, the hob runs on ordinary household AC power, which is usually between 110 and 240V.
How do I control the temperature and power settings?
Along with preset cooking modes, the CVI1350 has a digital touch control panel that enables accurate temperature and power level adjustment.
Is the CVI1350 energy efficient?
Since induction cooking heats cookware directly and reduces heat waste, it is indeed more energy-efficient than conventional techniques.
Does the CVI1350 have safety features?
Indeed, it has features like cookware detection, overheat prevention, child lock, and auto shutdown to guarantee safe operation.
How easy is it to clean the cooktop?
Using a moist towel and a light detergent, the smooth glass surface is simple to clean. Spills are less likely to burn on this surface because it doesn’t become as hot as conventional cooktops.