


![]()
Bowers & Wilkins CWM3 Series In-Wall Speakers
Unpacking
CWM3 Series in-wall speakers are designed to offer easy installation and high-quality audio reproduction for discrete custom install applications. They are particularly suitable for use in humid environments such as swimming pools. This manual describes the installation of CWM3 Series speakers within conventional stud and sheetrock (joist and plasterboard) walls. It begins by listing the contents of the carton.
- Two CWM3 Series speakers
- Two CWM3 Series speaker grilles
- Two aperture templates
- Two paint masks
- Quick Start Guide
- Warranty information
CWM3 Series Basics
CWM3 Series in-wall speakers comprise a baffle carrying the speaker drivers, crossover circuit, and connectors, and a magnetically secured grille. The baffle is secured in the wall aperture by dog-clamps that swing outwards and tighten. CWM3 Series in-wall speakers require wall aperture and minimum depth clearance as follows:
- Model CWM362
- Aperture Height 275mm (10.9 in)
- Aperture Width 181mm (7.2 in)
- Minimum Depth Clearance 76mm (3 in)
Before installing CWM3 Series speakers, you should ensure that the wall locations chosen are free of obstructions such as pipe work, duct, or wiring that will interfere with the installation. In existing dry-wall construction, use a stud-finding tool to help you map the wall construction and a pipe detector to scan the proposed installation locations.
Positioning CWM3 Series Speakers
The appropriate position for CWM3 Series speakers within the listening environment will depend on their specific application:
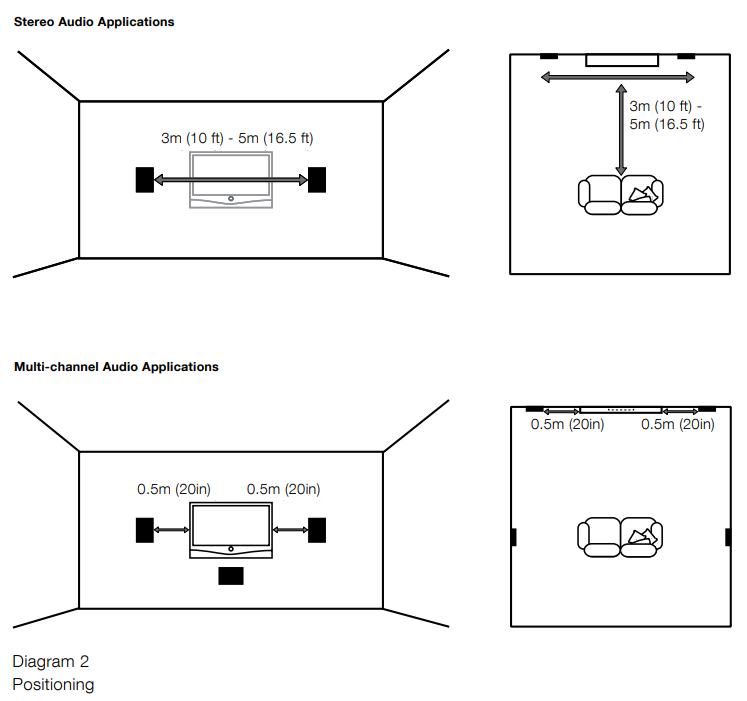
Stereo Audio Applications
For applications where a pair of CWM3 Series Speakers is to be used for conventional stereo reproduction, they should be located between 3m (10 ft) and 5m (16.5ft) apart and a similar distance in front of the listening area. Try to avoid corner locations for the speaker and ensure that the acoustic environment around each speaker is similar
Multi-channel Audio Applications
The centre channel speaker should be located either directly above or below the screen or, in the case of an acoustically transparent screen, directly behind. Surround channel CWM3 Series speakers should be located just behind and to either side of the listening position. Try to avoid corner locations for any of the speakers and ensure that the acoustic environment around each front and surround speaker is similar.
Stereo Audio Applications

Installing CWM3 Series Speakers
Using the supplied aperture template, mark a
Cut line on the wall. Check that the cut line defines the correct aperture dimensions. Cut along the line with an appropriate tool to create a rectangular aperture in the wall.
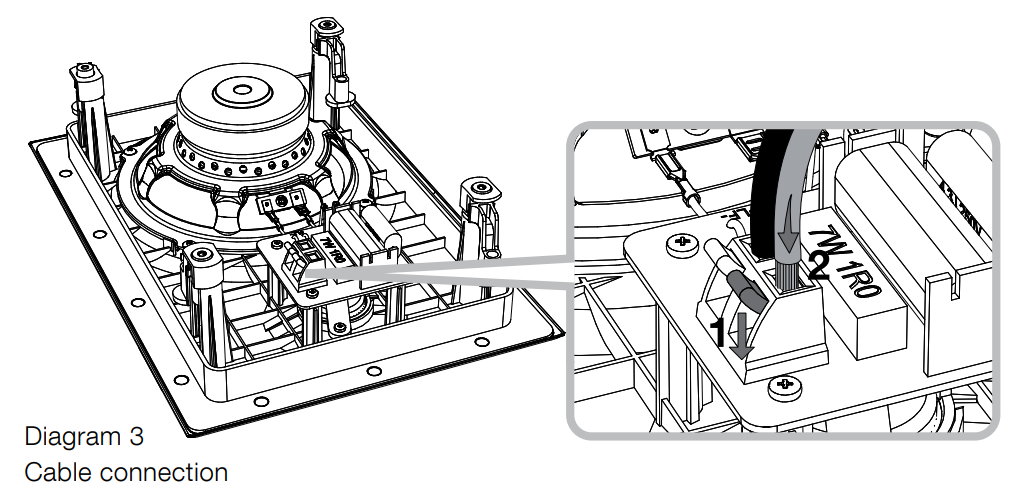
If the speaker cable is already present in the wall, feed the cable through the aperture. If speaker cables are not already installed, this should be done at this stage. You will likely need to gain access through the floor above to route the cables down through the wall space. Leave enough spare cable through the aperture to ease connection to the speaker, but not so much that it is likely to buzz or rattle when pushed back into the wall space. Approximately 1.0m (3 ft) is appropriate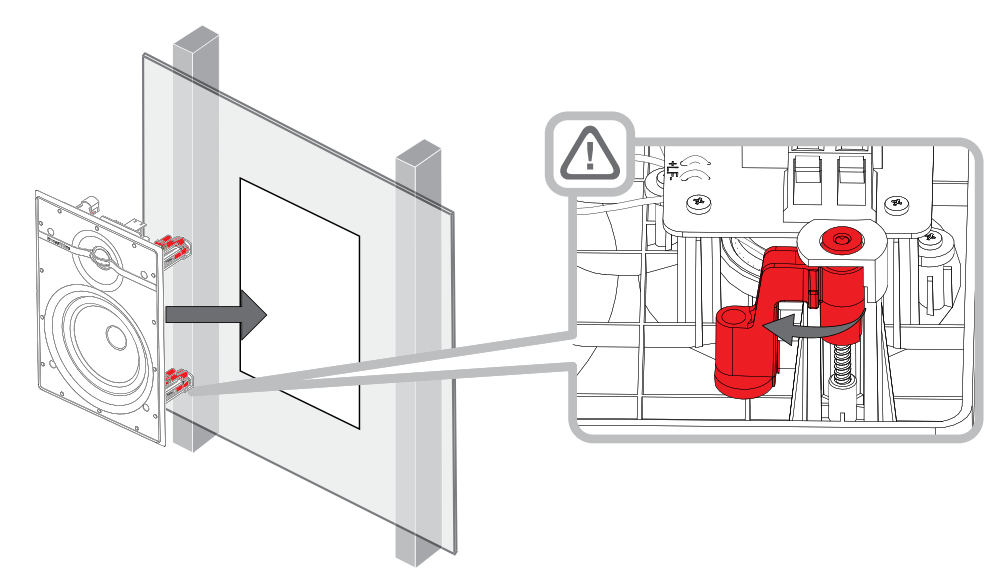
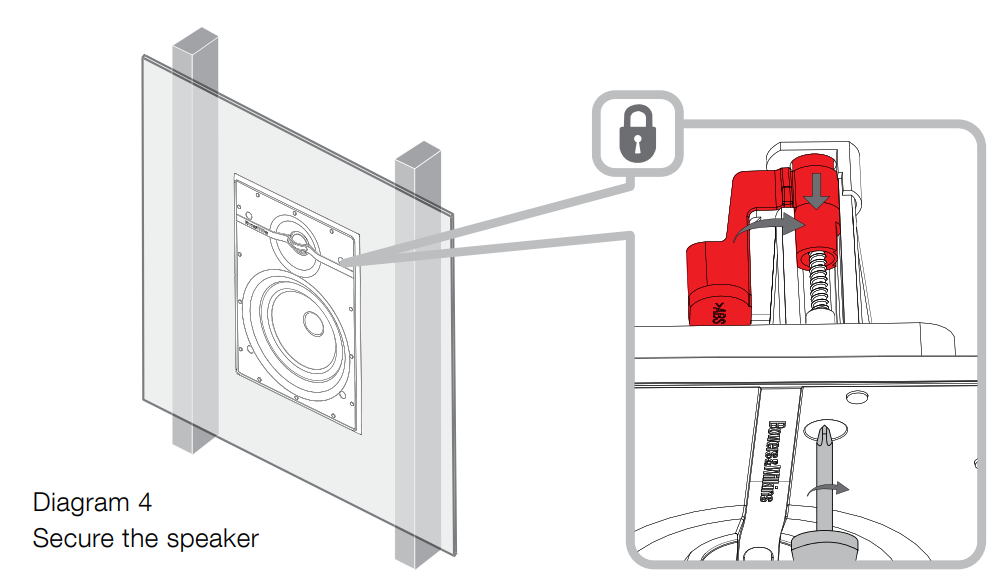
With the speaker connected to the cable, it
can be inserted into the wall aperture. Ensure that the four dog clamps are rotated inwards so that they can pass through the aperture, and then hold the speaker flange flush to the wall. Take care that the connection cable does not become trapped anywhere.
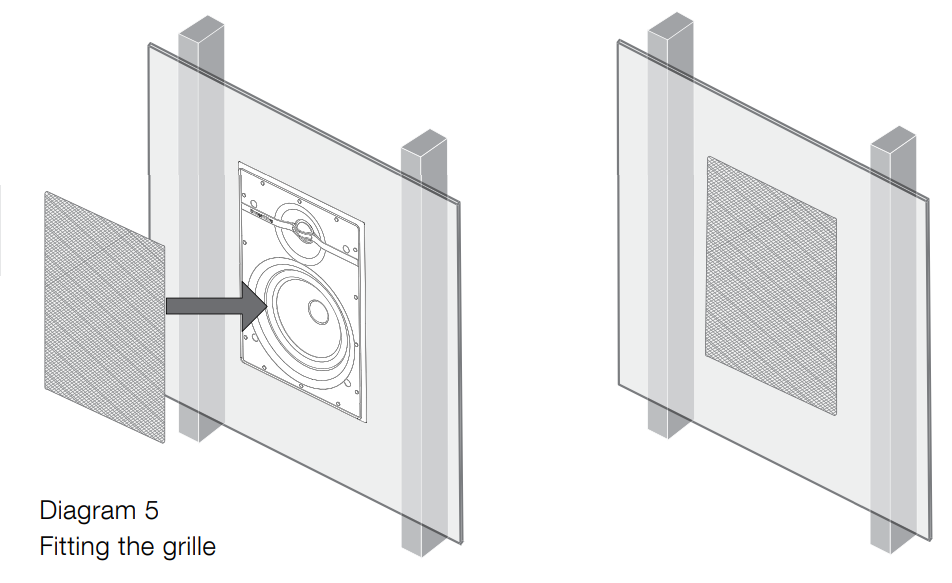
The grille can now be fitted. The grille is held in place magnetically, so it simply needs to be aligned with the groove in the frame flange, where it will click into place. Diagram 5 illustrates fitting the grille. The CWM3 Series speaker is now installed and ready for use.
Using a Pre-mount Kit
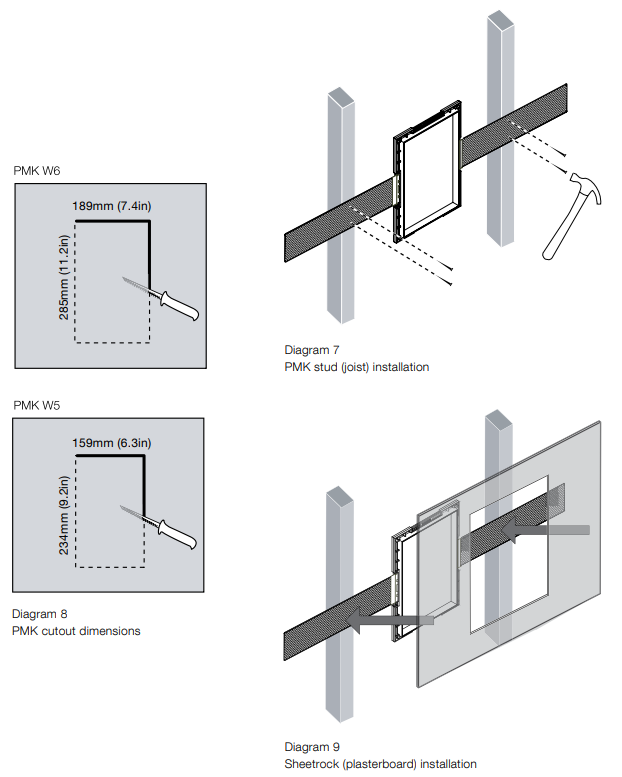
A pre-mount kit (PMK) comprises a plastic moulding that defines the aperture size of the specific speaker model, two perforated metal straps, and four plastic clips. To use a PMK, first attach one strap to each side of the moulding using the plastic clips. Diagrams 6-9 illustrate PMK installation.

Using a Back-box Kit
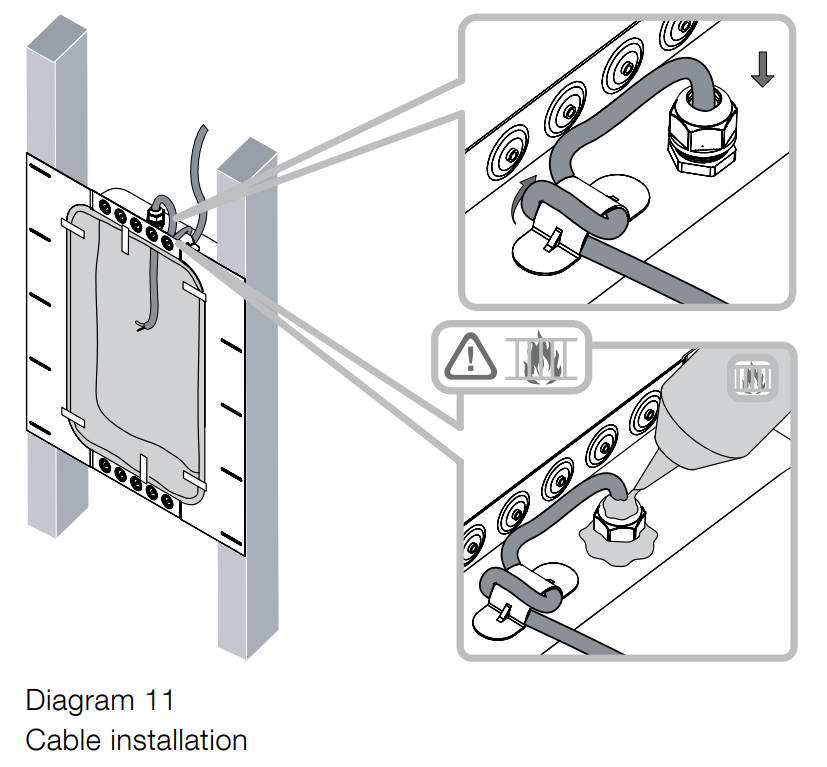
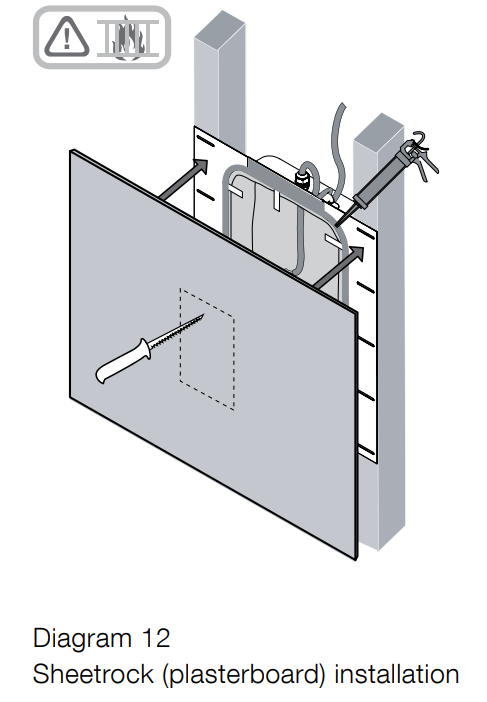
Custom install back-box kits comprise a fire-proof box that can be fitted behind in-wall or ceiling speakers before the sheetrock (plasterboard) is fitted to the studs (joists). As well as enabling compliance with fire regulations, back-boxes also help optimize speaker performance by providing a defined acoustic loading volume. Ensure that a generous length of cable is available in the back-box before the gland is sealed. A cable clamp adjacent to the gland provides cable strain relief.
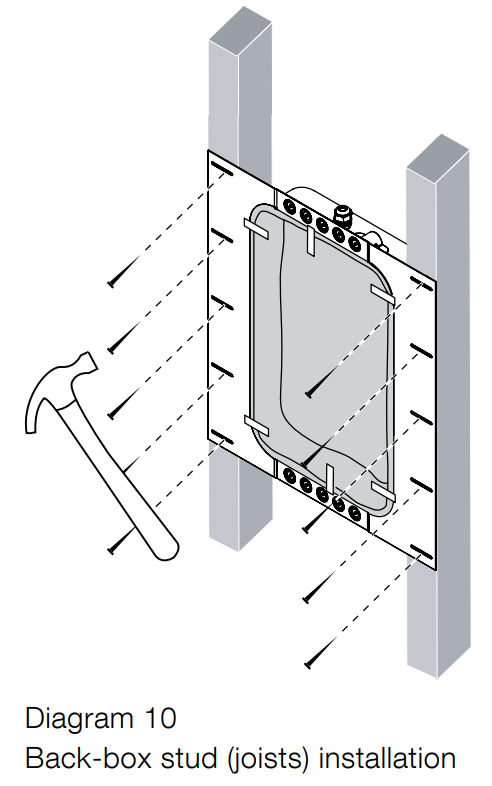
When the sheetrock (plasterboard) is fitted over the back, a generous bead of fire-retardant sealing mastic should be applied to the back box flanges to seal the assembly and minimise the possibility of vibration when the speaker is in use. Diagrams 10-12 illustrate back-box installation. tion
Environmental Information
- This product automatically manages its power state without the need for any interaction.
- This product complies with international directives, including but not limited to the Restriction of Hazardous Substances (RoHS) in electrical and electronic equipment, the Registration, Evaluation, Authorization and restriction of Chemicals (REACH), and the disposal of Waste Electrical and Electronic Equipment (WEEE).
- Consult your local waste disposal authority for guidance on how to properly recycle or dispose of this product.
Customer Service
- Ph: 800 370 3740
- Website: https://www.bowerswilkins.com/
FAQs
Q: Are the CWM3 speakers active or passive?
Since all of the CWM3 Series models are passive speakers, an additional amplifier or AV receiver is necessary. They don’t have integrated amplification.
Q: Are the speakers paintable?
Indeed. It is possible to paint the grilles to match the colour of the wall. Don’t spray the mounting frame or drivers; instead, use light, non-blocking layers of paint.
Q: Do the CWM3 speakers need a back box?
To enhance bass response and separate sound from other rooms, several models come with or suggest a back box or enclosure frame. Whether it is necessary or optional will be specified in the owner’s manual for your particular model.
Q: What amplifier power do the CWM3 speakers need?
Although recommended amplifier power varies by model, high-quality amplifiers with 25–150W per channel work well with the majority of CWM3 speakers. For safe operation, always match the amplifier’s output to the speaker’s rated power.
Q: Can these speakers be installed in ceilings as well?
The CWM3 Series is made especially for installation inside walls. Instead, Bowers & Wilkins suggests the CCM Series for ceiling installations.
Q: What size cutout do I need for installation?
The “Installation Specifications” section of the owner’s manual lists the precise cutout size and mounting depth for each CWM3 model. Prior to cutting the wall, always take precise measurements.
Q: Can I upgrade or replace the grilles or components?
Indeed. Bowers & Wilkins support may offer replacement grilles and some mounting components.
8 Comments
Thank you for your shening. I am worried that I lack creative ideas. It is your enticle that makes me full of hope. Thank you. But, I have a question, can you help me? https://accounts.binance.com/si-LK/register-person?ref=LBF8F65G
Thank you for your sharing. I am worried that I lack creative ideas. It is your article that makes me full of hope. Thank you. But, I have a question, can you help me?
Thank you for your sharing. I am worried that I lack creative ideas. It is your article that makes me full of hope. Thank you. But, I have a question, can you help me? https://accounts.binance.com/register-person?ref=IXBIAFVY
Can you be more specific about the content of your article? After reading it, I still have some doubts. Hope you can help me.
Thank you for your sharing. I am worried that I lack creative ideas. It is your article that makes me full of hope. Thank you. But, I have a question, can you help me? https://www.binance.info/register?ref=IXBIAFVY
Thanks for sharing. I read many of your blog posts, cool, your blog is very good.
Thank you for your sharing. I am worried that I lack creative ideas. It is your article that makes me full of hope. Thank you. But, I have a question, can you help me? https://accounts.binance.info/register/person?ref=IHJUI7TF
Your article helped me a lot, is there any more related content? Thanks!