

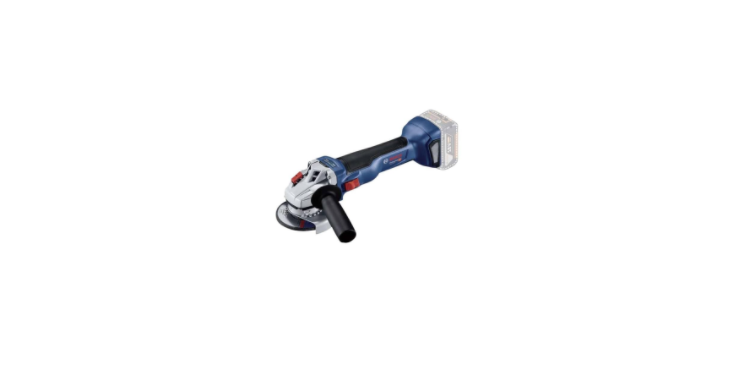

Bosch 18V-10 GWS Professional Angle Grinder
Safety Instructions
- Keep the work area clean and well-lit. Cluttered or dark aisles invite accidents.
- Keep children and bystanders away while operating a power tool.
- Never modify the plug in any way. Do not use any adapter plugs with earthed (grounded) power tools.
- Unmodified plugs and matching outlets will reduce the risk of electric shock.
- Water entering a power tool will increase the risk of electric shock.
- Do not abuse the cord. Never use the cord for carrying, pulling or unplugging the power tool.
- Keep the cord away from heat, oil, sharp edges or moving parts.
- Damaged or entangled cords increase the risk of electric shock.
- When operating a power tool outdoors, use an extension cord suitable for outdoor use.
- Use of a cord suitable for outdoor use reduces the risk of electric shock.
- Stay alert, watch what you are doing and use common sense when operating a power tool.
- A moment of inattention while operating power tools may result in serious personal injury.
- Use personal protective equipment. Always wear eye protection.
- Remove any adjusting key or wrench before turning the power tool on.
- A wrench or a key left attached to a rotating part of the power tool may result in personal injury.
- Do not overreach. Keep proper footing and balance at all times.
- This enables better control of the power tool in unexpected situations.
- Dress properly. Do not wear loose clothing or jewellery.
Product Description
The numbering of the product features refers to the diagram of the power tool on the graphics page.
- Unlocking the lever for the protective guard
- Direction of rotation arrow on housing
- Spindle lock button
- On/off switch(GWS 18V-10)
- Rechargeable batterya)
- Rechargeable battery release buttona)
- Vibration-damping auxiliary handle (insulated gripping surface) (GWS 18V-10 P)
- Standard auxiliary handle (insulated gripping surface) (GWS 18V-10)
- On/off switch (GWS 18V-10 P)
- Unlocking lever for on/off switch (GWS 18V-10 P)
- Extraction guard for grinding
- Protective guard for grinding
- Protective guard for cutting)
- Cover for cutting
- Mounting flange with O‑ring
- Carbide grinding heada)
- Grinding disca)
- Disc brush (dia. 22.22 mm)a)
- Disc brush (M14)a)
- Cutting disca)
- Diamond cutting disc
- Quick-clamping nut with bar
- Quick-clamping nut
- Two-pin spanner for clamping nut/round nut
- Handle (insulated gripping surface)
- Grinding spindle
- Hand guarda)
- Rubber sanding pada)
- Abrasive disca)
- Round nuta)
- Cup brusha)
- Conical brusha)
- Diamond annular cucuttera)
- Open-ended spannera)
- Extraction guard for cutting with cutting guides)
Noise/Vibration Information 
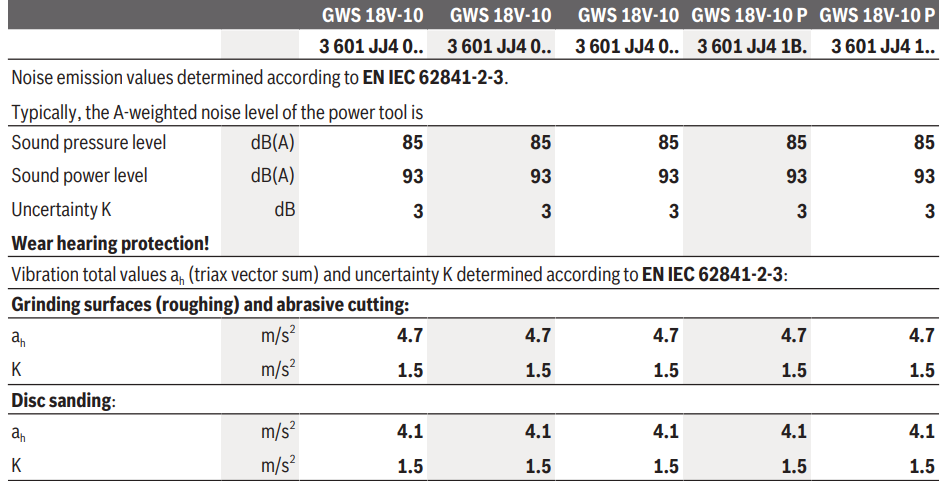
Grinding thin metal sheets or other materials that tend to easily vibrate with a large surface area can cause the noise emission value to increase by up to 15 dB. Suitable heavy-damping mats can reduce the increased noise emissions. Increased noise emissions must be taken into consideration, both for the risk assessment of the noise output and for selecting suitable hearing protection.
Kickback Stop
If there is a sudden kickback in the power tool, e.g. jamming in a separating cut, the power supply to the motor will be interrupted electronically.
Restart protection
The restart protection feature prevents the power tool from uncontrolled starting after the power supply to it has been interrupted. To restart the tool, set the on/off switch (4) to the “off” position and then switch the power tool on again.
Impact shutdown
The integrated impact shutdown switches the power tool off as soon as it hits the floor. To restart the tool, set the On/Off switch (4) to the “off” position and then switch the power tool on again.
Run-out brake
The power tool is fitted with the electronic Bosch Brake System. When it is switched off, the abrasive tool is brought to a complete stop within a few seconds. This means that the runout time is significantly shorter than for angle grinders without a run-out brake and enables the power tool to be set down sooner.
Battery Instructions
Rechargeable battery
- Bosch sells some cordless power tools without a rechargeable battery.
- You can tell whether a rechargeable battery is included with the power tool by looking at the packaging.
Charging the battery
- Use only the chargers listed in the technical data.
- Only these chargers are matched to the lithium-ion battery of your power tool.
Inserting the Battery
- Push the charged battery into the battery holder until it clicks into place.
Removing the Battery
To remove the rechargeable battery, press the battery release button and pull the battery out. Do not use force to do this. The rechargeable battery has two locking levels to prevent the battery from falling out if the battery release button is pressed unintentionally. The rechargeable battery is held in place by a spring when fitted in the power tool
Battery charge indicator
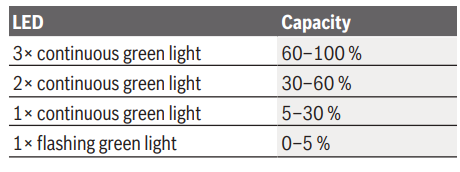
Note: Not all battery types have a battery charge indicator. The green LEDs on the battery charge indicator indicate the state of charge of the battery. Press the button for the battery charge indicator or to show the state of charge. This is also possible when the battery is removed. If no LED lights up after pressing the button for the battery charge indicator, then the battery is defective and must be replaced.
Battery Model GBA 18V
Battery model ProCORE18V.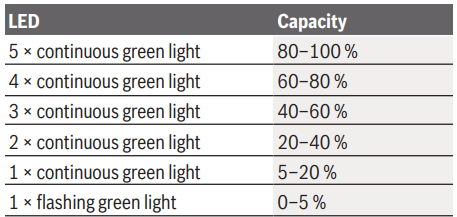
Recommendations for Optimal Handling of the Battery
Protect the battery against moisture and water. Only store the battery within a temperature range of −20 to 50 °C. Do not leave the battery in your car in the summer, for example. Occasionally, clean the ventilation slots on the battery using a soft brush that is clean and dry. A significantly reduced operating time after charging indicates that the battery has deteriorated and must be replaced. Follow the instructions for correct disposal.
Fitting
Protective Equipment
Remove the battery from the power tool before carrying out work on the power tool (e.g. maintenance, changing the tool, etc.). The battery should also be removed for transport and storage. There is a risk of injury from unintentionally pressing the on/off switch.
Protective Guard for Grinding
Place the protective guard (12) onto the holder on the power tool until the coding cams of the protective guard are aligned with the holder. When doing so, press and hold the unlocking lever (1). Press the protective guard (12) onto the spindle collar until the shoulder of the protective guard is sitting on the flange of the power tool, and rotate the protective guard until it audibly clicks into place. Adjust the position of the protective guard (12) to meet the requirements of the operation. To do this, push the unlocking lever (1) upward and rotate the protective guard (12) into the required position.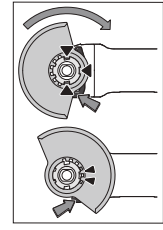
- Always position the protective guard (12) such that the two cams on the unlocking lever (1) engage in the corresponding openings on the protective guard (12). Adjust the protective guard (12) such that sparking in the direction of the operator is prevented.
- The protective guard (12) must only be able to be rotated in the direction of the accessory while the unlocking lever(1)is actuated. Otherwise, the power tool must not be used anymoreunder any circumstances and must be sent to the after-sales service.
Protective Guard for Cutting
- For cutting, always use the protective guard for cutting (13) or the protective guard for grinding (12) together with the cover for cutting (14). Provide sufficient dust extraction when cutting stone.
- The protective guard for cutting (13) is fitted in the same way as the protective guard for grinding (12).
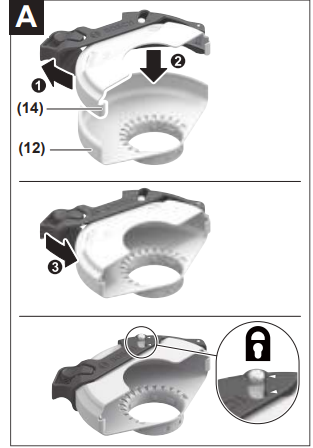
- Metal cover for cutting. Fit the metal cover for cutting (14) on the protective guard for grinding (12) (see Swivel the tool retainer back (➊).

- Attach the cover (14) to the protective guard for grinding (12) (➋).
- Press the tool retainer firmly into place on the protective guard (12) (➌).
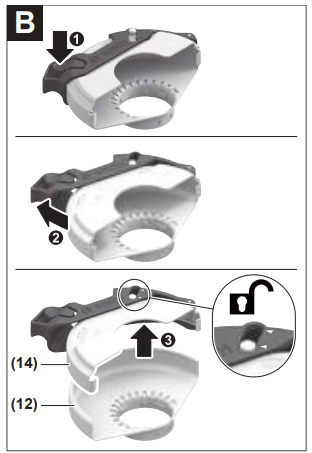
- To remove the cover (see, press the button on the tool retainer and swivel it back (➋).
- Remove the cover (14) from the protective guard (12) (➌).

Plastic Cover for Cutting
Attach the plastic cover for cutting (14) to the protective guard for grinding (12) (see). The cover (14)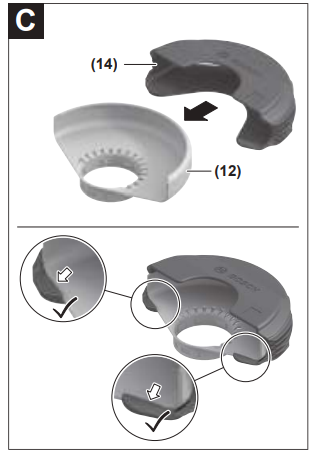 audibly and visually engages on withe protective guard (12). To remove the cover (se , unlock the cover (14) on the left- or right-hand side of the protective guard (12) (➊) and remove the cover (➋)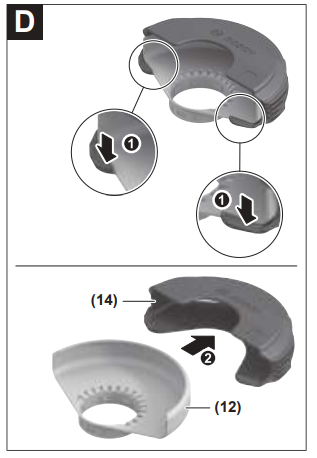
Hand Guard
Always fit the hand guard (27) when working with the rubber sanding pad (28) or with the cup brush/conical brush,/diamond annular cutter. Attach the hand guard (27) to the auxiliary handle (8)/(7). Standard auxiliary handle/low-vibration auxiliary handle.e Screw the auxiliary handle (8)/(7) on the right or left of the machine head, ad depending on the working method.
Fitting the Abrasive Tools
- The battery should also be removed for transport and storage.
- There is a risk of injury from unintentionally pressing the on/off switch.
- Do not touch grinding and cutting discs until they have cooled down.
- The discs can become very hot while working.
- Clean the grinding spindle (26) and all the parts to be fitted.
- Do not press the spindle lock button while the grinding spindle is moving.
- The power tool may become damaged if you do this.
- Remove the battery from the power tool before carrying out work on the power tool (e.g. maintenance, changing the tool, etc.).
Grinding/Cutting Disc
Pay attention to the dimensions of the abrasive tools. The diameter of the hole must match that of the hub flange. Do not use an adapter or reducer. When using diamond cutting discs, ensure that the arrow indicating the direction of rotation on the diamond cutting disc matches the direction of rotation of the power tool (see the direction of rotation arrow on the machine head). See the graphics page for fitting instructions. Use the quick-clamping nut (22) to secure the grinding/cutting disc without the need for additional tools.
- The quick-clamping nut (22) may be used only for grinding or cutting discs.
- Only use quick-clamping nuts (22) that are in good working order and not damaged.
- Always secure a grinding/cutting disc using only the quick-clamping nut (22) supplied.
Quick-clamping nuts (22) that are properly secured and not damaged can be removed by hand.
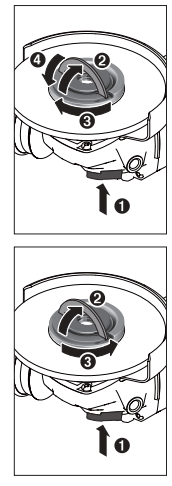
After fitting the mounting flange andthe grinding/cutting disc, the free thread length of the grinding spindle must be at least 4 mm. 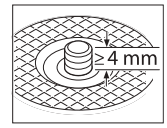
If the O-ring is missing or damaged, the mounting flange (15) must be replaced before operation can resume.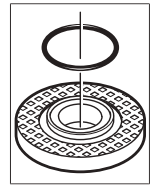
- After fitting the abrasive tool, check that the abrasive tool is fitted correctly and can turn freely before switching on the power tool.
Approved Abrasive Tools
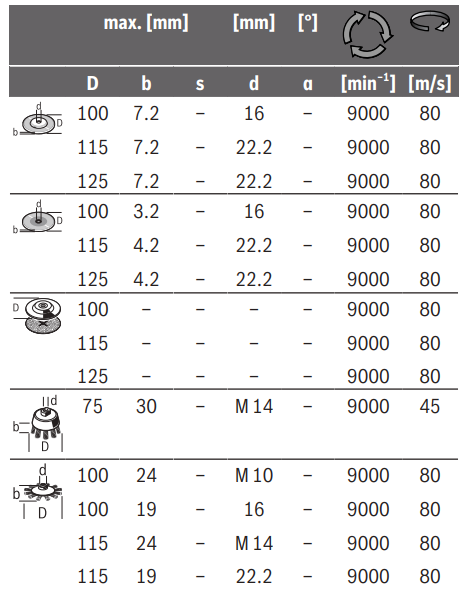
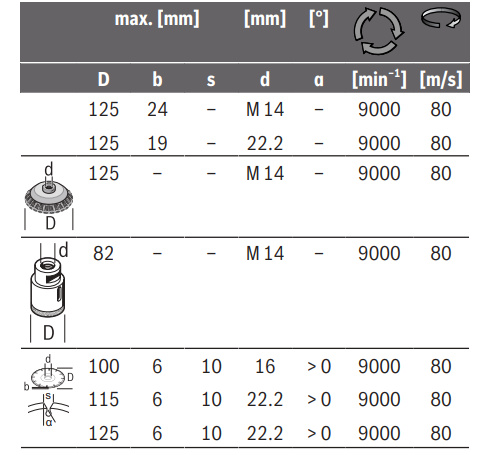
You can use all the abrasive tools mentioned in these operating instructions. The permissible speed [min-1] or the circumferential speed [m/s] of the abrasive tools used must at least match the values given in the table. It is therefore important to observe the permissible rotational/circumferential speed on the label of the abrasive tool.
Rotating the Machine Head 
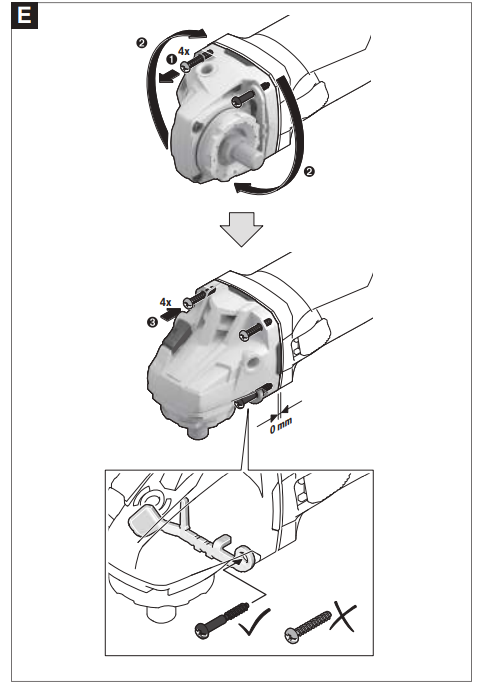
Remove the battery from the power tool before carrying out work on the power tool (e.g., maintenance).
changing tool, etc.). Completely unscrew the 4 screws (➊). Rotate the machine head carefully, without removing it from the housing, into the new position (➋). Screw in and retighten the 4 screws (➌).
Operation
- Do not load the power tool so heavily that it comes to a stop.
- There is a risk of injury from unintentionally pressing the on/off switch.
- Clamp the workpiece if it is not secure under its own weight.
- Do not use the power tool with a cut-off stand.
- Do not touch grinding and cutting discs until they have cooled down.
- The discs can become very hot while working.
- If the power tool becomes electrostatically charged, the built-in electronics will switch the power tool off. Press the on/off switch (4) again to restart the power tool.
Working Advice
Rough grinding
- Always use the protective guard for grinding (12) when rough grinding with bonded abrasives.
- Never use cutting discs for rough grinding.
- Move the power tool back and forth with moderate pressure.
Surface Grinding
- Always use the protective guard for grinding (12) when grinding with the flap disc.
- The flap disc (accessory) enables you to machine curved surfaces and profiles.
- Always fit the hand guard (27) when working with the rubber sanding pad (28).
- See the graphics page for fitting instructions.
- Screw on the round nut (30) and tighten it with the two-pin spanner.
Cup brush/disc brush/conical brush
- Always use the protective guard for grinding (12) when brushing with disc brushes.
- Always fit the hand guard (27) when working with the cup brush or conical brush.
- Tighten the cup brush/conical brush/disc brush with an open-ended spanner.
- To fasten the disc brush with a diameter of 16 mm (M 10) or 22.22 mm (M 14), attach the mounting flange with Oring (15) to the grinding spindle (26), screw on the round nut (30) and tighten with the two-pin spanne..r
Cutting Metal
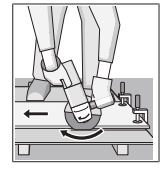
- For cutting metal with bonded cutting discs or diamond cutting discs, always use the protective guard
for cutting (13) or the protective guard for grinding (12) with a fitted cover for cutting (14). - Do not exert pressure on the cutting disc and do not tilt or swing the power tool.
- Do not attempt to reduce the speed of a disc coming to a stop by applying pressure from the side.
- The power tool must always work in an up-grinding motion.
- For best results when cutting profiles and rectangular tubing, start at the smallest cross-section.
Information on Structural Design
Recesses in load-bearing walls are subject to country-specific regulations. These regulations must be observed under all circumstances. Seek advice from the responsible structural engineer, architect or construction supervisor before starting work.
Start-Up
Switching on/off
Always check abrasive tools before using them. Carry out a test run for at least one minute with no load. Damaged abrasive tools can burst apart and cause injuries.
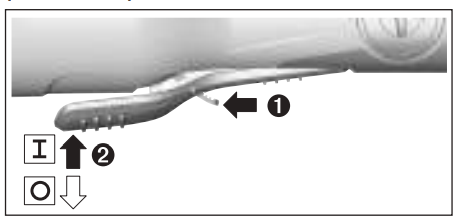
To start the power tool, push the unlocking lever (10forwardds and then push the on/off switch (9) up. To switch off the power tool, release the on/off switch (9). Always check abrasive tools before using them. Carry out a test run for at least one minute with no load. Damaged abrasive tools can burst apart and cause injuries.
Maintenance and Service
- Remove the battery from the power tool before carrying out work on the power tool (e.g. maintenance, changing the oil, etc)
- . The battery should also be removed for transport and storage.
- There is a risk of injury from unintentionally pressing the on/off switch.
- To ensure safe and efficient operation, always keep the power tool and the ventilation slots clean.
- Store and handle the accessories carefully
Technical Data 
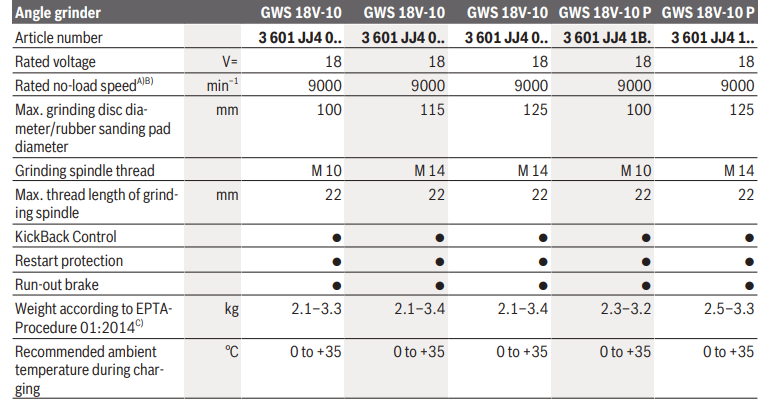

Only for EU countries
Use the designated collection systems. If disposed of incorrectly, waste electrical and electronic equipment may have harmful effects on the environment and human health, due to the potential presence of hazardous substances.
Battery packs/batteries
Please observe the notes in the section on transport. Unscrew the screws on the housing and remove the housing shell in order to remove the battery. To prevent a short circuit, disconnect the connectors on the battery one at a time and then isolate the poles.
Disposal
- Unplug the appliance from the mains.
- Cut through the power cord.
- Close the main gas tap.
- Dispose of the appliance in an environmentally friendly manner.
Information about current disposal methods is available from your specialist dealer or local authority. The guideline determines the framework for the return and recycling of used appliances as applicable throughout the EU.
Customer Service
- Website: www.bosch-home.com/welcome
- Timings: Monday to Friday 8 am to 8 pm,
- Ph: +49 (0)89 69 339 339