
Bose EdgeMax EM90-LP In-Ceiling Loudspeakers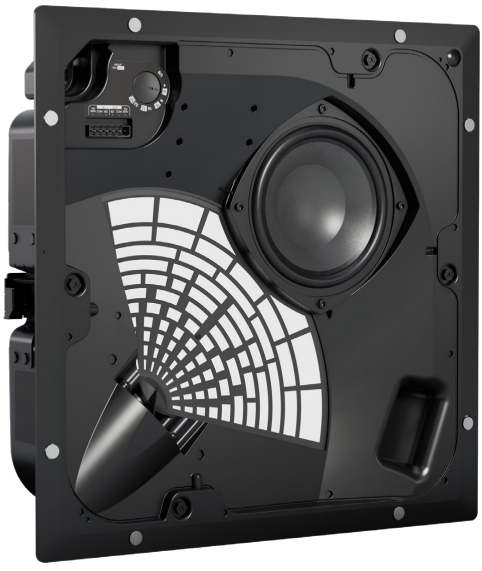
Safety Instructions
This document is intended to provide professional installers with basic installation and safety guidelines for this product in typical fixed-installation systems. Please read this document and all safety warnings before attempting installation. Do not attempt to service this product on your own. Refer all servicing to authorised service centres, installers, technicians, dealers, or distributors. To contact Bose Professional or to find a dealer or distributor near you, visit BoseProfessional.com.
- Keep these instructions safe.
- Heed all warnings.
- Follow all instructions.
- Do not use this apparatus near water.
- Clean only with a dry cloth.
- Do not block any ventilation openings.
- Install according to the manufacturer’s instructions.
- Only use attachments/accessories specified by the manufacturer.
- All Bose Professional products must be installed by local, state, federal, and industry regulations.
- Consult the local authority having jurisdiction before installing this product.
- Do not mount the product in locations where condensation may occur.
- Do not mount on surfaces that are not sturdy or that have hazards concealed behind them.
- If you are not sure about installing the loudspeaker, contact a qualified professional installer.
- Ensure the loudspeaker is installed according to local building codes.
- Do not make unauthorised alterations to this product.
- The grille is equipped with a safety lanyard pin designed for a single use.
- Avoid touching uninsulated wiring or wiring terminals.
- This product’s audio wiring terminals carry voltage that can result in discomfort upon contact.
Product Ratings
- Input Voltage: 70V/100V
- Impedance: 8 Ω, 32 W
- Current or Power: (70V): 4W, 8W, 16W, 32W; (100V): 8W, 16W, 32W
Package Contents

Dimensions

Technical Specifications
| Physical | |
| Hole cutout | 345 mm × 345 mm (13.6 in × 13.6 in) |
| Maximum Ceiling Thickness | 39 mm (1.5 in) |
| Net Weight, Loudspeaker with grille | EM90-LP: 7.5 kg (16.6 lb)EM180-LP: 7.6 kg (16.7 lb) |
| Net Weight, Tile Bridge | 1.4 kg (3.1 lb) |
| Shipping Weight | 11 kg (24.3 lbs) |
Installation
Installation Options and Accessories
- Adjustable Tile Bridge (included)
- EdgeMax Rough-in Pan (optional)

- EMCT Ceiling Tile (optional)
- Black Grille (optional)

Choosing an Installation Method
If using a flexible metal conduit, use a 3/8-inch conduit fitting or a 3/8-inch dual (duplex) connector.
- Use the top knockout when there is available space above the ceiling.
- Use the side knockout when there is limited space above the ceiling.
- Use both knockouts when an independent signal-in and signal-out wiring scheme is required and there is available space above the ceiling.

Wiring the Loudspeaker
With the Use of Direct Input Terminals
Wire gauge requirements from loudspeaker line wiring to loudspeaker terminals: Use 18 AWG (0.8 mm2) to 14 AWG (2.5 mm2) size wire only.
Connection Diagrams

Loudspeaker Settings


- * Factory default
- ** NC: No Connection (do not use)
Preparing the Installation
- Install the EM90-LP in a corner. See below for the room placement top view.

- Install the EM180-LP along a wall. See below for the room placement top view.

Loudspeaker Placement
When installing the loudspeaker near a wall-ceiling interface, allow sufficient space for the grille overhang. The grille must be flush with the ceiling surface so the magnets can fully engage. Use the enclosed template to ensure appropriate dimensions for the loudspeaker cutout and placement.
- For EM90-LP or EM180-LP in ceiling tile: Place the loudspeaker opening at least 114 millimetres (4.5 inches) from each wall to allow space for the tile bridge.

- For EM90-LP or EM180-LP in a hard ceiling: Place the cardboard template flush with the corner (EM90-LP) or wall (EM180-LP). This leaves at least 38 millimetres (1.5 inches) from each wall to accommodate the grille.

Using a Safety Cable
- Some regional construction codes require the use of a secondary method of securing loudspeakers to support structures to provide additional safety. Choose a mounting position, method, and hardware consistent with local building codes and regulations.
- Bose Professional recommends using (1) a safety wire, (2) a safety cable, or (3) a threaded rod as a secondary securing mechanism. See the diagrams below for safety attachment points.
- Follow the manufacturer’s instructions for any secondary securing mechanism implemented.


Assemble the Tile Bridge
- Attach the four rails to the centre frame using four of the included screws.
- Insert the screws from the inside of the tile bridge.
- The rails and centre frame are labelled A and B to identify the correct attachment points.
- Adjust the length of the tile bridge rails so the rails rest securely on the ceiling grid or furring.
- Tighten the four screws securing the tile bridge rails to the centre frame.
- Optional: Attach the L-brackets to the tile bridge to create an additional connection point for a safety wire, safety cable, or threaded rod

Preparing Tile
Cutting the Ceiling Tile
- Remove the tile and use the template to trace a loudspeaker hole onto the tile.
- To centre the template on the tile, draw an X by connecting the corners diagonally, and centre the template using the crossing point.
- Cut a hole in the tile.

Installing the Tile Bridge
- Place the assembled tile bridge across the ceiling grid. If necessary, adjust the tile bridge so the rails rest on the ceiling grid.
- Replace the tile in the ceiling.

Cutting the Ceiling
- Use the template to trace a hole in the ceiling.
- Cut a hole in the ceiling.

Installing the Tile Bridge
Insert the assembled tile bridge through the hole and place the tile bridge across the ceiling grid or ceiling furring. If necessary, adjust the tile bridge so the rails rest on the ceiling grid or ceiling furring.

Mounting the Loudspeaker
- Use a screwdriver and hammer to knock out the relevant wire opening.
- Make sure the anchors engage on the tile bridge before loosening your grip on the loudspeaker.
- Remove the connector, wire the connector, and reinsert the connector into the loudspeaker.
- Tighten the anchor arm screws to secure the loudspeaker.
- If using a power drill, set it to a low torque setting.
- Discard the PhaseGuide protector.
- Pass the audio wires through the wire opening and insert the loudspeaker through the hole in the ceiling and into the tile bridge.

Attaching the Grille
Insert the safety lanyard pin into the hole in the loudspeaker. Using both hands, position the grille against the loudspeaker. The grille secures to the loudspeaker magnetically.

Regulatory Compliance
Environmentally rated to IP55
- This product conforms to all applicable EU directive requirements.
- Proper disposal and recycling help protect natural resources, human health, a nd the environment.
- For more information on the disposal and recycling of this product, contact your local municipality, disposal service, or the shop where you bought this product.
Warranty
- This product is covered by a limited warranty.
- For warranty details, visit BoseProfessional.com/warranty
Customer Support
- Tel: 1-800-278-1083
- Website: https://support.bose.com/
MA 01748 USA Bose is a trademark of Bose Corporation. ArenaMatch is a trademark of Transom Post OpCo LLC. ©2024 Transom Post OpCo LLC.
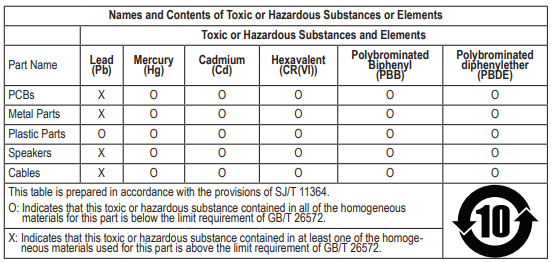
China Restriction of Hazardous Substances Table
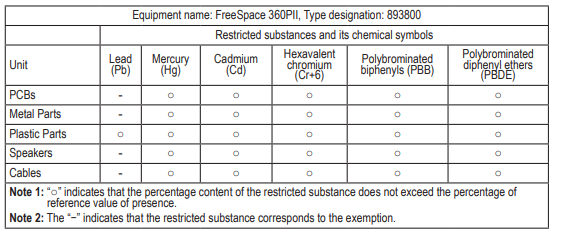
Taiwan Restriction of Hazardous Substances Table
6 Comments
Can you be more specific about the content of your article? After reading it, I still have some doubts. Hope you can help me.
Your point of view caught my eye and was very interesting. Thanks. I have a question for you. https://accounts.binance.info/uk-UA/register-person?ref=XZNNWTW7
Your article helped me a lot, is there any more related content? Thanks!
I don’t think the title of your article matches the content lol. Just kidding, mainly because I had some doubts after reading the article.
I don’t think the title of your article matches the content lol. Just kidding, mainly because I had some doubts after reading the article. https://www.binance.com/register?ref=JW3W4Y3A
Your article helped me a lot, is there any more related content? Thanks!