


 Cleer ARC 3 Open Ear Headphones

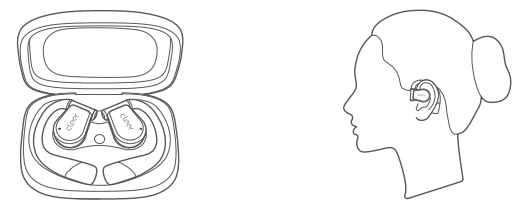
Overview

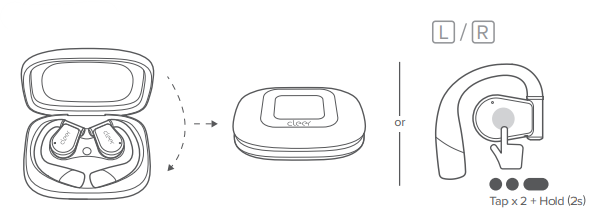
First-use
When using it for the first time, open the charging case, tap and hold the reset button for 2 seconds to power on the charging case. The earbud indicators will flash red and white alternately, and the earbuds will enter automatic pairing mode.
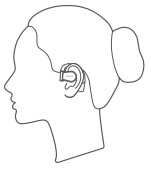
Fitting

Rotate the earhook hinge and slide the earhook behind your ear until it rests gently over the top of your ears. If you feel uncomfortable or unstable, stretch the hinge appropriately to find the position that works best for you.
Power on
 Power off

Bluetooth Pairing
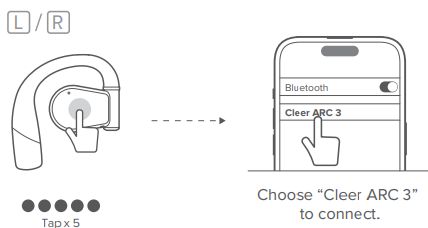 Put both earbuds back in the charging case, close the case, slide to the left or right on the touch screen to the pairing page, select “Pairing Mode”, and then take out the earbuds. After that, the earbuds will enter Bluetooth Pairing Mode and can be searched by other devices.

Dolby Atmos
This function is deactivated by default. You can quickly activate or deactivate the function according to your needs in the following ways.
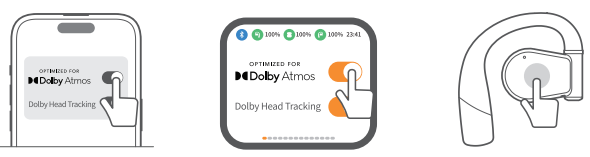
- A. Operate on the home page of the Cleer+ App
- B. Operate on the Dolby page of the charging case touch screen.
- C. Tap and hold the touch area of either earbud for more than 2 seconds.
Voice Control
When using the earbuds, simply say the following statements to control the earbuds.
- Previous song/Next song
- Play music/Pause music
- Volume up/Volume down
- Pick up/Hang up
- Take a photo
Head Motion Control

Default to be closed, activated in the Cleer+ App.
Earbuds Control

- You can customize the touch on the Cleer+ App by yourself.
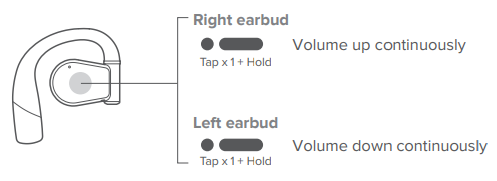
- This function is not available when using a single earbud
LED Behavior

Sterilization with UV-C light

The data comes from authorized third-party testing institutions. All the data is obtained at the laboratory and is for reference only. The sterilization can effectively kill 99.9% or more harmful bacteria, such as Staphylococcus aureus, Escherichia coli, Candida albicans, Salmonella, Klebsiella pneumoniae, and Pseudomonasaeruginosa, in the corresponding area on the earbuds.
Charging
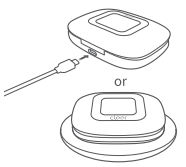
- Connect the ARC 3 charging case to a power source or place the charging case on a wireless charging pad.
- A 5-minute charge of earbuds will offer 1.5 hours of lay time. Up to 10 hours of total playtime with fully charged earbuds. With an additional 40 hours with the charging case.
Earbud Peering Mode
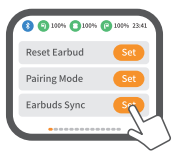
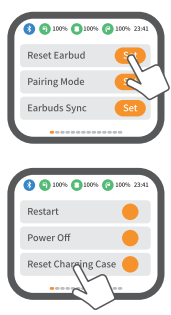
When an earbud is lost, put the replacement new earbud and the old earbud into the charging case, slide to the left or right on the operation interface to click Auxiliary → Earbuds Sync to complete pairing.
Restore Factory Settings
- Using Cleer+ App, click [Settings] + [Function Management) – [Clear Paired Devices] successively, to complete the operation.
- Using a charging case, put both earbuds into the charging case, slide to the left or right on the operation interface to click [Auxiliary] + [Reset Earbud] to complete the operation.
Settings for the charging case
Cleer Dongle pairing
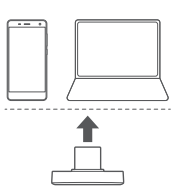
- Plug the Cleer Dongle into the device with a TYPE-C socket.
- Long-press the MFB button of the dongle until the LED of the dongle starts flashing alternately between red and white. The dongle is now ready for pairing.
- Put ARC 3 in Bluetooth pairing mode too.
- Put ARC 3 close to the dongle, and they will connect automatically. The LED of the dongle will be white, breathing.
It’s easy to connect to a device with a Lyre A socket by using a Lyre A to Lyre C adapter. ” Note that some Android mobiles may need to enable the ‘OTG’ setting to use the Cleer Dongle. Please contact your mobile service provider for more information.
Mode switching (LL or HD)

Restore Factory Settings
Long-press the MFB button of the dongle for 10 seconds, and the LED of the dongle turns off and then starts flashing white alternately between red and white. The dongle is now restored to its factory setting, and the pairing history is cleared.
Specifications (Dongle)
- Audio CODEC support: aptXTM Adaptive,aptXTM HD, SBC
- Frequency range: 2402-2480 MHz
- Support: Bluetooth 5.4,A2DP v1.3.2,AVRCP v1.6.2,HFP v1.9
- Input: 5V/100mA
- Maximum power of RF: 8dBm
- Weight: 2.2g
ARC 3
- Driver: 16.2mm neodymium dynamic driver
- Audio CODEC support: aptXTM Lossless, aptXTM Adaptive, LDAC, AAC, SBC
- Frequency response range: 20 – 20,000Hz
- Connections: USB-C cable for charging, Charging current 5V/2A
- UVC: UVC 270±10nm
- Battery charging (earbuds) :
- A 5-minute charge will give 1.5 hours of playtime, less than 2.5 hours for a full charge (when charging via USB-C cable ).
- The charging case is fully charged by wireless charging in 4 hours.
- Playback time: Up to 10 hours* in total 40 hours with charging case
- Support: Bluetooth 5.4,A2DP v1.3.2,AVRCP v1.6.2,HFP v1.9
- Weight: 12g (per earbud), 130g (earbuds and case)
Volume Sync Setting
-
- iPhone and earbuds volume are automatically synchronized, namely, the volume displayed on the iPhone is the volume of the whole system of the earbuds.
- Android phones (not all) are not synchronized with the earbuds’ volume, so users need to set up volume synchronization on their Android phones. Ways of setting are different based on phone brand; you need to consult with the phone manufacturers to confirm.

- HarmonyOS setting reference: Settings, Bluetooth, Setting Icon of Earbuds, Bluetooth device volume is synchronized with the phone.
- For Huawei EMUI system/VIVO/OPPO phones, find Developer Options in Settings, and then find Bluetooth Absolute Volume (the function is deactivated by default).
- Bluetooth earbuds will be synchronized with the phone volume after the function is activated.
- Generally, for other Android phones, it is most likely also to find the Absolute Volume function in Developer Options.
Troubleshooting
- Earbuds don’t charge in the charging case: first, make sure the charging case is charged.
- Then check the charging contacts of the earbuds and the charging case respectively, and use a soft cloth to clean up the dirt on the contacts, and then try again.
- Touch screen of charging case does not respond: open the charging case, tap and hold the charging case reset button for 8 seconds, and the charging case will be reset.
- Earbuds are hot when charging: when charging earbuds in a charging case, especially the earbuds with 0% battery level, it is normal for the earbuds to be slightly hot during fast charging.
- After taking the earbuds out of the charging case, the temperature of the earbuds will return to normal.
- But when the earbuds become extremely hot, take them out of the charging case immediately and contact the after-sales service for further processing.
Maintenance
- Then, wipe them with a piece of dry, hairless, soft cloth and dry them in the air.
- Do not use any chemicals or organic solvents (such as soapy water, hand sanitizer, or other acid-base solvents) to clean the earbuds, or the residual may cause skin irritation.
- Please regularly use a soft, hairless cloth to wipe the earbuds.
- Do not use paper towels or cloth containing wood fibers. Do not use dirty or abrasive cloth.
- When you put the earbuds back into the charging case for charging, please make sure that the earbuds are dry and clean.
- When charging the earbuds fails, please check whether the charging contact point of the charging case and earbudsthe are dirty.
- If yes, please wipe them clean with a piece of cloth or cotton, then try again.
Warranty
Labor: For a period of (1) year from the original date of purchase of the product (“Labor Warranty”), Cleer Limited will, at its option, repair or replace with a new or refurbished product, the product determined to be defective. If Cleer Limited elects to replace the product after this Labor Warranty has expired but while the parts warranty is still in effect, it will do so for the applicable labor charge.
Parts: For a period of (1) year from the original date of purchase of the product (“Parts Warranty”), Cleer Limited will supply new or refurbished replacement parts in exchange for parts determined to be defective.
Repair / Replacement Warranty: This Limited Warranty shall apply to any repair, replacement, part, or ~replacement product for the remainder of the original Limited Warranty period or for (90) days, whichever is longer. Any product replaced under this.
Customer Service
- Website: www.cleeraudio.com
- Ph: 1 888 672 5337 (67 CLEER)
FAQs
Q: What makes the Cleer ARC 3 different from traditional earbuds?
Rather than sealing inside the ear canal, the ARC 3’s open-ear design comfortably rests on the ear. This allows you to enjoy strong, focused audio while remaining aware of your surroundings.
Q: Do the ARC 3 headphones leak sound?
The ARC 3’s beam-forming acoustic design keeps audio concentrated towards your ears to reduce leakage, but because they are open-ear, a tiny amount of sound may be audible to those very close to you.
Q: Are the ARC 3 good for running or outdoor workouts?
Indeed. The sturdy ear-hook structure holds the headphones in place while you walk, and the open-ear design allows you to hear conversations and traffic.
Q: Can I use the ARC 3 for phone calls?
Absolutely. The headphones’ integrated microphones and noise-cancelling technology allow you to speak clearly even in noisy or windy settings.
Q: Does sleer ARC 3 support voice assistants?
Indeed. Using the built-in touch controls, you can use your phone’s built-in voice assistant (like Google Assistant or Siri).
Q: How long does the battery last?
The ARC 3 is built to last comfortably through a full day of mixed listening and calls, while battery life varies depending on volume and functions used. The USB-C cable that comes with the device is used for charging.
Q: Are they safe for people with sensitive ears?
Many consumers who experience ear irritation or pain from standard earbuds find the ARC 3’s design more comfortable for extended periods of time because it doesn’t fit within the ear canal.
Q: Can I wear glasses with the ARC 3?
Indeed. Most eyeglass frames fit the lightweight ear-hook design easily and without discomfort
4 Comments
Thanks for sharing. I read many of your blog posts, cool, your blog is very good. https://www.binance.info/en-ZA/register?ref=B4EPR6J0
Your article helped me a lot, is there any more related content? Thanks!
Thank you for your sharing. I am worried that I lack creative ideas. It is your article that makes me full of hope. Thank you. But, I have a question, can you help me?
Thanks for sharing. I read many of your blog posts, cool, your blog is very good. https://www.binance.bh/en/register?ref=JHQQKNKN