


Dangbei Atom LF5H 1080P Portable Laser Projector

Safety Instructions
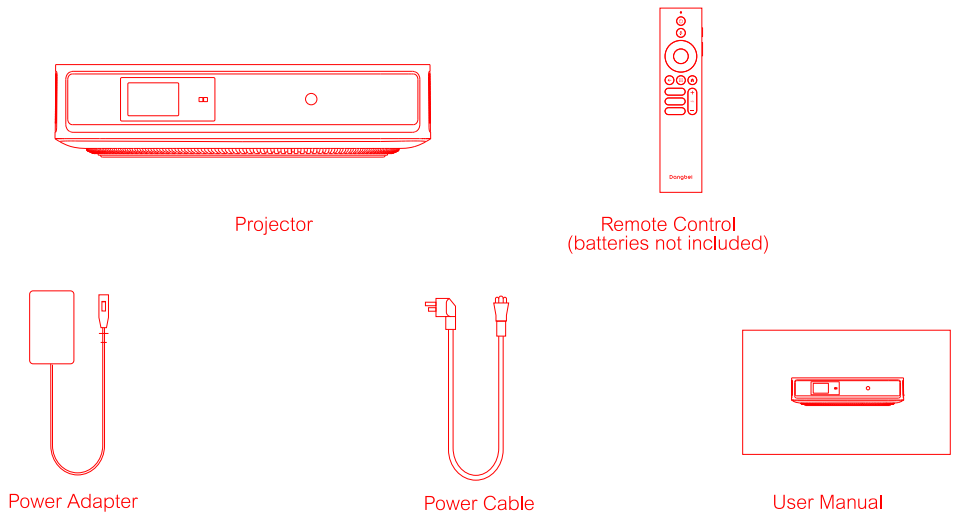
Before using this product, please check that all items are included in the box.
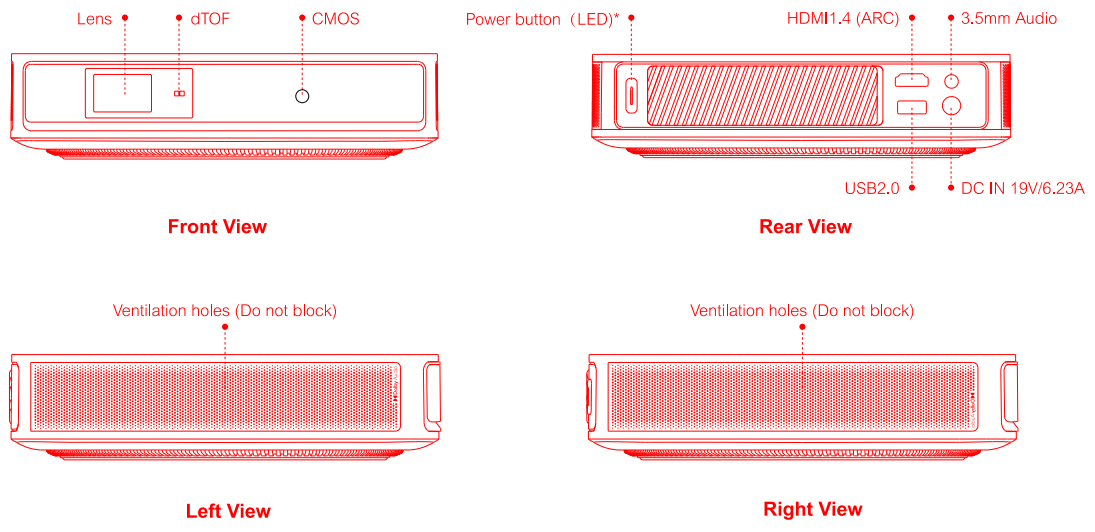
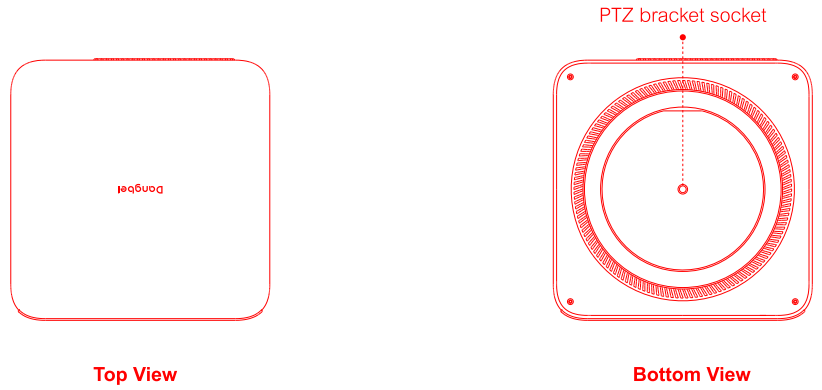
Projector Overview
Overview and interface description.

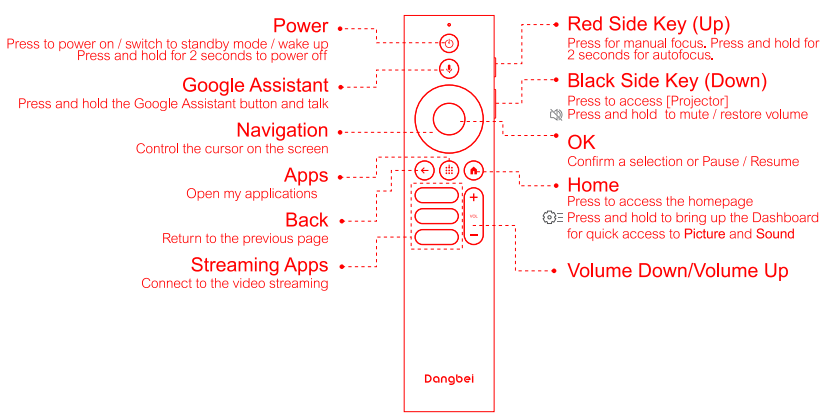
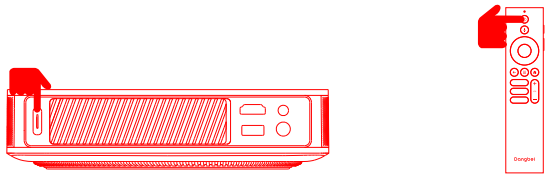
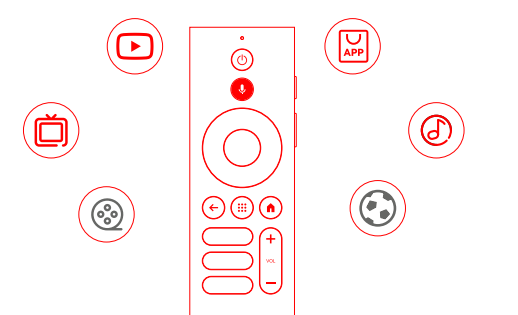
Remote Control Overview
- Open the battery compartment cover of the remote control.
- Install 2 AAA batteries (not included)
- Put back the battery compartment cover.
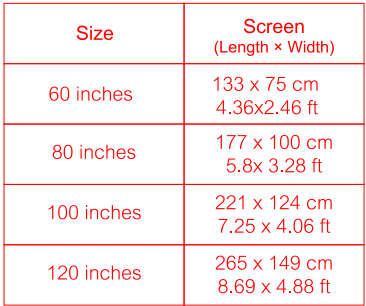
Placement
Position the projector on a stable, flat surface in front of the projection surface. A flat and white projection surface is recommended. Please follow the instructions below to determine the distance between the projector and the projection surface, and the corresponding projection size:
Power on
- Connect the projector to the power outlet.
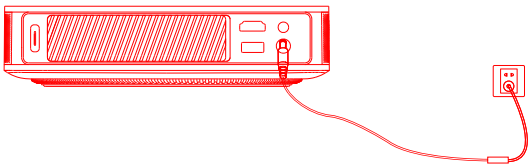
- Press the power button on the projector or remote control to turn on the projector.

- Standby Mode / Power off
- Press the power button on the projector or remote control to enter standby mode.
- Press and hold the power button on the projector or remote control for 2 seconds to turn off the projector.
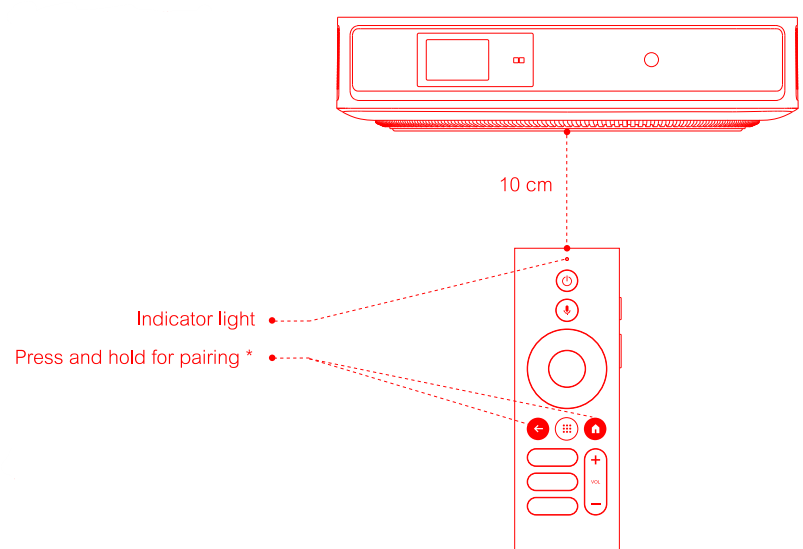
Remote Control Pairing
- Turn on the projector and wait for the Bluetooth pairing prompt on the screen.
- Bring the remote control within 10 cm / 0.33 ft of the projector.
- Release the keys after the indicator light starts flashing.
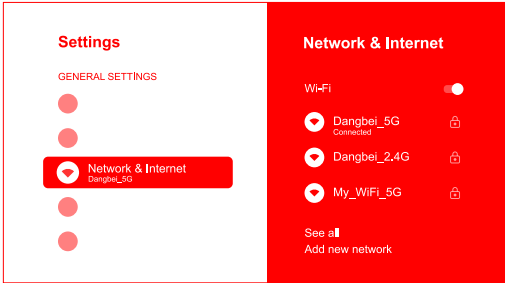
Network Settings
- Go to [Settings], select [Network & Internet], and turn on Wi-Fi.
- Choose your network and enter the correct password.
Focus Settings
- Method 1: Press the red side key (up) for manual focus. Press and hold for 2 seconds for autofocus.
- Method 2: Go to [Projector], select [Focus], and choose either manual focus or autofocus.
Autofocus
Select [Auto Focus] to trigger the autofocus function. The image will automatically become clear.
Manual focus
Select [Manual Focus] and use the navigation keys (up / down) on the remote control to adjust the focus distance and make the image clear.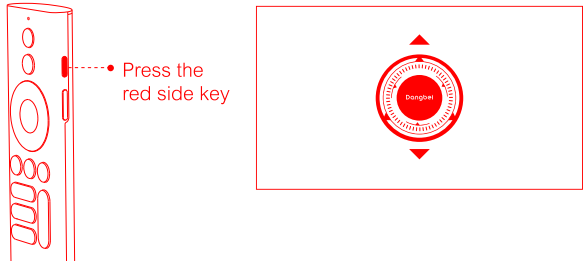
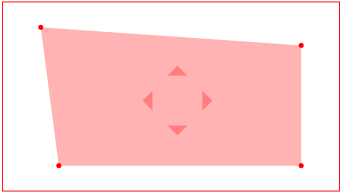
Keystone Correction
- Go to [ Projector] – [Image Correction].
- Select [Auto Keystone Correction], and the screen will automatically be corrected.
- Select [Manual Keystone Correction], and use navigation keys to adjust the four points and the image shape.
Intelligent Screen Fit
- Go to [Projector] – [Image Correction], and turn on [Fit to Screen].
- Follow the on-screen instructions to automatically adjust the projected image to fit the screen.
Intelligent Obstacle Avoidance
- Go to [Projector] – [Image Correction] – [Advanced], and turn on [Avoid Obstacles].
- Follow the on-screen instructions to automatically adjust the projected image to avoid any objects on the projection surface.
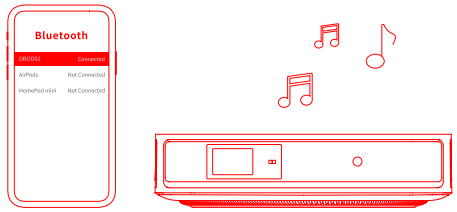
Bluetooth Speaker Mode
- Go to [Settings], select [Projector], and click on [Bluetooth speaker mode].
- Connect your phone to a device with the Bluetooth name containing “DBOD02”.After modifying the device name, the Bluetooth name will also be synchronized accordingly.
- When you hear “Bluetooth connection successful”, the projector can play music from your phone.
- Press and hold the key on the remote control for 2 seconds to exit the [Bluetooth speaker mode].
Google Assistant
Your TV is more helpful than ever. Use your voice to find movies, stream apps, play music, and control the TV. Get answers on screen, control smart home devices, and more.
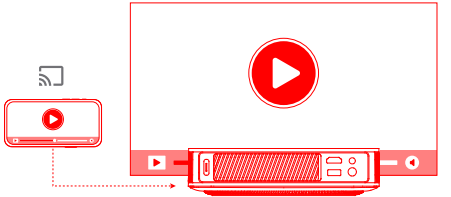
Chromecast built-in & Screen Mirroring
You can wirelessly cast movies, games, music, and your screen from your iOS, macOS, Android i™, or Windows device to the projector. Please make sure that the projector and your device are connected to the same wireless network.
Chromecast built-in
- Connect your device and the projector to the same wireless network.
- Open the streaming app on your device.
- Play a video and tap the casting icon aJ on the video screen.
- Select “DBOD02” to connect. The projector will display the video from your device. *Due to copyright restrictions, certain content cannot be cast to the projector. You can stream the content on the projector by installing the same application on it.
Screen Mirroring via AirScreen
To cast the device screen: You can project the entire screen from your device to the projector.
- Install the AirScreen app on the projector.
- Open the AirScreen app and follow the on-screen instructions to complete the process.
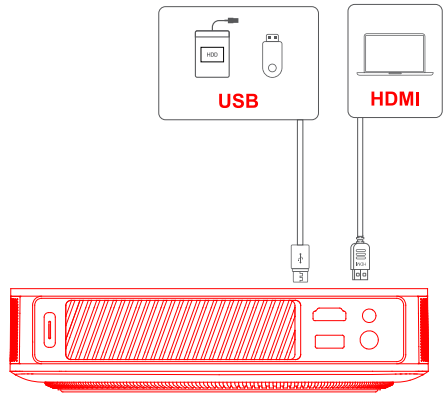
Inputs
- Go to [Inputs] — HDMI/HOME/USB.
- Watch the content from the different signal sources. *This product’s HDMI interface is HDMI 1.4 and does not support 4K video signal input.
Color Temperature
Go to [Settings] — [Display&Sounds] — [Picture] – [Color Temperature] to select from [Standard/Warm/Eye-care].
Projection Mode
Go to [Settings] – [Projector]- [Advanced Settings] – [Projection Mode] to choose the placement method of the projector.
Zoom
Go to [Settings] — [Projector] – [Image Correction] — [Image Adaption] to decrease the image size from 100% to 50%.
3D Mode
Before enabling 3D mode, go to [Settings] — [Projector] – [Image Correction], and click [Reset to Default Image] to restore the image to its default state. Go to [Settings] – [Picture] – [3D Mode] to enable 3D mode. *It is recommended to disable the [Auto Keystone Correction After Movement] feature when enabling 3D mode to avoid altering the image from its default state after moving the projector, which could prevent the use of 3D mode.
System & Product Info
Go to [Settings] — [System] — [About] to check the System & Product information.
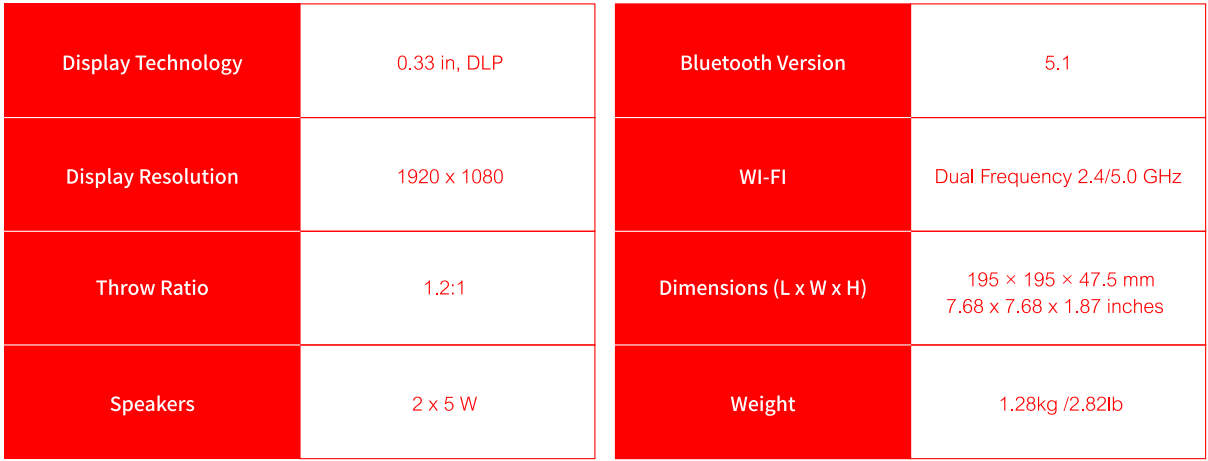
Specifications
Important Precautions
- Do not look directly at the projection beam with your eyes, because the strong beam may harm your eyes. RG2 IEC 60825-1:2014
- Do not block or cover the heat dissipation holes of the device to avoid affecting the heat dissipation of the internal parts and damaging the device.
- Keep away from humidity, exposure, high temperature, low pressure, and magnetic environments.
- Do not place the device in areas susceptible to excessive dust and dirt.
- Place the device in a flat and stable station, and do not place the device on a surface that is prone to vibration.
- Do not allow children to handle the device without supervision.
- Do not place heavy or sharp objects on the device.
- Avoid extreme vibrations, because these may damage the internal components.
- Please use the correct type of battery for the remote control. RG2
- Only use attachments/accessories specified or provided by the manufacturer (such as the exclusive power adapter, bracket, etc.).
- Do not disassemble the device. The device should only be repaired by staff authorized by the manufacturer.
- Place and use the device in a 5-35°C environment.
- The metal casing is coated with insulating paint.
- The plug is considered a disconnected device from the adapter.
- The adapter should be installed near the equipment and should be easily accessible.
- Where the power plug or an appliance coupler is used to disconnect the device, the disconnected device would remain readily operable.
- Never touch the power cable or power connector with wet hands. Risk of explosion if the battery is replaced with an incorrect type. Dispose of used batteries according to local regulations.
Statement
Google TV is the name of this device’s software experience and a trademark of Google LLC. Google, YouTube,e and Chromecast built-in are trademarks of Google LLC. installation.
- Reorient or relocate the receiving antenna.
- Increase the separation between the equipment and receiver.
- Connect the equipment to an outlet on a circuit different from that to which the receiver is connected.
- Consult the dealer or an experienced radio/TV technician for help. Changes or modifications not expressly approved by the party responsible for compliance could void the user’s authority to operate the equipment.
This device contains licence-exempt transmitters/receivers that comply with Innovation, Science and Economic Development Canada’s licence-exempt RSS(s). Operation is subject to the following two conditions:
- This device may not cause interference.
- This device must accept any interference, including interference that may cause.
Troubleshooting
No image output
- Press the power button located on the rear of the projector. enters projection mode successfully
- Ensure that the power adaptor has a power output.
No network
- Enter settings, and check the network connection status in the network option.
Blurry Image
- Adjust the focus or keystone.
- The projector lens is not clean.
Non-rectangular Image
- Use the keystone correction function to adjust the display.
Automatic keystone correction failed.
- The best automatic keystone correction distance is 2.0-4.0m, horizontal ‡30°.
Autofocus failure
- The best autofocus distance is 2.0-4.0m, horizontal ÷20°.
Smart Eye Protection failed.d
- The optimal sensing range is centered on the image. Being too close to the edges may cause the eye protection feature not to trigger.
Customer Support
- Website: https://aurzen.com
- Tel: 1-667-218-4830
- Timings: Mon-Fri, 9 AM – 5 PM EST