


AWOL VISION ThunderBeat Home Theater Sound System
Safety Instructions
- All the safety and operating instructions should be read before this product is operated.
- The safety and operating instructions should be retained for future reference.
- All warnings on the appliance and in the operating instructions should be adhered to.
- Follow all instructions – All operating and usage instructions should be followed.
- Clean only with a dry cloth. Do not block any ventilation openings.
- Install in accordance with the manufacturer’s instructions.
- Do not defeat the safety purpose of the polarized or grounding plug.
- A polarized plug has two blades with one wider than the other.
- A grounding plug has two blades and a third grounding prong.
- The wide blade or the third prong is provided for your safety.
- Only use attachments/accessories specified by the manufacturer.
- Unplug the apparatus during lightning storms or when unused for long periods of time.
- This equipment is a Class II or double-insulated electrical appliance.
- It has been designed in such a way that it does not require a safety connection to the electrical earth.
Package Content
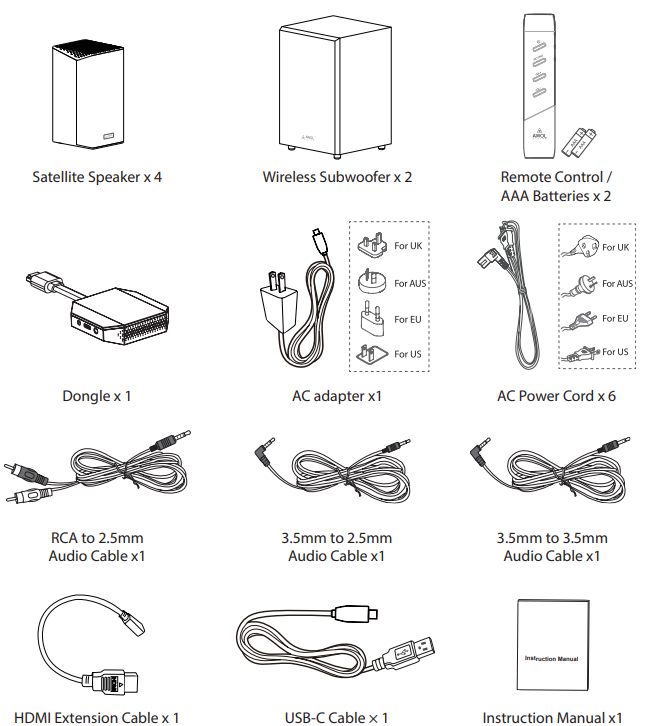
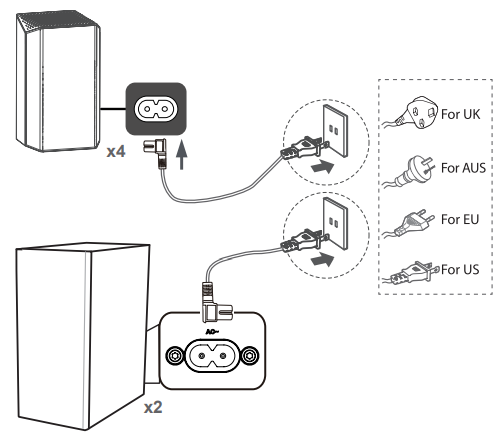
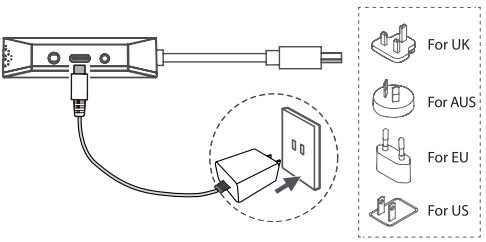
- Power cord quantity and plug type vary by region.
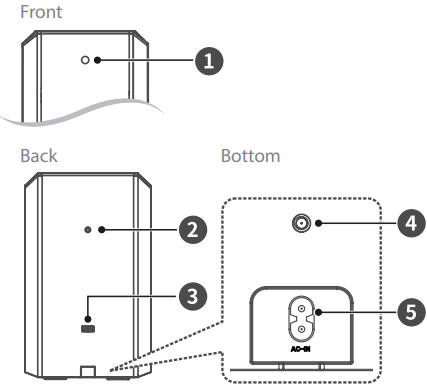
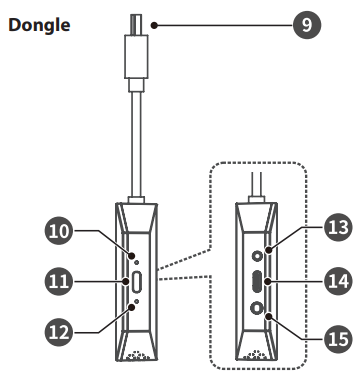
Identifying the Parts
- LED Indicators
- Wall Mounting Bracket Screw Hole (M4)
- USB Socket. For maintenance and upgrade services, and manual pairing with the Dongle.
- Floor Stand Screw Hole (1/4″) Used to install a floor support.
- AC ~ Socket Use to connect the power cable.

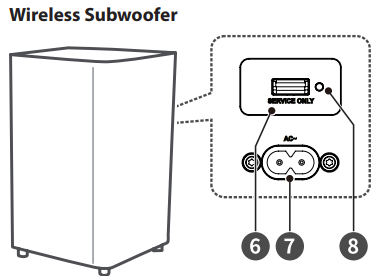
- USB Socket. For maintenance and upgrade services, and manual pairing with the Dongle.
- AC ~ Socket Use to connect the power cable.
- LED Indicators

- HDMI Input Plug: Connect the HDMI ARC/eARC port on your TV.
- LED 1 Indicators: Power and source status indicator.
- Reset Button Press and hold for 3 seconds to enter Bluetooth pairing mode.
- LED 2: Indicators Pairing status indicator.
- 2.5mm Center output
- Dongle Power Supply Port
- 3.5mm AUX Input

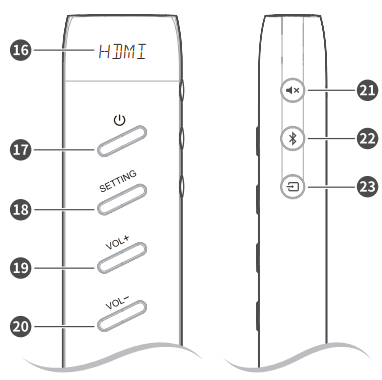
- Display Window: Show the current status.
- Switch the Satellite Speaker between ON and STANDBY mode.
- SETTING Setup menu.
- VOL + Increase the volume level.
- VOL – Decrease the volume level.
- 1x (MUTE) Mute or resume the sound.
- Select the Bluetooth mode.
- Select the play function.

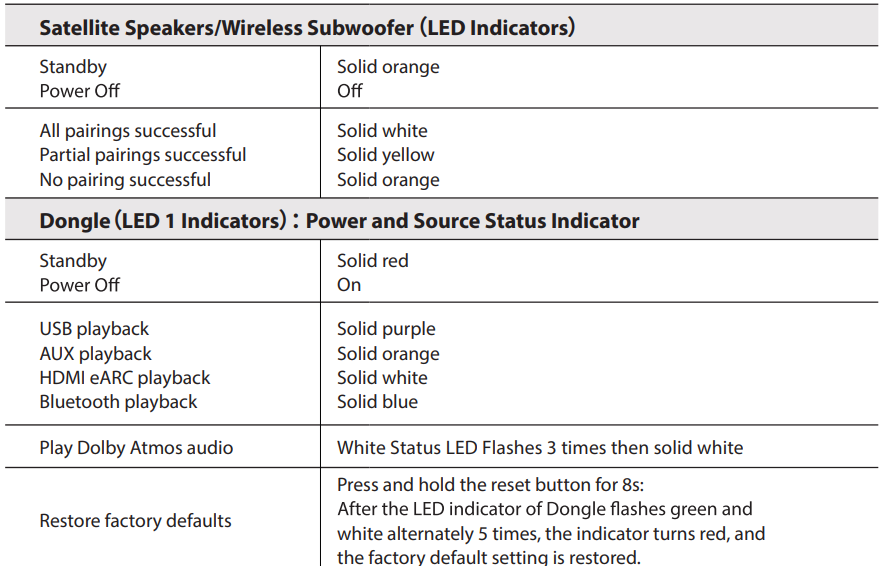
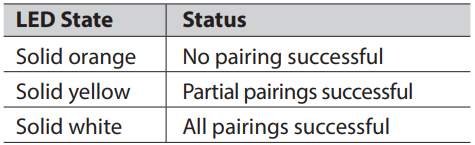
LED Indicators
Remote Control
Introducing the Remote Control
This remote control is fully functional and easy to operate wirelessly via Bluetooth, convenient for users to wirelessly control the sound system ON/OFF, function switching, volume adjustment, and other functions.
Replace the Remote Control Battery
- Pinch the front and back of the battery cover and slide it down to open the battery cover.
- Insert two AAA-size batteries (included).
- Make sure the (+) and (-) ends of the batteries match the (+) and (-) ends indicated in the battery compartment. Close the battery cover.

Pair up with the Dongle
- Make sure the Wireless Subwoofer/Satellite Speaker and Dongle are powered on, and the remote control is equipped with batteries.
- Press the SETTING and VOL – buttons of the remote control for 3 seconds at the same time to pair with the Dongle. The display will show: “::”. After successful pairing, the display will show: “V”.
Batteries
- Be sure to insert the batteries with the correct positive “®” and negative” ©” polarities.
- Use batteries of the same type. Never use different types of batteries together.
- Either rechargeable or non-rechargeable batteries can be used.
- Refer to the precautions on their labels. Do not drop the remote control.
- Do not allow anything to impact the remote control.
- Do not spill water or any liquid on the remote control.
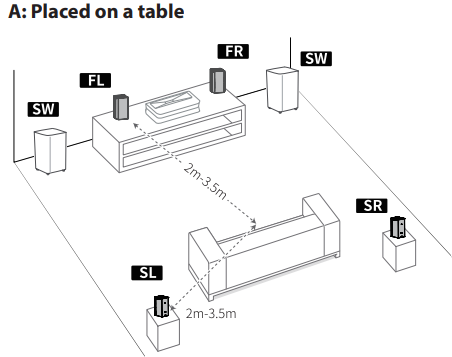
Placement and Mounting
Placement
- Placed on a table.
- Hang it on the wall.
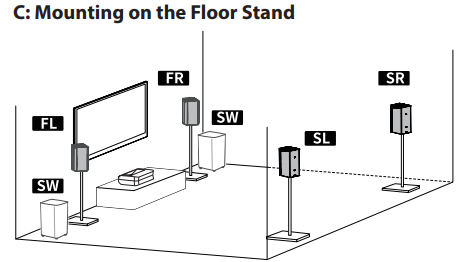
- Mounting on the Floor Stand (Floor Stand Sold Separately).


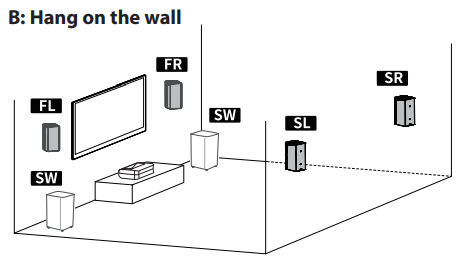
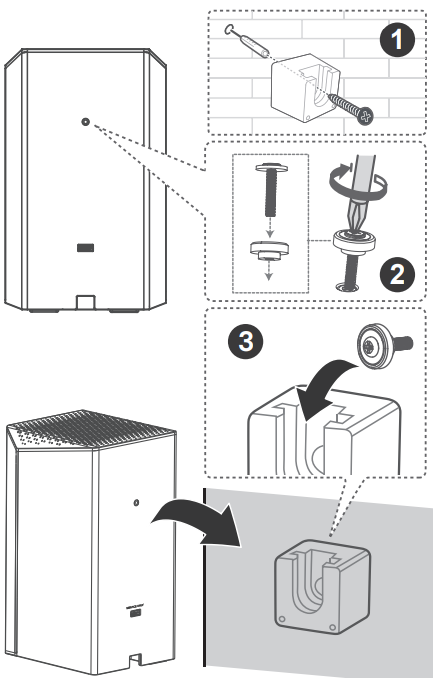
Wall Mounting
Installation must be carried out by qualified personnel only. Incorrect assembly can result in severe personal injury and property damage (if you intend to install this product yourself, you must check for installations such as electrical wiring and plumbing that may be buried inside the wall). It is theinstaller’s responsibility to verify that the wall will safely support the total load of the Satellite Speaker and wall brackets.
- Use an electronic stud finder to check the wall type before drilling and mounting.
Connections
- Ensure that the power supply voltage corresponds to the voltage printed on the back or the underside of the Satellite Speaker.
- Satellite Speaker Connect the main cable to the AC~ socket of the Satellite Speaker and then to a main socket.
- Subwoofer Connect the main cable to the AC~ socket of the subwoofer and then to a main socket.

- Adapter Connect Power Connect the adapter to the power supply port of the Dongle and then to a main socket.

Pair the Subwoofer/Satellite Speaker and Dongle
Automatic Pairing
The Subwoofer / Satellite Speaker and Dongle will automatically pair when both units are plugged into the main sockets and turned on.
- Determine the status based on the Wireless Subwoofer or Satellite Speaker indicator.

Basic Operation
Standby/ON
- Ensure the remote is paired with the Dongle.
- Press the U button on the remote control to switch the sound system ON.
- Press the U button again to switch the sound system back to STANDBY mode.
Select Modes
Press the # (SOURCE) button repeatedly on the remote control to select the HDMI eARC, AUX, USB, and $ (Bluetoothmodese. The selected mode will show on the display.
Adjust the Volume
- Press the VOL+/VOL- buttons on the remote control to adjust the volume.
- If you wish to turn the sound off, press the 1x(MUTE) button on the remote control.
- Press the 4x (MUTE) button again or press the VOL+ button on the remote control to resume normal listening.
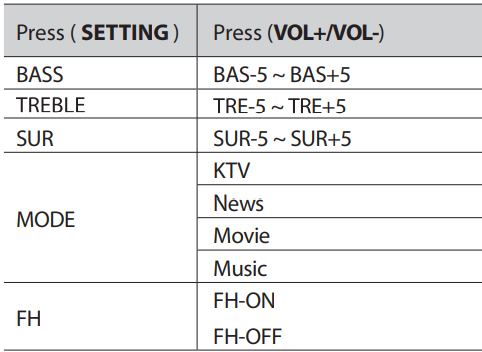
Setup Menu
Satellite speakers allow you to make personalized sound adjustments.
- Pressthe SETTING button repeatedly to select the sound menu to be adjusted: BASS, TREBLE, SUR, MODE, FH. Press VOL+/VOL— to change the sound level.

Play Audio
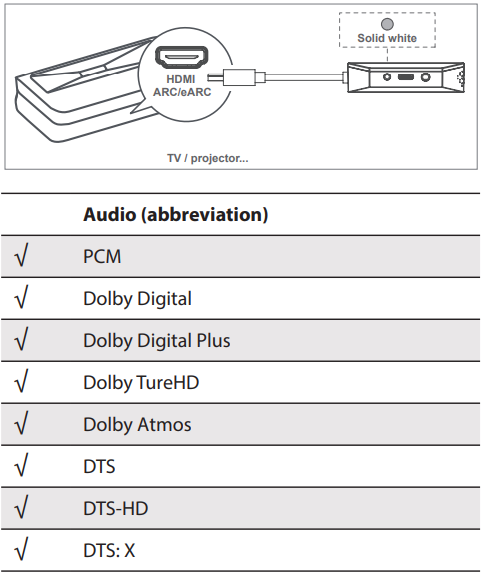
Use HDMI eARC to Play Audio
- Connect the Dongle’s HDMI input plug to the Projector/TV/Laser TV’s HDMI ARC/eARC port; the Dongle enters the HDMI eARC mode by default.

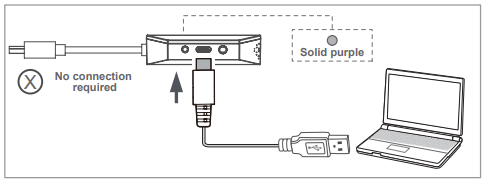
USB to Play Audio
- Connect one end of the USB-C cable to the Type-C port of the Dongle and the other end to the USB port of the computer.
- Press the # button on the remote control to select the USB function. Dongle (LED 1 Indicators) Solid purple Set your computer’s sound output to: Speakers (ThunderBeat).

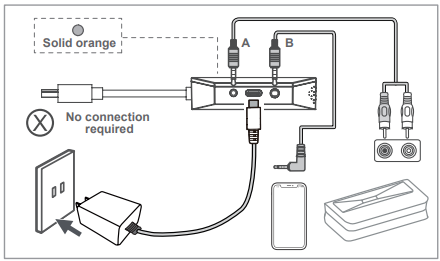
AUX to Play Audio
- Press the – button on the remote control to select the AUX function.
- Dongle (LED 1 Indicators) Solid orange Use an RCA to 2.5mm audio cable to connect the Projector/TV/Laser TV’s audio output sockets to the Dongle’s 2.5mm Center output port.
- Use a 3.5mm to 3.5mm Audio Cable to connect to the Dongle’s 3.5mm AUX input port and mobile phone, and you can listen to audio from your mobile phone through this device.

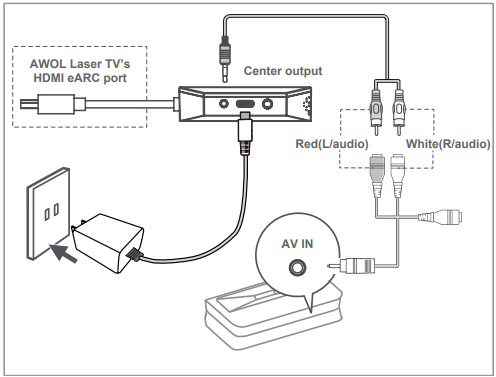
Wired Central Connection for AWOL Laser TV
If you own an AWOL Laser TV, you can output the center channel of the speaker system’s sound from your Laser TV in the following ways.
- The 2.5mm plug connects to the dongle’s 2.5mm center output jack; the 3.5mm plug connects to the AWOL Laser TV’s AV input jack.
- Connect Dongle’s HDMI input plug to the AWOL Laser TV’s HDMI eARC port. Select the route by remote control, Settings-Sound-Output device-HDMI eARC-Open” Center Speaker.”

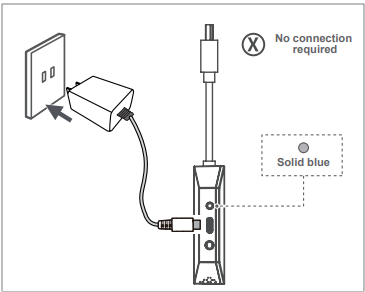
Use Bluetooth to Play Audio
- Press the # button on the remote control to select the Bluetooth function.
- The LED 1 indicator of the dongle flashes blue quickly.
- On the Bluetooth device, switch on Bluetooth, search for and select “ThunderBeat” to start the connection.
- When you hear a prompt tone, and the LED 1 indicator of the dongle lights up blue, the Bluetooth pairing is successful.
- Play audio from a Bluetooth device to listen to the audio through this device.
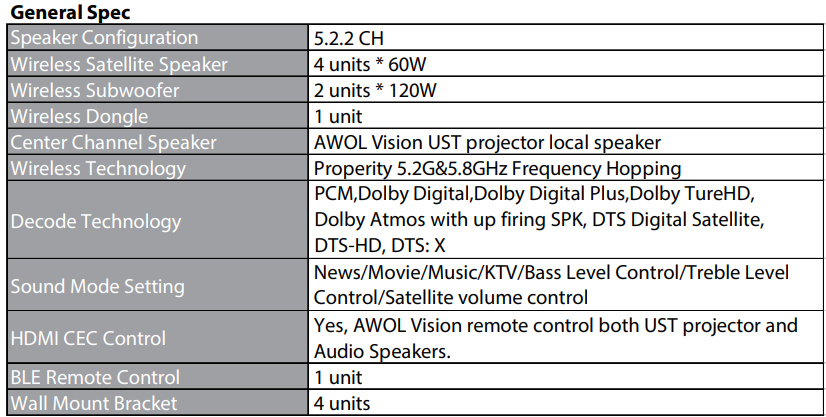
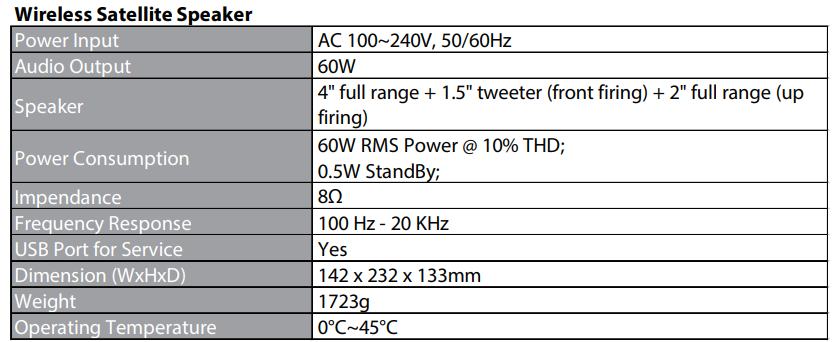
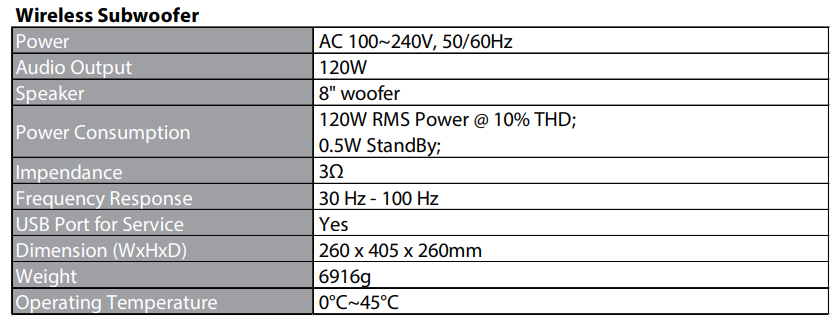
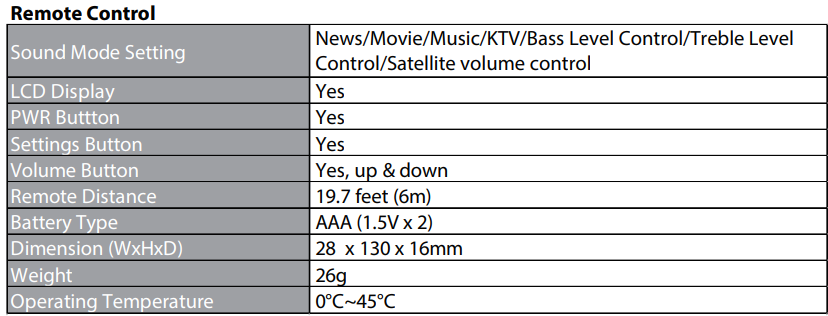
Specifications
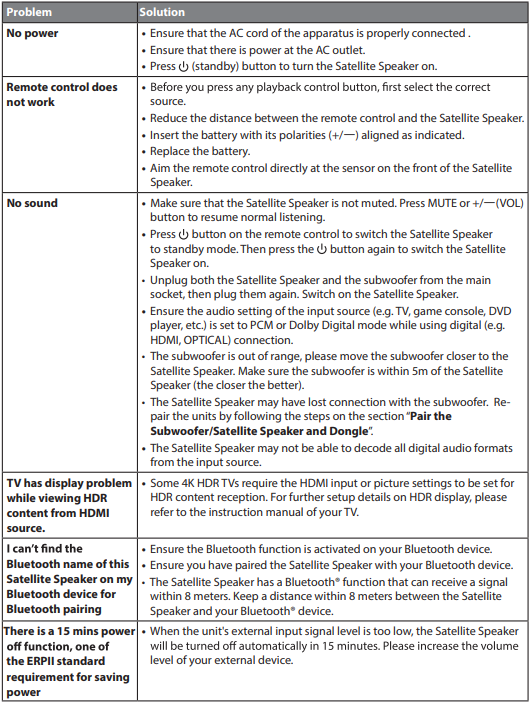
Troubleshooting
To keep the warranty valid, never try to repair the system yourself. If you encounter problems when using this Satellite Speaker, check the following points before requesting service.
Customer Service
- Tel: +1 (888) 891-6866
- Customer Service Hours: Monday–Friday, 9 AM–6 PM
- Website: https://awolvision.com/