
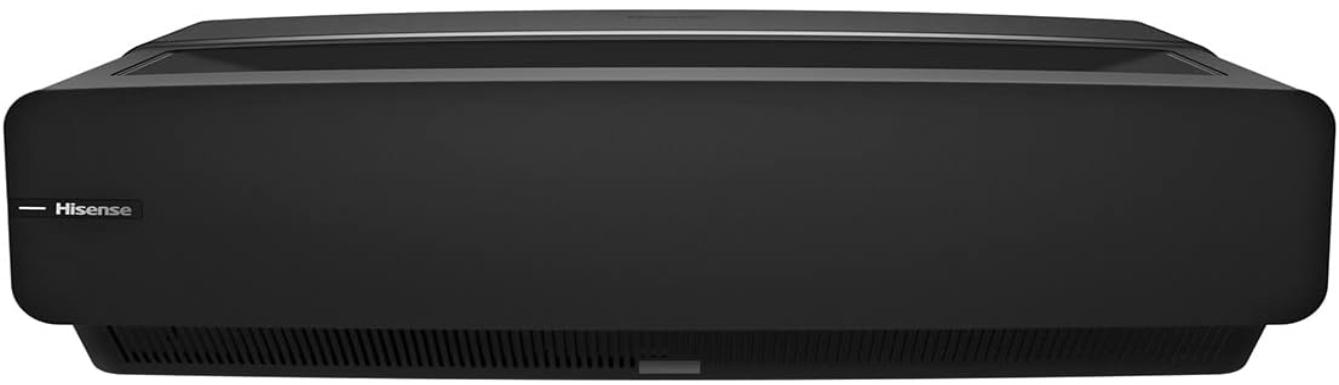
Hisense 100L5G Laser 4K HDR Android TV
Important Safety Information
- Do not place any water-containing vessel on this device, such as cosmetics or liquid medicine.
- Do not place any exposed fire source on this device. Keep away from high temperatures and heat.
- Do not expose the battery to direct sunlight or candlelight.
- Keep air vents on both sides clear from any objects to prevent the device from overheating inside.
- To avoid a short circuit, product damage, or electric shock, do not use any sharp object or metal to touch the ports or other openings on the Laser Cinema.
- If this device has been in a warm environment, allow any built-up condensation to evaporate first BEFORE you switch the device on. Do not allow a child to stand on or climb up this device.
- Children are particularly vulnerable to excessive blue light, and the damage to them is irreversible.
- The product can decrease the blue light ratio to reduce blue light hazard.
- Avoid long-term continuous use of the product, and ensure adequate break time.
- Looking at distant objects or exercises for the eye after use product.
- Clean the lens periodically with a clean cloth and make sure the Laser Cinema is turned off before you start.
Packaged Contents
- Laser Cinema
- 1 Remote control
- 2 AAA batteries
- 2 pairs of gloves for handling the Laser Cinema
- 1 Power Cord
- 1 Wrench to adjust the bottom of the Laser Cinema
- 1 Audio Out Cable
- Hisense 4K Laser Cinema Quick Setup Guide
- Important Safety Information & Warranty Card
- Cleaning kit for the lens
- 2 C-shaped blocks
- C-shaped Block Installing Instruction
- 1 USB extension cable
- A Display Screen
- A set of Wall Mount Brackets (optional equipment)*
- Additional items you receive will be based on your order.
Laser Cinema Diagram
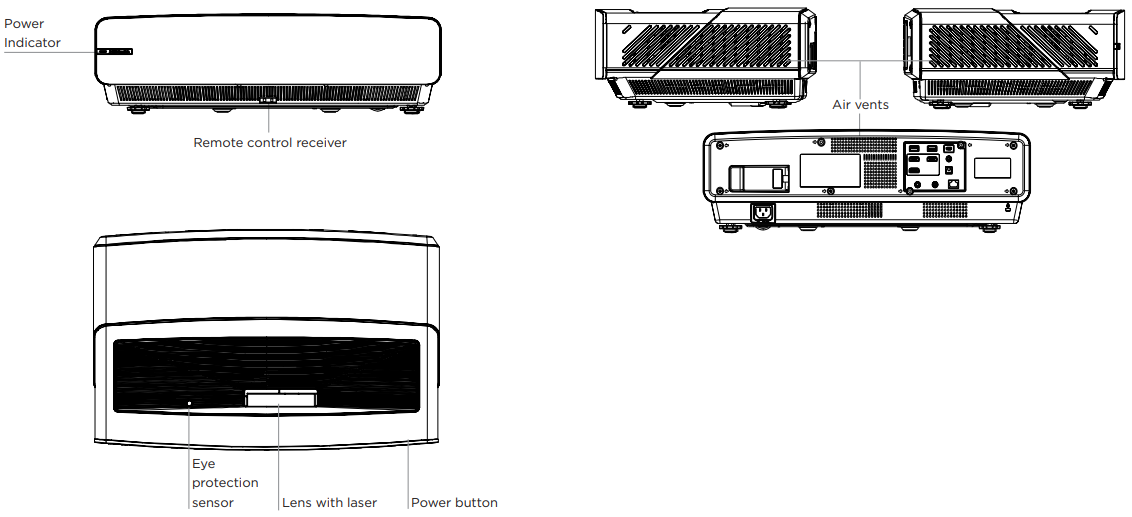
We strongly recommend that two people handle this device when moving it from one place to another. Be sure to protect the lens when you handle this device.
Mount the Screen
If you purchased a screen from Hisense to include with your Laser Cinema, then refer to the Screen Installation Guide that’s included in the package.
Set up the Laser Cinema
To begin setting up the Laser Cinema, we strongly recommend that TWO people move it from one place to another because of the weight. Be sure to protect the lens when you handle this device.
- Now, to get started, we recommend that you connect all cables to the ports on the back of the Laser Cinema before you position it. (Audio, video, Ethernet cables, and external devices are not included.)
- Position the Laser Cinema so it is parallel with the screen surface.
- We recommend the distance from the back panel of the Laser Cinema to the wall to be 8 1/8 inches.
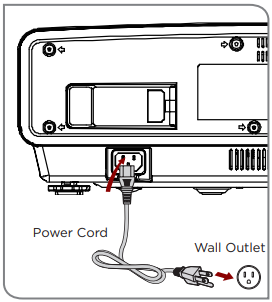
- Plug the power cord into a wall outlet.
- Press the POWER button to turn on the Laser Cinema.
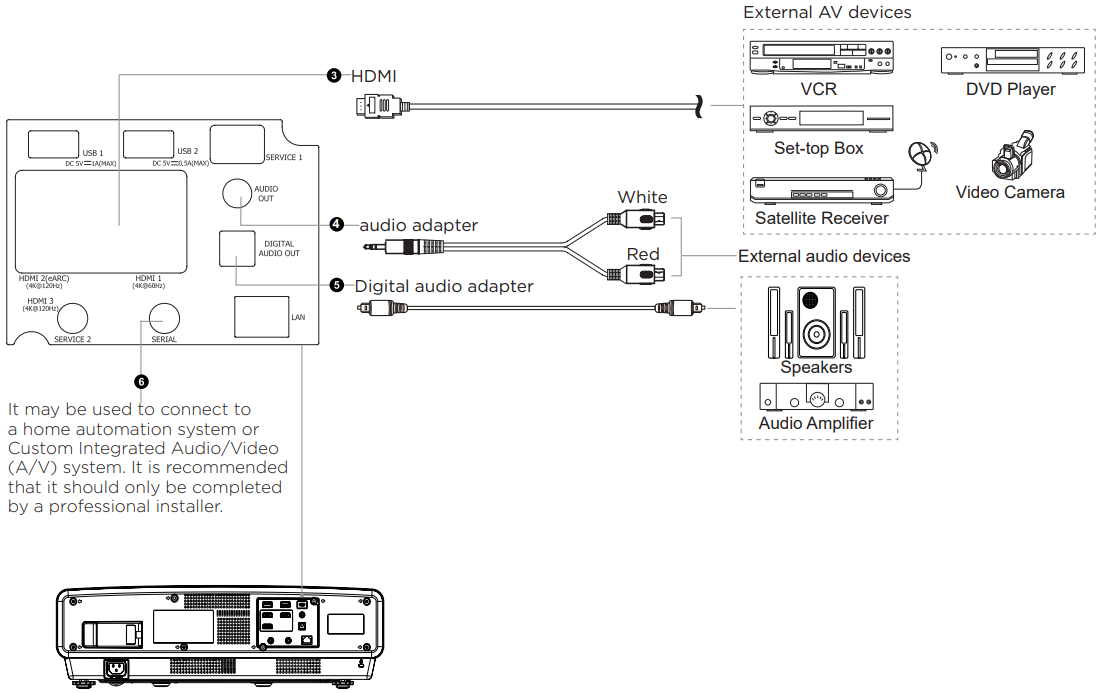
Ports to Connect Certain Cables
USB devices for browsing photos, music, and movies. This unit only recognizes USB Memory Sticks.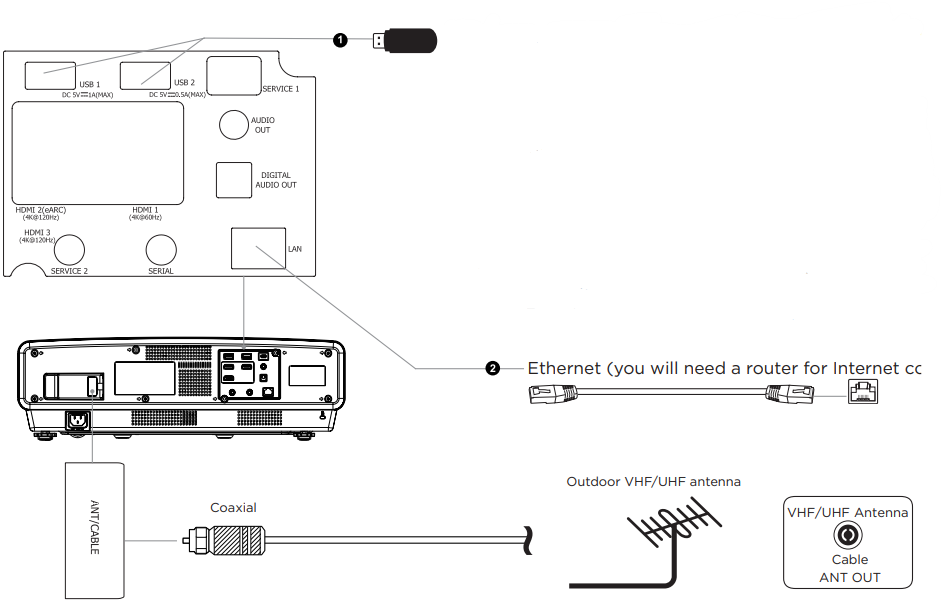 Check to ensure that you have selected the right cables for the ports and that they are connected securely. Loose connections can affect the quality of the picture, image, and color.
Adjust the Display Image and the Screen
- Follow the steps in the order shown below, only if they apply to your situation.
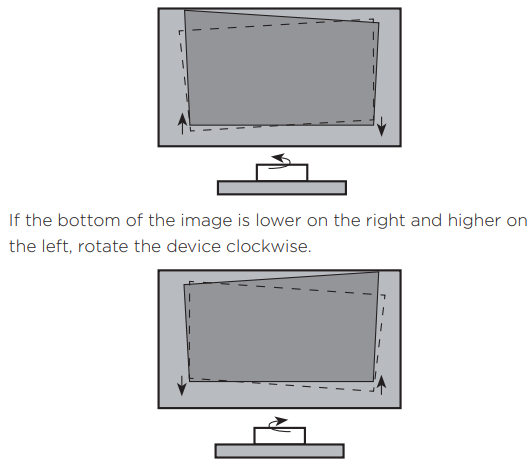
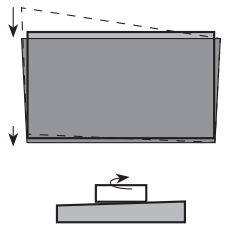
- If the bottom of the image is lower on the left and higher on the right, rotate the device counterclockwise.
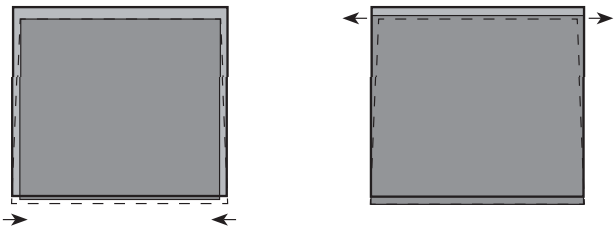
Fitting Image
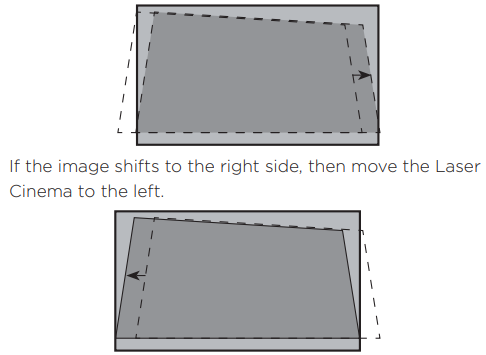
- If the image shifts to the left side, then move the Laser Cinema to the right
Adjust the Upper-Right Corner of the Image
- If the top of the image is lower on the left and higher on the right, then use the wrench to rotate the front-right foot and the back-right foot clockwise to the same height.
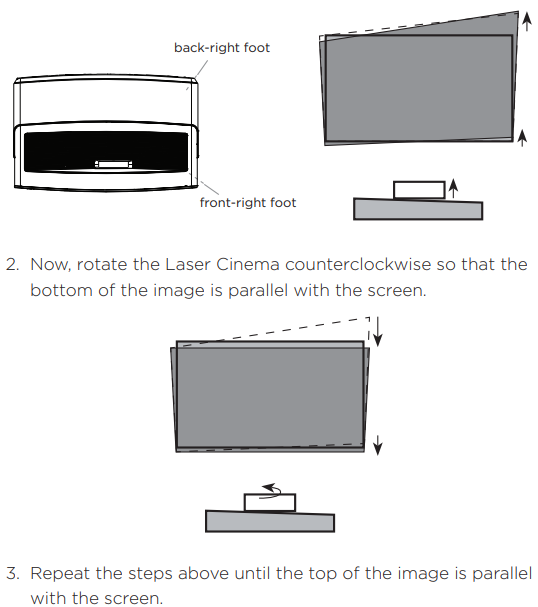
- If the upper-right corner is inside the screen after adjusting, use the wrench to rotate the front-right foot and the back-right foot counterclockwise to the same height, and rotate the Laser Cinema clockwise, to make the image parallel with the screen.
- If the top of the image is higher on the left and lower on the right, then use the wrench to rotate the front-left foot and the back-left foot of the Laser Cinema clockwise to the same height.
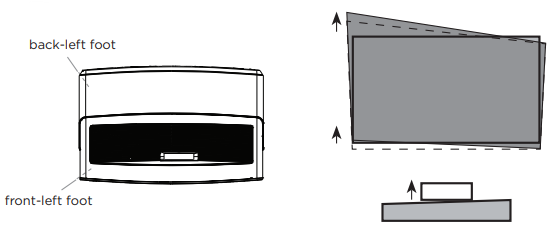
- Now, rotate the Laser Cinema clockwise so that the bottom of the image is parallel with the screen.
- Repeat the steps above until the top of the image is parallel with the screen.
- If the upper-left corner is inside the screen after adjusting, use the wrench to rotate the front-left foot and the back-left foot counterclockwise to the same height, and rotate the Laser Cinema counterclockwise, to make the image parallel with the screen.
Fill the Top of the Image to the Screen
If the top of the image is wider than the screen, then use the wrench to rotate the left- and right-front feet of the Laser Cinema clockwise.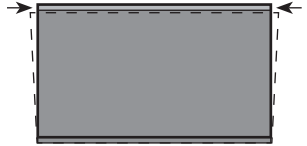
If the top of the image is narrower than the screen, then use the wrench to rotate the left- and right-back feet of the Laser Cinema clockwise, until the left and right borders of the image are parallel with the screen borders. Next, move the projector further from the screen to fill the image to the screen width. If the back feet are already at their maximum height, rotate the left- and right-front feet of the Laser Cinema counterclockwise.
Use Your Remote

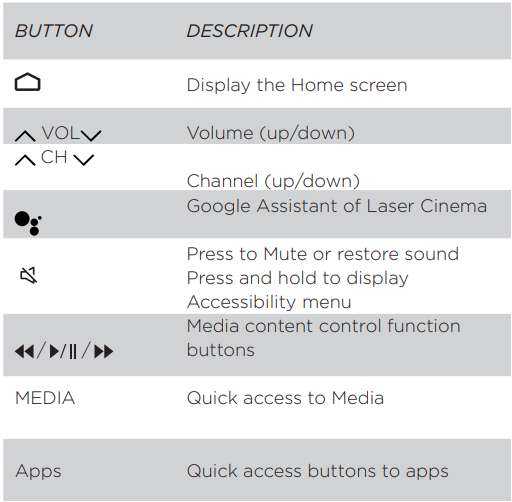
- Press and slide the back cover to open the battery compartment of the remote control.
- Insert two AAA-size batteries. Make sure to match the (+) and (-) ends of the batteries with the (+) and (-) ends indicated in the battery compartment.
- Restore the battery compartment.
Batteries & Remote
- Discard batteries in a designated disposal area. Do not throw them into a fire.
- Remove old batteries immediately to prevent them from leaking into the battery compartment.
- If you do not intend to use the remote control for a long time, then remove the batteries.
- Battery chemicals can cause a rash.
- If the batteries leak, clean the battery compartment with a cloth.
- If chemicals touch your skin, then wash it immediately.
- Do not mix old and new batteries.
- Do not mix alkaline, standard (carbon-zinc), or rechargeable (NiCd, NiMH, etc.) batteries.
- Do not continue using the remote if it gets warm or hot.
- Call our Support Center immediately on the support website.
Range
- The remote control can work at a distance of up to 26 feet in front of the Laser Cinema.
- It can work at a 30-degree horizontal or 115-degreevertical angle. ( This angle is used by infrared means in an unpaired state.)
Pairing
- Pair the remote to the Laser Cinema after you power it on. Keep the remote control within 10 feet of the Laser Cinema. Press and hold the [ ] button for at least 3 seconds to start pairing.
- If the remote paired successfully, then a confirmation will display on the screen. If it did not pair successfully, then an unsuccessful message will display. Repeat step 1.
Proceed through the Screen Setup Menu
Projection Mode
If you need to flip the image over top-to-bottom and/or left-to-right, select the Projection Mode and press the UP/DOWN buttons. Before you use the Auto Geometric Correction function, ensure that the Laser Cinema and your mobile device are connected to the same Wi-Fi network.
- Position the Laser Cinema and use the leveling feet as needed to fit the entire display border within the screen area.
- Click Next to continue.
- Scan the QR Code with your mobile device to begin automatic geometric correction.
- When the app loads, the Laser Cinema will display an alignment grid.
- Click “+” on your mobile device to take a photo of the entire screen and image.
- For best results, stand about 10 feet away from the screen and use landscape mode.
- Click “upload” on your mobile device to complete the automatic geometric correction.
Geometric Correction
- Select a point for adjustment using the UP/DOWN/LEFT/ RIGHT buttons. Adjust eight main points at the corners and midpoints.
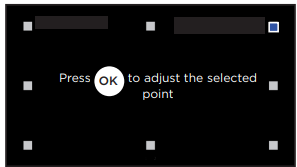
- Adjust the position of the point by pressing the UP/DOWN/ LEFT/RIGHT buttons, then press the Back button to view and select other points. Your changes will apply automatically.
Laser Cinema
- Press the Menu button on your remote.
- Next, select Settings to enter the Settings Menu.
- Select Device Preferences > Accessibility > TalkBack or Video Description to turn TalkBack or Video Description on or off.
Maintenance
- Do not touch this device when it is running or just turned off because it may be hot.
- Do not wipe this device with oil because it may deteriorate the exterior or damage the paint.
- Contact with rubber or ethylene products for a long time may cause stains on this device.
- If the outside of the Laser Cinema is dirty, turn off the Laser Cinema and wipe with a damp soft cloth.
- Do not touch the lens with your hands.
- Do not touch or wipe the lens with an ordinary cleaning cloth.
- Use a dust blower to remove the dust on the lens.
- To turn off this device, press the Power button on the remote control.
- Do not cut off the power directly when the device is working.
- Grease, dirt, and fingerprints should be cleaned carefully by the professional by using optical cleaning cloth, lens wiping paper, or professional cleaning solutions to avoid destroying the optical filming and affecting the image quality.
Specifications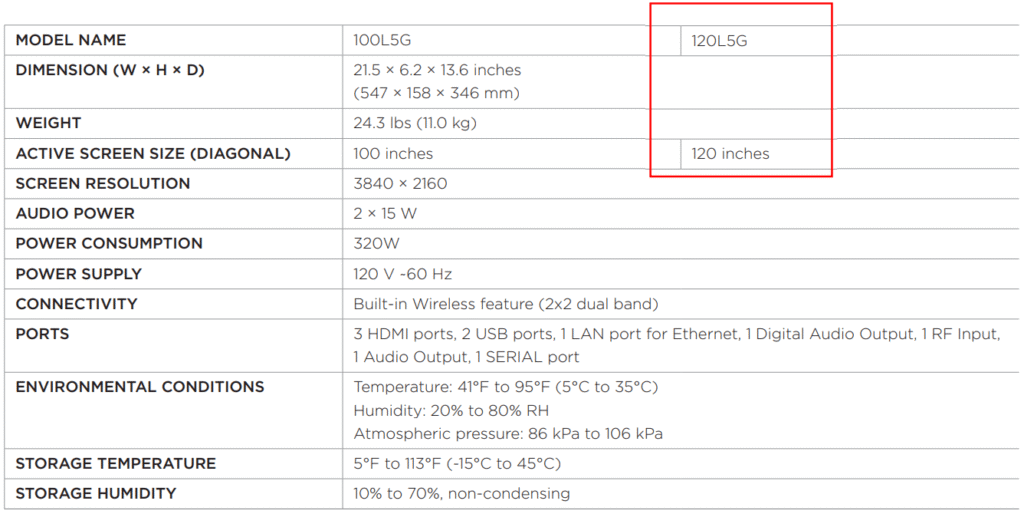

Troubleshooting
When you experience an issue with your Laser Cinema, turn it off and on again. If this does not resolve the problem, then refer to the tips below. No sound or picture.
- Check if the power cord is plugged into a powered AC outlet.
- Press the Power button on the remote control to activate the unit from ‘Standby’ mode.
- Check to see if the LED light is on or not. If it is, then the Laser Cinema is receiving power.
The picture is normal, but there is no sound
- Check the volume settings.
- Check if ‘Mute’ mode is set to On.
Sound but no picture, or a black and white picture
- If the picture is black and white, unplug the Laser Cinema from the AC outlet and replug it after 60 seconds. Check that the Color is set to 50 or higher. Try different Laser Cinema channels.
The sound and/or picture is distorted or appears wavy
- An electric appliance may be affecting the Laser Cinema.
- Turn off any appliances that are nearby and move them farther away from the Laser Cinema.
- Insert the power plug of the Laser Cinema set into another power outlet.
The sound and picture are blurry or cut out.
- If using an external antenna, check the direction, position, and connection of the antenna.
- Adjust the direction of your antenna or reset or fine-tune the channel.
The remote control does not work
- Confirm that Laser Cinema still has power and is operational.
- Change the batteries in the remote control.
- Check if the batteries are correctly installed.
FCC Notice
This device has been tested and found to comply with the limits for a Class B digital device pursuant to Part 15 of the FCC Rules. These limits are designed to provide reasonable protection against harmful interference in a residential installation. This device generates, uses, and can radiate radio frequency energy and, if not installed and used in accordance with the instructions, may cause harmful interference to radio communications. However, there is no guarantee that interference will not occur in a particular installation. If this device does cause harmful interference to radio or Laser Cinema reception, which can be determined by turning the device off and on, the user is encouraged to try to correct the interference by one or more of the following measures:
- Reorient or relocate the receiving antenna.
- Increase the separation between the device and receiver.
- Connect the device into an outlet on a circuit different from that to which the receiver is connected.
- Consult the dealer or an experienced Radio/Laser Cinema technician for help.
Declaration of Conformity
- Trade Name: Hisense
- Model: 100L5G/120L5G
- Responsible Party: Hisense USA Corporation
- Address: 7310 McGinnis Ferry Road, Suwanee, GA 30024
Customer Service
- Website: https://global.hisense.com/
- Tel: 0191 387 0804
- Opening hours: Monday to Friday 9.00 am – 6.00 pm Saturday 9.00 am – 5.00 pm