
Brother TJ-4522TN Titan Industrial Printer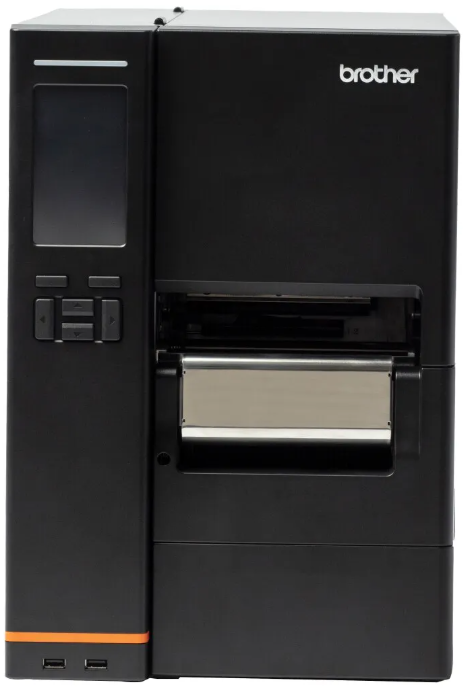
Introduction
The robust design of the label printer can handle up to 600 m of ribbon and has the capacity to handle 8″ label rolls. The label printer comes equipped with several functions, including:
- Built-in Ethernet USB 2.0 Ports (for connecting a keyboard or barcode scanner) Serial Interface (RS-232C) Wi-Fi and Bluetooth Interface Expansion Slot (for the optional WLAN / BT Interface
(PA-WB-001)) - 16-bit Color Touchscreen (TJ-4422TN/TJ-4522TN only) The label printer uses its high-performance and high-quality built-in Monotype Imaging® TrueType font engine with the CG Triumvirate Bold Condensed smooth scalable font. It also provides a choice of eight different sizes of the alphanumeric bitmap font and supports most of the standard barcode formats.
Operations Overview
The components included in the box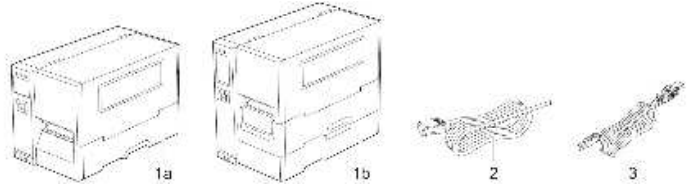
- Label Printer
- TJ-4420TN/TJ-4520TN/TJ-4620TN
- TJ-4422TN/TJ-4522TN
- Power Cord
- USB Cable
Front View
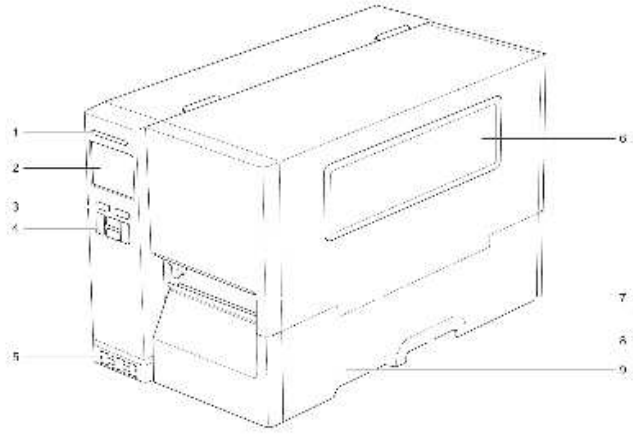
- Power LED
- LCD
- Selection Buttons
- Navigation Buttons
- USB Host Ports
- Media View Window
- Media Output Slot
- Media Cover Handle
- Media Cover
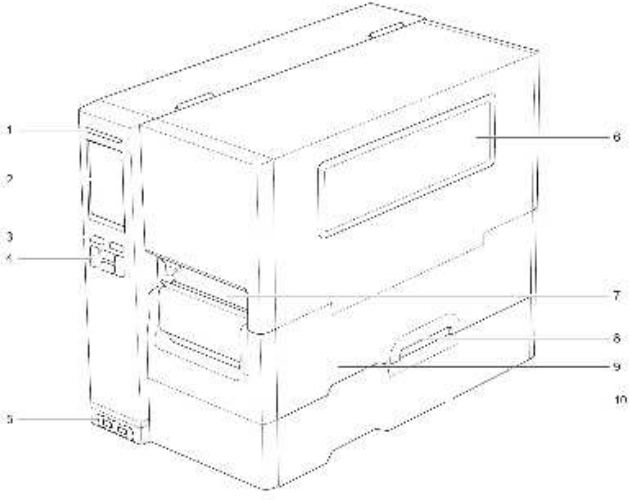
- Power LED
- Touchscreen
- Selection Buttons
- Navigation Buttons
- USB Host Ports
- Media View Window
- Media Output Slot
- Media Cover Handle
- Media Cover
- Base Cover
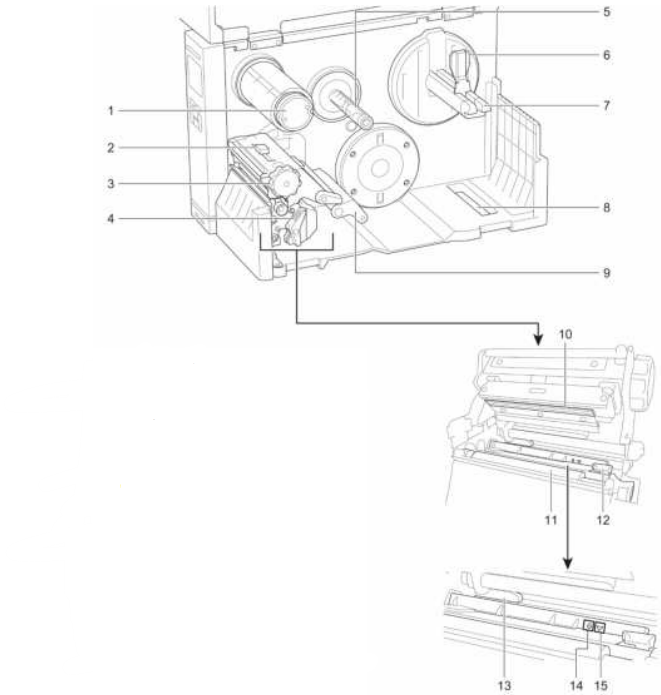
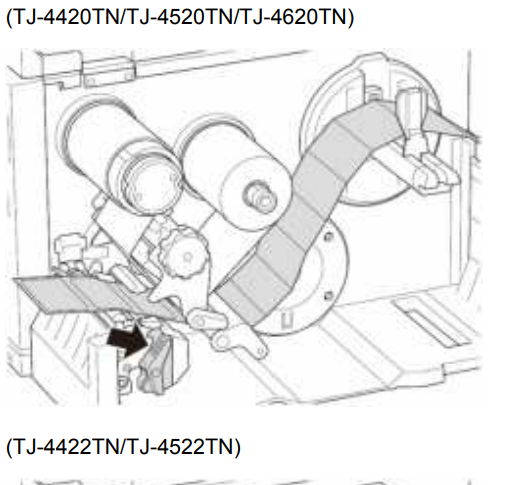
Interior View
- Ribbon Rewind Spindle
- Print Head Tension Position Adjustment Slider
- Print Head Tension Adjustment Knob
- Print Head Release Lever
- Ribbon Supply Spindle
- Label Roll Guard
- Label Supply Spindle
- External Label Entry Slot
- Damper
- Print Head
- Platen Roller
- Front Label Guide
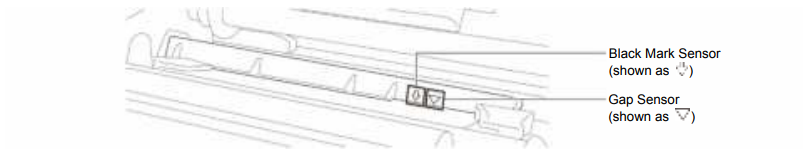
- Ribbon Sensor
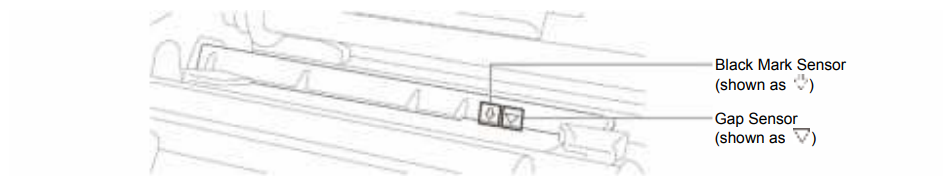
- Black Mark Sensor (shown as )
- Gap Sensor (shown as )
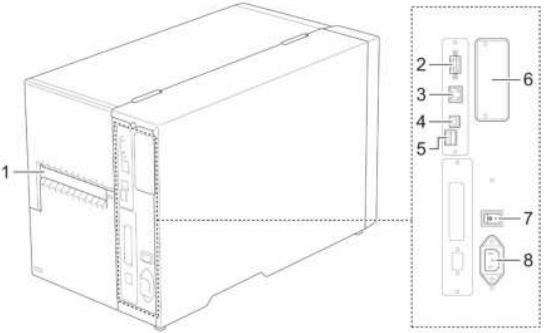
Rear View
- External Label Entry Slot
- RS-232C Serial Port
- Ethernet Port
- USB Port (USB 2.0/Hi-Speed Mode)
- microSD Card Slot 1
- Wi-Fi and Bluetooth Interface Expansion Port 2
- Power Switch
- Power Cord Socket
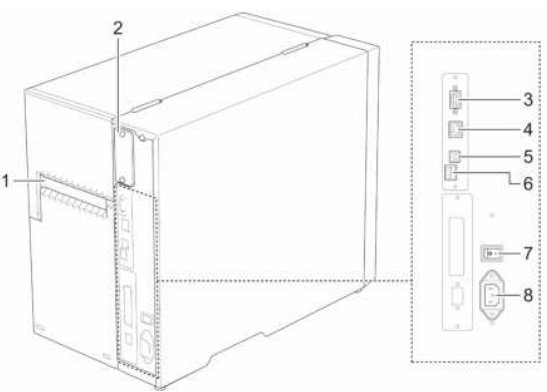
- External Label Entry Slot
- Wi-Fi and Bluetooth Interface Expansion Port 1
- RS-232C Serial Port
- Ethernet Port
- USB Port (USB 2.0/Hi-Speed Mode)
- microSD Card Slot 2
- Power Switch
- Power Cord Socket
Control Panel
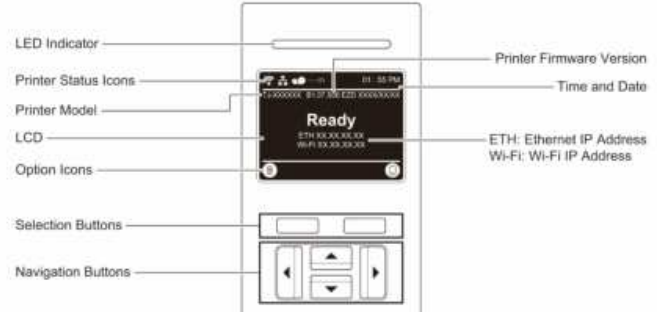
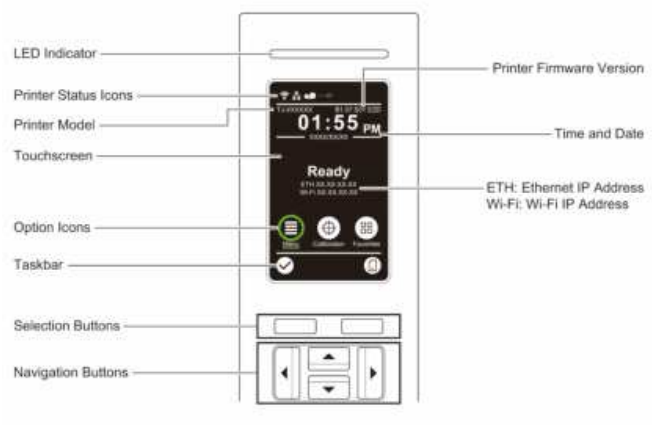
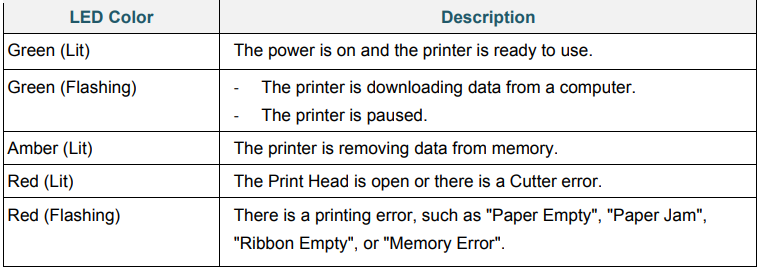
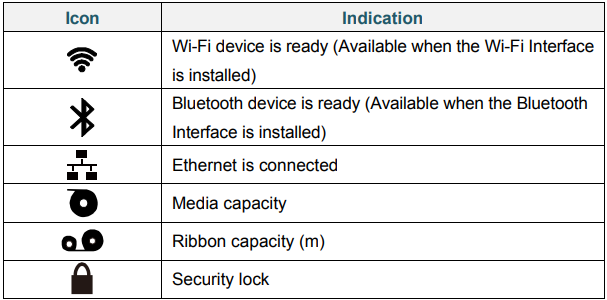
LED Indicators and Buttons
Selection and Navigation Buttons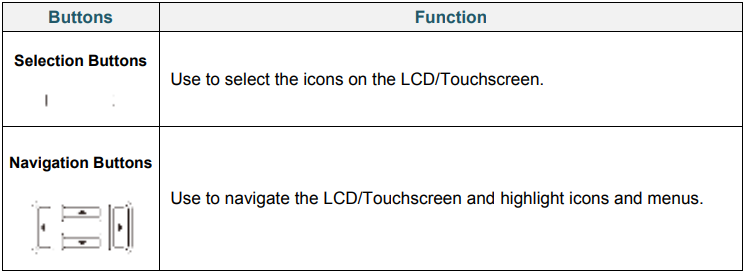
Printer Status Icons
Option Icons
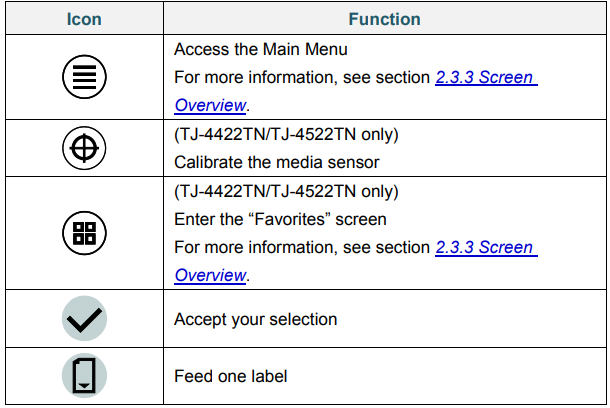
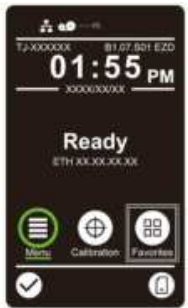
Screen Overview
Select the icons to access printer features and change settings. 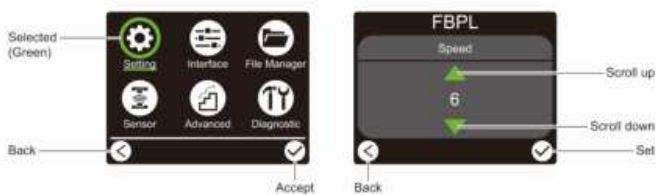
Access the Main Menu
Make sure the printer’s LCDs are “Ready”. If not, press the left Selection button. 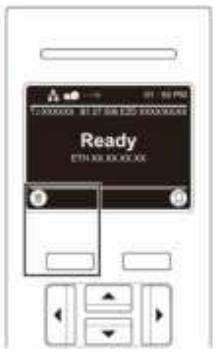
To select an option on the Main Menu, use the Navigation buttons to browse the options and then press the button under the icon.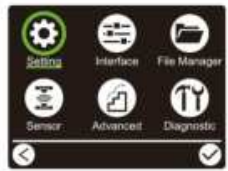 Make sure the printer’s Touchscreen displays “Ready”. If not, tap the Menu icon.
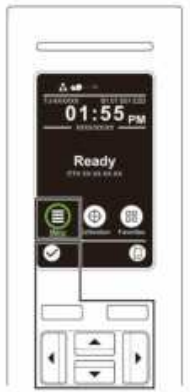
To select an option on the Main Menu, tap the option’s icon.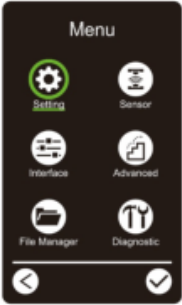
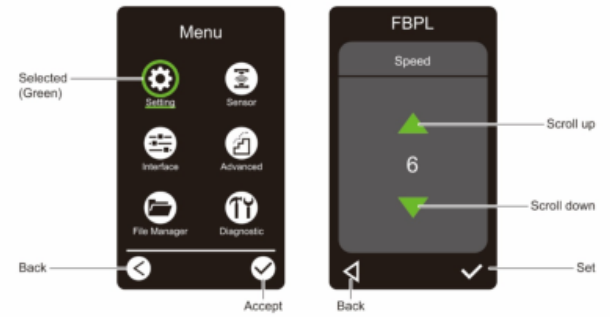
Main Menu Overview
Use the Main Menu options to configure various printer settings without connecting the printer to a computer.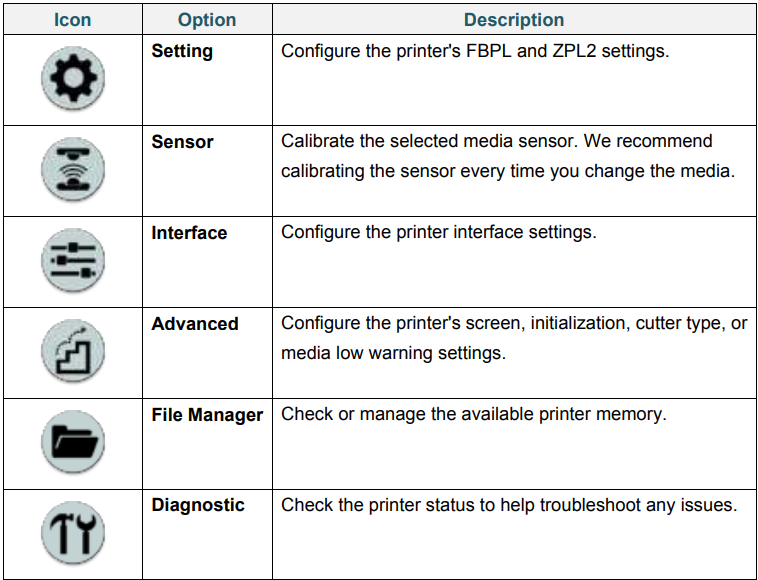 Add frequently used Main Menu options to “Favorites” for quick access. To display the “Favorites” list, tap the Favorites icon
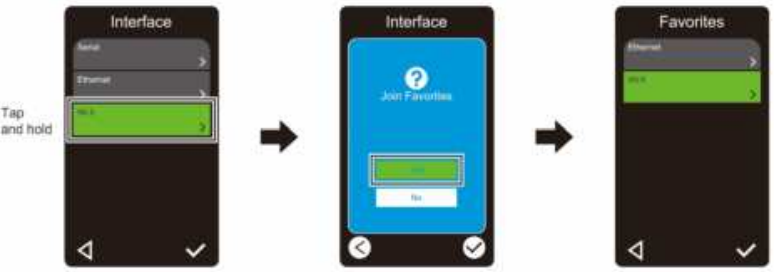
Add an option to the “Favorites” list
- Tap and hold the option you want to add to favorites until “Join Favorites” appears.
- Tap “Yes”.
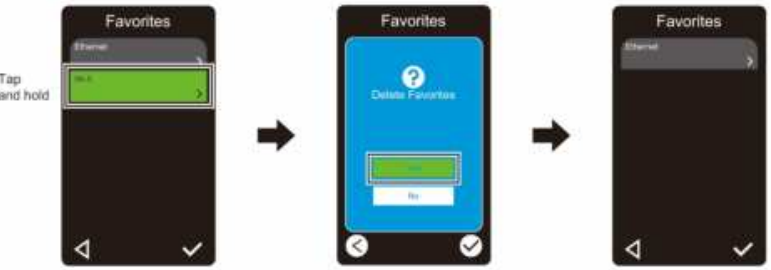
Remove an option from the “Favorites” list:
- Tap and hold the option you want to remove from favorites until “Delete Favorites” appears.
- Tap “Yes”.
Set Up Your Printer
Connect the Power Cord
- Place the printer on a flat, secure surface.
- Make sure the Power Switch is in the OFF position.
- Connect the printer to the computer using a USB cable.
- Plug the Power Cord into the Power Cord Socket at the rear of the printer, and then plug the Power Cord into a correctly grounded power outlet (earthed electrical socket).
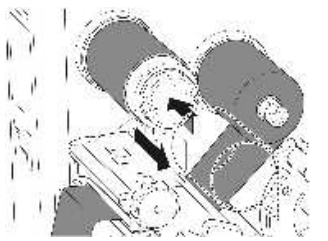
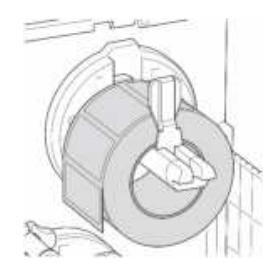
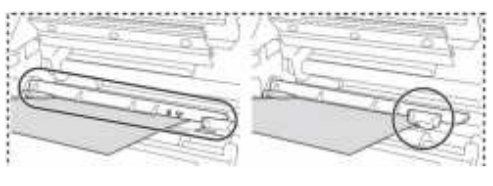
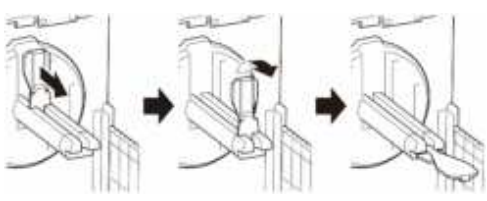
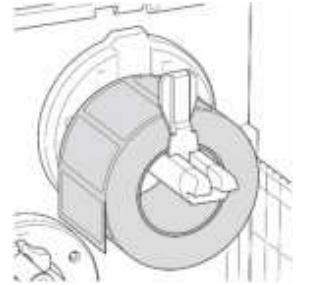
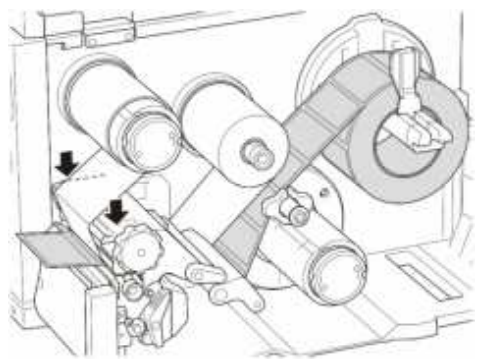
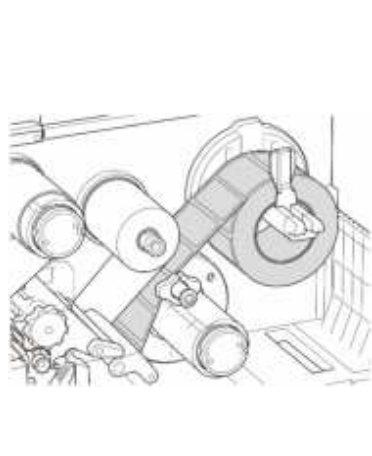
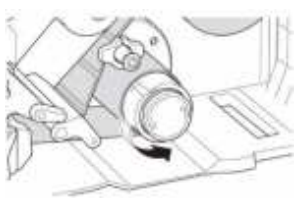
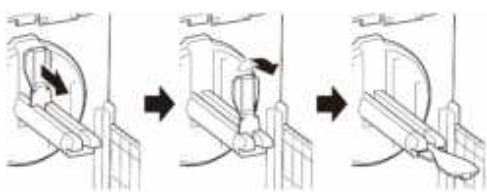
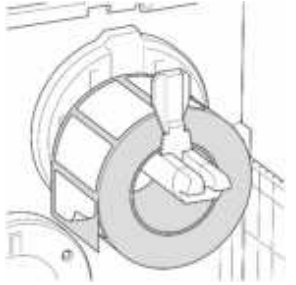
Load the Ribbon
Unless indicated otherwise, the illustrations in this User’s Guide show the TJ-4422TN/TJ-4522TN.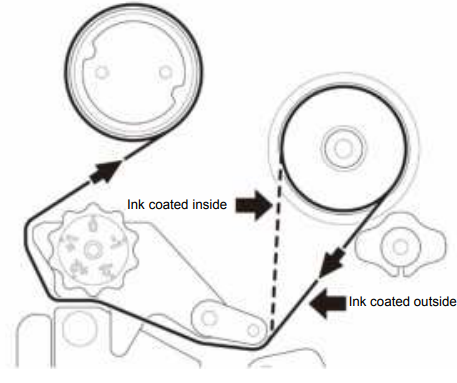 Remove Used Ribbon
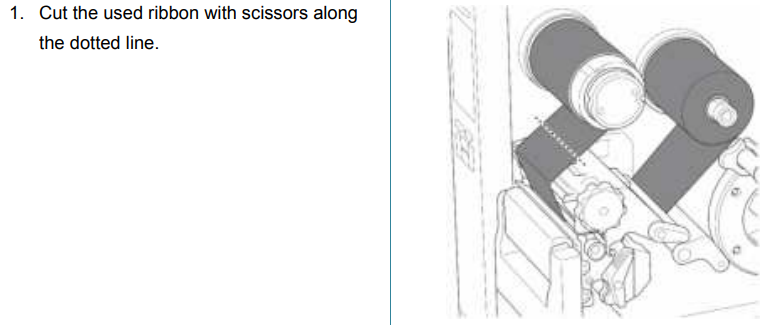
Unless indicated otherwise, the illustrations in this User’s Guide show the TJ-4422TN/TJ-4522TN.
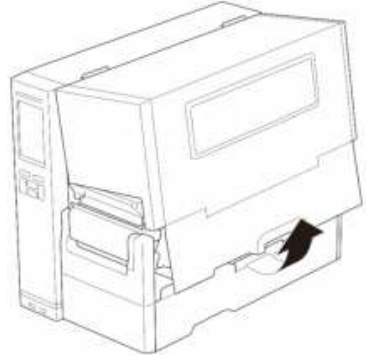
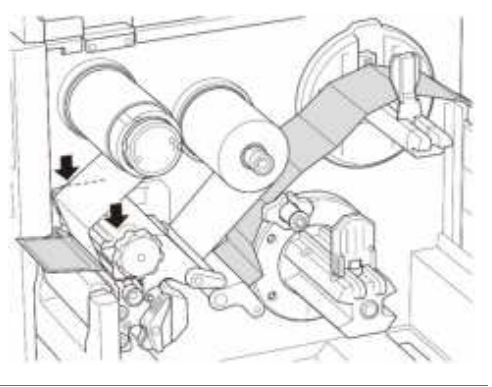
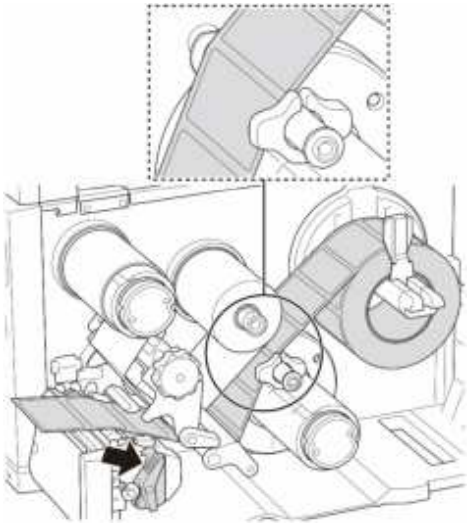
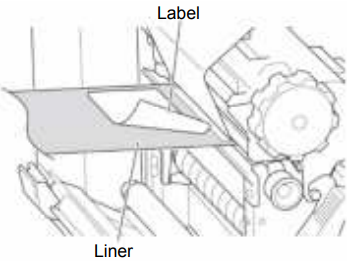
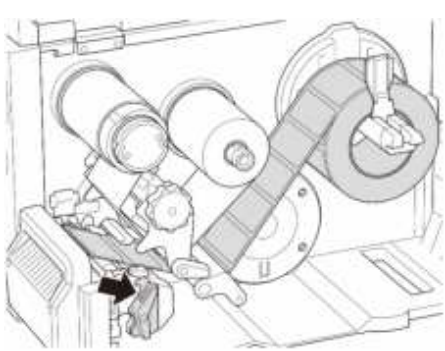
Load the Media
Unless indicated otherwise, the illustrations in this User’s Guide show the TJ-4422TN/TJ-4522TN.
- Open the Media Cover.
- Slide the Label Roll Guard horizontally to the end of the Label Supply Spindle, and then flip down the Label Roll Guard.
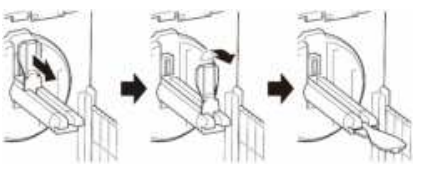
- Place the label roll on the Label Supply Spindle and then flip the Label Roll Guard upwards to hold it in place.
- Place the label roll on the Label Supply Spindle and then flip the Label Roll Guard upwards to hold it in place.
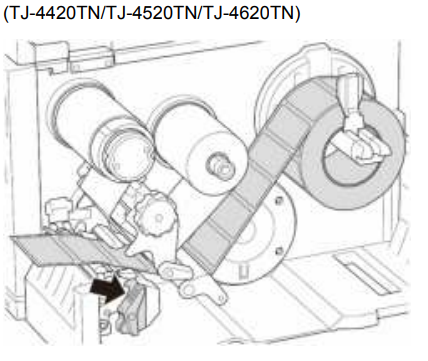
- Move the Media Sensor by adjusting the Media Sensor Position Adjustment Knob. Make sure the position of the Gap or Black Mark Sensor matches the position of the Gap/Black Mark on the label roll.
- Adjust the Front Label Guide to fix the media position.
- Make sure you thread the media through the Media Sensor.
- The sensor locations are marked by the triangle mark (Gap Sensor) and the arrow mark (Black Mark Sensor) at the sensor housing.
- The Media Sensor position is adjustable. Make sure the position of the Gap or Black Mark Sensor matches the position of the Gap/Black Mark on the label roll.
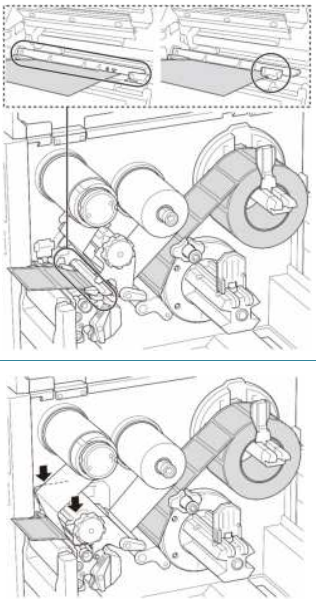
Load External Media
Unless indicated otherwise, the illustrations in this User’s Guide show the TJ-4422TN/TJ-4522TN.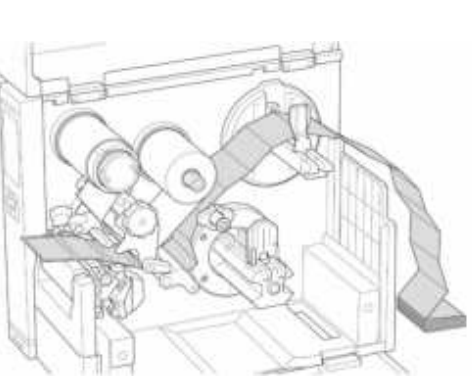
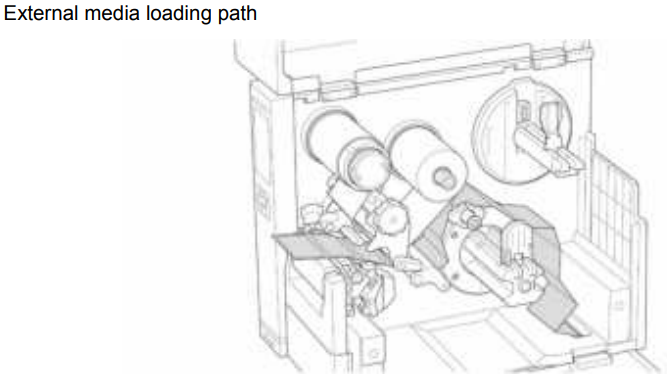
- Open the Media Cover.
- Insert the media through the External Label Entry Slot.
- Align the Label Roll Guard with the label width.
- Move the Media Sensor by adjusting the Media Sensor Position Adjustment Knob.

- Adjust the Front Label Guide to fix the media position.
- Make sure you thread the media through the Media Sensor.
- Slide the Label Roll Guard horizontally to the end of the Label Supply Spindle, and then flip down the Label Roll Guard.
- Place the label roll on the Label Supply Spindle and then flip the Label Roll Guard upwards to hold it in place.
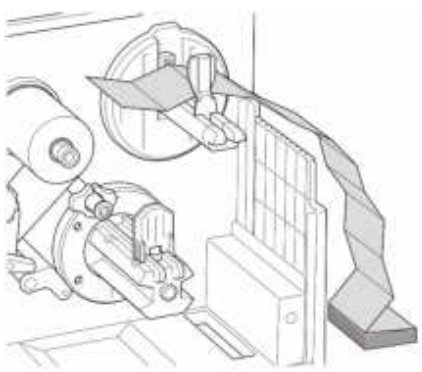
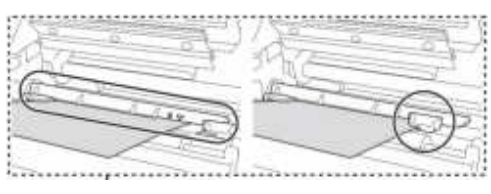
- Push the Print Head Release Lever and thread the label through the Damper, Media Sensor, and Front Label Guide to install the media.
- Move the Media Sensor by adjusting the Media Sensor Position Adjustment Knob.
- Adjust the Front Label Guide to fix the media position.
- Make sure you thread the media through the Media Sensor.
- Close the Print Head on both sides and make sure it locks into place.
- Turn the Print Head Release Lever, Label Guide Release Lever, and Peel-Off Kit, and pull approximately 650 mm of the label roll through the Media Output Slot.
- Thread the liner through the Label Peeler Cover Slot.
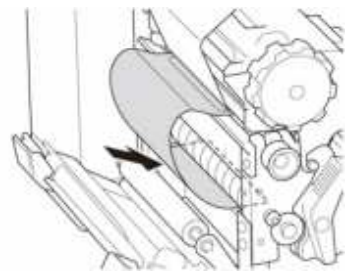
- Adhere the liner to the Media Rewind Spindle.
- Set the printer mode to “Peel Off” using the Main Menu (Main Menu > Settings> Print Mode > Peel Off) or using the Brother Printer Management Tool (BPM) as follows.
- Start the BPM. Click the Printer Configuration button.
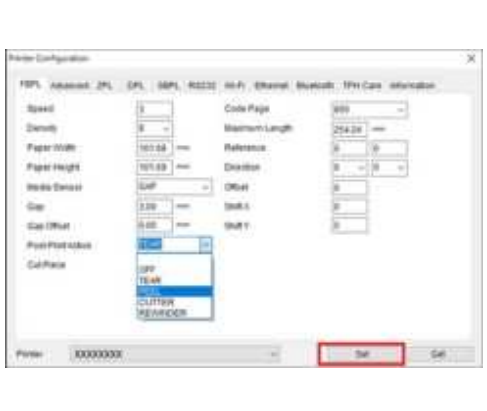
- Press the right Selection button to feed a label to test.
Load Media in Cutter Mode
Open the Media Cover.
- Slide the Label Roll Guard horizontally to the end of the Label Supply Spindle, and then flip down the Label Roll Guard.
- Place the label roll on the Label Supply Spindle and then flip the Label Roll Guard upwards to hold it in place.
- Push the Print Head Release Lever and thread the label through the Damper, Media Sensor, and Front Label Guide to install the media.
- Feed the media through the Label Cutter Cover Slot.

Improve Print Quality
Unless indicated otherwise, the illustrations in this User’s Guide show the TJ-4422TN/TJ-4522TN. For the best print quality, adjust the Print Head using the Print Head Tension Adjustment Knob. Choose one of five levels of tension adjustment depending on the media width you use. 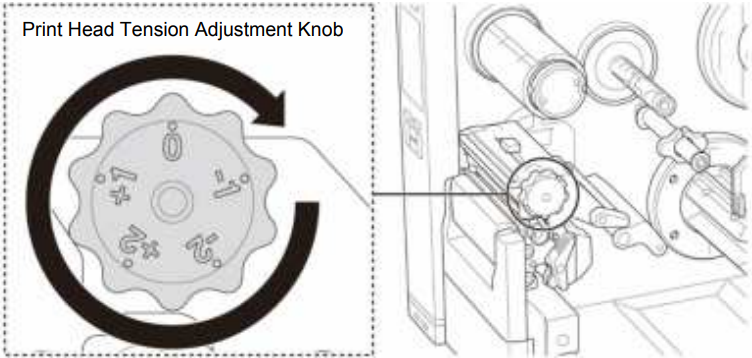
For labels (less than 2″ width), set the Print Head Tension Position Adjustment Slider as close to the label center as possible to prevent unnecessary friction between the Print Head and the Platen Roller.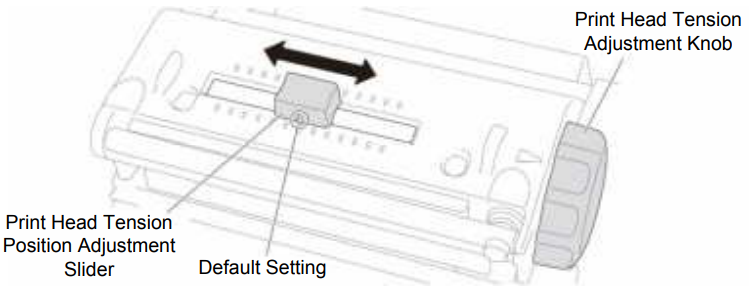
Wrinkled Labels
Wrinkles can occur due to many factors, including media width and thickness, Print Head pressure balance, ribbon film characteristics, and print density/darkness settings.
Adjust Ribbon Tension
To avoid wrinkled labels, adjust the ribbon tension using the Ribbon Tension Adjustment Screw. 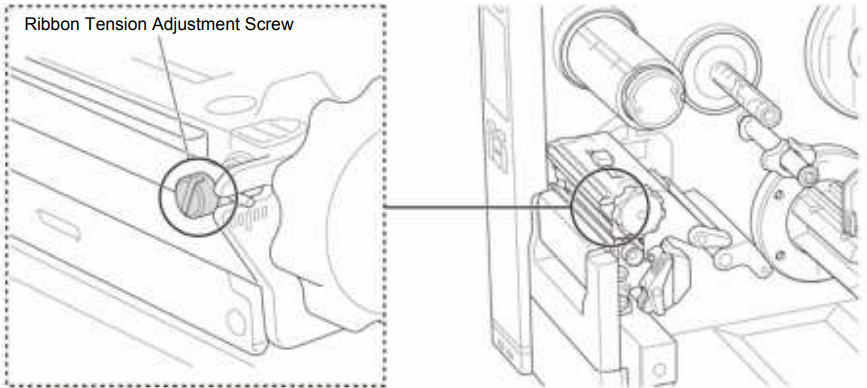
The Ribbon Tension Adjustment Screw has five levels for adjustment. 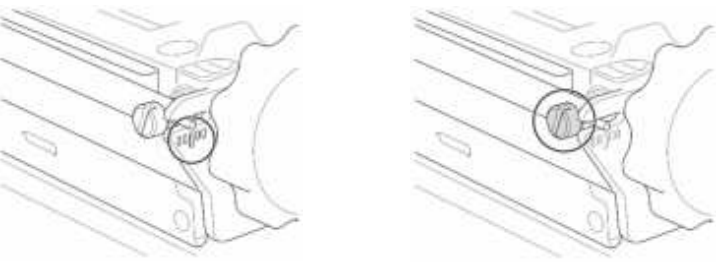
The Print Head Tension Adjustment Knob has five setting levels. 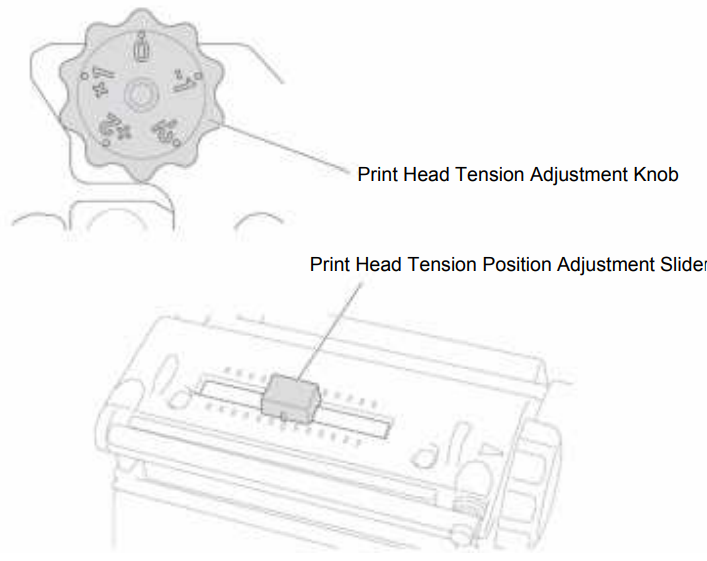
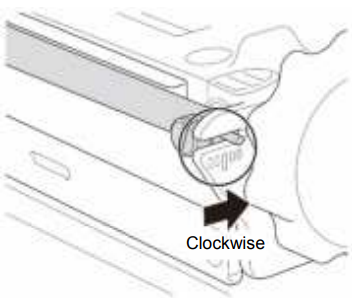
- Turn the Ribbon Tension Adjustment Screw clockwise once per level on the Ribbon Tension.
- If the Ribbon Tension Adjustment Screw is positioned on the innermost side but the ribbon wrinkle has not improved, move the Print Head Tension Position Adjustment Slider one level at a time, print the label again, and check if the wrinkle is gone.
- If the ribbon wrinkle still has not improved after moving the Print Head Tension Position Adjustment Slider, turn the Print Head Tension Adjustment Knob one level at a time again and check if the wrinkle is gone.
Printing
The model name and serial number are located on the back of the printer. Make sure you download the correct driver for your model.
USB Connection
- Connect your printer to the computer using a USB cable.
- Visit support.brother.com, go to your model’s Downloads page, and download the latest
printer driver and software. - Run the Seagull Driver Wizard application and select Install printer drivers and USB.
- Follow the on-screen instructions.
Bluetooth Connection
Check the Bluetooth Local Name:
- BPM: Connect the printer to the computer using a USB cable. Click Printer Configuration > Bluetooth.
- LCD: Select Interface > Bluetooth.
- Turn on the Bluetooth feature on your computer and then pair it with a printer by selecting Start > Settings > Devices > Bluetooth & other devices and enabling Bluetooth. Then, select Add Bluetooth or other device and select a printer. Run the Seagull Driver Wizard application and select Install printer drivers and Bluetooth.
Wi-Fi Network Connection
Make sure both your wireless router/access point and your printer’s network settings are correctly set up. For more information, see the documentation provided with your wireless router/access point, or contact the router manufacturer, your system administrator, or Internet service provider.
- Configure the network settings.
- Connect your printer to the computer using a USB cable.
- Click Printer Configuration > Wi-Fi.
- Specify SSID, Encryption, and Key (Network Password), and then click Set.
- Click Get. Click Printer Function > Configuration Page.
- The network settings are printed. Confirm that the printer’s IP address is correct.
- Run the Seagull Driver Wizard application and select Install printer drivers and Network.
- Select your printer, and then click Next.
- If your TCP/IP port does not appear in the list, click Create port and select Standard TCP/IP port > New Port. Type your printer’s IP address and port name, and then click Next.
- Click Finish. Return to the Specify Port window and select the port you created.
Wired Network Connection
- Connect both the printer and the computer to your router/access point using LAN cables.
- The printer automatically receives a default IP address and displays it on the screen.
- Run the Seagull Driver Wizard application and select Install printer drivers and Network.
- Select your printer, and then click Next.
- If your TCP/IP port does not appear in the list, click Create port and select Standard TCP/IP port > New Port.Type your printer’s IP address and port name, and then click Next.
- Click Finish. Return to the Specify Port window and select the port you created.
- Follow the on-screen instructions.
Create and Print Labels Using BarTender
BarTender is a label creation tool that can be downloaded for free from the product’s page at
support.brother.com.
- Launch BarTender.
- Follow the on-screen steps to create a label.
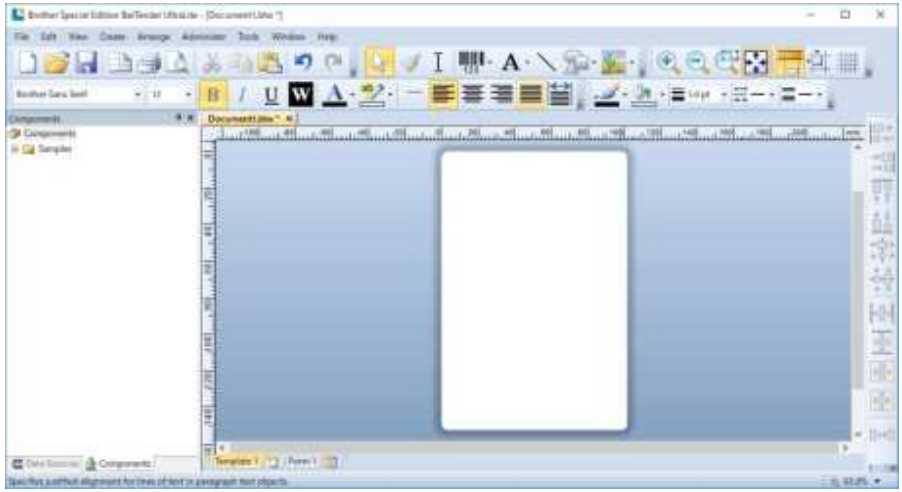
- Click File > Print to print the label.
Operation
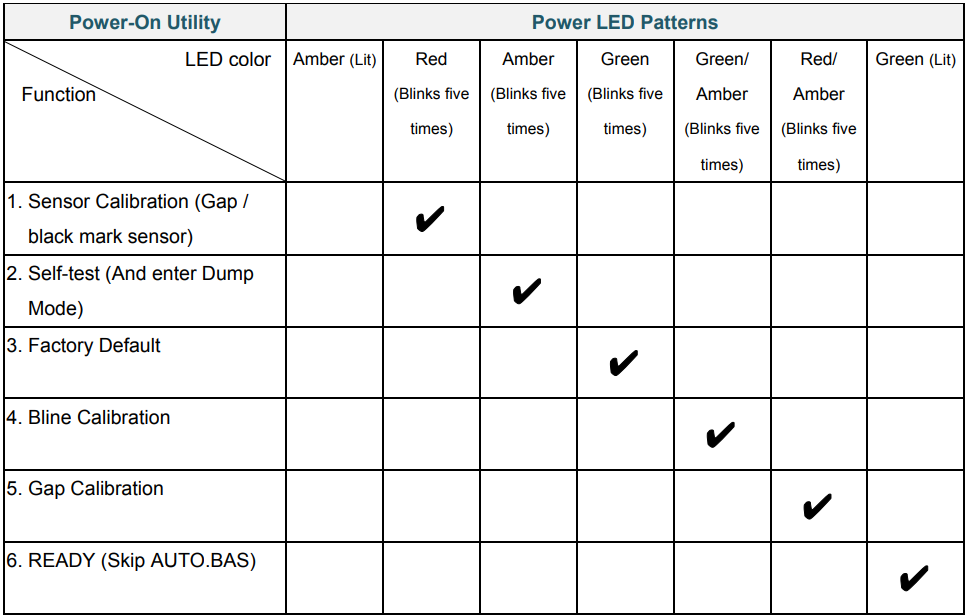
There are various power-on utilities to set up and test the printer’s functions.
Use power-on utilities to set sensor calibration, self-test, and factory default functions.
- Turn off the label printer.
- Press and hold the right Selection button, and then turn on the Power Switch.
- Release the button when the function you want to set or test appears on the screen.
Ribbon and Gap
Calibrate the Gap/Black Mark Sensor sensitivity when:
- You purchase a new printer.
- You change lthe abel stock.
- The label printer initializes.
To calibrate the Ribbon and Gap/Black Mark Sensors:
- Turn off the printer.
- Press and hold the right Selection button, and then turn on the Power Switch.
- Release the button when Sensor Calibration appears on the screen.
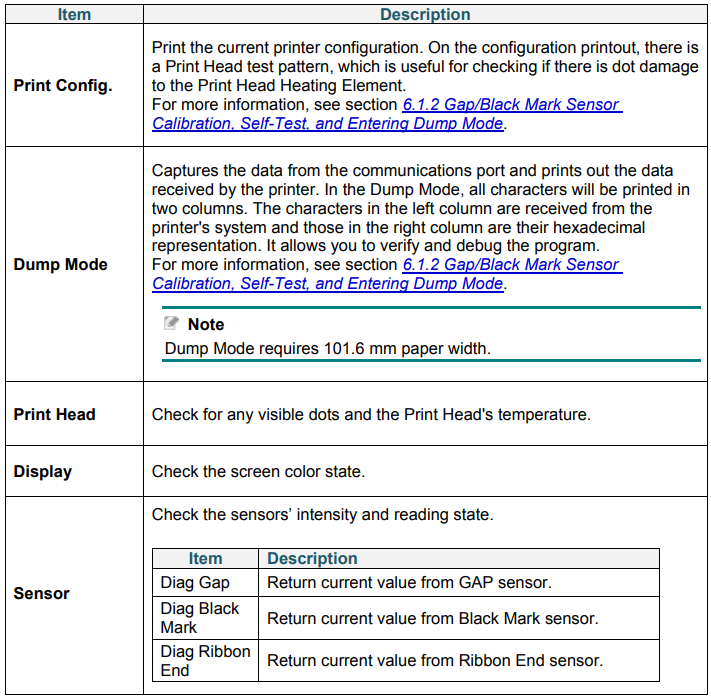
Calibrate the Gap or Black Mark Sensor if the sensor’s settings used in the last print job are not suitable for the current print job. During the calibration of the Gap/Black Mark Sensor, the printer detects the label length, prints the internal configuration (self-test), and then enters Dump Mode. To calibrate the Gap/Black Mark Sensor
- Turn off the printer.
- Press and hold the right Selection button, and then turn on the Power Switch.
- Release the button when the self-test appears on the screen.
- The printer calibrates the sensor and detects the label length, prints the internal settings, and then enters Dump Mode.
Self-test
Print the printer configuration after you run Gap/Black Mark Sensor calibration. The self-test printout lists the printer’s configuration and available memory, and can indicate if there is any dot damage on the heater component.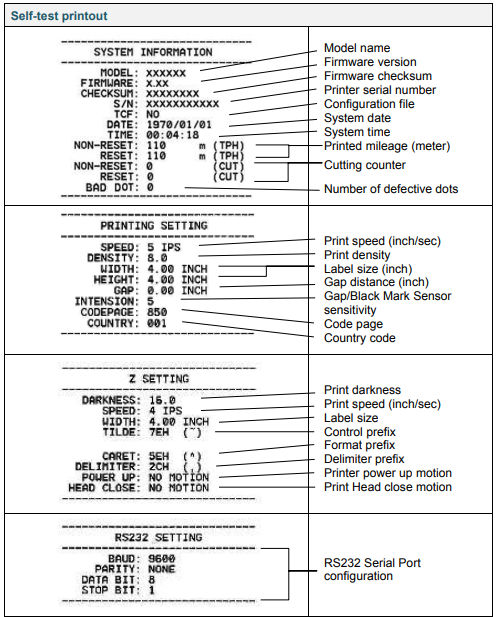
Dump Mode
The printer enters Dump Mode after printing the printer configuration. Dump Mode allows users to verify and debug the printer’s programs. The characters in the left column are received from the printer’s system, and those in the right column are their hexadecimal representation.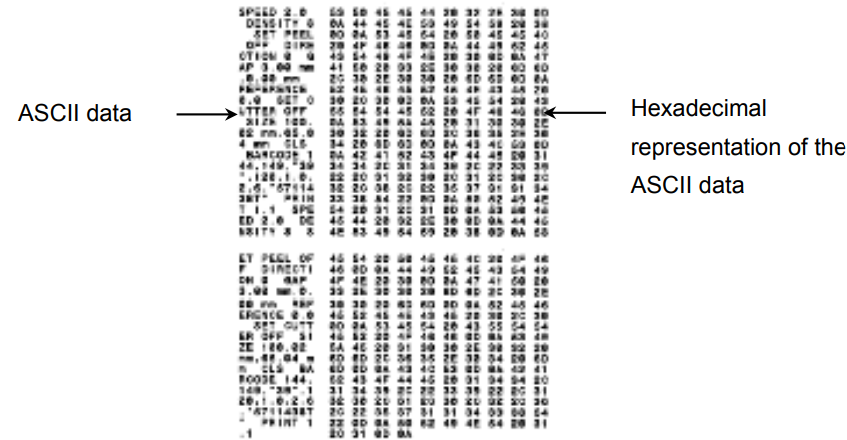 Printer Initialization
Printer initialization clears the printer’s DRAM and restores its factory settings.
- Turn off the printer.
- Press and hold the right Selection button, and then turn on the Power Switch.
- Release the button when Factory Default appears on the screen.
After the initialization, the following factory settings will be restored.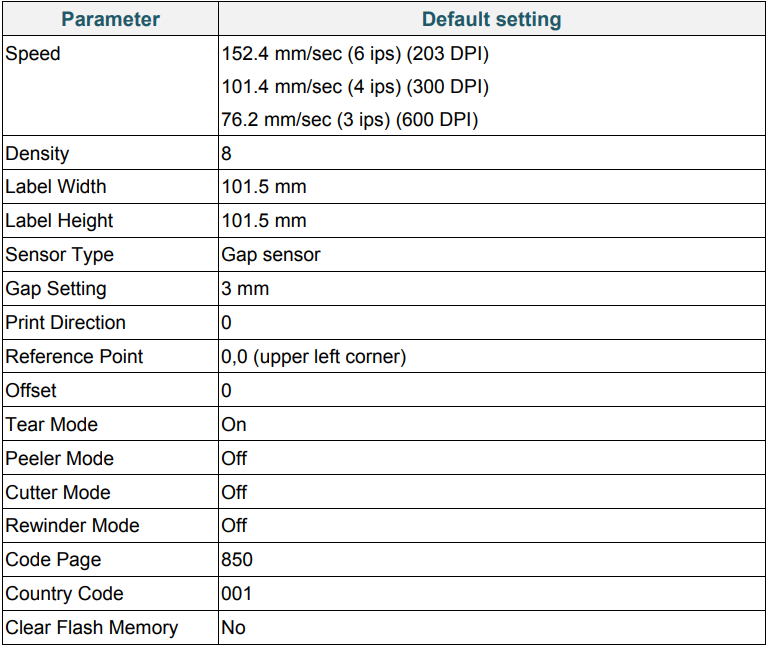
Media Sensor Calibration
- Turn off the printer.
- Press and hold the right Selection button, and then turn on the Power Switch.
- Release the button when Bline Calibration appears on the screen.
Media Sensor Calibration
- Turn off the printer.
- Press and hold the right Selection button, and then turn on the Power Switch.
- Release the button when Gap Calibration appears on the screen.
Skip the AUTO.BAS Program
You can upload the AUTO.BAS program to the printer’s flash memory so that it runs automatically at startup, but if you do not want it to run automatically, follow these steps:
- Turn off the printer.
- Press and hold the right Selection button, and then turn on the Power Switch.
- Release the button when READY (Skip AUTO.BAS) appears on the screen.
- The printer will start without running the AUTO.BAS program.
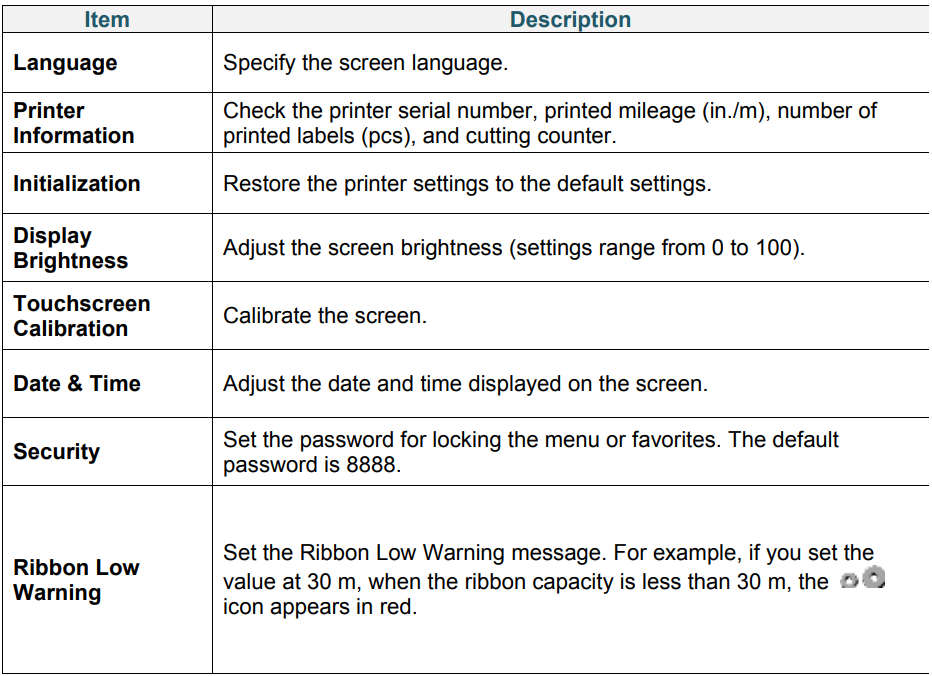
Change Printer Settings
- From the Main Menu, select Settings.
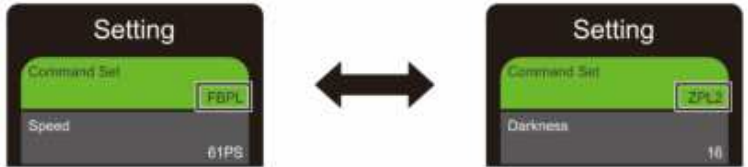
- Select the programming language you want in Command Set.

- Press the button under the icon.
TJ-4422TN
- In the Main Menu, tap Settings.
- Tap Command Set, and then select the programming language you want.
- Tap the icon.
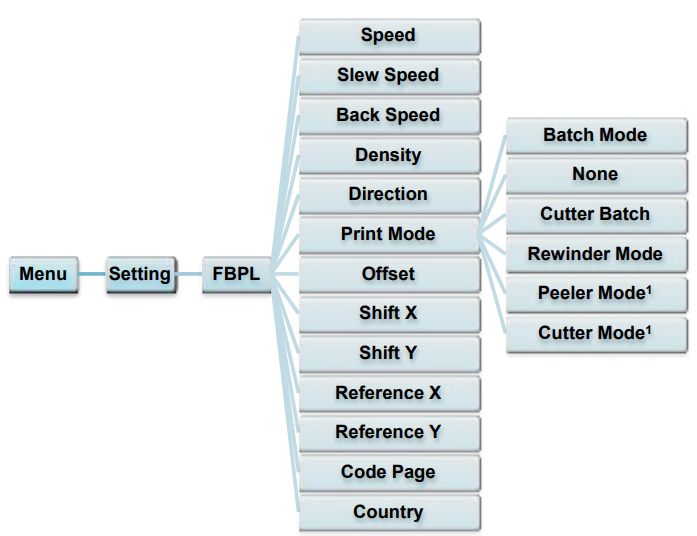
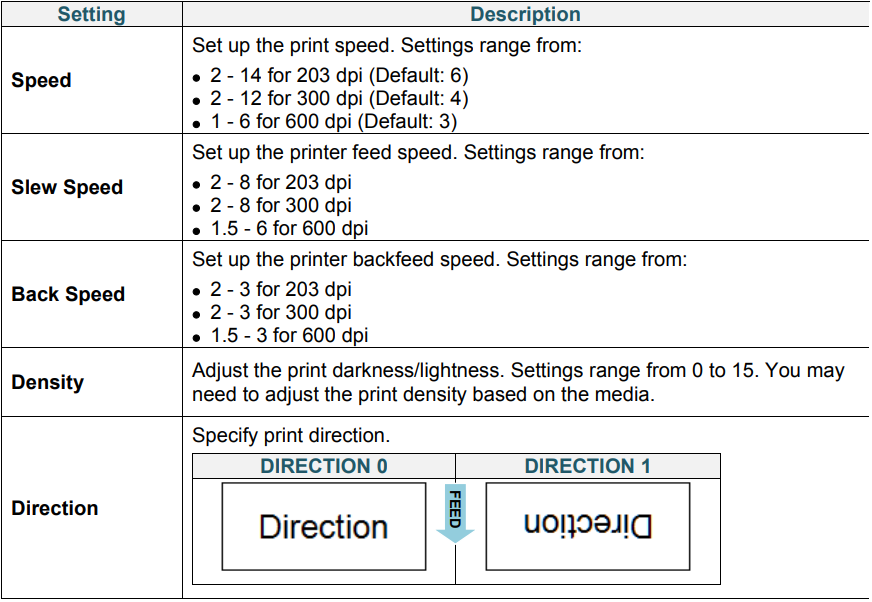
FBPL Settings
Available FBPL settings.
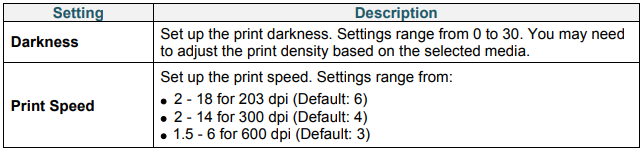
Available ZPL2 settings

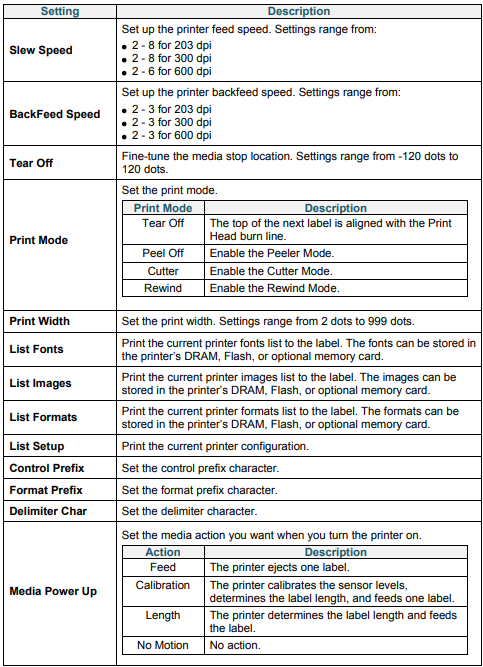

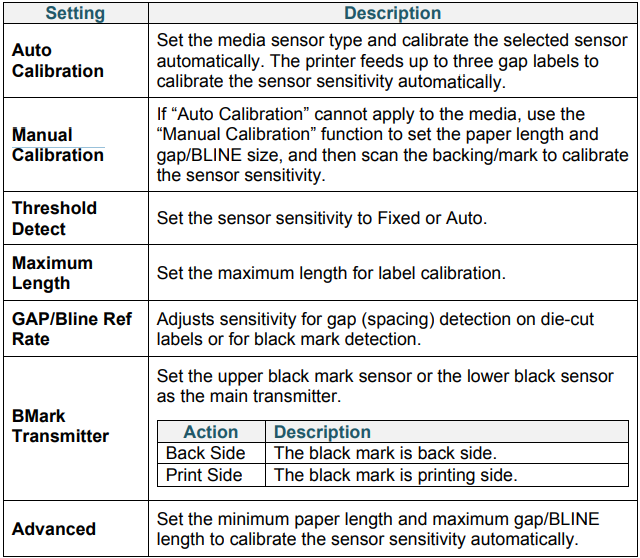
Sensor Settings
We recommend calibrating the sensors every time you change the media.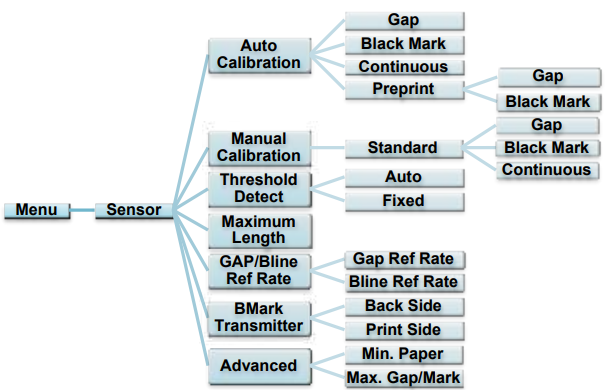
Interface Settings
Set the printer interface settings.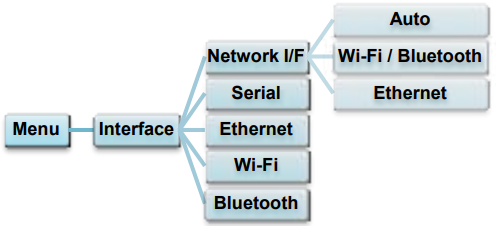
Network I/F setting
Set the network interface as Wi-Fi / Bluetooth or Ethernet
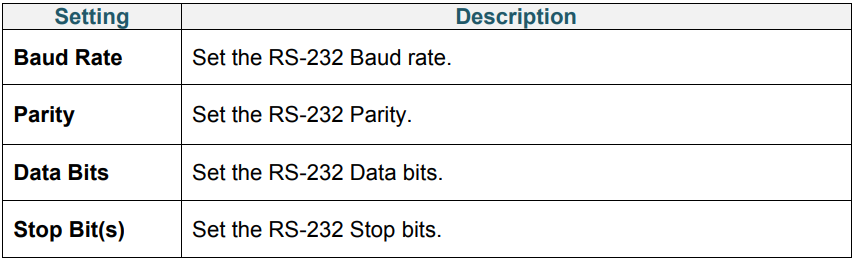
Serial Communication Settings
Set theprinter’sr RS-232 settings.
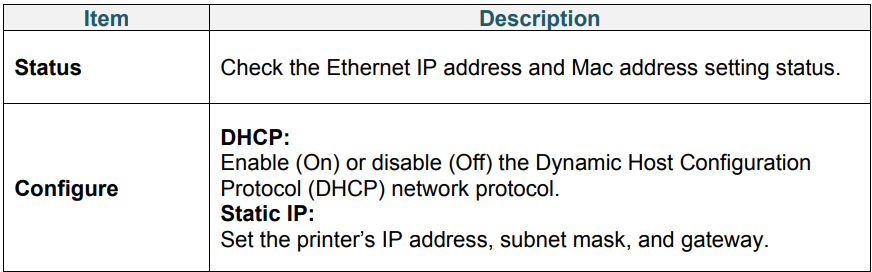
Ethernet Settings
Configure your printer’s Ethernet (wired) connection and check its status. When the Ethernet is connected, the Ethernet icon and IP address appear on the screen as shown below.
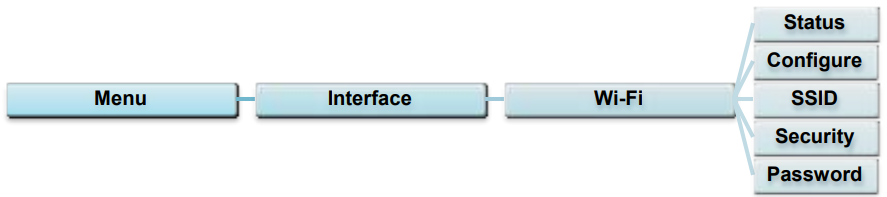
Wi-Fi Settings
Configure your printer’s Wi-Fi connection and check its status. To use this feature, set up the Enterprise configuration using the Brother Printer Management Tool (BPM). For more information on setting up Wi-Fi using the BPM, see the Brother Printer Management Tool Quick Start Guide on your model’s Manuals page at support.brother.com. When the Wi-Fi Interface is connected, the Wi-Fi icon and IP address appear on the screen as shown below.

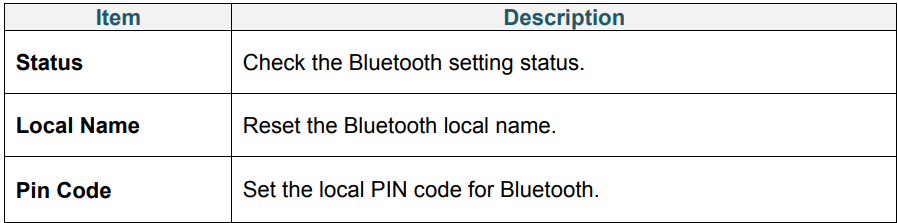
Bluetooth Settings
Configure your printer’s Bluetooth connection, check its status, and reset the local name. Enable the Bluetooth feature to allow your mobile device to discover and connect to your printer.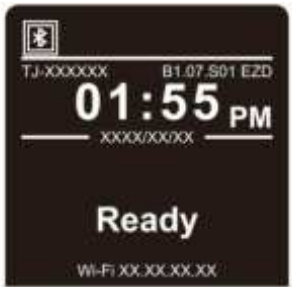

Advanced Settings

File Manager
Check the printer’s available memory, show the files list, delete the files, or run the files that are saved in the printer’s DRAM/Flash/Card memory.

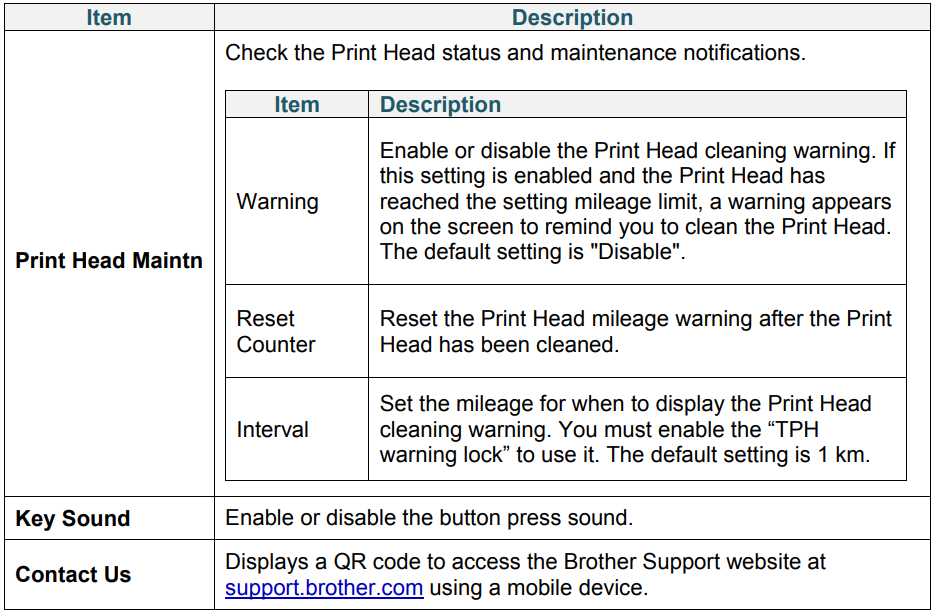
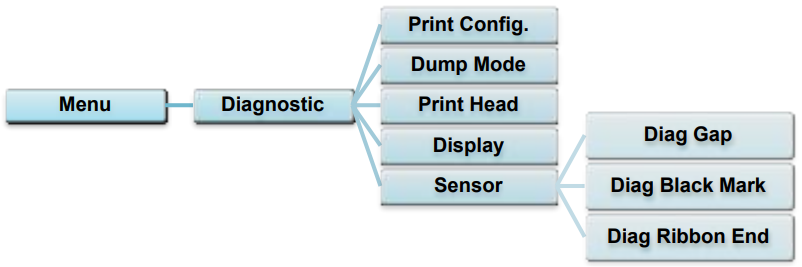
Diagnostic Functions
Brother Printer Management Tool
The Brother Printer Management Tool (BPM) is an integrated tool that lets you:
- Check a printer’s status and settings
- Change printer settings
- Send additional commands to a printer
- Download graphics and fonts
- Create a printer bitmap font
- Download and update firmware
- Configure the wireless LAN (Wi-Fi) and Bluetooth settings. Using this tool, you can also review your printer’s status and settings to troubleshoot any problems.
Start the BPM
Double-click the BPM icon to start the software.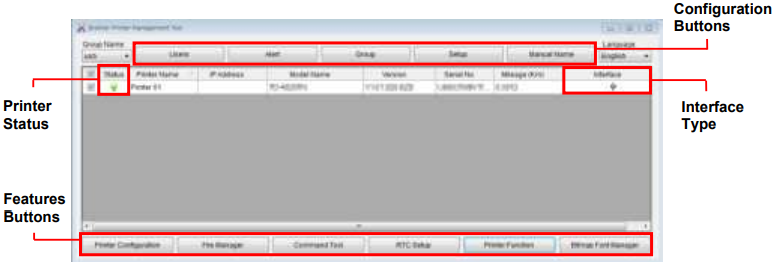
The BPM’s main screen allows you to access the following options:
- Printer Configuration
- File Manager
- Command Tool
- RTC Setup
- Printer Function
- Bitmap Font Manager. For more information, see the Brother Printer Management Tool Quick Start Guide on your model’s Manuals page at support.brother.com.
Using the BPM
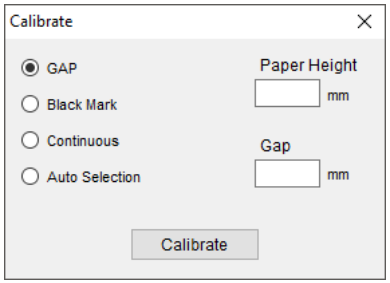
Use the BPM to set the media sensor type (Gap Sensor or Black Mark Sensor) and calibrate the selected sensor.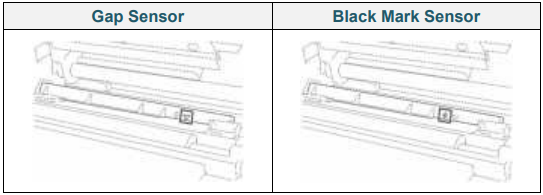
The Gap Sensor (transmissive sensor) detects the beginning of the label,l and the printer feeds the label to the correct position. The Black Mark Sensor (reflective sensor) detects the mark, and the printer feeds the media to the correct position.
- Make sure the mediaalready installedledl, led,d, and the Print Head is closed. (See section
- Load the Media.)
- Turn on the printer.
- Start the BPM.
- Click the Printer Function button.
- Click the Calibrate button.
- Select the sensor media type and click Calibrate.
Product Specifications
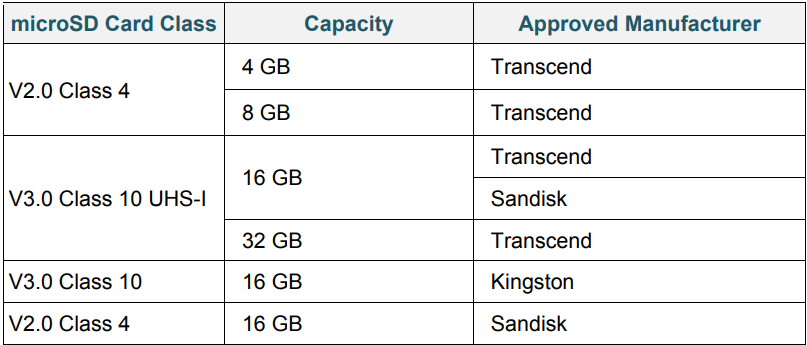
Recommended microSD Cards
Troubleshooting
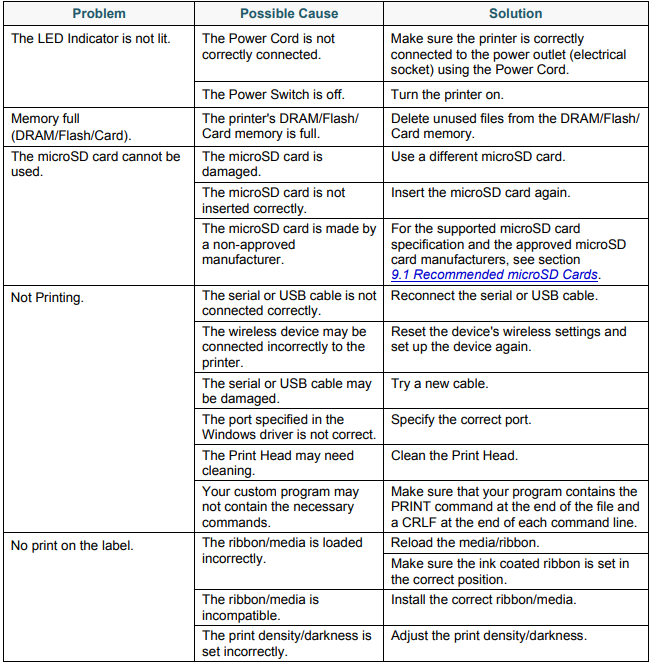
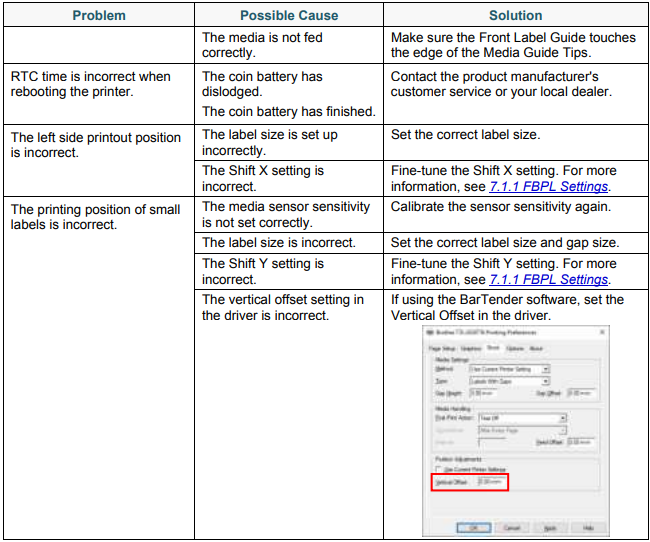
Common Problems
This chapter explains how to resolve typical problems you may encounter when using the printer. If you have any problems with the printer, first make sure you have performed the following tasks correctly. If you still have problems, contact the product manufacturer’s customer service or your local dealer.
Error Messages
When an error occurs, the screen displays the appropriate error message.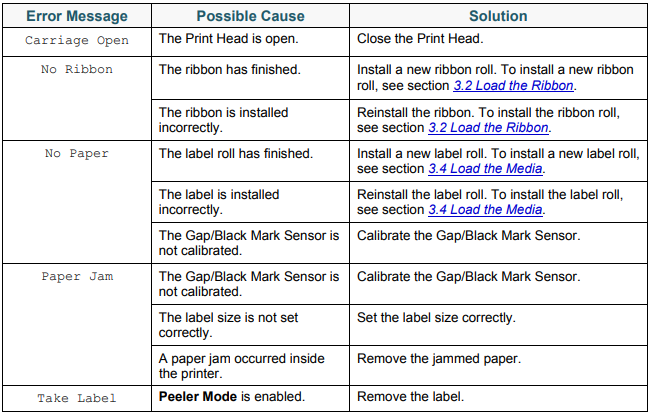
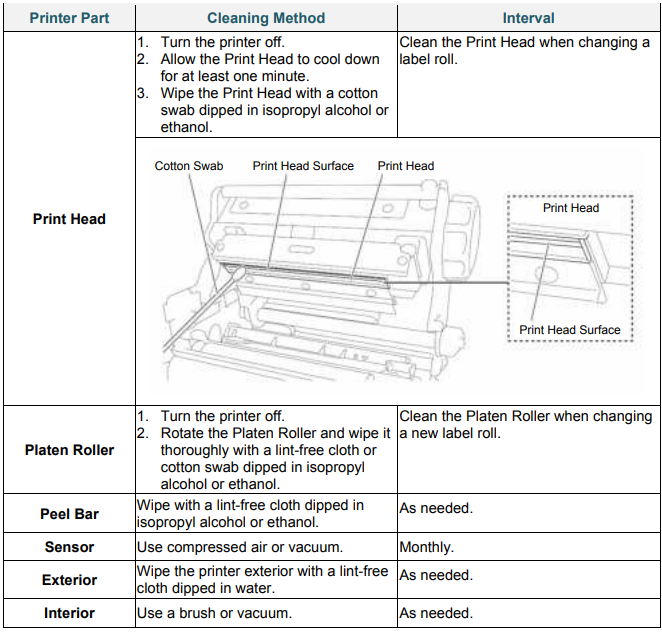
Maintenance
We recommend cleaning your printer on a regular basis to maintain its correct performance.Recommended cleaning materials:
- Cotton swab
- Lint-free cloth
- Vacuum / Blower brush
- Compressed air
- Isopropyl alcohol or ethanol
Customer Support
- Website: support.brother.com
- Tel: 1-877-276-8437