


Swellpro Splashdrone 4 Waterproof Drone
Product Overview
The SwellPro SD4 (SplashDrone 4) is the latest evolution of the water-resistant drone. This all-new drone represents over seven years of design improvements and experience – resulting in the most powerful all-digital floating & flying platform SwellPro has ever built. A new benchmark for water-resistant drones. Simply put, there is no drone in the worldlike it. With its modular multi-functional payload system, open interface design, and surface navigation mode, the SwellPro SplashDrone 4 can quickly adapt to different tasks in the field. The SplashDrone 4 is the 5th generation of water-resistant drone from SwellPro – the pioneer and innovator of water-resistant drones worldwide.
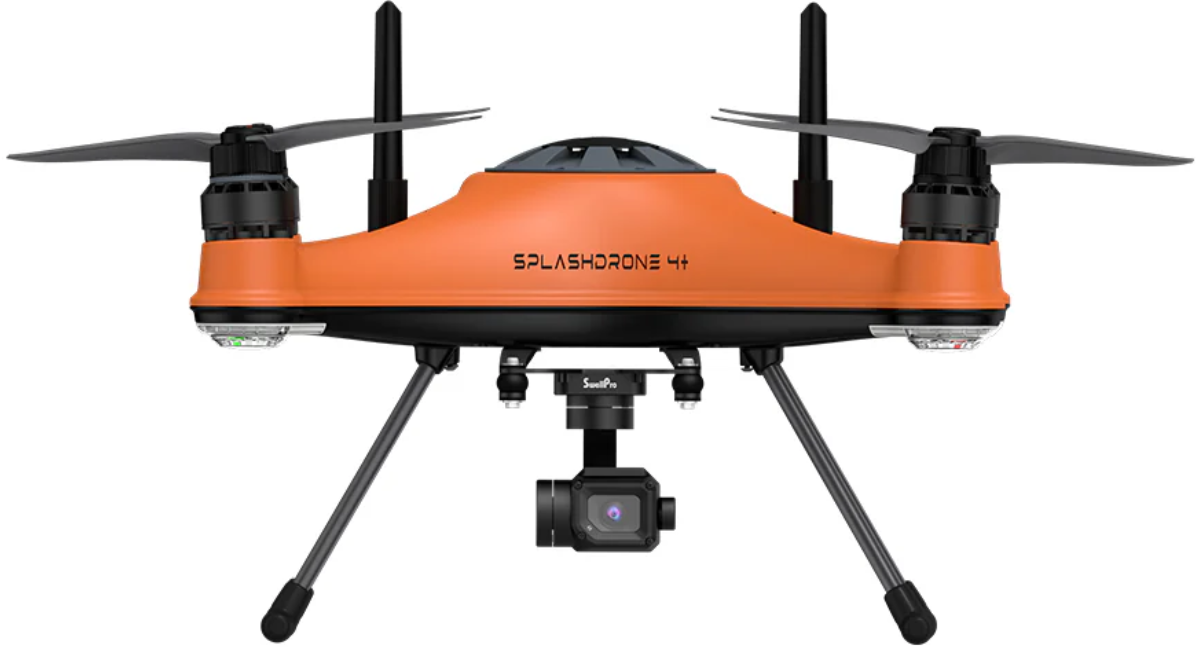
Aircraft Diagram

- Strobe Light
- CW (clockwise) Propeller
- Water resistant Motor
- Rear Arm Light
- CCW (Counter-clockwise) Propeller
- Landing Gear
- Antennas
- Battery Status Indicator
- Gimbal Camera Port
- Payload Accessory Port
- SDK Port
- USB Port and Pairing Button
- Power Button
- Battery Hatch
- Battery Hatch Lock
- Front Arm Light
- Compass Sensor
- GPS Cover
Remote Controller Diagram
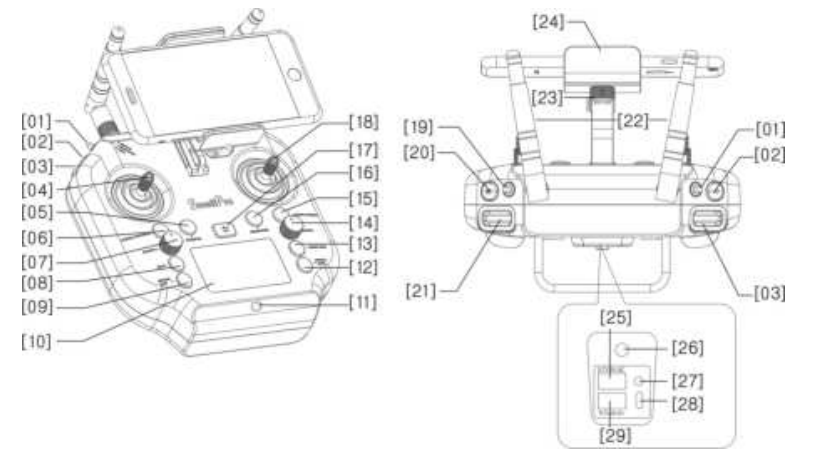
- Automatic Landing Gear Toggle
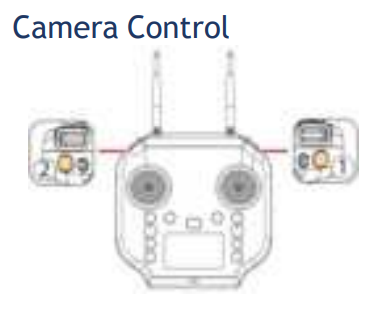
- Video Button
- Gimbal Pan/Tilt Roller
- Left Joystick (Throttle/Yaw)
- Follow Me Button
- Smooth+ Yaw Switch Button
- Smooth+ Yaw Knob
- Boat Mode Switch Button
- Left Payload Release Button
- Display Screen
- Charging Indicator
- Right Payload Release Button
- Gimbal Mode Switch Button
- Smooth+ Roll Knob
- Smooth+ Roll Switch Button
- RTH Return Home Button
- Power Button
- Right Joystick (Pitch/Roll)
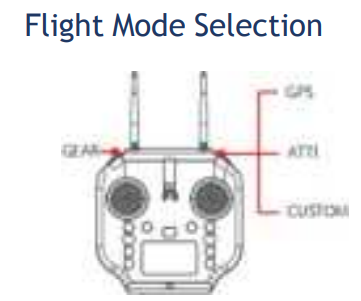
- Flight Mode Toggle
- Photo Button
- Gimbal Pitch Roller
- Antennas
- Phone/Tablet Mount Adjustment Knob
- Phone/Tablet Mount
- Serial Port
- Charging Port
- Reset Button
- Micro USB Port
- Ethernet Port
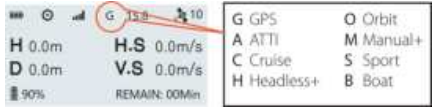
Remote Controller Screen
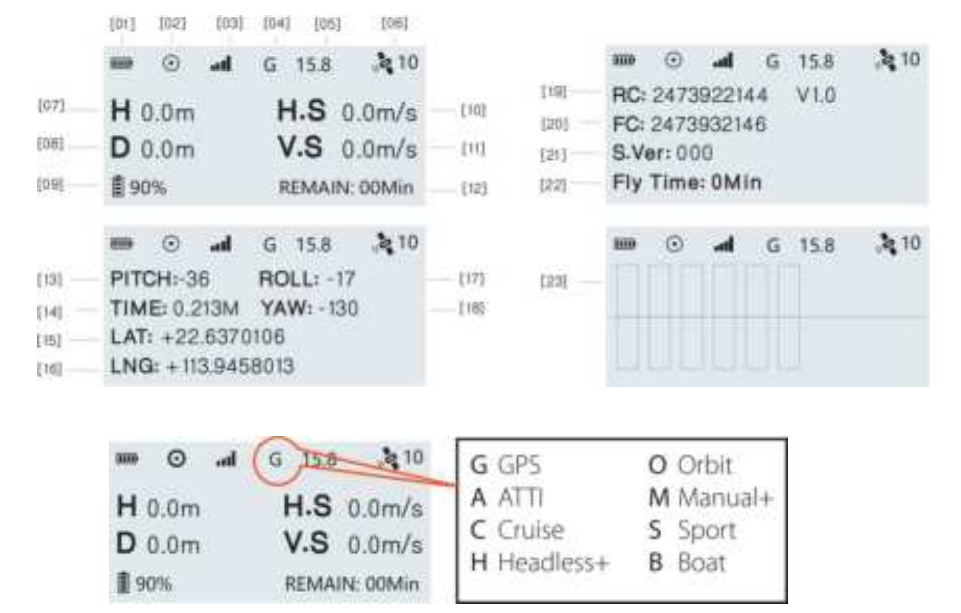
- Remote controller Battery Level
- Remote controller GPS Signal *1
- Drone Signal Strength/Pairing Status
- Flight Mode
- Drone Battery Voltage (V)
- Drone GPS Location Accuracy *3
- Drone Height from Take-off Point
- Drone Distance from Take-off Point
- Drone Battery Level
- Horizontal Flight Speed
- Vertical Flight Speed
- Estimated Remaining Flight Time
- Pitch Angle
- Total Flight Time
- Drone Latitude *4
- Drone Longitude *4
- Roll Angle
- Yaw Angle
- Remote controller Serial Number & Firmware Version
- Flight Controller Serial Number
- Flight Controller Firmware Version
- Joystick and Control Input
- Total Flight Time
Setting Up the Drone
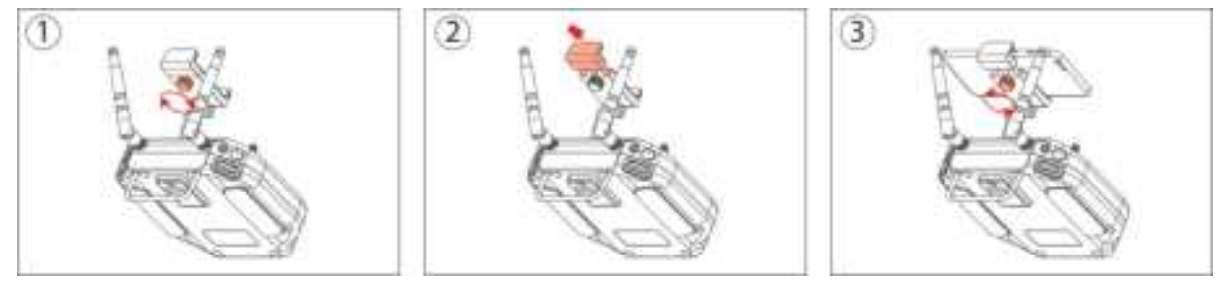
Install Propellers
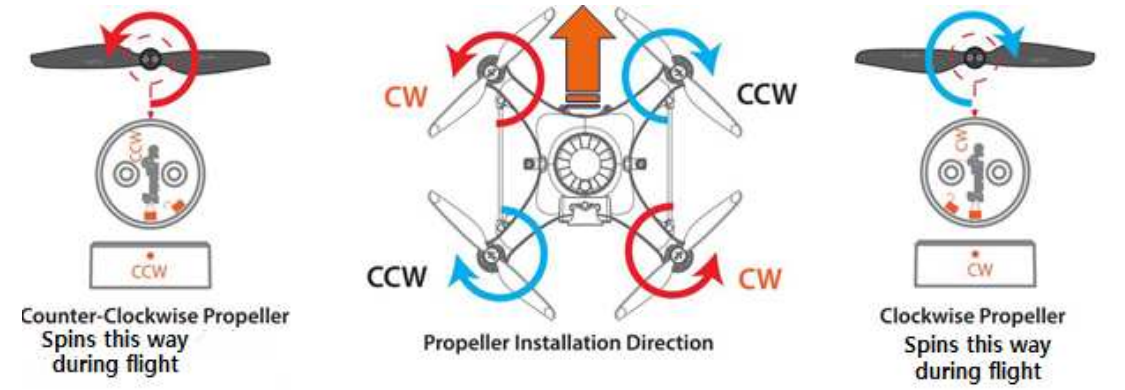
The SplashDrone 4 has two pairs of propellers – two clockwise propellers and two counter-clockwise propellers. The hub of each motor shows the type of propeller used for that motor. Propellers should not be attached to the wrong motors.
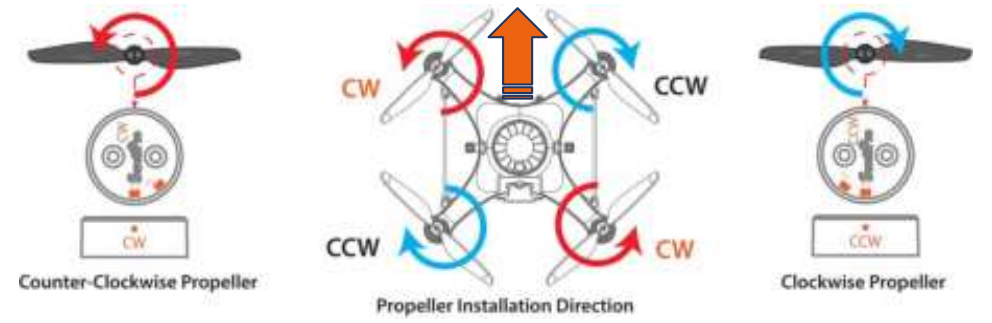
To install or remove propellers:
- Check the propeller’s marking (CW/CCW) to see if it matches the motor.
- CCW propellers to CCW motors, same for CW.
- Place the propeller on the motor, and rotate the propeller in the hub for 1/8th of a turn until it engages.
- Hold the arm of the aircraft tight with one of your hands.
- Rotate the propellers in the direction indicated by the lock signs with your other hand.
- To remove the propeller, repeat steps 3 and 4.
Always place one hand under the motor to support it when installing or removing propellers. Failure to provide this support could result in bending or breaking the landing gear. The blades are sharp; please be careful to avoid injury. Spin each propeller by hand to check that the motors are free of sand or salt and spin freely.
Install the Intelligent Battery
The Intelligent battery is quick and easy to change. Ensure the battery is OFF before inserting or removing it from the drone.
- Unlock and open the water-resistant hatch.
- Slide in the fully charged intelligent battery and push it into the battery slot.
- Close the battery hatch. Fasten the catch and then lock the hatch.
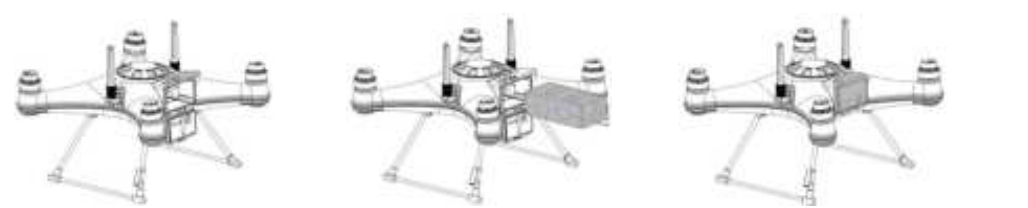
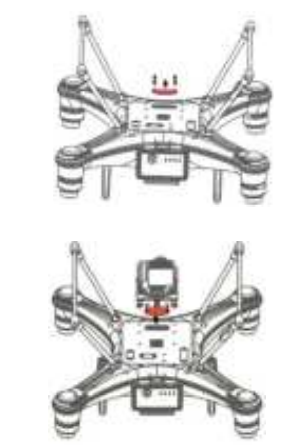
Install the Camera/Accessories
- Unscrew and take off the gimbal port cover plate using a hex screwdriver.
- Plug the gimbal connector into the drone’s gimbal port and screw it in place with a screwdriver.

- Align the holes on the base of the gimbal to the bottom of the drone, and screw in to mount the gimbal. Make sure the camera is pointing to the front of the drone.

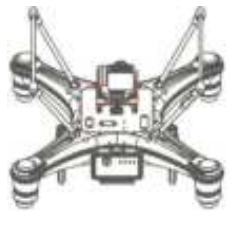
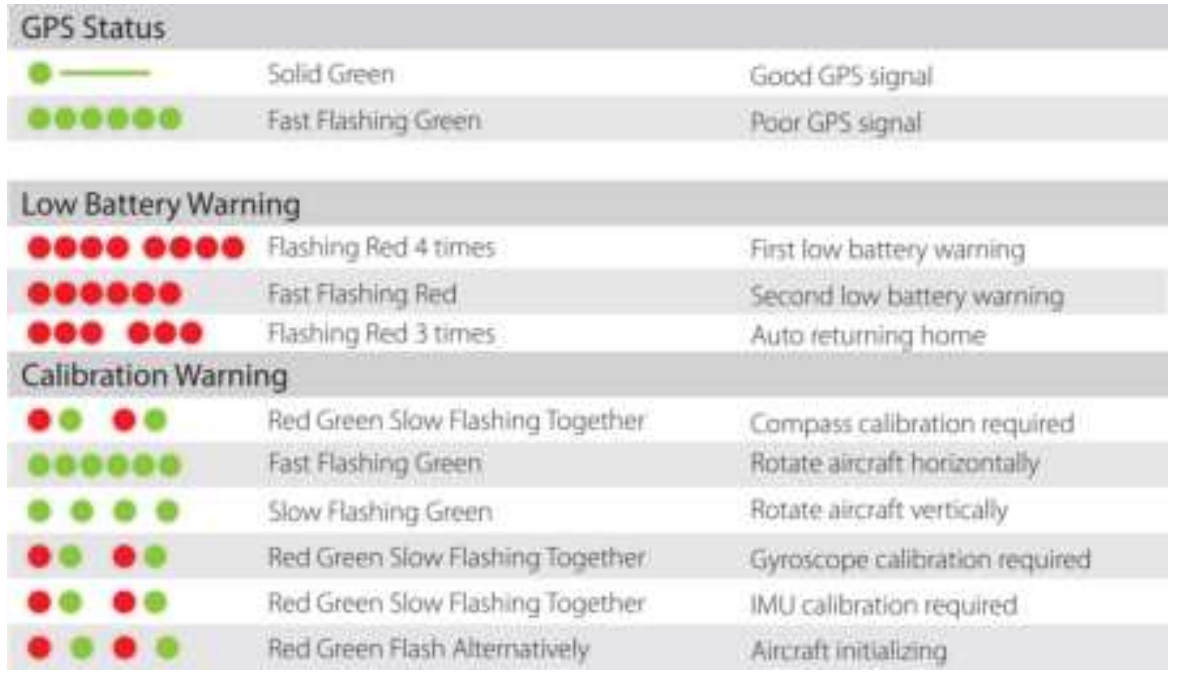
Status Indicator
There are two types of aircraft status indicators:
- Aircraft status indicators (red), which are on the front arms.
- GPS signal status indicators (green), which are on the rear arms.
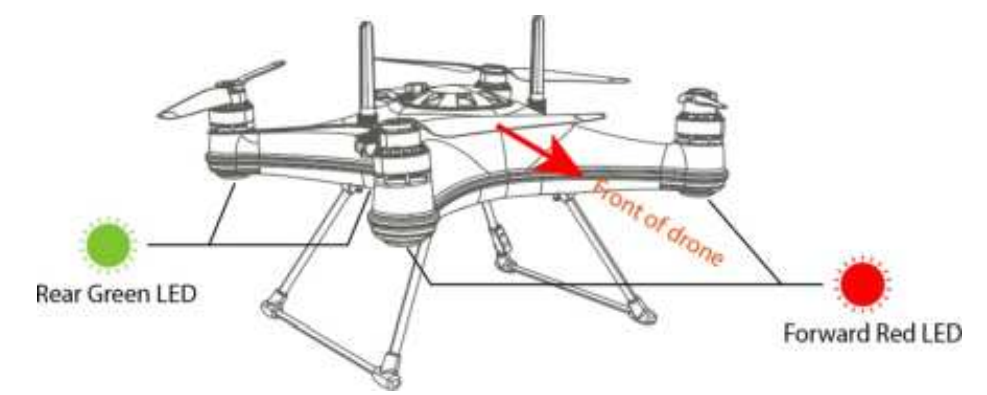
The red LED indicators are used to identify the head of the drone. All aircraft status indicators can be turned on or off in the APP settings. All the status indicator messages are going to be displayed on the remote controller screen or the SDFly App.
Propellers
The SplashDrone 4 has two pairs of propellers – two clockwise propellers and two counter-clockwise propellers. The hub of each motor shows the type of propeller used for that motor. Propellers should not be attached to the wrong motors.
To install or remove propellers:
- Check the propeller’s marking (CW/CCW) to see if it matches the motor.
- CCW propellers to CCW motors, same for CW.
- Place the propeller on the motor, and rotate the propeller in the hub for 1/8th of a turn until it engages.
- Hold the arm of the aircraft tight with one of your hands.
- Rotate the propellers in the direction indicated by the lock signs with your other hand.
- To remove the propeller, repeat steps 3 and 4.
Intelligent Battery
Each slide-in SplashDrone 4 battery has a battery management system, teamed with 6600mAh of high-performance 18650 lithium cells to provide up to 30 minutes of flight time.
The SplashDrone 4 intelligent battery provides:
- Real-time power monitoring and alerting
- Integrated balance charging to ensure battery health, safety, and long life by constantly monitoring battery health, state-of-charge, and temperature.
- Fast, slide-in battery replacement. Integrated connectors allow for wire-free installation and replacement.
- Battery charging and usage data logging to allow for better battery management

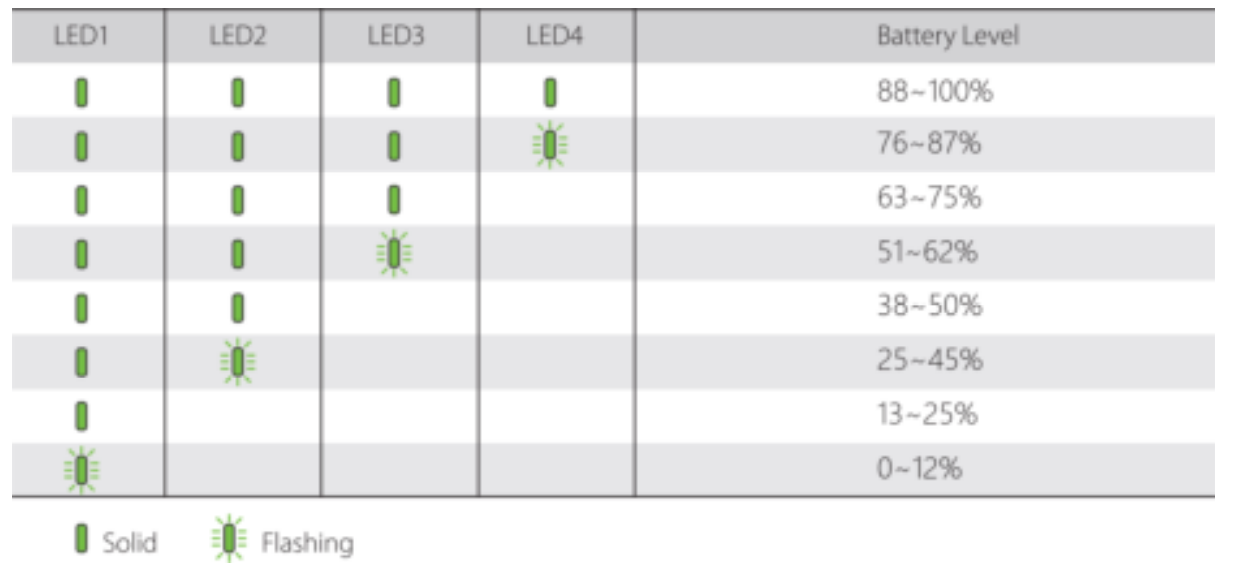
Battery Level
The battery level LEDs on the battery pack allow you to check the state of charge of the battery quickly and accurately. With the Battery turned OFF, short-press the power button – the battery LEDs will indicate the state of charge.
Battery Warning Signs 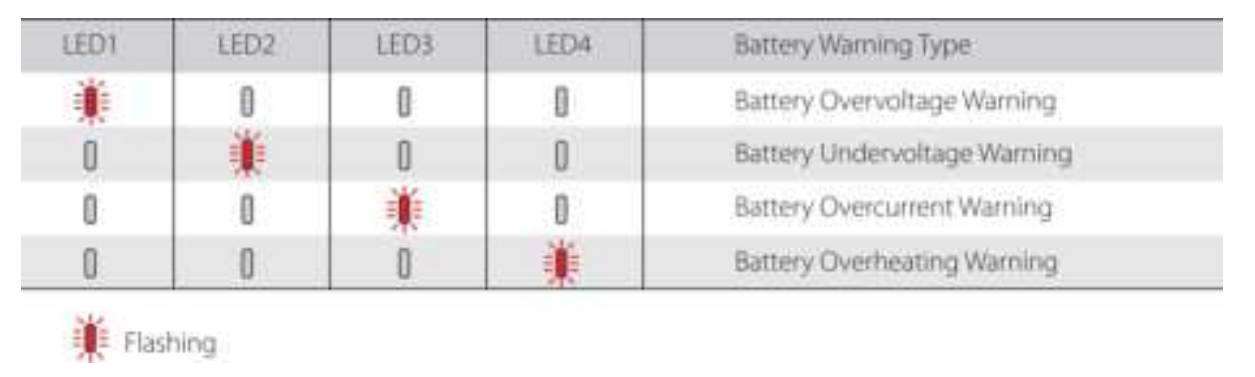
Powering On/Off the Battery
Press the power button once, then press and hold the power button for three seconds to turn the battery on or off.
Charging the Batteries
Your SplashDrone 4 is shipped with partially charged batteries. Ensure the drone battery and the remote controller battery are fully charged before use.

The drone and remote controller batteries can be charged simultaneously using the in-the-box charger.
How to Charge
Refer to the above diagrams to connect the intelligent battery and charger. Press the power button to turn on the intelligent battery, and the battery will enter the charging state. The battery needs to be turned on for charging.
Installing the Intelligent Battery
The Intelligent battery is quick and easy to change. Ensure the battery is OFF before inserting or removing it from the drone.
- Unlock and open the water-resistant hatch.
- Slide in the fully charged intelligent battery and push it into the battery slot.
- Close the battery hatch. Fasten the catch and then lock the hatch.
Low Battery
The SplashDrone 4 has two low battery warnings to help the pilot manage the drone’s battery life. Each time a battery level alarm is activated, the remote controller will beep and vibrate to alert the pilot.
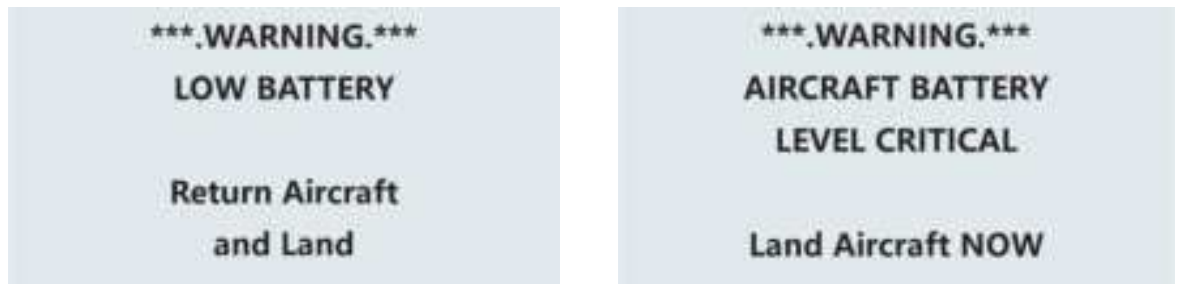
Level 1 alarm: The drone battery level has reached 13.0 V. The remote controller screen will prompt “LOW BATTERY; Return Aircraft and Land”. The front drone status indicators will flash a pattern of 3 red lights. Please find a safe place to land the drone as soon as possible.
Level 2 alarm: The drone battery level has reached 12.0 V. The battery icon on the remote controller screen will flash. The battery level is now below 10%, and you should plan to land the drone safely. The remote controller screen will prompt “AIRCRAFT BATTERY LEVEL CRITICAL; Land Aircraft NOW”.
After 10 seconds, the drone will initiate an in-place auto-landing to protect the drone and battery. The front aircraft status indicators are going to flash red constantly.
To halt the Auto-Landing, switch the drone to ATTI mode to regain control of thedrone. If the pilot continues to fly the drone below 12 V (not recommended), there is a strong risk that the battery will not be able to maintain flight and the drone will fall out of the sky and crash (at the owner’s risk).
Aircraft Antenna
The antennas of the drone can be oriented either upwards or downwards to maximize reception in different situations. The SplashDrone 4 has an effective range of upto 3 km. Due to the way radio frequency travels, when flying 0.5m above the water, the transmission range can be reduced. For the drone floating on the water surface (with the drone antenna upwards), the transmission range reduces to 500m. Generally, upward-pointing antennas improve reception when the drone is floating or flying close to the water surface. Orienting the antennas downwards maximizes range for higher altitude flights. Adjust the antennas’ orientation to maximize range for your flight plan.
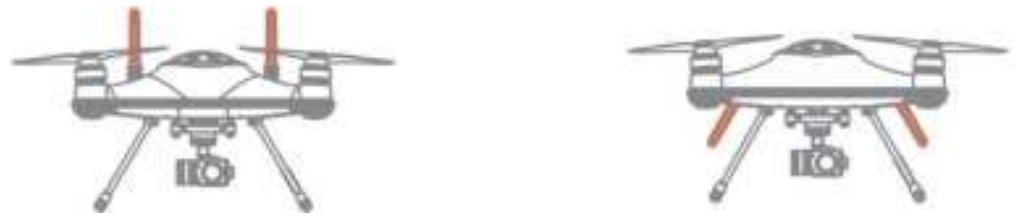
To adjust the antenna position: loosen the antenna nut, adjust the antenna position, and retighten the nut.
Strobe Light
The top of the aircraft is equipped with a high-intensity strobe light, which helps identify the drone’s position to the pilot and other air traffic. This meets the requirements of night flight regulations in some countries and helps ensure flight safety at night. The strobe can be activated and deactivated in the app (STB)
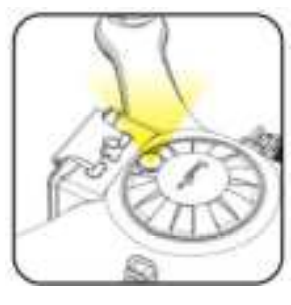
Water-Resistant Barometric Membrane
The water-resistant barometric membrane is SwellPro’s featured technology. It allows air to come through the internal body of the aircraft to keep the barometer functioning properly, while assisting in helping to resist water entry into the SplashDrone 4. The water-resistant barometric membrane is delicate yet an extremely important part for proper flying and water resistance. Therefore, you should pay special attention to the proper use of water resistant barometric membrane during your operation.
- Always check the water-resistant barometric membrane to ensure there is no damage before flying.
- Rinse the water-resistant barometric membrane thoroughly with freshwater after flying.
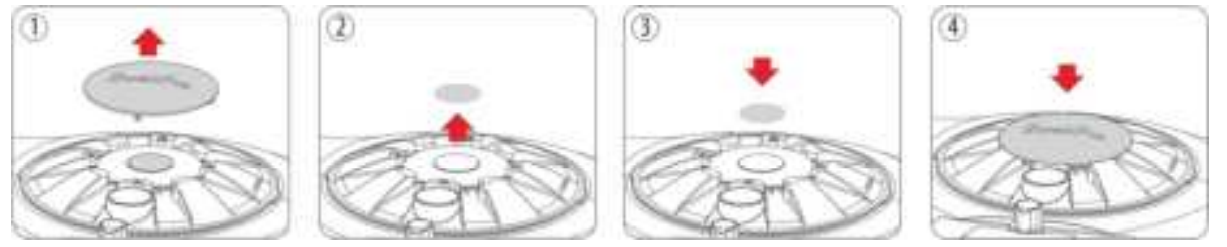
- Take out the top cover. Peel off the old water-resistant barometric membrane.
- Clean the surface barometricvent and make sure there is no residue on the surface. Put the top cover back.
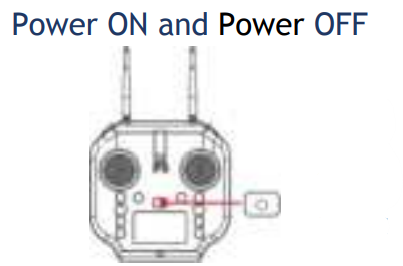
Using the Remote Controller
- Press and hold the Power switch for 3 seconds.
- The Remote controller will power ON.
- Press and hold the Power switch for 3 seconds.
- The Remote controller will power OFF

GPS: Sets the drone to GPS flight mode. ATTI: Sets the drone to ATTI flight mode. CUSTOM: Sets the drone to the user-selected flight mode. This can be changed in the app. The default flight mode is sport mode.

Video: Press the video button once to start video recording. Press again to stop video recording and save the video file. It is important to stop video recording before powering off the drone. Photo: Press the photo button to capture photos.
Tilt Control Roller: Control the tilt angle of the gimbal. Pan Control Roller②: Control the direction of the gimbal.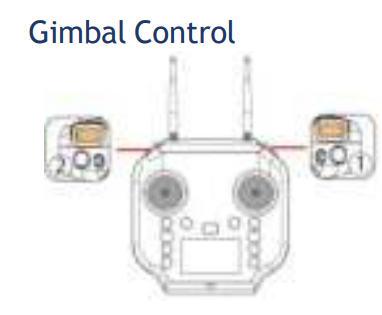
Start Follow Me: Check that the remote controller has a GPS lock by checking the GPS status indicator on thescreen. Press and hold the Follow Me button ①. Theremote controller will beep twice. Stop Follow Me: Short-press the “FOLLOW ME” button, the remote controller will beep once.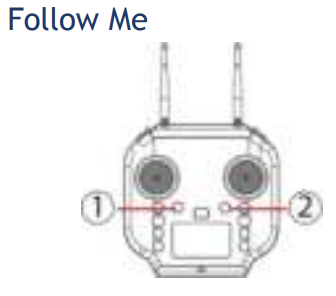
RTH: Long-press the Return Home button ②, the remote controller will beep and vibrate twice to indicate that the drone will initiate the return to home process. The flight mode indicator on the remote controller status bar will change to the letter “R” to indicate the drone is on the RTH process.
Smooth + Controls: The patented “Smooth+” flight control allows the pilot to finely tune the Roll and Yaw of SplashDrone 4. Smooth+ makes professional, steady flight control as easy as turning the knobs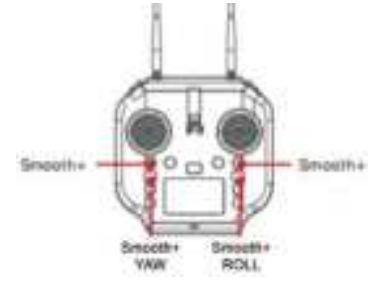
BOAT Button
In Boat mode, the SplashDrone 4 can effectively be controlled like a boat on the surface of the water. With a maximum surface speed of 1m/s. To enter the Boat mode:
- Land or place the drone on the water.
- For landing on the water, lock the drone and wait for the motors to stop spinning.
- Switch the drone to GPS or ATTI mode.
- Arm the drone by using the inward gesture.
- Press the BOAT button on the remote controller.
- The drone now enters the Boat mode.
- Press the BOAT button again to exit Boat mode. The drone can then take off normally.
Controller Rear Ports
- SDK Serial Port: access to flight control data and transparent transmission.
- Charging Port: remote controller charging port
- Pairing Button: used for aircraft and remote controller pairing
- Micro USB: use for remote controller firmware upgrade
- Ethernet Port: This supports the development of computer ground station software to control the aircraft and its airborne equipment.


Attach Mobile Devices
To attach your mobile device to the remote controller: Release the tightening knob behind the mobile device mount, then slide open the mount to accommodate your device, and retighten the knob to secure your mobile device. There is a larger mobile device mount specifically designed for the use of tablets. Visit the SwellPro website for more information.
Charging the Remote Controller
The remote controller can be charged from the in-the-box charger or a standard 5V USB adapter. The LED light on the remote controller will turn red while charging. When the remote controller is fully charged, the LED light will turn off.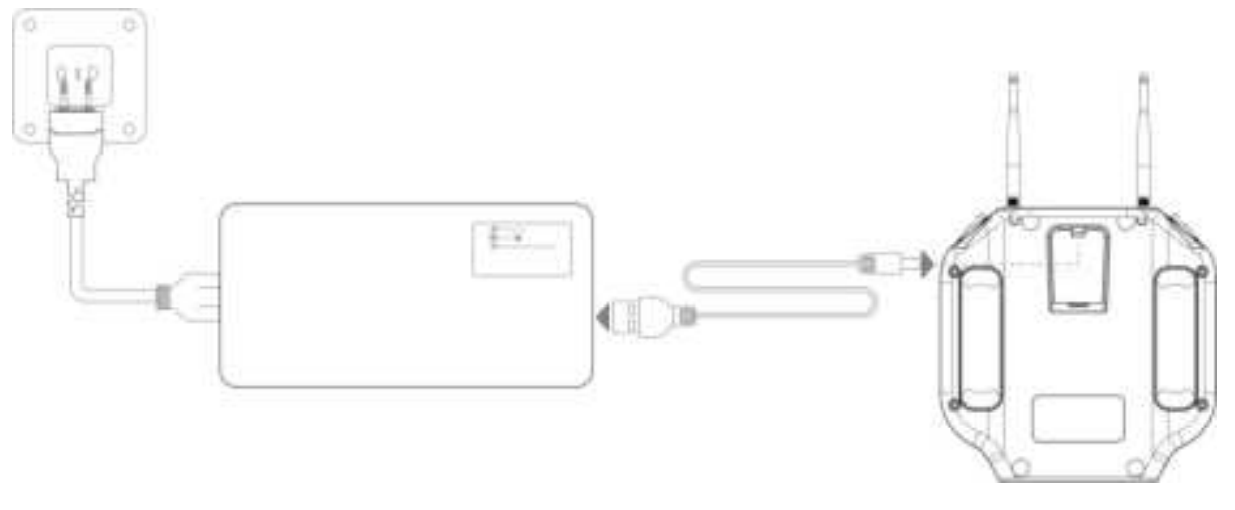
Pairing the Remote Controller
The remote controller and the aircraft are paired in the factory before shipping the product. There is no need to pair them on your first use. Charging the Remote Controller\ Pairing the Remote Controller
ONLY pair the remote controller for the following condition: After powering on the drone and the remote controller for more than one minute, the remote controller signal status bar still shows the Unpair sign as shown below
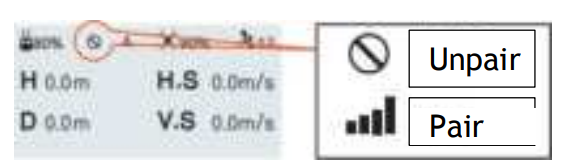
Proceed to the following steps to re-pair:
- Power on both the aircraft and the remote controller.
- Wait for 1 minute, long-press the pairing button of the aircraft for over 5 seconds.
- Double-click the remote controller pairing button.
- The pairing is going to finish in 2 minutes. Repeat the steps when pairing.

Flight
The drone relies on sensitive sensors to control flight positioning and stability. The SplashDrone 4 is flight tested before shipment; however, an initial calibration of the compass is required for your first use. Before operating the drone from a ship or other moving platform, ensure all necessary calibrations have been completed on board, as some calibrations require a completely stable surface.
Safety and Environment
- Please make sure you have a comprehensive understanding of the SplashDrone 4 and all the necessary measures required to implement a successful return home function in the event of an emergency.
- We recommend taking professional training and guidance. When flying, choose an appropriate environment according to your skills. Check all calibrations and choose a large open area to practice.
- Please check with the local NZ Bi-Laws and also the rules and regulations set down by the NZ CAA, and ensure you fully understand them. Before using this product, it remains the duty of the drone pilot to comply with the local laws regarding privacy protection.
- DO NOT fly the SplashDrone 4 under the influence of alcohol, drugs, or any other physical or mental impediment. Do not fly the drone with a malfunctioning remote controller. Please fly the drone away from crowds.
Environment Requirement
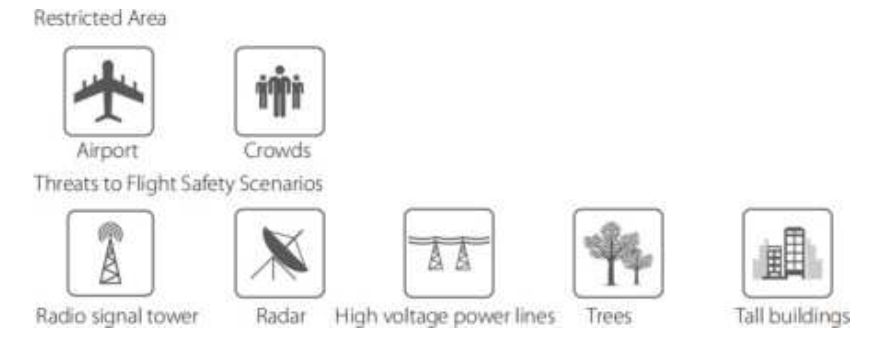
- Flying between or near tall buildings could adversely affect the functioning of the compass and adversely affect or block GPS and transmission signals.
- Avoid flying near areas with high electromagnetic interference, such as power lines or signal towers, to minimize the risk of interfering with the remote controller of the drone.
- Below 4000 meters above sea level, as environmental factors, including air density and wind shear, reduce the performance of the aircraft and battery.
- Before flying in low temperatures, warm the battery to -25°C to maximize flight time. Although the SplashDrone 4 is water resistant, do not fly in fog or strong wind conditions.
Restrictions
According to provisions of the International Civil Aviation Organization and many national air traffic regulations, drones must be operated in specified airspaces. By default, the SplashDrone 4 is configured not to exceed an altitude of 120m above the Home Point altitude. o If you need to cancel the safety fence, please set the flight altitude to 0 through the SDFly app.
Pre-Flight Checklist
- Intelligent batteries, remote controller, and your mobile devices are fully charged.
- Check all propellers are in good condition and correctly installed.
- Manually rotate the 4 motors to ensure they can spin smoothly.
- Make sure the water-resistant barometric membrane is not damaged.
- All the payload modules are tightly mounted to the aircraft.
- The micro SD card has been inserted and tightly sealed.
- SD Fly app is successfully connected to the aircraft.
Compass Calibration
- The drone is brand new. The drone has been repaired.
- Please calibrate every time you fly in a new location or in the same location on a different day.
- The drone has been subjected to strong magnetic fields.
- The drone has crashed or been subjected to heavy shaking.
- The drone sways or drifts excessively during hovering in GPS mode.
Compass Calibration Process
- Place the drone on a level surface, power on the remote controller, then the drone. Wait for the aircraft to connect to the remote controller.
- After the connection finishes, rapidly move the Flight Mode switch back and forth until the aircraft’s rear status indicators flash green, or the remote controller screen prompts “Compass Calibration Rotate TheAircraft Horizontally”. The drone will now perform compass calibration.
- Pick up the aircraft and hold the drone horizontally and rotate clockwise about 2~3 turns until the rear indicators slowly flash green or the remote controller screen prompts “Compass Calibration Rotate The Aircraft Vertically”.
- Hold the drone nose-down and rotate clockwise about 2~3 turns until the remote controller screen prompts “WARNING Aircraft Initializing, Please Wait”.
- Place the drone on a level surface for 30 seconds. When the prompt disappears, power off and restart the drone. The compass calibration is complete.
Gyroscope Calibration
The gyroscope provides stability data to the flight controller.
Process gyroscope calibration for the following situations:
- The drone trembles significantly during hovering in GPS mode.
- The drone’s tilt range is too large during ascent in ATTI mode.
- The drone drifts during ascending or descending in GPS mode.
Gyroscope Calibration Process
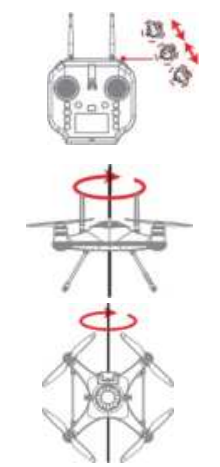
- Place the drone on a level surface, power on the remote controller, then the drone. Wait for the aircraft to connect to the remote controller.
- Hold the left joystick down to its lowest position, then quickly move the right joystick left to right, back and forth, until the front and rear status indicators flash alternately, or the remote controller screen prompts “WARNING aircraft Initializing,
- When the front status indicators flash re,d and the rear status indicators turn solid green, or the “WARNING Aircraft Initializing, Please Wait” prompt disappears, power off and restart the drone. Gyroscope calibration is complete.
IMU Calibration
The Inertial Management Unit (IMU) provides the raw data of the aircraft’s attitude in space in nine dimensions. The IMU accelerometer sensor is critical to balance the aircraft in flight. Proceed with IMU calibration for the following situations:
- The drone cannot arm (unlock) the motors after the compass calibration.
- The drone sways or drifts excessively during hovering in GPS mode.
- The drone has crashed or been subjected to heavy shaking.
- The remote controller screen prompts “WARNING IMU error – Calibrate IMU”.
IMU Calibration Process
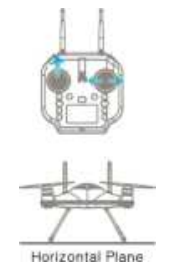
- Place the drone on a level surface, power on the remote controller, then the drone. Wait for the aircraft to connect to the remote controller.
- Hold the left joystick up to its highest position, then quickly move the right joystick left to right, back and forth, until the front and rear status indicators flash alternately, or the remote controller screen prompts “WARNING aircraft Initializing, Please Wait”. The drone will now perform IMU calibration. Now release the joysticks. This process will be completed in 20 seconds. Do not move the drone during this process.
- When the front status indicators flash red, and the rear status indicators turn solid green, or the “WARNING AircraftInitializing, Please Wait” prompt disappears, power off and restart the drone. IMU calibration is complete.


Basic Flight Steps
- Check that the aircraft is correctly assembled.
- The propellers are correctly mounted and secure.
- The battery hatch is closed and locked.
- The silicone plug on the back of the remote controller is closed.
- The mobile device is securely mounted to the remote controller.
- Place the aircraft on flat, open ground or water.
- Power on the remote controller, followed by the drone.
- Connect the mobile phone to the remote controller Wi-Fi.
- Open the APP and wait for the camera image to appear, and the flight data display is normal.
- For your safety, you should stand upwind and at least 3 meters away from the drone.
- Novice pilots should always take off in GPS mode.
- Arm the drone or use the auto take-off on the APP.
- Stop video recording before shutting down the drone; otherwise, the video file may be damaged.
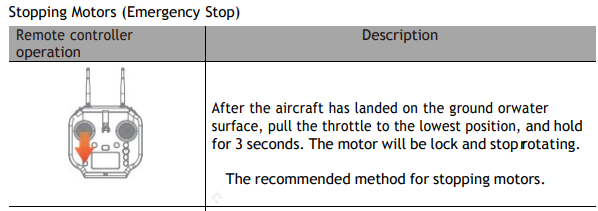
Starting/Stopping Motors
Before starting the drone, take the following precautions:
- Place the aircraft in an open area 3 meters away from yourself and others.
- After the aircraft is powered on, the system will conduct self-checking.
- After the self-checking is completed, it will sound a confirmation tone.
- Unlocking in ATTI mode is not affected by GPS signal strength.
- However, it is recommended that Novice Pilots fly in GPS Mode ONLY.
- In Custom mode, the motors cannot be unlocked.

Water Takeoff and Landing
- When taking off from choppy water, ascend quickly from the surface to prevent the drone from being affected by a passing wave.
- When landing on water, descend vertically to the surface. If the drone lands with horizontal speed, it may flip and be inverted. The flight controller will shut down the motors if the drone becomes inverted on the water.
Boat Takeoff and Landing
- There should be enough space for the drone to take off or land on the boat.
- If there is not enough space on the boat, taking off and landing on the water can be a safer alternative option, as there is sufficient space for the drone to operate.
- When the boat is rocking, the drone may not arm its motors in GPS mode. In this case, carefully take off in ATTI mode and then switch to GPS mode if the satellite signal is back.
- Always be aware of the direction of the wind relative to the boat for take-off and landing.
- The Smooth+ controls are useful to finely control and balance the drone’s position during this operation. For your safety, it is not recommended to launch or land the SplashDrone 4 from your hands.
Power Flip
If the drone becomes inverted on the water, the Power-Flip feature enables the drone to flip back to its upright position. When the drone is floating upside-down on the water, pull both the left and right joysticks simultaneously down and inwards and maintain it for 3 seconds. The drone will flip itself automatically to its upright position.
 When the drone is floating upside-down on the water, pull both the left and right joysticks simultaneously down and inwards and maintain it for 3 seconds. The drone will flip itself automatically to its upright position.
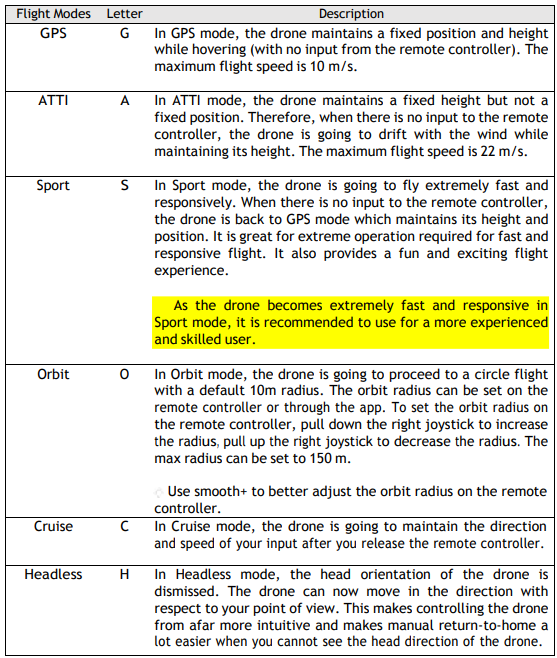
Flight Modes
There are 7 flight modes to configure on the SplashDrone 4 to accommodate the different flight preferences and needs. They are GPS mode, ATTI mode, Sport mode, Orbit mode, Cruise mode, Headless mode, Manual+ mode, and Boat mode. For GPS mode and ATTI mode: GPS mode and ATTI mode can be set by simply switching the flight mode toggle on the remote controller. For Sport mode, Orbit mode, Cruise mode, Headless mode, Manual+ mode, and Boat mode: Switch the flight mode toggle to Custom mode, then turn to the SDFly app and set the flight mode among these 5 modes in the app’s flight mode section.

Intelligent Follow
Thanks to the built-in GPS module on the remote controller. The drone can accurately track the location of the remote controller. When Follow Me mode is turned on, the drone will accurately track and follow the remote controller’s position. You can still adjust the aircraft direction, following distance, and camera angle on the remote controller.
- When the remote controller or the drone loses the GPS signal, Follow Me mode will automatically be disengaged, and the drone will hover in a fixed position in the air.
- When the remote controller and the drone lose connection, the remote controller will beep and vibrate once, and the drone will initiate the return-to-home process.
Start Follow Me: Check that the remote controller has a GPS lock by checking the GPS status indicator on the screen. Press and hold the Follow Me button ①. The remote controller will beep twice. Stop Follow Me: Short-press the “FOLLOW ME” button, the remote controller will beep once. Smooth+
The patented “Smooth+” flight control allows the pilot to finely tune the Roll and Yaw of SplashDrone 4. Smooth+ makes professional, steady flight control as easy as turning the knobs.

To enter Smooth+ mode, simply press the Smooth+ buttons. Press the left Smooth+ button to engage Smooth+ YAW. The left joystick will now only control the ascent/descent of the drone. Press the right Smooth+ button to engage Smooth+ ROLL. The right joystick will now only control the pitch of the drone.
Dynamic Return to Home (RTH)
The SplashDrone 4 constantly senses the GPS location of the remote controller, allowing the aircraft to always return to the pilot, even if they have moved from the original take-off point.
- If the remote controller lost the GPS signal during the RTH process, the drone would return to the last known GPS location of the remote controller.
- Long-press the Return Home button, the remote controller will beep and vibrate twice to indicate that the drone starts the RTH process.
- The flight mode indicator on the remote controller status bar will change to the letter “R” to indicate the drone is in the RTH process.
Return Home Process
- If the drone’s height > 20m and the distance from Home Point > 15m, the drone will maintain its altitude and return to its home point before landing.
- If the drone’s height < 20m and distance from Home Point > 15m, the drone will ascend to 20m and then return to its Home Point before landing.
Low Battery Auto Return to Home
Low battery auto Return-to-Home can be turned on or off through the app according to your preference. By default, low battery auto Return-to-Home is on. Low battery auto Return-to-Home will be available later in 2021. Low battery auto RTH will initiate when the drone’s intelligent battery reaches Level 1 low battery warning.
- Level 1 alarm: The drone battery level has reached 13.0 V. The remote controllerscreen will prompt “LOW BATTERY; Return Aircraft and Land”. The front drone status indicators will flash a pattern of 3 red lights. If the low battery auto Return-to-Homeis turned on, the drone is going to auto RTH after this low battery warning.
- Low Battery Auto Payload Release: Low battery auto payload release is used to increase the RTH possibility when the drone is attached to a heavy load. By default, the low battery auto payload release is off.
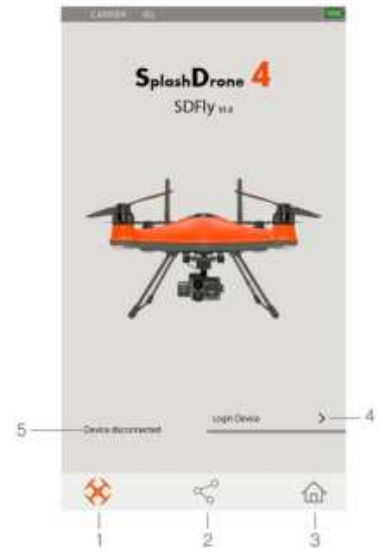
SD Fly APP
SDFly is a whole new flight App designed by SwellPro. It marks the new era for SwellPro. SDFly allows SwellPro pilots to do live HD viewing, adjust aircraft and camera settings, proceed with mission planning (including route planning and grid flight planning), and easily browse, download, and share aerial footage. This App currently only supports the SplashDrone 4. It works both on iOS and Android.
Connect SD Fly
After successfully installing the app, turn on the remote controller and then the drone. Connect your mobile device to the remote controller’s Wi-Fi hotspot named SWP_Bxxxxx. The default password is “12345678”. After connecting to the Wi-Fi, open the SDFly APP. You can now log in to the drone.
Map Download
Since the mobile device uses Wi-Fi to connect to the remote controller, for Apple users, it is totally fine; however, for Android users, it may result in no internet service, which leads to the map malfunction. Simply go to the Wi-Fi settings and turn on the smart connection to allow the phone to use the mobile network while connecting to the Wi-Fi. If your mobile device does not support the smart connection, you can also choose to download the map for the use of the intelligent flight mission. To download the map:
- Log in to the device. Go to the map interface.
- Tap the map download icon [1] as shown.
- Area adjustment [9] is going to show up. Set the desired size of the map you
- want to download.
- Then tap the location on the map [10] you want to download.
Map download is also great for flying in remote areas where the mobile signal is weak.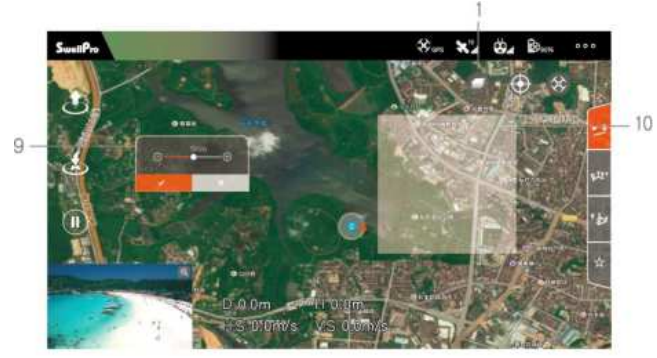
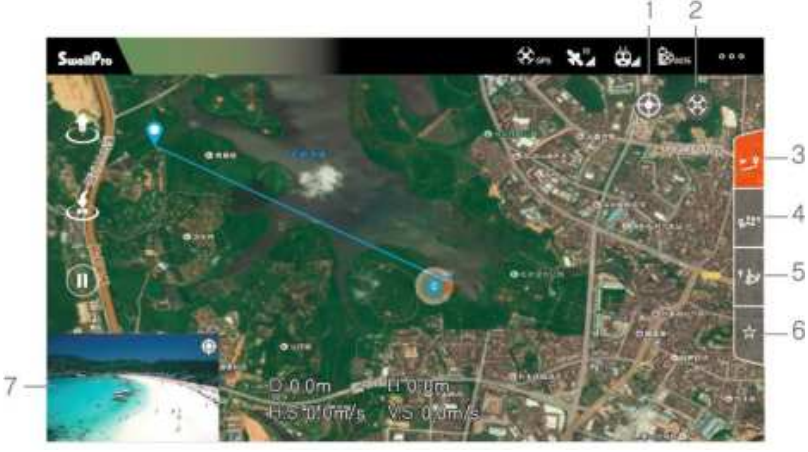
Main Interface
- Main interface
- Browse/Share pictures vidand eos
- Info
- Log inn the drone
- Connection Status
Camera Interface
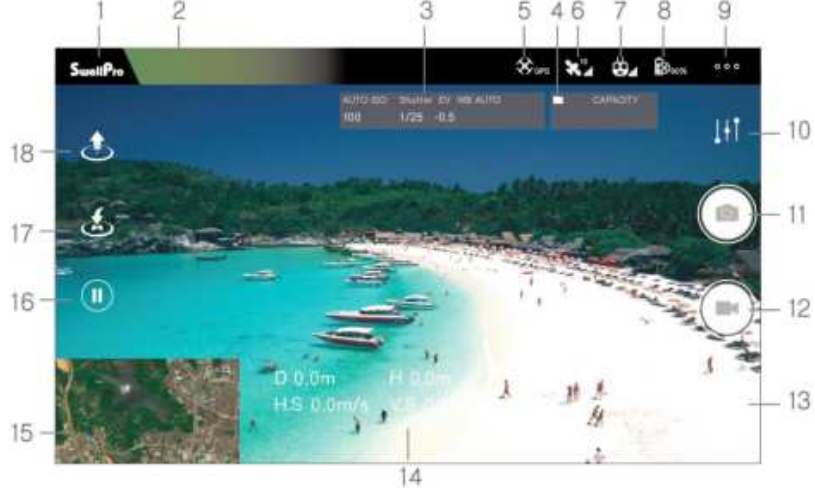
- Home Screen: Return to the main interface.
- Flight Status: Displays the flight status of the aircraft and warning information.
- Camera Parameters: Current camera parameters
- Memory card Information: Remain memory card capacity.
- Flight Mode: Current flight mode.
- GPS Signal Level: GPS signal quality.
- Remote Controller Signal Level: The signal quality between the remote controller and the aircraft.
- Aircraft Battery Level: Real-time display of the battery life of the drone
- Flight Settings: Set the drone flight settings.
- Camera Settings: Set camera parameters and settings
- Photo: Take a photo
- Video: Start/stop video recording
- Playback: Browse photos and videos that have been taken
- Thumbnail map: Tap to quickly switch to the map interface.
- Mission terminated: Tap to terminate current flight planning.
- Tap to take off: Tap to automatically take off and hover at a height of 3 meters.
Map Interface
- Remote Controller Location Tap to quickly identify the location of the remote controller on the map.
- Drone Location Tap to quickly locate the position of the drone on the map.
- Tap to Fly In GPS mode, tap where you want to fly to on the map, and the Splash Drone 4 will automatically fly to the location and hover.
- To fly a route through a series of waypoints.
- Grid Flight Planning: Set an area boundary on the map.
Set the Wi-Fi Password
To set the Wi-Fi password
- Connect the SDFly to the remote controller.
- Log in to the device.
- Go to flight settings, showing as 3 dots on the top right of the interface.
- Scroll to advanced settings and select “Set WiFi Password”.
- Type the password you want and press “SAVE PASSWORD”.
- Re-connect the Wi-Fi.
To reset the Wi-Fi password
- Power on the remote controller.
- Wait for 40 seconds for the MultiSync video transmission system to boot up.
- Press the pairing button on the back of the remote controller 5 times.
- Wait for another 20 seconds for the Wi-Fi password reset to finish.
- The Wi-Fi password is restored to the default, 12345678.
Care and Maintenance
- Do not allow the batteries to come into contact with any kind of liquid.
- Do not drop the battery into the water.
- Do not leave batteries out in the rainor near a source of moisture.
- Do not heat batteries. A battery fire can be extinguished using sand or a dry powder fire extinguisher.
- Do not put batteries in a microwave oven or a pressurized container.
- Do not put the loose battery cells onto any conductive surface, such as a metal table.
- Do not place heavy objects on the batteries or the battery charger.
Charging
- Always use a SwellPro-approved charger to charge the battery of the drone and the radio controller.
- To avoid any potential accidents happening, please do not leave the battery charging unattended.
- Disconnect the charger when not in use.
- Do not clean the charger with denatured alcohol or other flammable solvents.
- Never use a damaged charger.
Storage and Transportation
- Keep batteries out of the reach of children and pets.
- The ideal storage temperature is 22°C ~ 28°C.
- Keep the battery in a dry and ventilated environment
- Never drop the battery into the water, or store it in places where there is a possibility of water leakage.
- Do not drop, strike, impale, pierce, or manually short-circuit the battery.
- Keep the battery away from metal objects, such as watches, jewelry, and hairpins.
Disposal
Dispose of the battery in specific recycling boxes only after a complete discharge. DO NOT place the battery in regular trash containers. Strictly follow your local regulations regarding the disposal and recycling of batteries.
Specifications


Disclaimer and Warning
Please keep it out of reach of children and pay particular attention to the possible scenarios of children unexpectedly appearing during flight operations. Be sure to read this document carefully before using the productto fully understand your legal rights, responsibilities, and safety instructions. Failure to do so may cause property damage, accidents, and personal injury.
- Damage or injuries incurred when the user/s are under the influence of alcohol, drugs, or medication.
- Damage or injuries caused by flying the drone in areas of magnetic fields & radio interference.
- Dage or injuries caused by using broken & aging components.
- Other Damage(s) or injuries that are not SwellPro’s liability.
- Any malfunction caused by operators’ failure to follow the guidance of the manual to assemble and set up or operate the drone as described and designed.
- Damage or injuries caused to a person/s or property due to failure in correctly calibrating the drone as outlined in the manual before the flight.
- Damage or injuries as a result of flying the drone out of eyesight range, or more than 300m away from the controller.
Customer Service
- Website: www.swellpro.com
-
Phone: +1866-534-5788
-
Office hours: 9 00 – 17:00 (EST, UTC-5), Monday to Friday
-
Address: R413, Block 10A, Science and Technology Ecological Park, ShenZhen, 518063 Guangdong, China