


GENEINNO GTP-EXCAM1 T1 Pro External Camera
Introduction
TP CAM-1 is a dedicated external camera for the Geneinno Intelligent Underwater Robot. Connect through a customized watertight connector with Geneinno Intelligent Underwater Robot’s unique expansion interface. An external camera is used to observe and shoot the scene beneath the T1 Pro.
Installation Guide
Support bracket installation
- Use a cross screwdriver to unscrew the four fixing screws of the bracket and remove the original bracket of the underwater robot.
- Replace the original bracket with the support bracket, and install 4 fixingscrews using a cross screwdriver.
Accessory Installation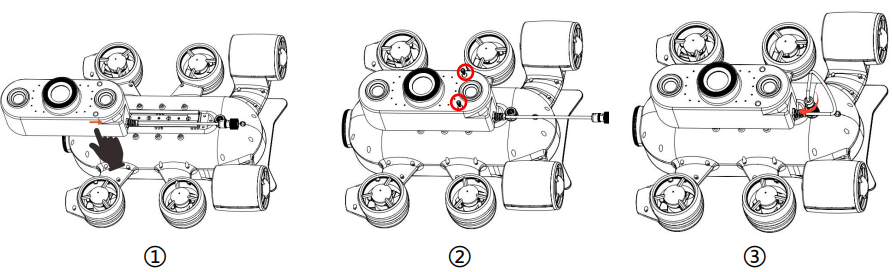
- Unscrew the sealing metal cover of the 8-pin waterproof connector of the obot counterclockwise.
- Match the slot to the slide rail in the bottom of the host, and slide the external camera according to the direction indicated by the arrow.
- Align the screw with the hole and install the screws.
- Insert the connector into the extension port on the robot host. Tighten it clockwise.
Accessory Buoyancy Block Installation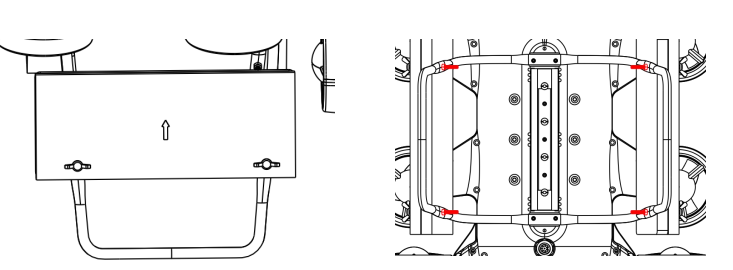
- Align the mounting hole with the hole on the bracket, with thearrow of buoyancy block upward.
- Install the wing screw through the hole, insert fromthe outside to the inside, and tighten the nut by hand.
Start
Device Connect
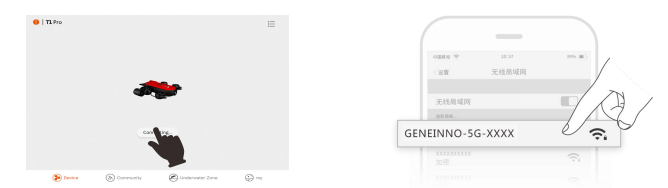
- Open APP, choose T1 Pro, click “Device not connected” icon, jumptotheWi-Fi setting page, find and connect to the Wi-Fi named GENEINNO-5G-XXXX/GENEINNO-XXXX, default code is: 88886666
- After Wi-Fi is connected, go back to the APP main interface, click the “Device connected” icon to enter the control interface.
Device Operation 
- External camera switch: Click the switch icon to enable the external camera.
- Screen switch: Click the “Screen Switch” icon to switch the screens between the external cameraand the main camera.
- External camera LED light: Slide left to adjust the “External Camera LED Brightness Adjustment “icon to adjust the LED brightness, supporting three levels of adjustment.
- External camera settings: Include all the settings of the external camera.
- Shoot/record: When switched to the external camera, the shutter is enabled to takephotos/videos from the external camera
- External camera album: Album view path: Settings – Album – External Camera Album
Image Settings
- White Balance: Enable in Auto or Manual mode. In manual mode, could adjust the image RGB color style (default value 48/17/33)
- Sharpness: Enable in Auto or Manual mode. In manual mode, could adjust image sharpness (default value 100).
- Saturation: Enable image saturation manual set, default value 50.
- Contrast: Enable image contrast manual set, default value 50.
- Brightness: Enable image brightness manual set, default value 50.
- Live resolution: Enable live stream resolution switch, default 1080P.
- Image flip: Enable manual image flip in vertical and horizontal.
- Simultaneous Video: Enable the same shutter for both the main camera and the external camera.
- Restore Default Settings: Restore image default settings.
- SD card format: Erase all files in the SD card, including photos and videos.
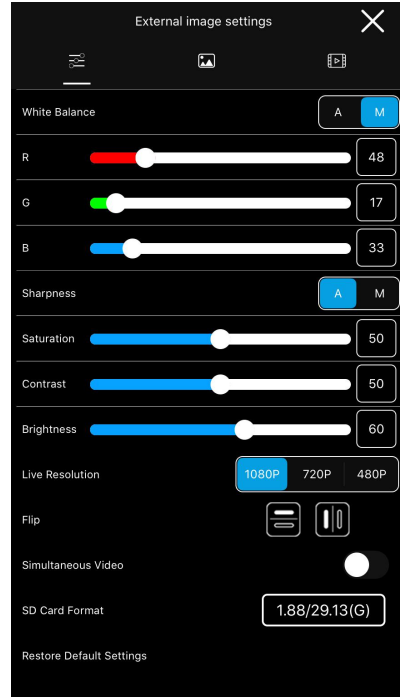
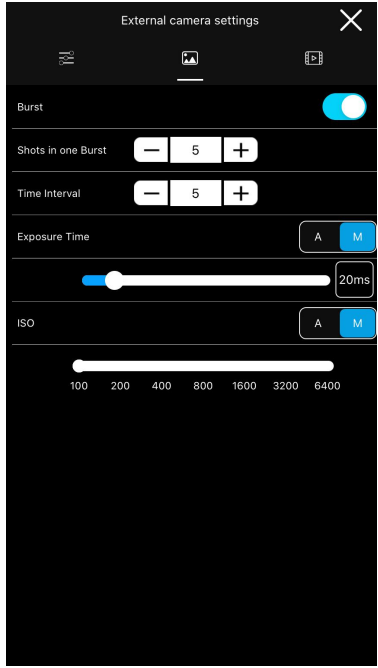
Photo Settings
- Burst: Enable burst mode, capture multiple photos, and set the burst number and time interval.
- Exposure Time: Enable in Auto or Manual mode. In manual mode, could adjust the exposure time (default value: 20ms).
- ISO: Enable in Auto or Manual mode. In manual mode, could adjust the image ISOvalue.

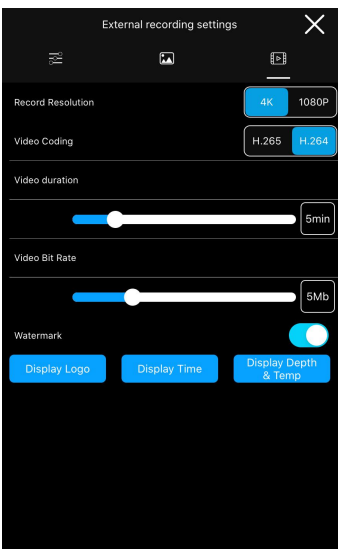
Record Settings
- Record resolution: Set in 4K or 1080P.
- Video coding: Support video coding in H 265/H. 264, video\ saved as MP4 format by default.
- File time length: Range from 0-30 minutes, unsegmented division when time length is 0
- Video bit rate: Range from 5MB to 20 MB. Video bit rate could impact video file size and record quality.
- OSD: Set watermarks in photos and videos. Watermarks are enabled by default.
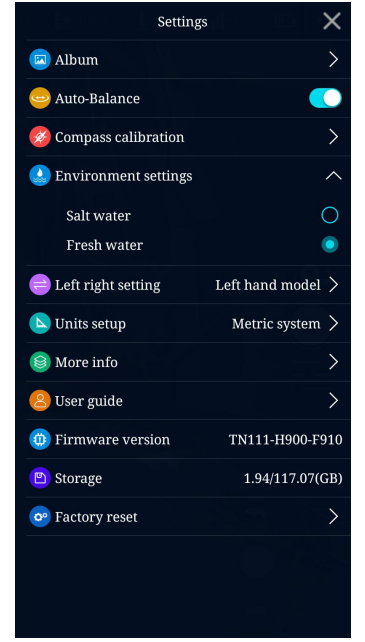
- Album: Open the ROV and external camera albums
- Auto-balance: Enable/disable auto balance
- Compass calibration: start compass calibration

- Environment setting: the option for fresh/salt water, select salt water or fresh water, which affects depth accuracy only.
- US/Japan hand switch: US/Japan hand control mode switch
- Unit setting: set the unit to the Metric system or the British System
- More info: more information display
- User guide: user guidance for starters
- Firmware version: firmware version display
- Storage: display of the ROV storage status in the machine
- Restore to factory settings: restore the machine to factory settings

External Camera Album
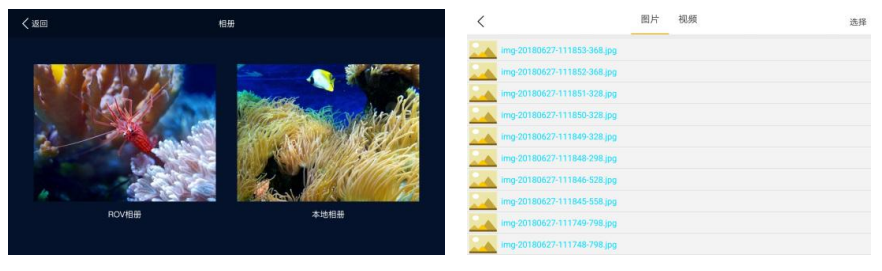
Enter album, then press “External camera album“icon in the right uppercornerto enter the external camera album, to check and save files, coulddeleteordownload multiple photos and videos by long press.
Export photos and videosfrom thef external camera to the PC Windows
First, connect your PC to Geneinno T1 Pro WIFI, then openabrowseronPC, enter http://192.168.8.7/media to enter the device file system. Photosareinthephoto storage folder, Videos are in the video storage folder. Right clickonthefile and click ‘Save as’to download the selected files.
Mac
The Mac connects to Geneinno T1 Pro WIFI, and thenopentheFinderapplication on the Mac. After opening the application, press the command+Kkeyon the keyboard and enter SMB:// 192.168.8.7 in the server address, thenenterthe storage folders to download files
Maintenance
- Please check all watertight plugs for any liquid residues suchas waterbefore starting to use.
- Please wipe clean before connecting. Do not place heavy objects on top of this product, and donot usesharpobjects to puncture /beat /impact /squeeze, etc.
- Do not deliberately disassemble, damage, or short-circuit this product; do not put it in a fire, an ultra-high temperature /ultra-low temperature environment.
- And do not put it in dangerous substances such as flammable and explosive objects and strong corrosive solvents. Do not look directly at the LED lights or directly touch the LEDlight.
- The external camera cable needs to be inspected regularly duringtheequipment life cycle. Once the cable outlet surface is damagedor thecableis hardened, it needs to be repaired or replaced in time.
- The external camera cable should not be pulled during storage. The cable should be stored in a stretched state and should not be excessivelybent
- After finishing use, please rinse with fresh water and wipe dry in time to reduce seawater corrosion and store in a dry and ventilated place. Please use smooth tools such as cotton cloth to clean the surfaceof thisproduct
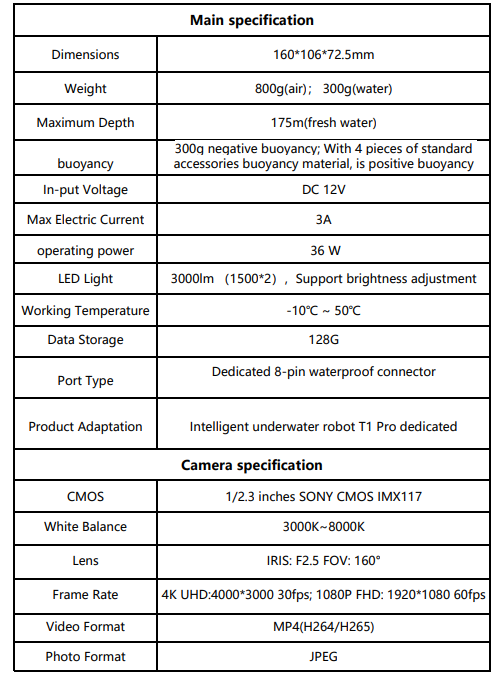
Specification
APP Download
- Scan the QR code to download the “Geneinno” APP. l Search “Geneinno” in the iOS App
- Open the app, please register as a Geneinno member, and log in.
After-sale service
For more information, please check the Geneinno APP Help selection.

Support
If you have any questions or technical issues, send an email to the after-sales services of Chasing or contact us on the official website.
- Website: https://www.chasing.com
- Address: 506 of Xita in Digital cultural industry base of Shennan 10128 Nanshan, Nantou street, Nanshan District, 518052 Shenzhen.