
HUBSAN X4 PRO Quadcopter GPS Altitude Hold Drone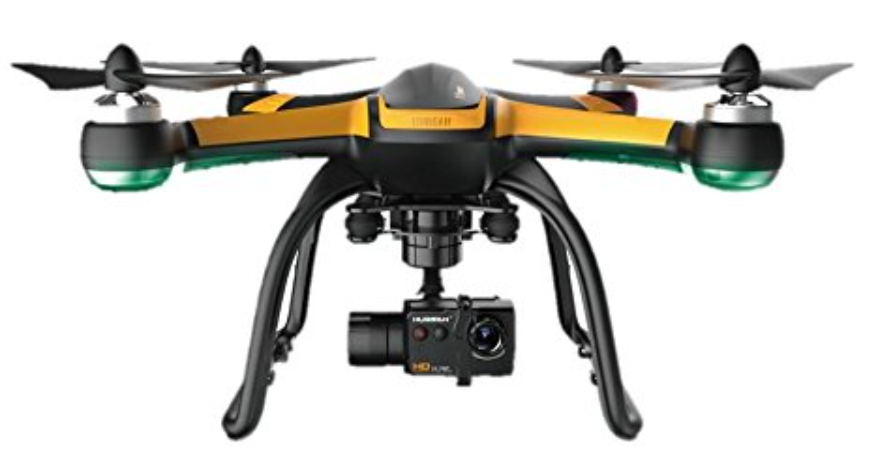
Important Safty
OPERATION
Be careful when using the X4 Pro. There are subtle electronic components, which will be damaged if you crash down and break the X4 Pro or drop it in water. Do not use a broken X4 Pro, such as an X4 Pro with broken propellers, to avoid damage.
Flight
- Be responsible for your and others’ safety when you fly X4 Pro
- X4 Pro cannot fly in crowded places; it needs enough space to operate.
- Do not fly it in bad weather
- Never try to catch the X4 Pro while it is in flight
- Only for age 14+ to play this product
- Power off X4 Pro after flight, or the propellers may still be rotating to cause injuries.
Reading Instruction
- No operating
- Important Notice
- Instruction
- Explanation, reference
USAGE ADVICE
Hubsan provides you with three files for X4 Pro
- ‘Disclaimer
- ‘Hubsan X4 Pro Instruction Manual
- ‘Ground Station Instruction Manual’. Read the teaching video and the disclaimer first, then read the manuals.
General Introduction
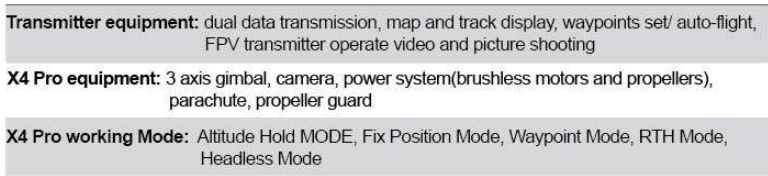
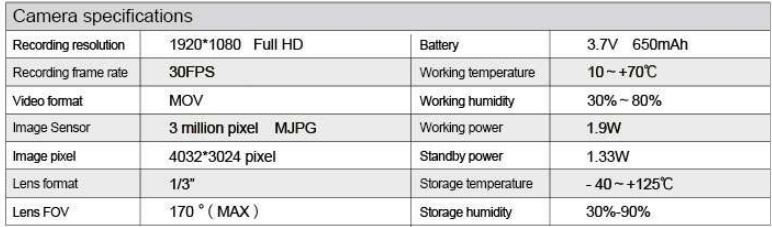
Hubsan X4 Pro is a high-tech mid-sized quadcopter that can display aerial photography. It is equipped with high accurate and stable 3-axis gimbal, a 1080P HD aerial photography camera, and an advanced smart flight control system. High-integrated Android transmitter can realize long-distance camera control, video transmission, grand station auto flight, FPV flight, and social network sharing, etc. functions. Hubsan X4 Pro will help you easily shoot stable HD videos and pictures.
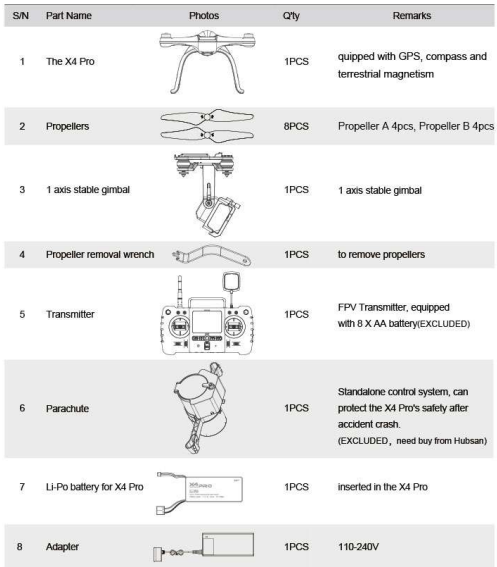
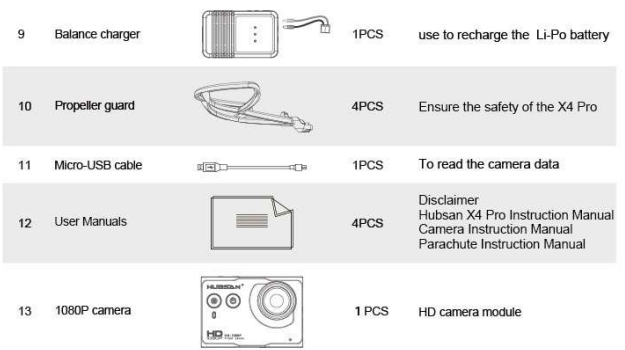
ACCESSORIES INCLUDED
Check all the accessories in the package before use.
 Introductoin
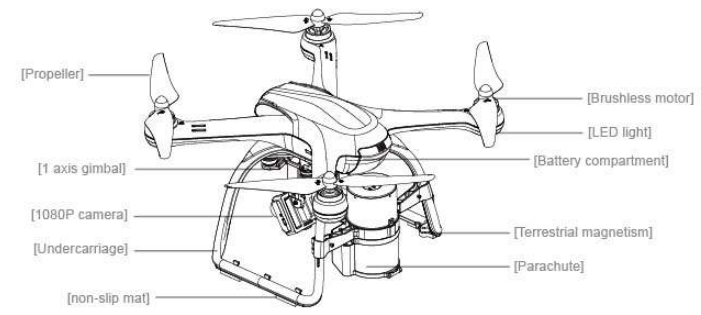
The Hubsan X4 Pro consists of a quadcopter, camera, gimbal, parachute, propeller guard, power system, flight control system, and radio transmission system.
PREPAR FOR USE
Thanks for buying HUBSAN products.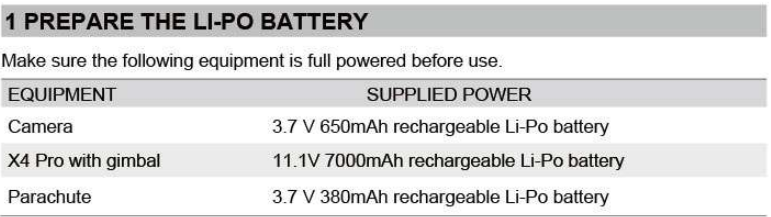
LI-PO BATTERY IN THE X4 PRO
The X4 Pro is equipped with an 11.1V, 3-cell, 7000mAh rechargeable Li-Po battery. Always charge the Li-Po battery with the Hubsan provided Charger.
CHARGING
Connect the battery to the balance charger and the wall charger, the two LED lights will turn red whilst charging and turn green when charging is finished, charging time is around 180 min.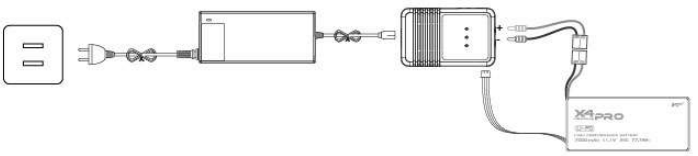

POWER ON/ OFF THE X4 PRO LI-PO BATTERY
- Power on: Put the battery into the battery compartment, connect the battery plug with the correct polarity, and then the X4 Pro will power on. The LED on X4 Pro will blink blue circularly.
- Power off: Disconnect the battery plug, the X4 Pro is powered off, the LED will turn off_
CHECK THE LI-PO BATTERY POWER
After the X4 Pro and the Transmitter finish pairing, the battery power will display on the screen.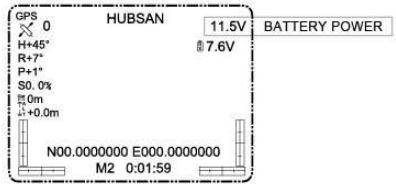
Always partially charge your I ipo battery before storage
LiPo batteries retain a charge over a reasonable period; It is not normally necessary to recharge stored LiPo batteries unless stored for periods longer than 3-6 months_ If your LiPo battery has been over-discharged, it will not be possible to recharge it again.
Safety
IMPORTANT
This X4 Pro is not a toy_ Any improper use of this product will result in serious injury_ Be aware of your personal safety, safety to others, and your surrounding environment. We recommend beginners learn to fly with more experienced pilots playing nearby before attempting to fly the X4 Pro for the first time.
LI-PO BATTERY SAFETY NOTES
The X4 Pro is powered by a lithium-polymer(Li-Po) battery. To avoid risk of fire or damage, never recharge your battery while it is inserted in the plane_ If you do not plan to fly the plane for a week or more, store the battery approximately 50% charged to maintain battery performance and life_
Description
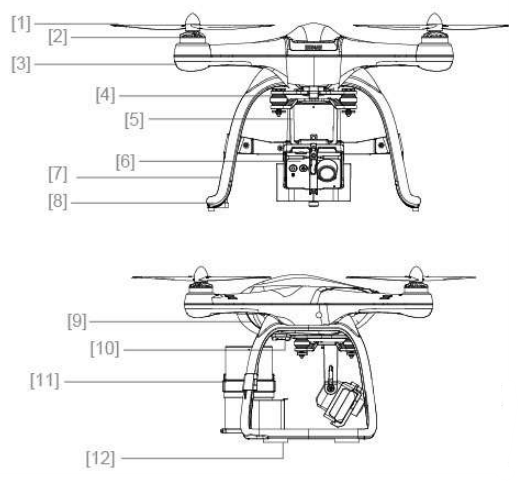
- Propeller
- Brushless motor
- LED light
- Shock-resistant equipment
- 3-axis gimbal
- 1080P camera
- Undercarriage
- Terrestrial magnetism
- Battery compartment
- External interface
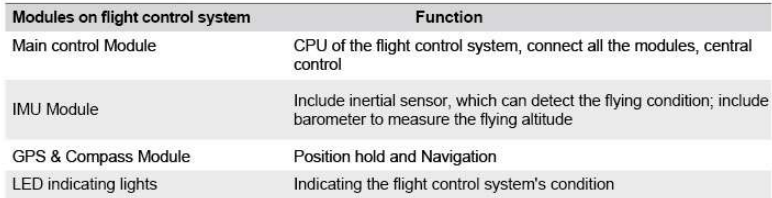
Flight Control
Hubsan X4 Pro is easy to operate and very stable, it supports moving forward/backward, left/ right, ascending and descending basic flight action, and also supports lost control protection, power alarming, and IOC functions_
PREPARE
Insert the battery into the camera and fix the camera on the gimbal. Power on the camera, users can press the buttons on the camera to shoot pictures and videos_ Users can also use the H7000 transmitter for recording and playback the videos_
Camera Buttons
- Power on/off: Press the power button(<2sec), power on; Hold down the power buttoW2sec ), power off.
- Video shooting: Press the video button(<2sec), start shooting; Hold down the video button(2sec), shooting slop.
MICRO-SD CARD
Insert the Micro-SD card into the camera before shooting, as Picture 9 shows. Always insert/remove the Micro-SD card after power off_ The Micro-SD card is not included in the package; users need to prepare a brand Micro-SD card(class4-6, over 4GB) support 32GB(MAX) Micro-SD card. Need to format the Micro-SD card before use.

Reading Data
Use the Micro-USB cable to connect to the PC when the camera is powered on, copy the pictures/videos from the camera, and charge the camera at the same time.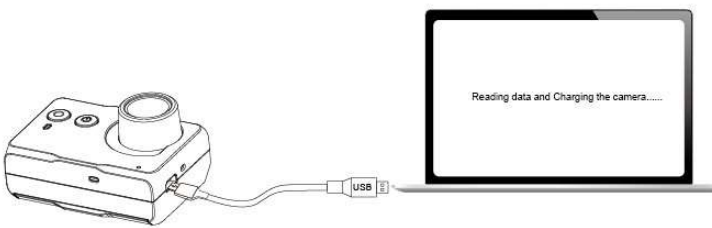
- Need power on the camera, then copy. The camera is only recharging when it is powered off and connected to the PC_ The camera cannot shoot when it is connected to the PC.
- The camera will be recharging while connected to the X4 Pro or the PC, the charging circuit is about 500rnAh, and the camera battery is 3/V/ 670mAh.
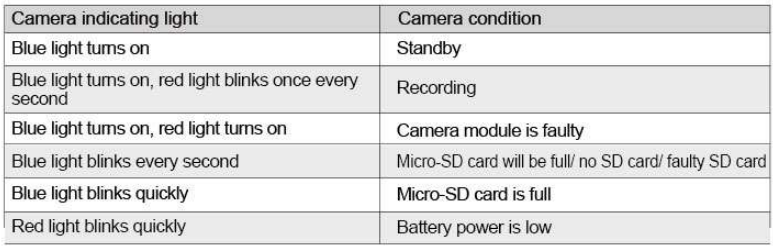
CAMERA INDICATING LIGHT
Use the Micro-USB cable to connect to the PC when the camera is powered on, copy the pictures/videos from the camera, and charge the camera at the same time.
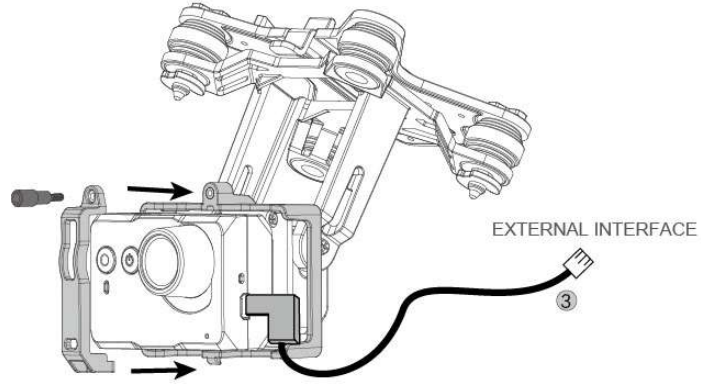
Install The Camera
Method:
- Unscrew the fix set for the camera, remove the fix set_
- Put the camera in the slot(camera facing outside), install the fix set, and fix it with screws.
- Plug the camera data wire into the USB interface, plug the other end into the X4 Pro external interface (see more details on 2_3_1)
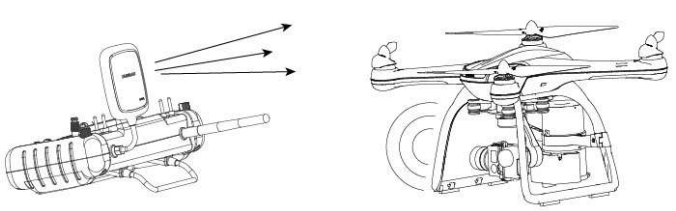
PREPARE THE 1 AXIS STABLE GIMBAL
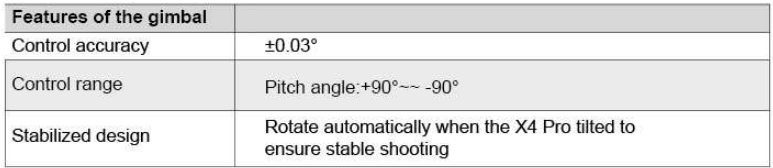
- Step 1: Take out the 1-axis gimbal from the box, aim at the bottom slot with the Shock Resistance Equipment slot, and gently slip it into the bottom.
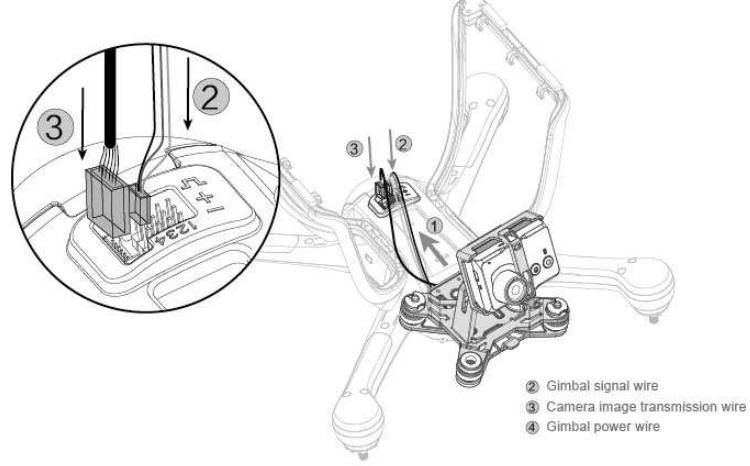
- Step 2: Connect the gimbal signal plug with one of the external interfaces.
- Step 3: Insert the image transmission plug into the left slot.
After the installation, power on the X4 Pro, the 1-axis gimbal will power on and adjust automatically_ Slip the T2 rotary switch to easily control the gimbal rotation.
GIMBAL INSPECTION AND EXCEPTION HANDLING
- Gimbal engine abnormal, due to the unlevel surface having contact with the gimbal, or the gimbal crashed or hit. Put the X4 Pro on a level and open surface before flight, do not collide the gimbal after it powers on
- Flying in fog or cloud will cause Dew Formation and lead to faulty gimbal_ The gimbal will be normal after it is dry.
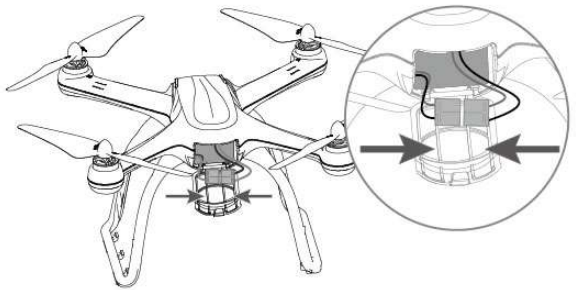
INSTALL THE PARACHUTE (EXCLUDED, NEED TO BUY FROM HUBSAN)
- Step 1: Install the fix set. Take out the parachute set from the box, remove the screw from the fix set, and open the turn buckle.
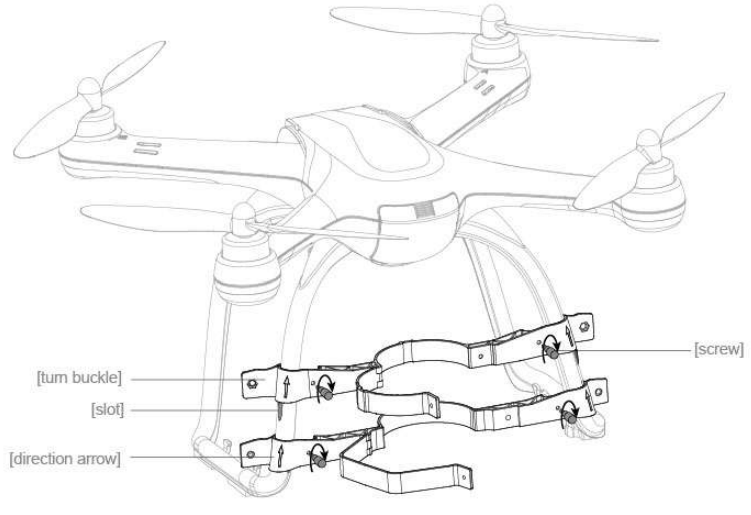
- Make sure the fix set reaches the slot position before fixing the screw, or it will cause instability, and the X4 Pro will shake during flying.

PREPARE THE PROPELLER SET
Hubsan X4 Pro equipped with 9-inch propellers—black and grey colors_ The propellers are easily damaged, please purchase spare propellers from Hubsan_.
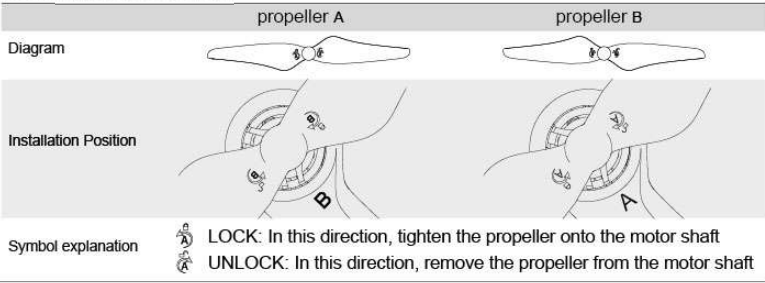
METHODS
Take out the 4pcs propellers, install them tightly onto the accordance motor shafts_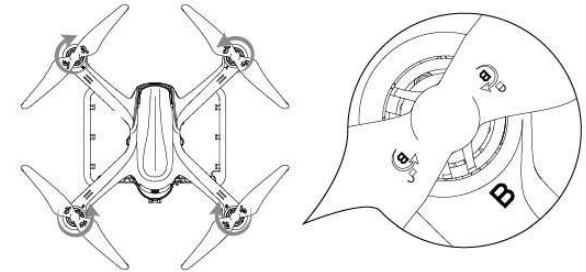
- The propellers are designed to automatically tighten up. Do not screw it too tightly. Do not use screw glue_
- Make sure the black and grey propellers are installed correctly; it cannot fly if the propellers are installed incorrectly.
- Wear gloves when installing the propellers to avoid scratches, as the propellers are thin and sharp.
REMOVE PROPELLER
Hold the motor with the Propeller removal wrench, rotate the propellers in the unlock direction to remove the propeller_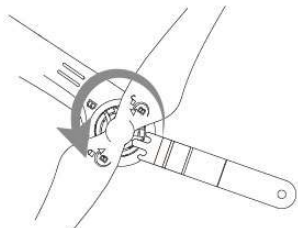
- Check if the propellers are installed correctly before every flight.
- Check if the propellers are in good condition, and need to be exchanged if they are broken or aging_
- Do not touch or come near the speedy propellers or motors to avoid scratches or injuries_
- Always use Flubsan propellers to ensure the best flight experience_
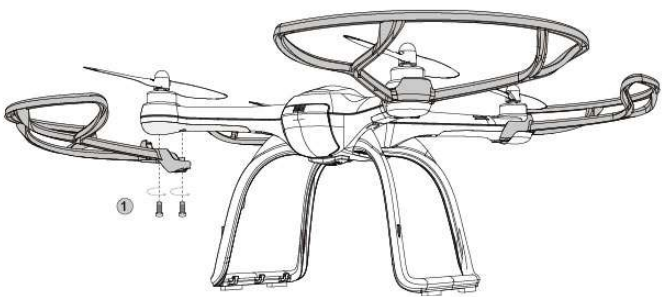
PREPARE THE PROPELLER GUARD
As for beginners, we recommend that users use the Flubsan X4 Propeller Guard to enhance the safety of flying. The Propeller Guard is optional.
- Method: Fasten the screw to install the propeller guard as the picture below picture shows_
Functions
MAIN MEN
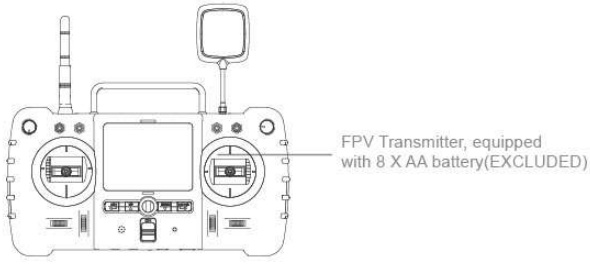
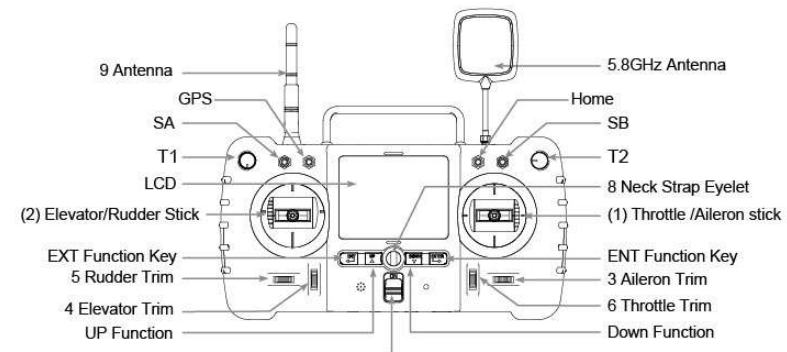
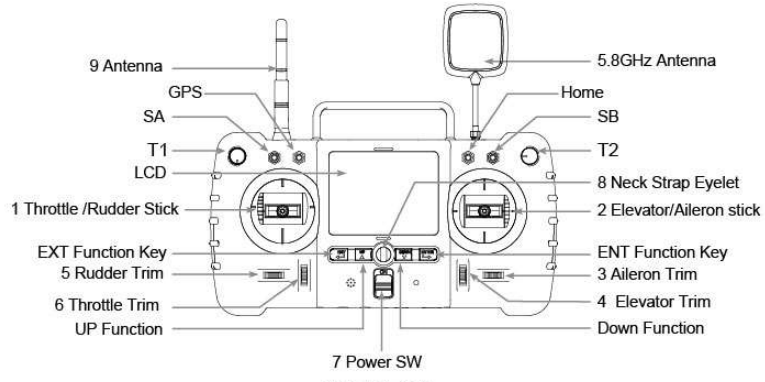
TRANSMITTER
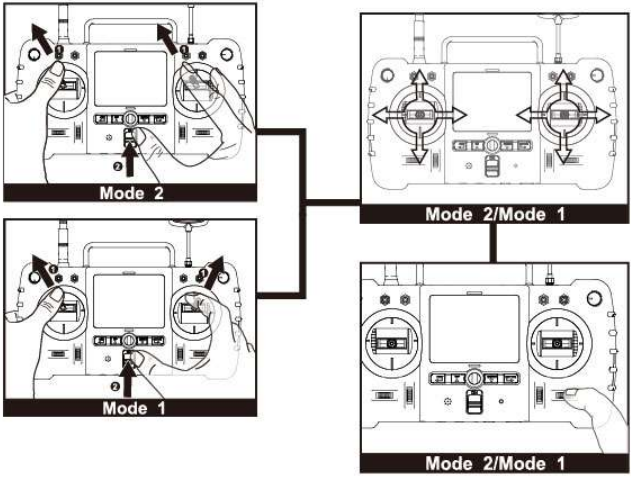
MODE 1
MODE 2
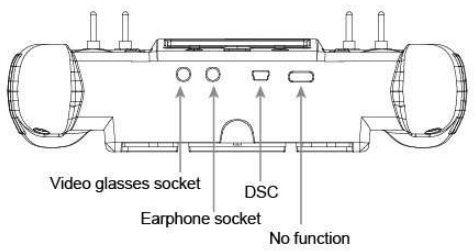
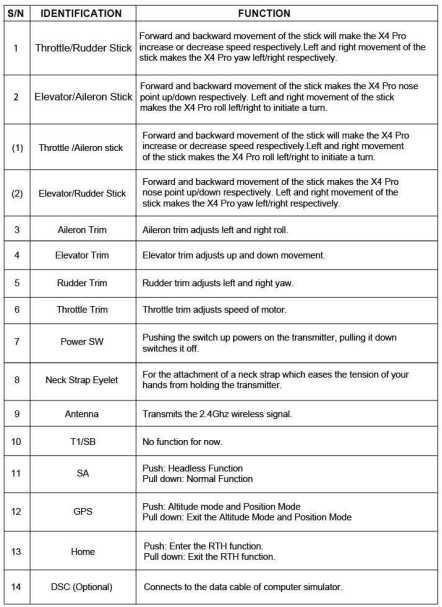
INPUT KEY FUNCTION
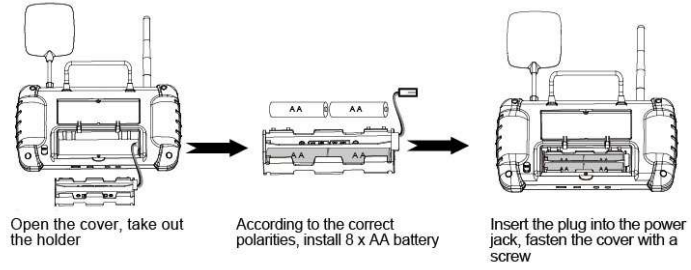
BATTERY MOUNTING
TRANSMITTER STICK CALIBRATION
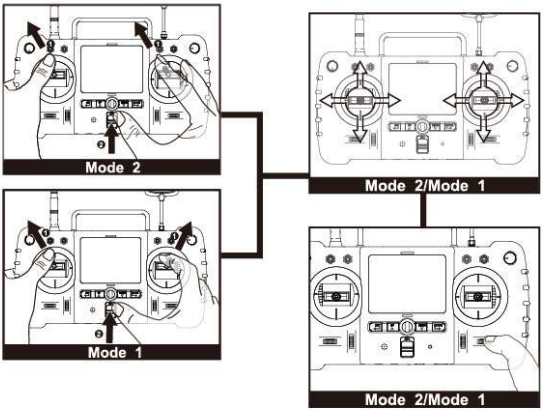
MODE I transmitter
Push the left joystick to the top on the left, and the right joystick to the top on the right. Keep them in this position, and then turn on the transmitter. The LCD screen will show ‘CALIBRATE STICK.. Move the joysticks in a circling motion about 3 times, and then release the joystick and press any trim to save and .exit
MODE 2 transmitter
Push the two joysticks to the top on the left and keep them in this position, and then turn on the transmitter, the LCD screen will show ‘CALIBRATESTICK’. Move the joysticks in a circling motion about 3 times, and then release the joysticks and press any trim to save and exit.
ANTENNA SIGNAL INSTRUCTION
The live video distances sound and 1000 meters. In order to gain the furthest communication distance, make sure the transmitter’s antenna is planted vertically and there are no obstacles between it and the X4 Pro when in flight. Keep the antenna vertical and let the signal surface(the logo side) face the X4 Pro video signal antenna.
Bend the transmitter antenna vertically, and keep the signal surface towards the X4 Pro video signal antenna; Ensure there are no obstacles between the two, or the X4 Pro will lose control.
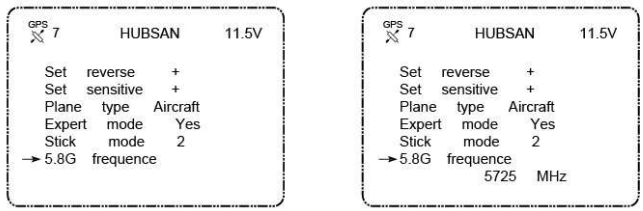
FREQUENCY SELECTABLE 5.8GHZ
The transmitter will automatically find the best frequency to ensure the quality live video transmission. In case there is any interference in your location, you can change the setting from the range 5725MHz-5865MHz to get a longer range and better video transmission. Hold down the ENTER key for 1 second to enter setting status, move the arrow to 5.8G FREQUENCE with up/down key, press the ENTER key again and select the frequency you need with up/down key, hold down the EXIT key for 2 seconds to confirm and exit.
Start To Fly
When the installation is finished, please do some practice and training (For example, use an imitator to do some fly training or ask for some professional guidance Please choose a suitable place to play the X4 Pro.
THE FLIGHT ENVIRONMENT FOR X4 PRO
- Fly the X4 Pro in an open place. The GPS signal may become weak, and the position holding and RTH functions may lapse when the X4 Pro flies around trees and buildings.
- Do not play the X4 Pro in bad weather. Such as strong wind, heavy snow, rainy day, and foggy day.
- When playing the X4 Pro, please keep away from the barrier, people, high-line cable, trees, and so on.
- Do not play the X4 Pro in places such as the station and launch tower, to avoid interaction.
- Can not play in the South Pole and the North Pole.
- Do not place the X4 Pro in the forbidden place.
CHECK BEFORE FLYING
- Make sure the power is full on the Transmitter, X4 Pro, parachute, and camera.
- Make sure the propellers are installed correctly.
- Make sure the gimbal vibration setting is completely correct and that the installation is correct.
- Make sure to insert the Micro-SD card when shooting and recording.
- ensure that when n the power is on, the camera and gimbal can work normally.
- Make sure whether the motor can work normally or not.
BIND THE TRANSMITTER AND THE X4 PRO
Power on the transmitter, then the X4 Pro: the transmitter will show the lipo battery voltage and other values as shown below. If no value shows, need to bind the transmitter to the X4 Pro. Power on the transmitter, then press the ENTER button until the LCDs ‘System initializes.
Compass Calibration
After the X4 Pro powers on, the blue LED of the X4 Pro will blink circularly. Put the X4 Pro on a level surface, and do not move it. Then the LCD screen will show “Check Compass”, indicating the X4 Pro is checking the compass. Keep the X4 Pro in a level surface, slowly rotate it until the “Check Compass” disappear_ If the X4 Pro sense abnormal of the compass sensor, it will enter into the state of compass calibration, the transmitter LCD screen will show ” CAL compass 1″, levelly spin the X4 Pro until the LCD screen shows ” CAL compass 7, then vertically spin the X4 Pro until the ” CAL compass 7 disappear,
CALIBRATION
Method of calibration: Hold the Throttle Stick in the bottom down, quickly move the Toggle Switch until the LCD screen shows ” CAL compass 1″, levelly spin the X4 Pro until the LCD screen shows ” CAL compass 2″, then vertically spin the X4 Pro until the ” CAL compass 2disappearsss, indicating successful calibration.

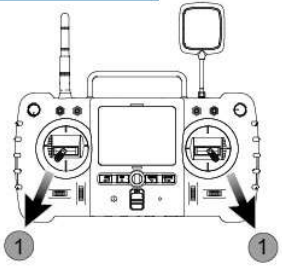
START/ STOP THE MOTORS
Start the motors. Hold 1: Pull the two sticks as the picture shows, and release them after the motor starts. Method 2: Press the ENTER button for one second, and the LCD will indicate the status of the X4 Pro
Stop the motor. Method 1: Pull the two sticks again as the picture, release them after the motor stops; Method 2: Press the ENTER button for one second, the motor will stop_
Basic Fligih
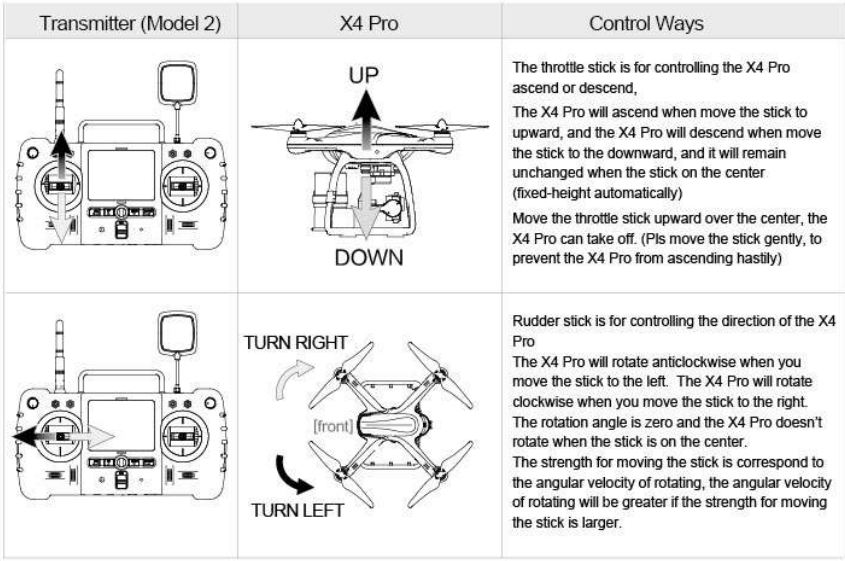
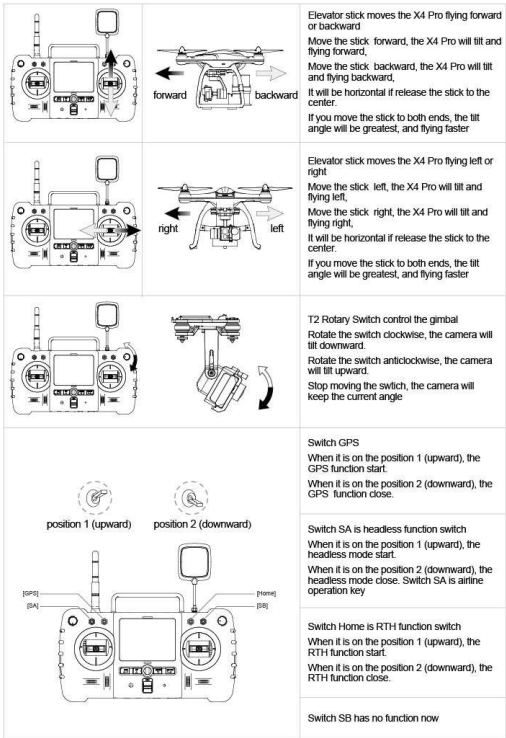
The operation mode for the transmitter is Model 2; the manual will take Model 2 as an example to illustrate the transmitter’s operation.
- He sticks to the center: The transmitter’s stick is in the center_
- Stick’s rudder offset: The offset of the transmitter sticks from the center.
Function of Control Protection
When the X4 Pro loses the signal of the transmitter (loses control), the flight control system will control the X4 Pro to land or return to the departure position and land automatically, which can prevent the X4 Pro from losing or crashing.
EXIT THE RTH MODE
Pull down the RTH function switch; the X4 Pro will exit the RTH Mode.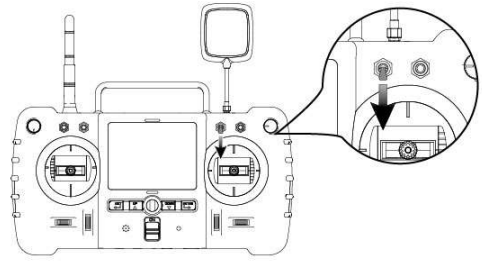
- To ensure the X4 Pro can return to the departure point successfully after it loses control, fly after the X4 Pro enters the safe flight states.
- During the process of losing control & returning, if the quantity of GPS star less than 6, and lasting for 20 seconds, the X4 Pro will descend automatically._
INTELLIGENT BATTERY ALARM FUNCTION
When the voltage of the X4 Pro’s battery is lower than ‘I 0.8V, the X4 Pro will descend slowly, although the X4 Pro will ascend when increasing the throttle, you should get the X4 Pro back and land as soon as possible_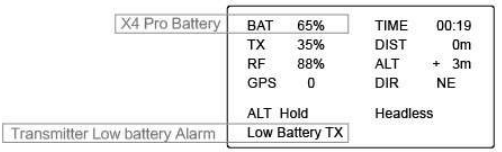
- Mode 1: Put the left stick in the upper left position and the right stick in the upper right position, and hold, then power on the transmitter. Rotate both sticks a couple of times in full circles.
- The motor doesn’t work.
Recalibrate the transmitter. - Pro shift to the other side during flying.
When powered on, please keep the X4 Pro steady for 10 seconds. The purpose of this is to initialize
the sensor.
FCC Information
This equipment has been tested and found to comply with the limits for a Class B digital device, pursuant to Part 15 of the FCC Rules. These limits are designed to provide reasonable protection against harmful interference in a residential installation. This equipment generates, uses, and can radiate radio-frequency energy, and, if not installed and used in accordance with the instructions, may cause harmful interference to radio communications. However, there is no guarantee that interference will not occur in a particular installation. If this equipment does cause harmful interference to radio or television reception, which can be determined by turning the equipment off and on,
Customer Support
- Email: sales@hubsan.com
- Tel : +86 75583947818.