


Autel Robotics EVO Max 4T 8K Camera Drone
Introduction
The EVO ™Max 4T (hereinafter referred to as the EVO Max 4T) is equipped with a 640512 thermal imaging camera and a 4K visible light camera, which can take both thermal imaging and visible light images at the same time, and supports the picture-in-picture mode. The body is equipped with 12 visual sensors with an omnidirectional obstacle avoidance function. The App provides users with dozens of intelligent photography modes and various mission flight modes, such as rectangular, polygonal, aerial missions, and tilt photography, so that users can plan their aerial points and routes according to their actual needs. (To change
Description
- screw propeller
- any power-generating or
- Head LED indicator power-driven machine
- landing chassis
- Front visual system light
- Pier Camera
- power button
- Tail LED indicator light
- Rear visual system
- micro SD Card slot
- External SSD interface
- The USB-C interface

- Right-side visual system
- Fan exhaust air port
- Vehicle battery
- Fencybutton/indicator

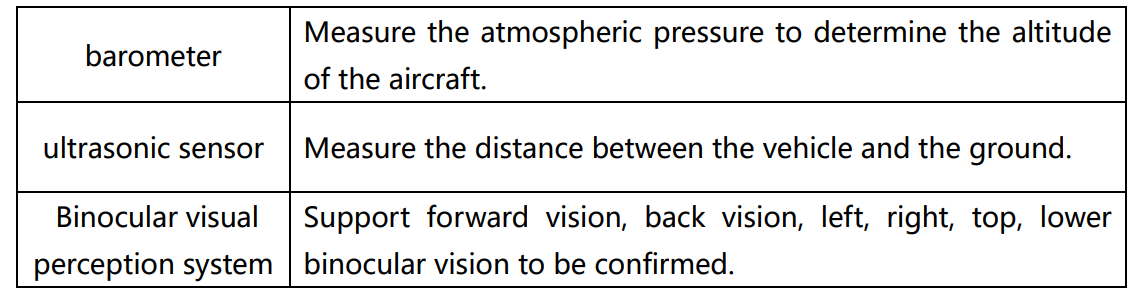
- ultrasonic sensor
- LED fill light
- Upper visual system
- Lower visual system
Patent Information
This product was obtained according to the patent procedure. The patent number is as follows: Daotong Intelligence provides the following documentation and teaching videos for the first time using EVO Max 4T.
- Quick Guide: Basic knowledge of operating products
- If any items are missing, contact the Smart User Support or authorized dealer.
- Battery Safety Operation Guidelines: Basic knowledge and safe operation of batteries.
- Disclaimer and Safe Operation Guidelines: Instructions on how to operate the product safely.
- The Product Maintenance Manual:
- User Manual: Guide you to master the operation method of the product.
Recommended Reading Order
- If any items are missing, please contact the Daotong Intelligent User Support or an authorized dealer.
- Read this document in detail, use the Quick Guide, and watch the teaching video to understand the use process. Please carefully read the User Manual, Disclaimer, er and Safe Use Guidelines and Battery Safe Operation Guidelines before flight to ensure the safe operation and use of all functions.
- Before using the aircraft, ensure that you are familiar with the local laws and regulations related to flight, the functions of the aircraft, the flight control, and the intelligent return process.
- If you have any questions about using this product, please contact the Daotong Smart User Support or an authorized dealer.
First Flight Notice
Thank you for purchasing EVO Max T. Through this manual, al you can understand the characteristics of the product and learn to operate the aircraft and remote control in the best way. Before first using the product, please read this manual and\ other accompanying documents for inquiry.
First-Time Use
- For the first use, your EVO Max 4T and remote control are in the following steps.
Charging
Please use the official standard battery single charger and charger, and connect them to the smart flight battery and the remote control UCB-C interface for charging respectively, to wake up the use state of the battery (Please refer to section 4 )
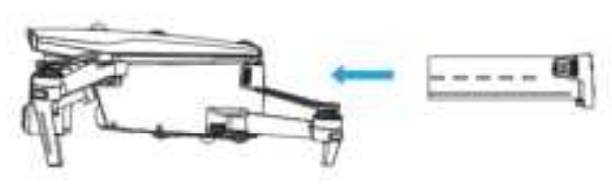
Prepare the Aircraft
- Remove the cover: tap the cover and remove it.
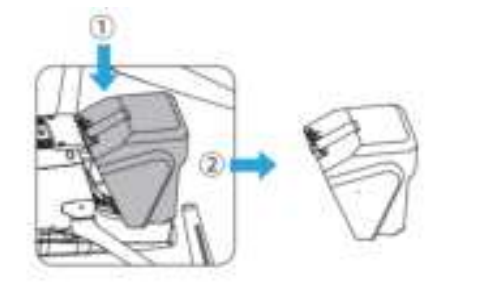
- Align the smart flight battery from behind the rear of the aircraft fuselage and push it in

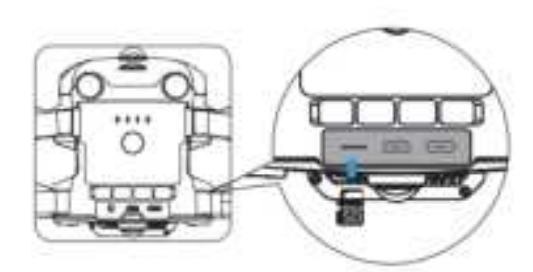
- Insert the micro SD memory card into the card slot behind the fuselage

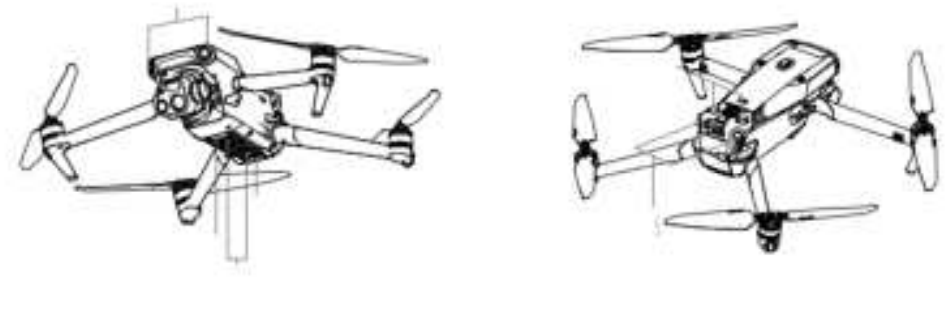
Expand the Arm
When expanding the left/right arm, expand the front arm and then the rear arm.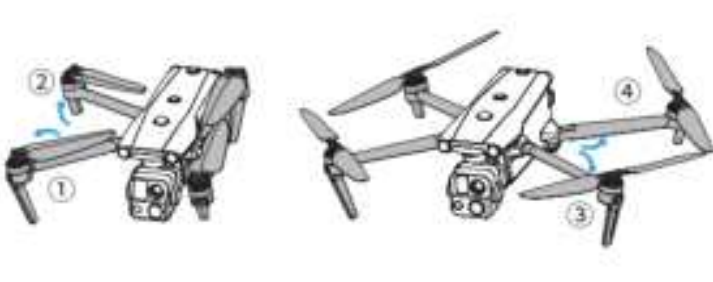
Installing/Removing the Propeller
EVO Max 4T Using the fast dismantling propeller design, the aircraft factory has been installed on the four-arm propeller. Refer to the following steps to install/remove the propeller:
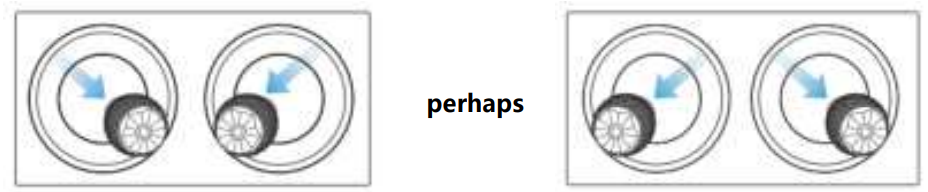
Install propeller
Select the matching propeller corresponding to each motor. Press the propeller midshaft position vigorously as shown, and then turn in the locking direction, so that the propeller is installed firmly.
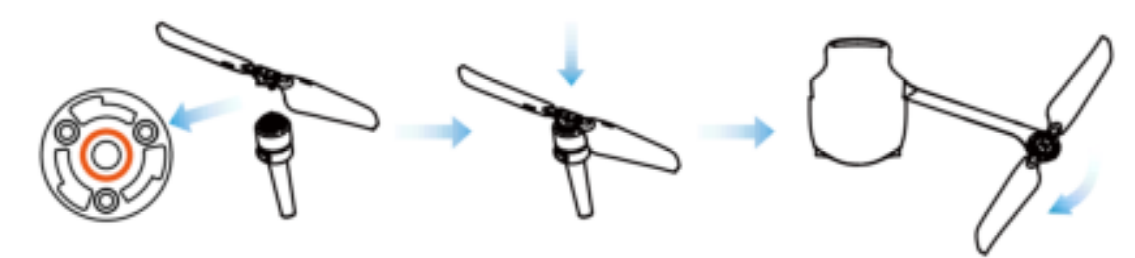
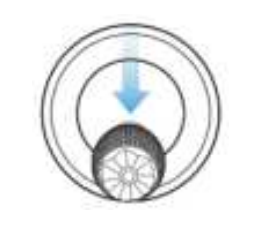
 Remove the propeller
- Turn off the aircraft.
- Press the propeller hard and rotate in the unlock direction to remove the propeller.
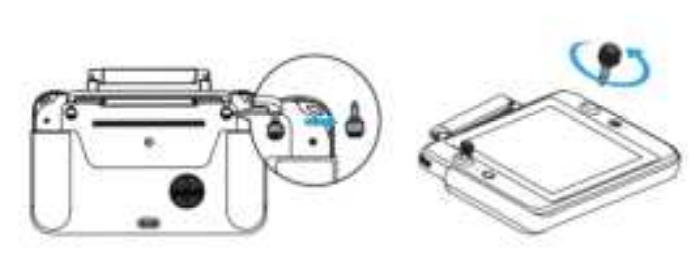
Prepare the Remote Control
Remove the handle from the back of the remote control and install the joystick.ck
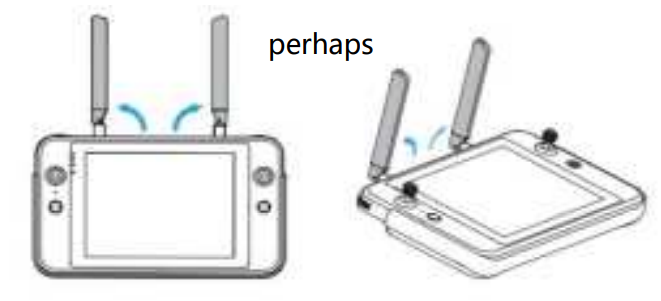
When used for the first time, the antenna of the remote control is in the storage state and needs to be expanded. ded
Flight Safety
Before using the aircraft, please conduct the relevant basic flight training, be familiar with the functions and characteristics of the aircraft and the remote control, or be guided by a professional. Do not fly in dangerous weather conditions such as gusts, rain, hail, or snow. Fly in open areas away from populated areas, buildings, and interference sources. Please fly 6000 m below. Due to insufficient light conditions, no GPS signal, and spatial stenosis, the use of some functions may be limited. For night flight, please turn on the night navigation light function to ensure flight safety. ty.
Hazard avoidance system (multi-source sensor fusion sensing system)
EVO Max 4T The aircraft fuselage is equipped with a multi-source sensor fusion sensing system based on “binocular vision + millimeter wave radar”, which has the long-distance detection ability of night obstacle detection, water surface height detection, wire and other small objects, realizing 360° all-round perception and obstacle avoidance, and helping the flight platform to realize all-weather and multi-scene operations (To change, add a detailed description of the new sensor)
Vision Sensor
EVO Max 4 T. The front, rear, upper, and lower binocular visual perception system uses image data to calculate the distance between the aircraft and potential obstacles. Once an obstacle is detected, the system will cause the vehicle to stop advancing. The binocular vision system at the front, rear, and bottom also has a Starpoint positioning system. The system uses ultrasonic sensors to calculate the altitude of the aircraft, while the binocular camera obtains position information through image a nalysis. (To change, add a description of the new sensor)

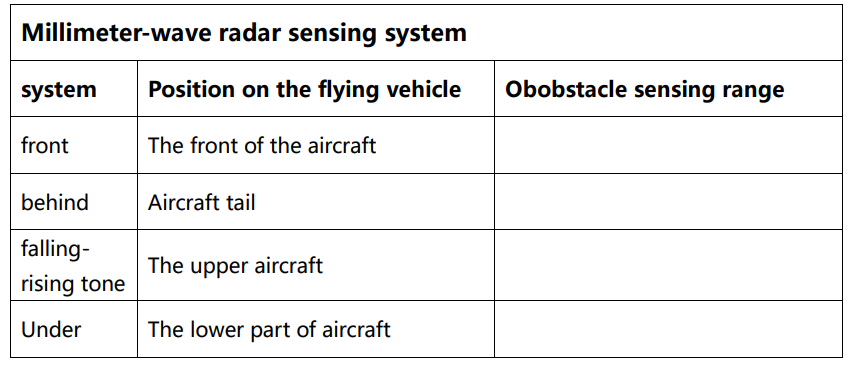
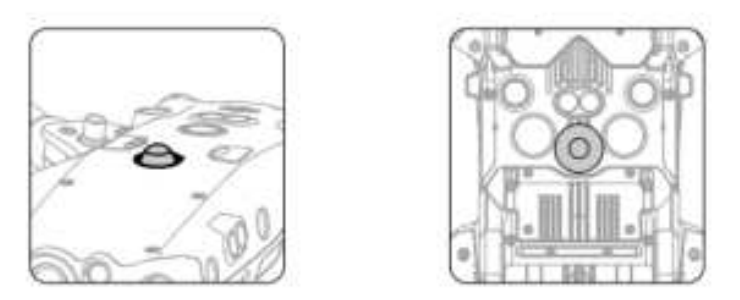
High-Precision Millimeter-Wave Radar
The fuselage is equipped with a 4-way millimeter-wave radar, with a detection range of more than 40 meters (Picture of millimeter wave)
Aircraft Night Navigation Light
The top and bottom of the aircraft fuselage are each equipped with a night navigation light, which facilitates the identification of the aircraft when flying in a low-illumination environment, and can be opened or closed in the Autel Enterprise App.\ (Night flight light drawing is required)
Flight Under the Aircraft
A group of LED fill lights is placed at the bottom of the aircraft fuselage. When the aircraft is taking off or landing in a low illumination environment, the LED fill light will assist the visual positioning system, which can be turned on or off in the Autel Enterprise App. (LED lights in the section)

Ensure that the vehicle is in a GPS or visual positioning mode. Wait until the flight LED indicator becomes a slowly flashing green light or a twice-flashing red light before taking off. Special care should be taken when the GPS signal is weak or fails to meet the visual positioning requirements (e. g., with a small visible texture on the surface, or when flying at more than 12 meters). The binocular visual sensing system and Starpoint positioning system are affected by the brightness and texture of the lower surface of the vehicle.
Intelligent Flight Characteristics
Automatic return flight
- Out of control protection. The function of runaway protection is to help the drone return automatically or land in its current position if necessary. The runaway protection is activated in the following two conditions.
- Communication interruption. If the communication between the aircraft and the remote control is interrupted for 3 seconds, the runaway protection will start.
- If the GPS signal is available when the runaway protection function is activated, the aircraft will activate the automatic return function. Otherwise, the vehicle will land in place.
- After the communication resumes, you can still press the pause button ( ) to regain control of the vehicle. The flying vehicle battery level is low. The runaway protection is activated when any of the following batteries is l.ow
Descent Characteristics
- Landing protection: When the aircraft reaches above the return point, the landing protection function will detect the ground environment below.
- If the ground is flat, the aircraft will land automatically.
- Otherwise, it will hover in place and wait for the next instruction.
- The aircraft records the takeoff point as the default return point.
- Accurate landing takes effect only when the return point is not refreshed during the flight.
- Choose an open, well-lit area as the takeoff point.
- When landing the aircraft by precise landing, ensure that the takeoff environment has not changed.
- Landing protection and accurate landing can be enabled using the App.
Restrictions For The Flight
Limit the Flight Area
EVO Max canCan automatically identify the restricted flight zone and avoid these areas by default during the flight. This function ensures that the vehicle complies with the legal flight area requirements.
Limit the height limit
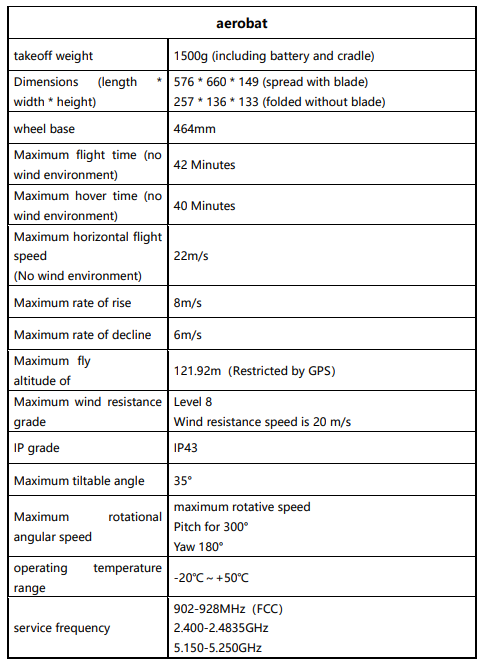
- Maintain flight altitude below 121.92m above ground level.
- This flight altitude is controlled and restricted by GPS positioning.
Pre-flight checklist
Follow these steps for a full pre-flight inspection:
- Ensure that the motor, the head, and the camera can work properly.
- Expand the antenna of the remote control.
- Ensure that the aircraft and remote control are in the complete pairing state.
- Ensure that all warnings and errors displayed on the Autel Enterprise App are processed.
- Ensure that the Autel Enterprise App and firmware have been updated to the latest version.
- Ensure that you are familiar with the flight control operations.
- Check if the flight area is open and open.
- Make sure the camera lens and the obstacle avoidance sensor are clean.
Operation
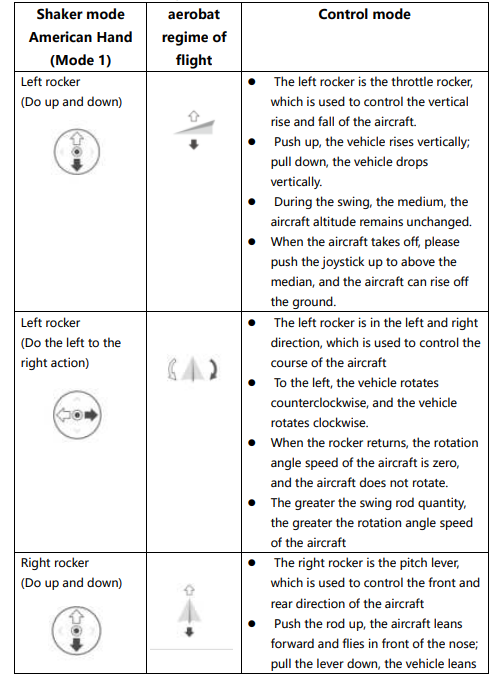
The aircraft offers three rocker modes: American, Chinese, and Japanese. Each mode controls the vehicle differently, and the default mode is the American hand.
- Place the aircraft in an open area. Stand at least 3 meters from the rear of the vehicle.
- Open the remote control.
- Turn on the aircraft and wait for the tail LED light to turn green and flash slowly.
- Start the motor with the remote control and take off.
- Carefully navigate the aircraft.
- Land the aircraft and turn off the motor.
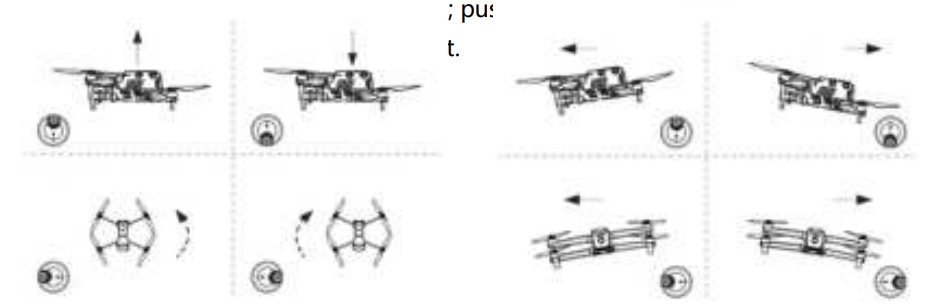
Start/Close
- Start the motor: break the left and right swing lever for 2 seconds

- Close the motor: After the motor is started, the motor operation can be stopped by using the following two methods

- Method 1: When the flight is in the landing state, pull the throttle bar (left joystick) down to the bottom until the motor is closed.
- Method 2: When the flight is in the landing state, the left and right rocker will break the rod until the motor is closed.

Take-Off/Landing
- Aircraft take off. Place the aircraft on empty ground and point the tail towards the user. The aircraft is as follows: Push up, the aircraft will slowly take off vertically and r..ise


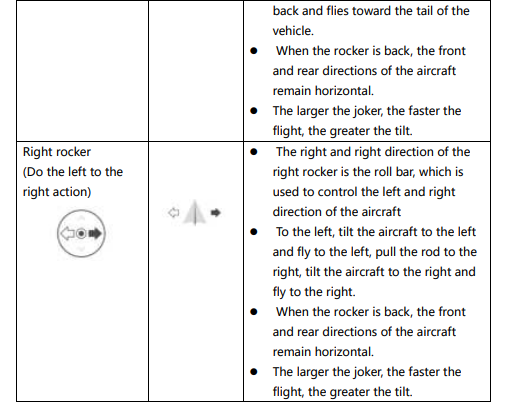
The craft lands manually
- Find the right location for the aircraft to land (open and flat area).
- When the aircraft reaches the target position, release the rocker to hover over it.
- Pull the left joystick down to land the aircraft.
- When the aircraft reaches the ground, pull the left rocking lever to the bottom until the motor is closed
- Low battery warning activates in non-GPS environments.
- Battery underbattery warning activation
Daotong Intelligent Aircraft EVO Max 4T
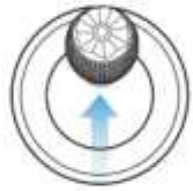
The aircraft has an LED indicator light at the end of each arm. The head LED is stable red, which can help you identify the nose direction. The tail LED will display the current flight status of the aircraft. The following table shows the meaning of each status indicator light. Slow flicker: flicker every 2 seconds R red Quick flash: blink twice per second G greenAlternate flicker: flicker alternately in different colors Y yellow
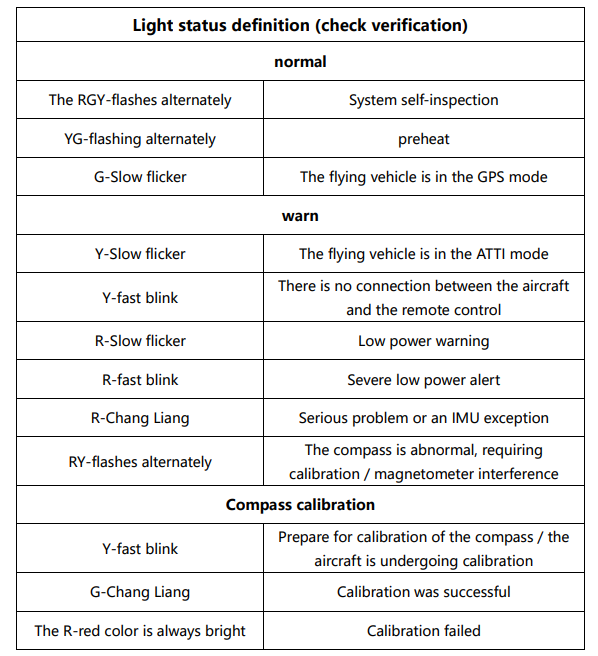
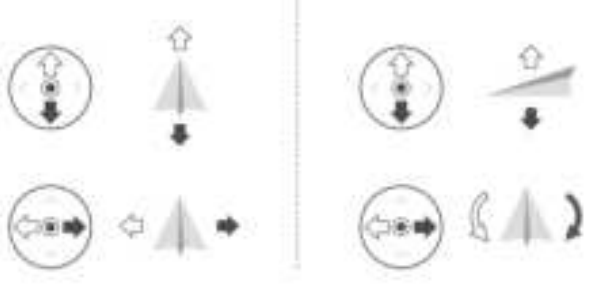
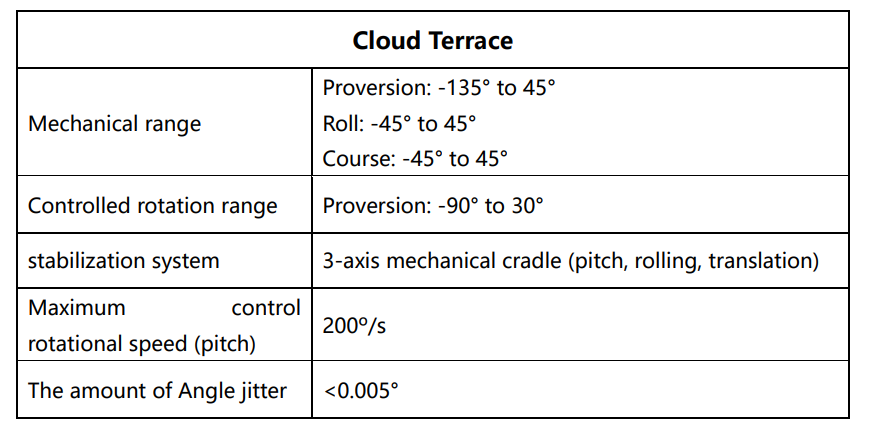
Controlled Rotation Range of the Cloud Head
The channel melt optical L10T has a high-precision three-axis motor structure, which keeps the camera stable when the aircraft flies, thus ensuring image stability and clarity. The controllable rotation angle of the three-axis motor is shown in Fig.
Working Mode
Increased stability mod:e: The roller shaft is kept horizontal, while the pitch shaft remains at a user-set angle. This mode is used to capture stable horizontal pictures and videos..
FPV Pattern
The roller shaft is aligned with the rolling direction of the vehicle, while the elevation shaft is maintained at a user-specified angle. The pattern is used for the first-person perspective.
Remove/Install the Cloud Head.
The aircraft adopts a Yuntai removable design. For the disassembly steps, please see the following
- Place the vehicle on a horizontal surface to make the cradle head up.
- The screwdriver (model) shall unscrew the metal cover screws to fix the FPC connector and pull the connector wiring interface out from the slot.
- Pinch the tail of the shock absorber gently and lift the cradle head.
- Slide thecradle head in a straight line down the tank.
- Place the connector wiring port in the slot, and push it to the bottom when inserted.
- Turn on the power switch for the aircraft. If the cradle head connector cable is properly connected, the cradle head will automatically rotate for a self-test.
Camera
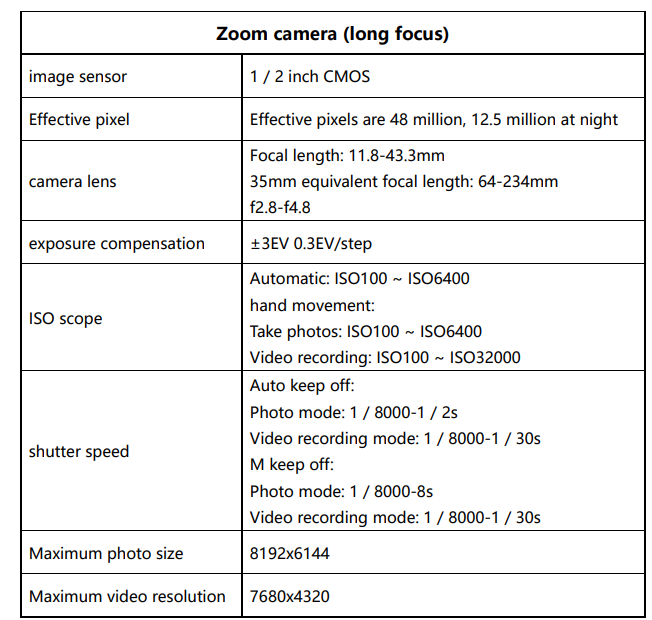
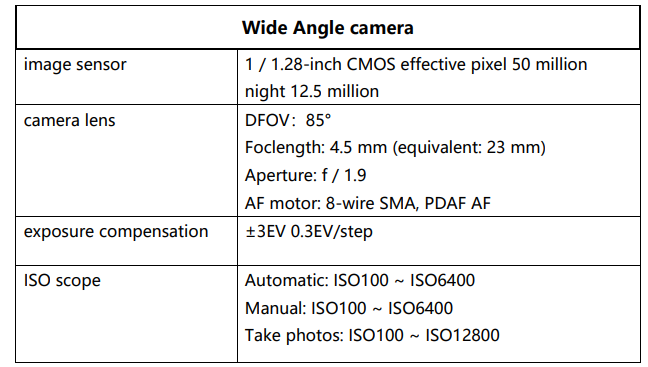
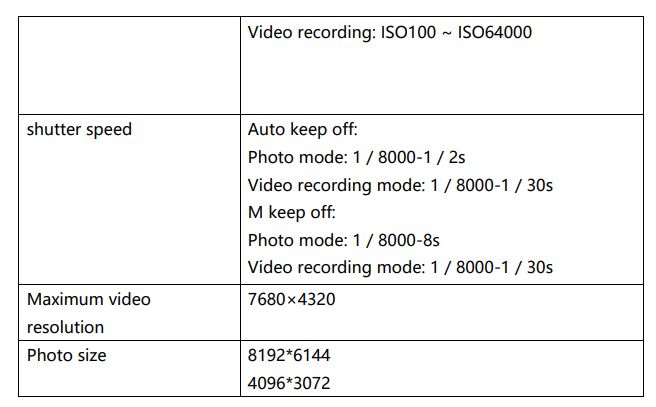
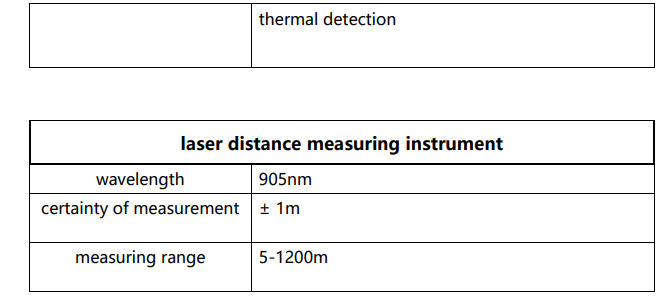
The melt L10T integrates four sensor systems: telephoto camera, wide-angle camera, infrared thermal imaging camera, and laser rangefinder. Combined with the leading multi-sensor fusion algorithm, it realizes visible 8k ultra HD resolution video recording, 10 x optical zoom, 640 * 512 HD infrared thermal imaging, and 1.2km laser ranging, enabling a variety of industrial application scenarios. The camera supports a variety of camera modes, including: single shot,
continuous shot, AEB, timing, and HDR photo. The camera saves photos in DNG or JPG format and records video in MOV or MP4 format. Images and videos can be stored in the micro SD card or the vehicle’s built-in memory.
Camera Operation
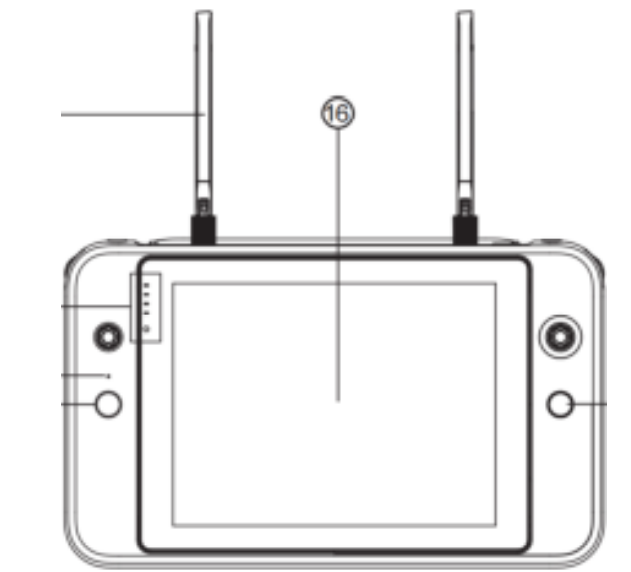
Control the camera with the Autel Enterprise App built into the smart remote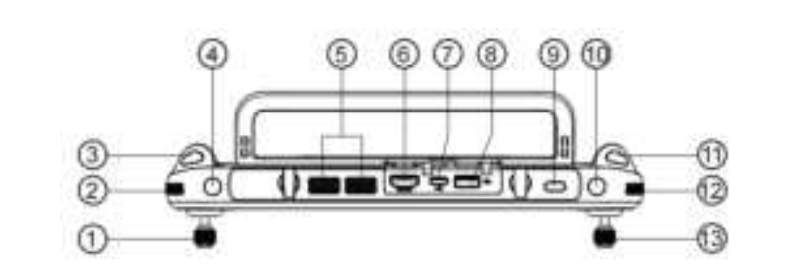
(Top view, with the following 6 keys indicated separately)
- Pitch wave wheel: Adjust the pitch Angle of the head, dial clockwise, rotate up on the head, dial counterclockwise, and rotate down under the cloud
- Zoom wave wheel: Dial to do the screen zoom, clockwise dial, increase the zoom multiple, counterclockwise dial, reduce the zoom multiple
- Photo button: Short-press to shoot
- Video recording button: Short press to start/stop video recording
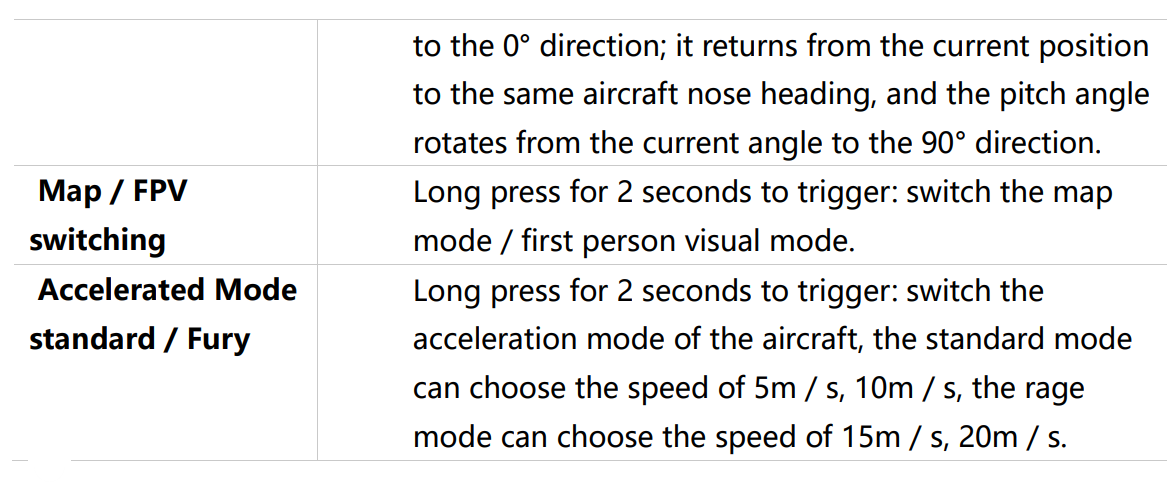
- Custom key C 1 / C2: You can quickly take a shooting function, and you can make an independent custom function setting in A utel E nterprise A pp
Flight Control System
EVO Max 4T Stable and convenient flight control is implemented through its built-in intelligent flight control system. The system supports several advanced functions, including return, runaway protection, Starpoint positioning system, etc. The working description of each module is shown below. 
Flight Mode
Depending on the GPS availability and flight conditions, the aircraft can automatically switch between the three flight modes.


Attitude Mode
When the aircraft is in an environment without a GNSS signal or a poor signal, the flight control system only maintains the stable attitude of the UAV, and the aircraft may drift due to the lack of accurate positioning.
Intelligent Flight Function
- Intelligent tracking: Intelligent tracking uses deep learning algorithms to detect six types of objects in real time: pedestrians, cyclists, cars, trucks, boats, and animals.
- Point to the flight: Pointing to the flight allows the user to set the direction of the vehicle by touching a point on the screen.
- gesture recognition: The main camera uses deep learning algorithms to recognize and respond to three gesture commands: straighten your arms up to set yourself as a target, raise your arms flat to take a photo, and raise one arm to start or stop recording.
- Precise landing: Precision landing uses the binocular vision system below the aircraft to record information at its takeoff position. During the process of return flight and landing, the visual algorithm is used to calculate the position error of the aircraft and its takeoff point in real time, so as to control the precise landing of the aircraft at the takeoff position.
- Safe landing: The safe landing function uses the lower visual system of the vehicle to create a depth map. The flatness and angle of the depth map are then calculated to detect whether the surface is sufficiently flat to ensure a safe landing.
Data Storage/Transmission
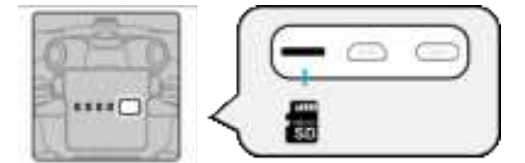
Use the microSD card.
Before opening the aircraft, insert a microSD card into the port, as shown in the figure below. EVO Max 4T:: Maximum support capacity. The SD card for the GB (to be confirmed). If you plan to shoot HD video, we recommend using Class 10, UHS-3 microSD cards or external SSD high-speed hard drives.
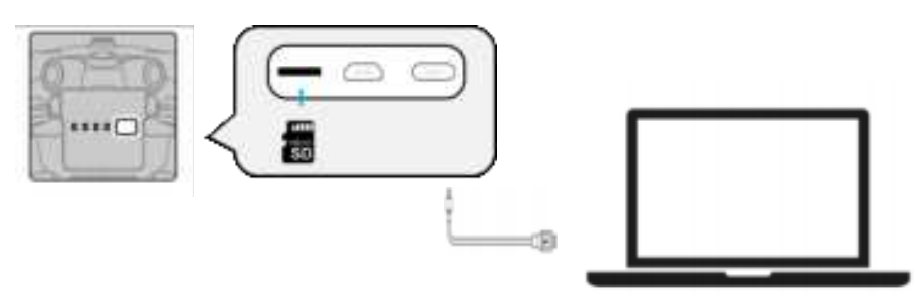
Transfer the files to the P C/Mac.
To transfer photos and video to the P C/Mac, connect the computer to the flying vehicle via the USB-C interface, as shown below.
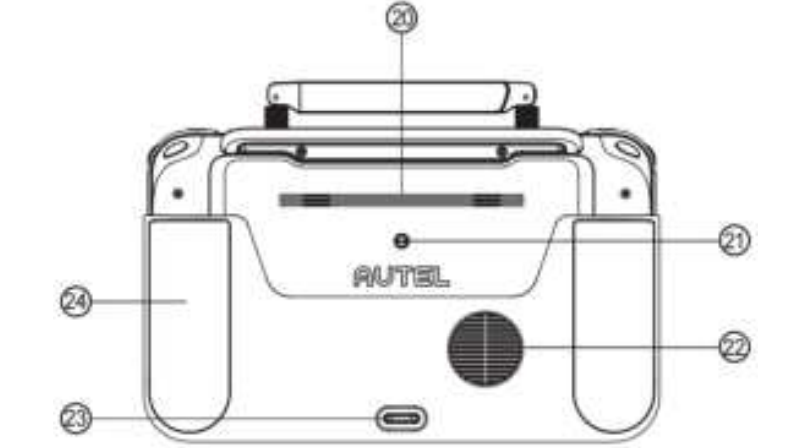
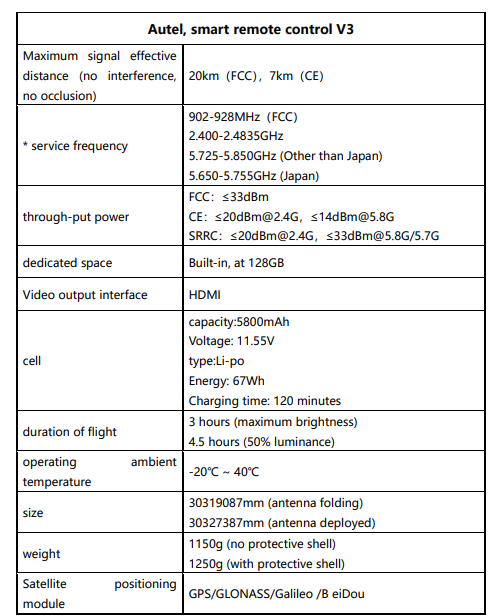
Intelligent Remote Control
The function and use of the components of the intelligent remote controland the control of the aircraft
Product Functions
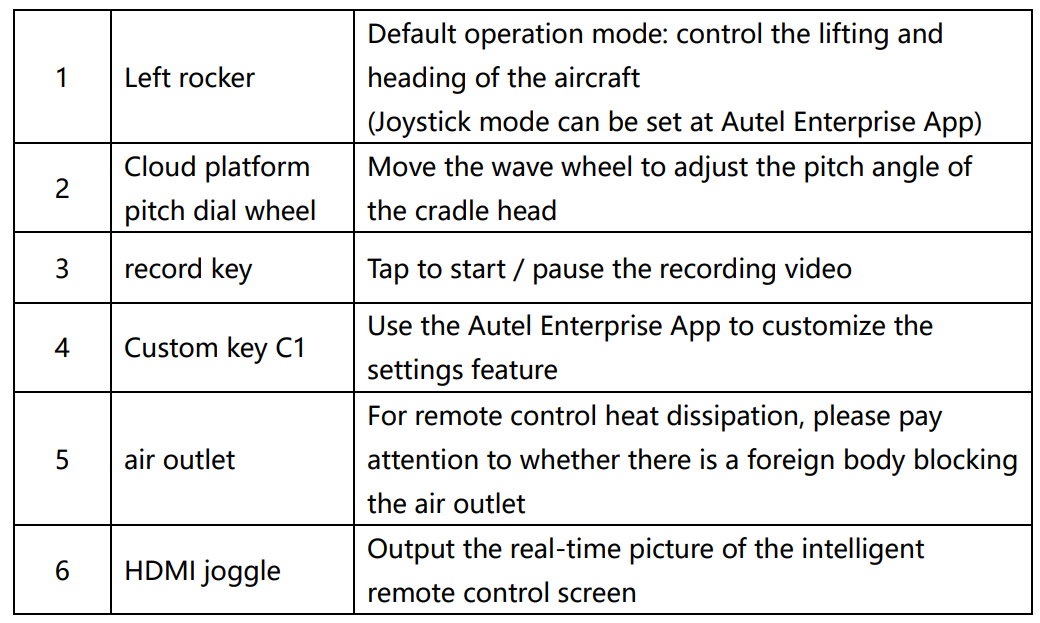
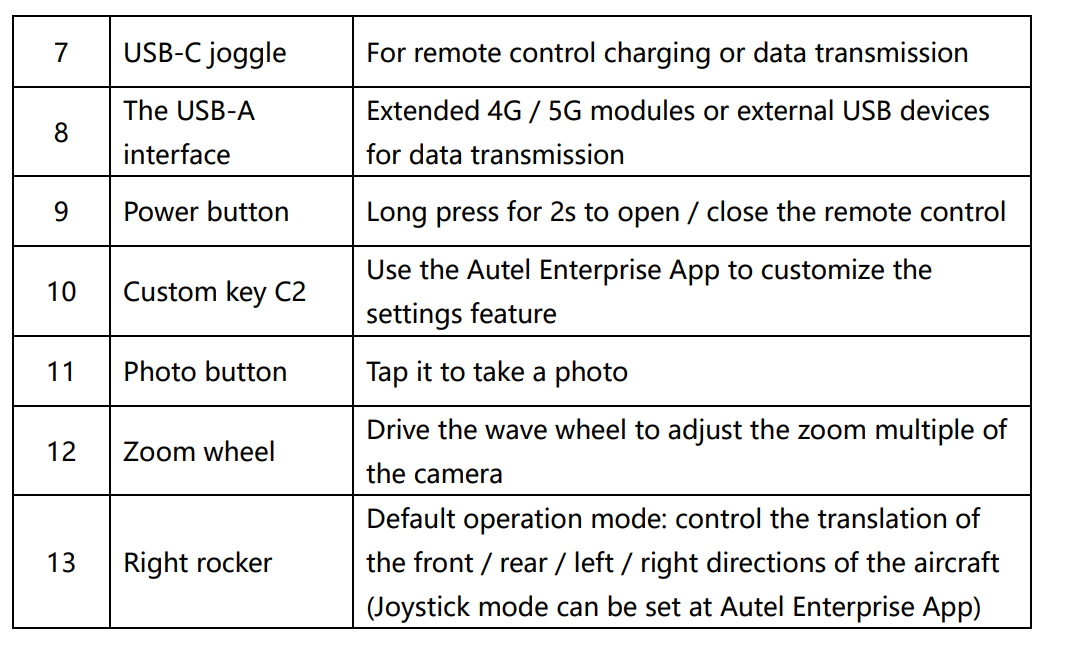
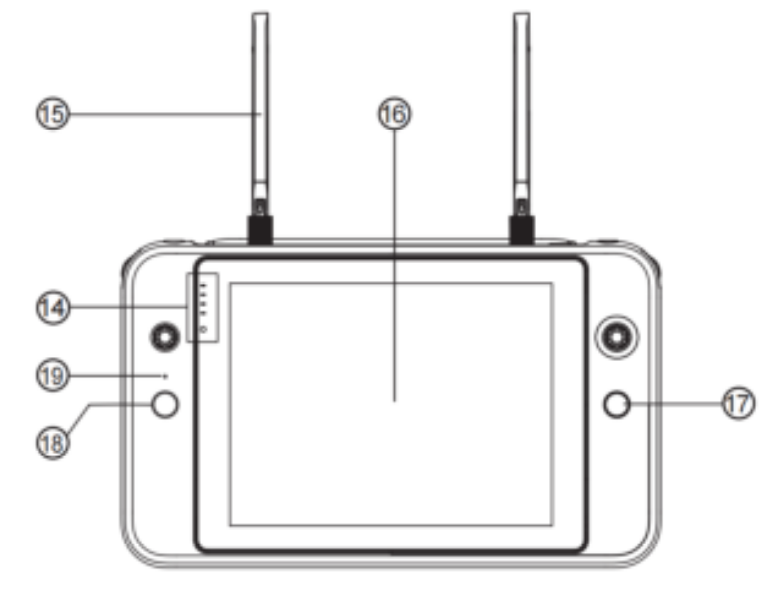

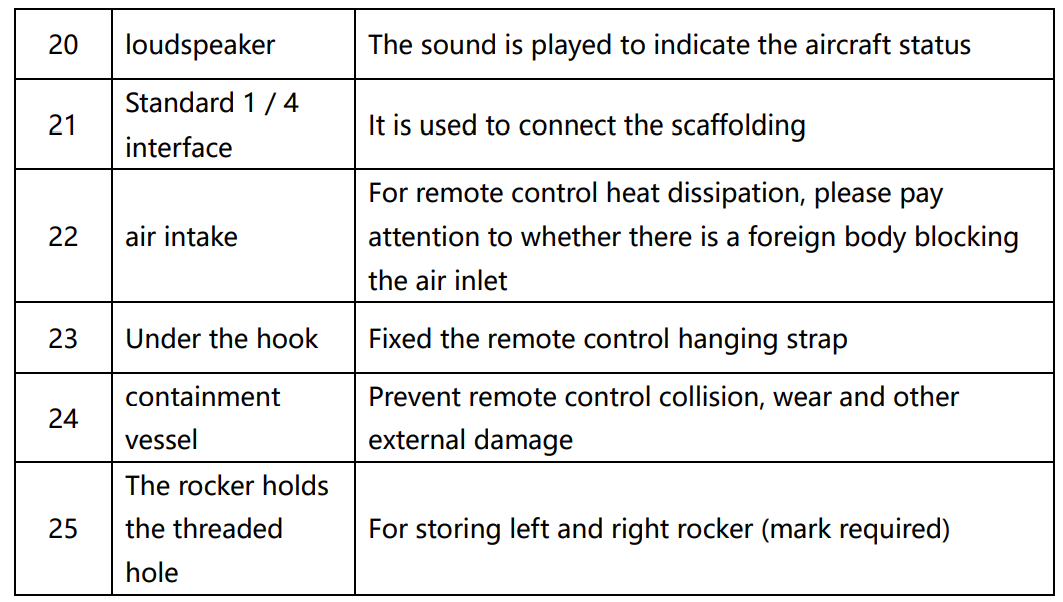
Usage Instructions
- Expand the remote control. The remote control is folded in the packing box. Expand the antenna before use.
- Turn on the power supply. Long-press the power button on the top of the smart remote control body for 2 seconds to open the remote control.
- Activate the intelligent recontrol. When the smart remote control is used for the first time, it can be activated normally. When activated, the smart remote control should be kept networked.
Follow these steps to activate the vehicle
- Make the remote control in the power-on state, and select the corresponding model.
- Click on the avatar in the upper right corner of Enterpriseise’s main page, and register
Smart remote control, power, and charging
Power quantity Pressress the power button of the remote control. The power prompt light will display the power of the remote control. The power surplus is roughly as shown in the figure: (confirm the power light)

Point out the lock screen of the smart remote control, home interface,, or pull down the top status bar toview the current power.
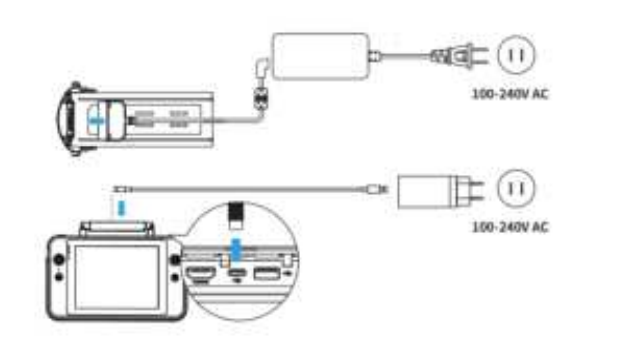
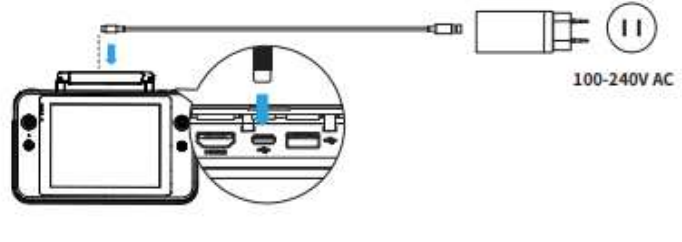
Equipment Charging
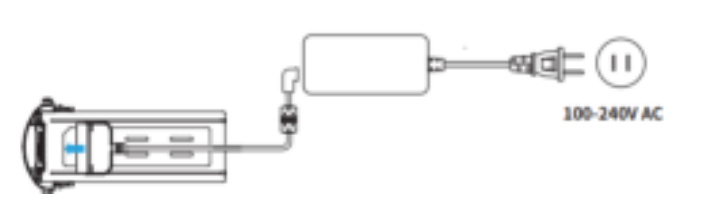
- Use the dual-head USB-C data cable to connect the USB-C port at the top of the smart remote control, and connect the other end to the USB-C port of the power adapter, and connect to the AC power supply (100-240V).
- After the AC power supply is connected, the power prompt light of the intelligent remote control will start to flash in turn.
- It takes about 120 minutes for the smart charger to fully charge to the full charge..
Point Out
- Please charge with the official standard or certified charging device
- It is recommended to fully charge and discharge the smart remote control every three months to keep the battery in the best condition.
- Please use the official standard or certified smart charger and dual-head USBC data cablee the charging rate may be affected.
- The charging environment temperature is different, but the charging rate is slightly different, and the actual charging time shall prevail.
Installation and Use of Accessories
- Install the remote control hanging belt. If usinare strap, refer to the following installation steps..
- Thetwo metal clips on the strap are tightened to a narrow position on both sides of the metal handle of the smart remote control.
- After opening the metal button, bypass the lower hook at the bottom of the back of the smart remote control body, and then tighten the metal button.
- After wearing the strap around the neck, the wearing mode as shown in the figure can reduce the holding pressure of the hand.
Rocker Storage and Installation
On the back of the intelligent remote control. When the joystick needs to be stored, rotate the screw from the body of the intelligent remote control, align the bottom of the rocker with the screw hole, and rotate clockwise to the back handle. If you need to take out the installation, please take the opposite step. (Shaker-out drawing)
Adjust the Antenna
Expand the remote control antenna and adjust the antenna position. Different antenna positions receive different signal intensities. When the antenna and the back of the remote control are at 180° or 260° angles, and the antenna plane is facing the aircraft, the signal quality of the remote control and the aircraft can reach the best state. When handling the aircraft, always keep the aircraft in the optimal communication range.

Remote Control
For frequency operation using the Autel Enterprise App, refer to the following specific steps for frequency operation:
- After the (position) opposite frequency button enters the opposite frequency state of the aircraft, the flight indicator light of the aircraft will be in the high-frequency flashing state (to be confirmed)
- Open the remote control and run Autel Enterprise App, enter the “intelligent Photography” interface, click the gear icon in the upper right corner, enter the Settings menu, click “Remote Control-> Remote Control to frequency> Main Remote Control to frequency”, wait for a few seconds until the frequency matching is successful.
- If the intelligent remote control and the aircraft are on the same frequency, please keep the distance between them within 50 cm
Calibration
If the smart remote control is used abnormally, it is recommended to calibrate the smart remote control. You can use the Autel EnterpriseAppto calibrate the rocker and keys, following the following steps:
- Open the remote control. Enter the App Camera Interface> Set ( )> Remote> Remote Calibration.
- There will be two meter word shapes and two horizontal bars, representing the left and right joysticks and the left and right dial wheels.
- Shaker calibration: Push and hold the joystick in eight directions until a beep is heard each time.
- Wheel calibration: Turn the dial wheel clockwise until a beep is heard, and then turn counterclockwise until a beep is heard.
Joystick Mode
The joystick mode is divided into Japanese, American, and Chinese hands. You can set the joystick mode in the Auto Enterprise App according to your preferences. The default control mode of the remote control is the American Hand (Mode 2) mode (Please refer to the below).
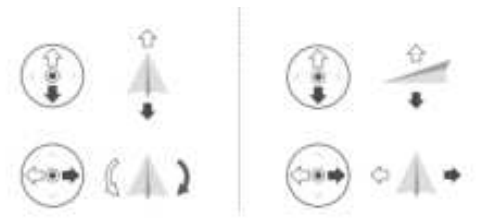
Shock Mode Description
When using the intelligent remote control for flight control, it is necessary to understand the flight control mode of the current joystick, and fly carefully. The joystick mode is Japanese, American, and Chinese hands, as shown in the following figure:
Japanese Hand (Mode 1)
Left rocker: Push the joystick up and down to control the vehicle’s forward and backward movement; push it left or right to control the direction of the aircraft. Right joystick: push the joystick up and down to control the rise and descent of the aircraft; push the joystick to the left or right to control the left or right movement.
American Hand (Mode 2)
- Left joystick: push the joystick up and down to control the rise and descent of the aircraft; push it left or right to control the heading of the aircraft.
- Right joystick: push the joystick up and down to control the forward and
Chinese hand (Mode 3)
- Left joystick: push the joystick up and down to control the forward and backward movement of the aircraft; push the joystick to the left or right to move the aircraft to the left or right.
- Right joystick: push the joystick up and down to control the rise and descent of the aircraft; push it left or right to control the heading of the aircraft.
If you are the first time to operate the drone, please keep the lever gentle until familiar with the operation of the drone.
Key Function
Automatic takeoff/return button, pause button.
The return function is only enabled if the GNSS signal is good. To manually activate the automatic return function, press the return button () on the remote control. Upon receiving the command, the aircraft will automatically return and land at the preset return point. EVO Max 4 T. Its omnidirectional obstacle avoidance system can be used to detect and avoid obstacles in the air route. When the aircraft is in the return state, the function of the remote control will be disabled, and you can short-press the pause button () to activate it again.
Custom key C 1 / C2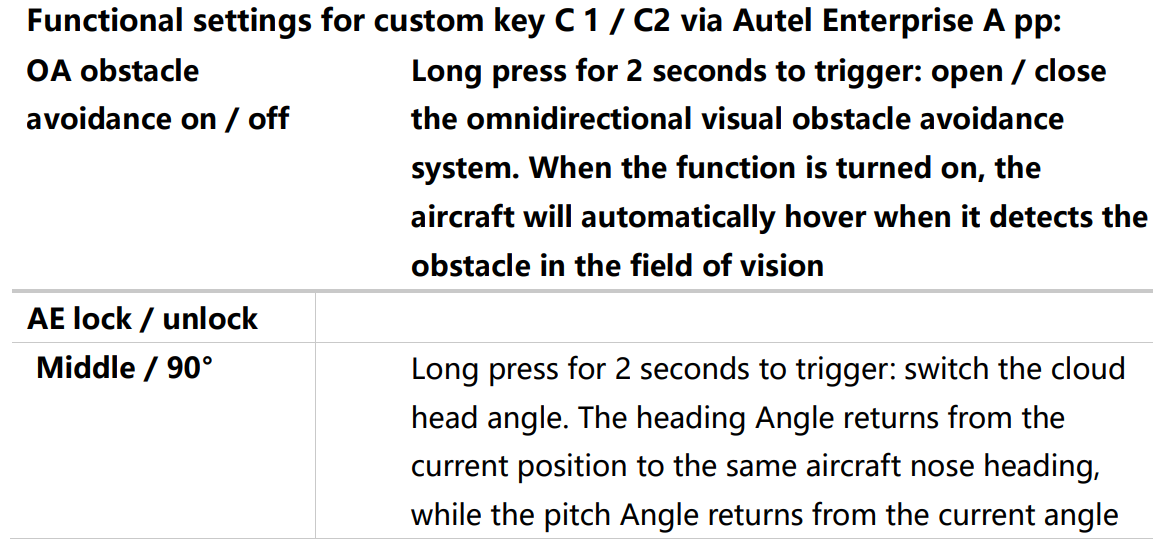
 Autel Sky Link Map Transfer Function
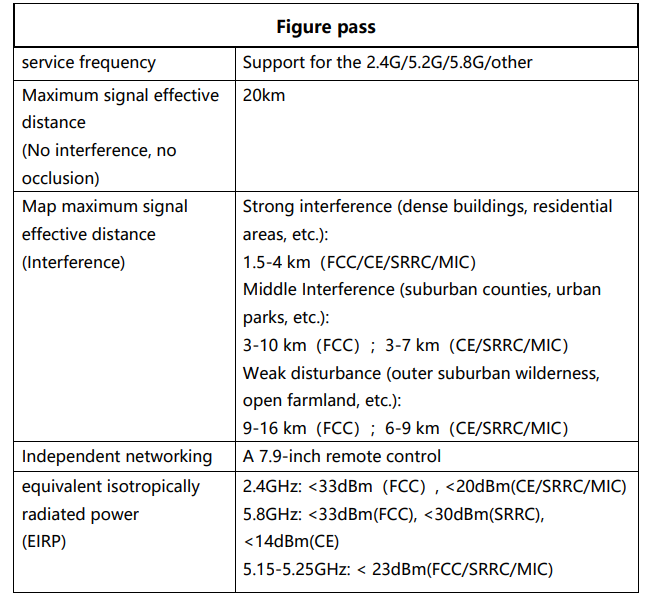
EVO Max 4T The aircraft is equipped with Autel SkyLink 2.0 map transmission technology, equipped with 2 map transmission antennas and 4 receiving signals, so that the communication distance between EVO MMax4T and the ground control terminal can reach / 20 km.
- It supports the adaptive frequency hopping transmission of multiplex frequency bands and selects the optimal channel according to the electromagnetic interference situation, which has a strong anti-interference ability.
- The real-time transmission picture quality reaches 1080p / 60 fp, and it has a high transmission code rate and low time delay transmission characteristics of 64Mbps.
- The AES-256 encryption mode is adopted for the full-link data transmission and storage, to ensure that the end-to-end communication data is not monitored.
Equipment Calibration
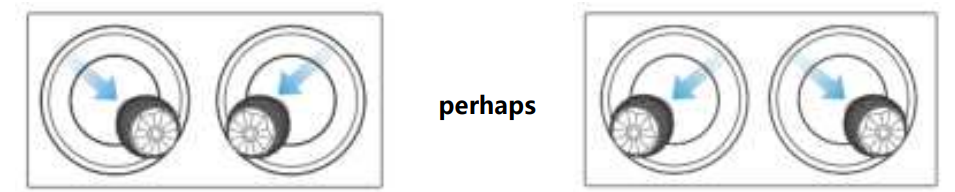
The compass is calibrated at the factory, without user calibration in normal conditions. If the compass displays an error message, the flight direction of the vehicle is inconsistent with the control input, or the flight site deviates too much from the calibration position, please calibrate it in the following steps.
- Turn on the vehicle and remote control and run Autel Enterprise App> Smart Photography> Click Set.
- At the beginning of the calibration process, the aircraft tail LED light turns yellow and flashes.
- Hold the vehicle and keep it horizontal, and then turn the vehicle until the vehicle’s tail LED light turns green.
- Hold the aircraft and keep it in the vertical direction, nose down, and then turn the aircraft until the aircraft’s tail LED light turns green.
- Hold the aircraft so that the nose is forward and the side down, and then turn the aircraft until the aircraft’s tail LED light turns green.
IMU Calibration
IMU needles are calibrated at the factory; there is no user calibration in normal conditions. If the acceleration and angular velocity of the vehicle are abnormal, calibrate the vehicle as described below.
- Remove the blades and fold the arms to place the aircraft horizontally
- Place the vehicle according to the Autel Enterprise App prompts, and keep the vehicle stationary
Remote Control Prompt Tone
In some scenarios, the remote control will issue a prompt sound (such as boot, low remote control power, obstacle reminder, etc.). For prompt details, you can refer to the real-time screen prompt of the remote control. Users can turn off the voice broadcast and obstacle reminder sound by themselves, and the operation method is: intelligent photography-setting-general-voice broadcast/obstacle reminder sound.
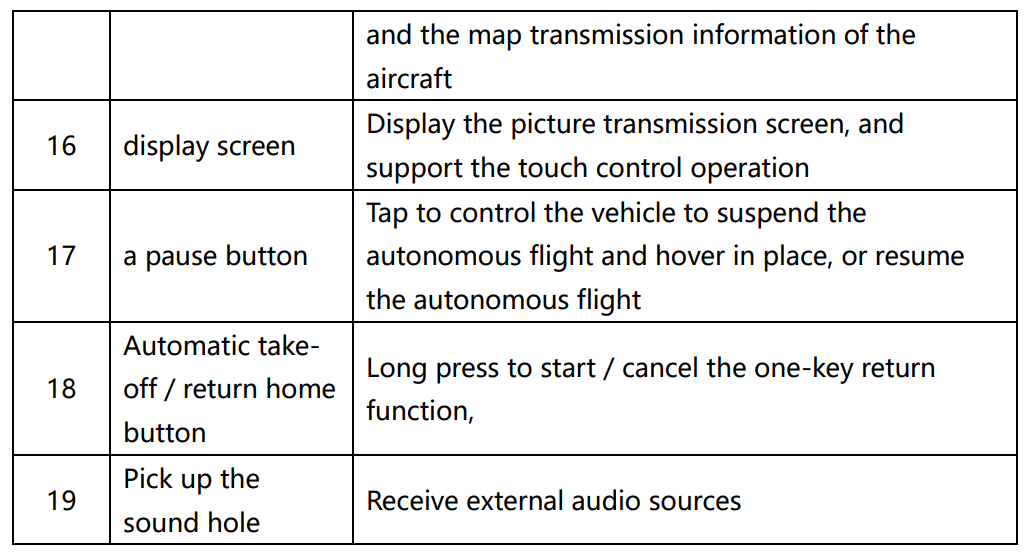
Picture Transmission and Picture Output
The aircraft comes with a variety of image output modes, which can be wired transmission or wireless transmission.
HDMI Interface
The remote control is equipped with a H DMI interface. After connecting the HDMI interface, the remote control interface can be output to the display screen.
Live streaming function
The remote control has a built-in live broadcast function, which supports the R TMP protocol. Users can fill in the R TMP address, screen display mode, and live broadcast resolution on the function page. Operation method: Intelligent photography-Settings-Live streaming (this function is turned off by default)
Intelligent Flight Battery
Use, storage, and maintenance of intelligent flight battery, etc
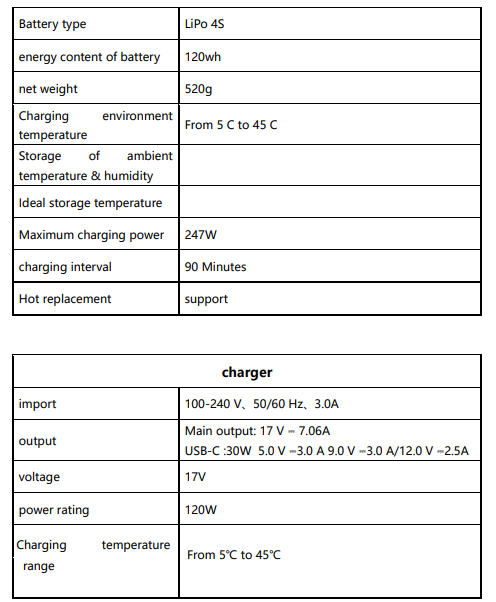
Product profile
EVO Max 4T The rechargeable lithium polymer battery used has the characteristics of high energy density and large capacity. The battery needs to be charged with a dedicated charging device provided. (Required copy)
Battery Use
- Install the aircraft battery
- Turn off the battery power switch before installing the battery.
- Insert the battery into the battery compartment, as shown in the right picture.
- A click when the battery is in place.
- Remove the aircraft battery.
- Turn off the power switch of the aircraft battery before removing the battery.
- Press the buckle on both sides of the battery to slowly extract the battery.
- Turn on the battery. Before installing the battery, make sure it is turned off.
- The battery level indicator light displays the current battery level.
- Turn off the battery. Long-press the power button for 3 seconds to turn off the battery.
- If the battery is mounted on the vehicle, LED1 and LED4 will flash 5 times to indicate a shutdown.
- After all battery level lights are off, remove the battery from the vehicle.
Battery Power View and Charging
Check battery power. When the battery is off, short-press the power button for 1 second to check the battery level. The LED will display the current battery levels, as follows: Battery level indicator status (non-charging status)
Battery Charging
Connect the charging interface of the power adapter to the slot of the battery metal electrode, and connect the plug to the AC power supply (100-240V) to charge from 0 for up to 90 minutes, but the charging time is related to the remaining power.
Point Out
- The battery and charger provided by the official company must be used. It is forbidden to transform the battery pack and its charger, or to replace it with third-party equipment.
- Daotong Intelligence will not be responsible for all the consequences caused by using the charging equipment provided by Daotong Intelligence.
- When the charger is not used, it should be disconnected from the aircraft battery and power supply. Wait for the battery to cool to room temperature before charging.
- If the battery is connected to the charger immediately after the flight, the overtemperature protection function may be automatically activated, preventing the battery from charging until it is completely cooled.
Battery level Indicator Lamp
The LED indicator on the aircraft battery is illuminated from left to right to indicate the current battery level during the charge cycle and turns off after the battery is fully charged.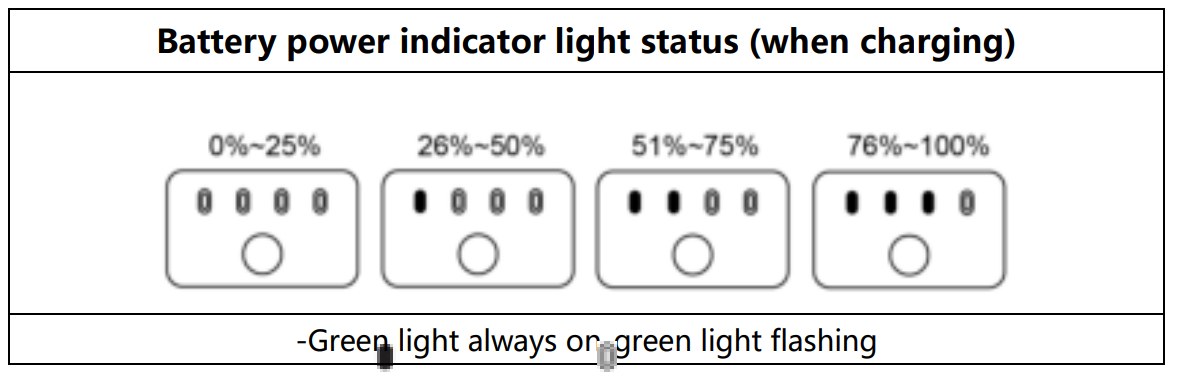 Battery Function
- Battery thermal replacement. When the aircraft needs to replace the battery and the power supply is on, the original battery can be directly removed, and another fully charged battery can be replaced within 30 seconds.
- Battery self-heating. The battery has the self-heating functin a low-temperature environment:
- When the battery is heated and insulated, the battery power indicator light flashes as shown in the figure. (LED graphic)
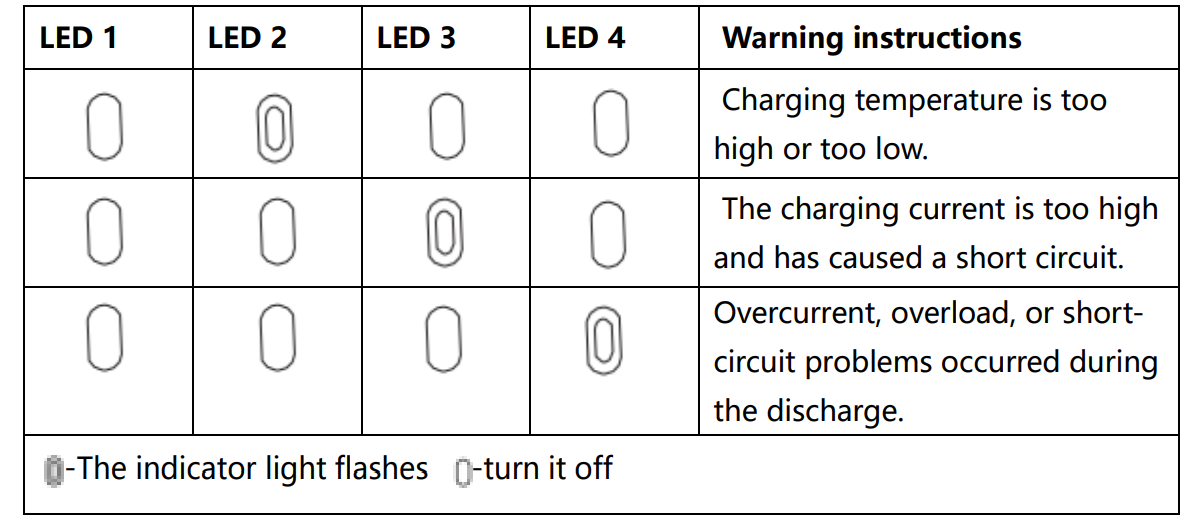
 Other battery level indicator light warning instructions
 Battery Storage and Disposal
Keep close contact with the water or heat source during storage.
- Do not store batteries near direct sunlight or sharp objects, water, metals, or reactive chemicals.
- Storage of batteries at extreme temperatures shortens their service life.
- Otherwise, it may cause battery damage or failure.
Storage for Self-Discharge Protection
The battery will automatically discharge to a safe charge. This is the default setting, and the discharge process takes 2-3 days.
Battery Disposal
- Be sure to completely discharge the battery before discarding it.
- Send the battery to the designated recycling point for proper disposal.
Autel Enterprise App
Autel Enterprise A pp Software interface and function use.
Product Profile
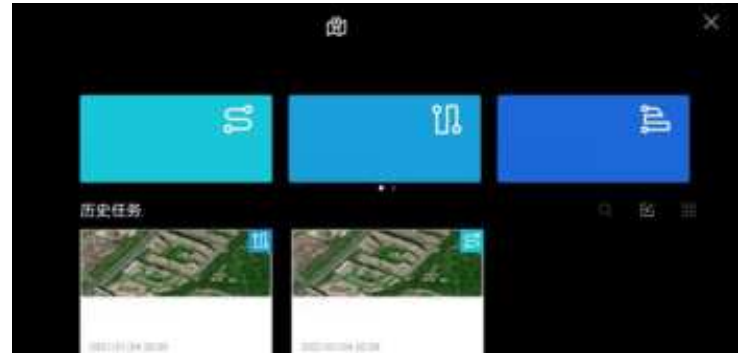
The software integrates various professional functions to improve efficiency quickly and realize intelligent operation. Users can choose various task modes such as navigation point task, rectangular task, polygon task, tilt photograph,hy and so on through the Autel Enterprise App.
Navigation Point Mission
After calling and execution, the aircraft will fly automatically according to the route and perform the corresponding action at each point. Click “Mission Flight” on the main interface of the App, and select
Flight speed: the flight speed of the aircraft when flying up to this point, and the aircraft will gradually adjust the flight speed to the set value during the process offlying to this point. Click “Airpoint”> select “Flight Speed”> swipe left and right to change the value. Action: Click the point> Select “Action”> Set the point action and camera action. The point action is divided into “overfly” and “hover”. When choosing flyover, the camera can choose to take photos, take photos, range, start recording, stop recording, or add action. When hovering, the camera action can choose regular photography and video recording (1~10s).
Tay pitch Angle: the head pitch Angle (0°~90°). Click AirPoint> Select “Action”> Add Camera Action> Slide left and right to adjust the pitch angle. Yaw angle: the nose orientation as the aircraft flies to the navigation point. Click Airpoint> Select Action> Add Camera Action> Select Yaw Mode.
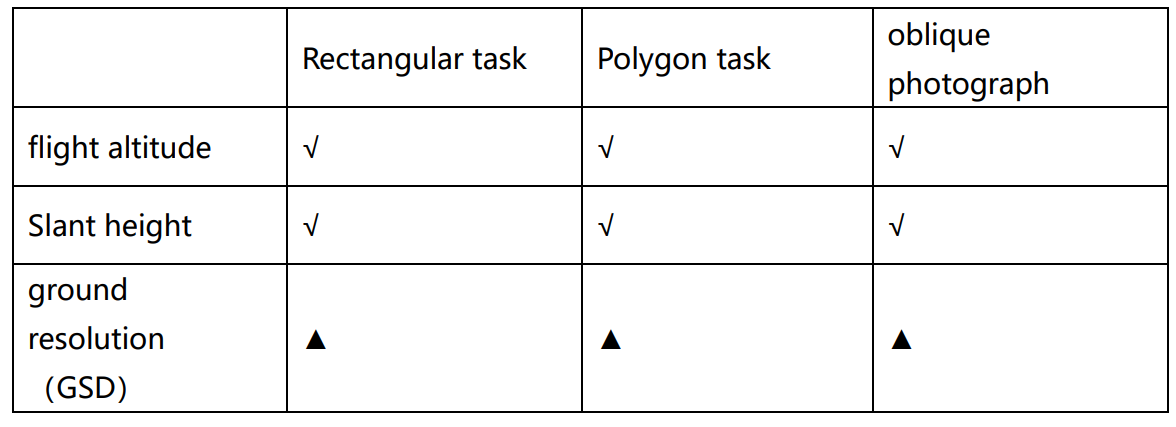
Regional Tasks
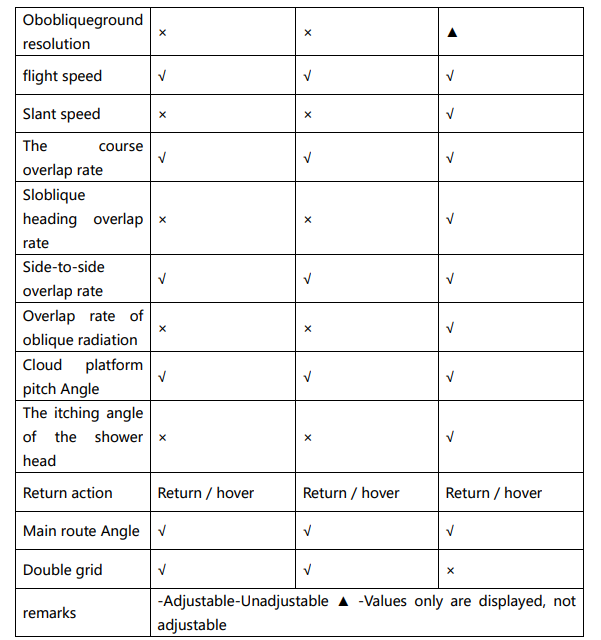
Users can choose three regional tasks (rectangular, polygonal, and tilt photography). The user can set the flight parameters of the aircraft, and the system will calculate and plan the flight path. Click “Mission Flight” on the main interface of the App, and select the rectangular task, polygon task, or tilt photography to enter the planning interface. Create a project, you can manually move, zoom in, and narrow the task area, and click the bottom menu to modify the parameters.
When opening the double grid, it is suitable for 3D modeling. Polygon task: to generate the irregular polygon flight area, and to fly with the bow word when turning off the double grid, which is suitable for the orthographic image data acquisition. When opening the double grid, it is suitable for 3D modeling.
Tilt photography: The generated route consists of one normal route and four inclined routes, which are suitable for accurate 3D modeling.
Historical Tasks
You can also find the corresponding historical task by searching the ( ) file name.
Firmware Update and Equipment Maintenance
Firmware update
Before the flight, please confirm that the firmware of the aircraft, remote control, and supporting products is the latest version
Firmware download and upgrade
Method 1: Autel Enterprise App Online upgrade
- Keep the aircraft and remote control on to ensure that the aircraft and remote control have completed frequency matching.
- Open the Autel Enterprise App on the remote control side. If there is a new firmware update, the prompt box will automatically pop up in the software interface to remind you to download and install it.
- Click to upgrade, and the Autel Enterprise App will download the latest firmware and automatically upgrade. When starting the upgrade automatically, you can view the upgrade process through the software interface.
Method 2: The official website firmware package is upgraded offline
- Use P C/M ac to download the firmware upgrade package from the official website of Daotong Intelligence, visit: C/Mautelrobotics.cn/download/23.html, select the corresponding model to download.
- Insert the micro SD card into the PC / Mac, move the downloaded file to the root directory of the micro SD card, and then remove the micro SD card from the PC/Mac.
- Insert the micro SD card into the vehicle and power on the vehicle.
- At this time, the front and rear indicator lights on the aircraft arm will quickly flash the green light alternately.
Product Maintenance
To ensure that EVO Max 4T maintains optimal performance, read and follow maintenance instructions are in this section.
Product maintenance
- Please keep the camera away from liquid contact or immersion. If the camera enters water, use a soft, dry cloth and place it in a relatively dry environment.
- When the aircraft accidentally falls into the water, do not turn on the power supply immediately. This behavior will cause permanent damage to the aircraft; do not store the aircraft in ahigh-humidityy place.
- Do not use a liquid containing volatile, ethanol, and other volatile components to clean the camera lens, body visual sensor, infrared sensor lens, and the surface of the fill light.
- Daotong Intelligence recommends that you regularly check the various components of the aircraft and related products to see if there has been a strong impact, causing loosening, abnormal sound, or failure to function properly. If you have any questions, please contact the A utel R obotics technical support personnel or authorized dealer.
Storage
- Store aircraft and accessories out ofthe reach of the reach of children and pets.
- Store the aircraft and its accessories in a cool, dry place.
- The recommended storage temperature for the aircraft is 22 C to 28 C (72 F to 82 F)
Specifications
Warranty policy
Dotong Intelligence (Autel Robotics) promises to users who purchase products from its official authorized channels that, under normal use, the Dotong Intelligence (Autel Robotics) products you buy have no defects in materials and process during the warranty period. The warranty period of this product starts from the date you receive the goods.
Service
If your equipment needs inspection or repair, contact DaoIntelligence in the following ways:
- Send an email to after-sale@autelrobotics.com
- Call the following number for intelligent technical support: 400-800-1866.
- Contact your authorized dealer.
FCC Caution
Any Changes or modifications not expressly approved by the party responsible for compliance could void the user’s authority to operate the equipment. This device complies with part 15 of the FCC Rules. Operation is subject to the following two conditions: (1) This device may not cause harmful interference, and (2) this device must accept any interference received, including interference that may cause undesired operation.
This equipment generates, uses, and can radiate radio frequency energy and, if not installed and used in accordance with the instructions, may cause harmful interference to radio communications. However, there is no guarantee that interference will not occur in a particular installation.
- Reorient or relocate the receiving antenna.
- Increase the separation between the equipment and receiver.
- Consult the dealer or an experienced radio/TV technician for help.
ISEDC Information
This device complies with Innovation, Science, and Economic Development Canada licence-exempt RSS standard(s). Operation is subject to the following two conditionsThisis device may not cause interference, and
This device must accept any interference, including interference that may cause undesired operation of the device. The device complies with RF exposure guidelines, and users can obtain Canadian information on RF exposure and compliance. The minimum distance from the body to use the device is 20cm.
Trademark Information
EVO Max™, Autel Enterprise™, Starpoint™, and Autel Robotics® are the registered trademarks of Shenzhen Daotong Intelligent Aviation Technology Co., Ltd. (hereinafter referred to as “Daotong Intelligent”) in China and other countries/regions.
Copyright Warning
Without the express written consent of Daotong Intelligence, no person or entity shall copy or forward any part of this manual in any form or by any means (including, but not limited to, electronic, mechanical, copied, recorded, or otherwise) without Daotong Intelligence.
Customer Service
This section contains information on technical support, repair services, and requesting replacement or optional parts. If you have any questions or concerns about our product, please contact Daotong Intelligent Customer Support
- Tel: (844) 692-8835
- website: www.autelrobotics.com